Blog Archives
Spiced Pumpkin Bread
Spiced Pumpkin Bread
Easy, easy!
Preheat oven to 350 Fahrenheit.
Use an electric mixer when following this recipe, and you’ll have this Spiced Pumpkin Bread made quickly!
1/2 cup white sugar
1/2 cup brown sugar
1/2 cup vegetable oil or canola
Mix ^
3 eggs beaten
1 can pumpkin purée (15 oz.)
1/2 Tbsp. cinnamon
1/2 Tbsp. nutmeg
1/2 tsp. baking powder
1/2 tsp. baking soda
1/4 tsp. salt
Mix ^
1 & 1/2 cups all purpose flour
Mix ^
Pour evenly into two greased and floured 9″ x 5″ loaf pans.
Bake at 350 Fahrenheit for 30 minutes!
Yields two small, moist, yummy loaves! Enjoy!

Your Friend,
~Amber Hamilton Henson
PS
This recipe will link with other blogs!
You’re welcome to visit the blog party link ups:
NiftyThriftyThings’ Nifty Thrifty Sunday
ArkansasWomenBloggers’ Sunday Link Up
ImAddictedToRecipes’ Scrumptious Sunday Link Party
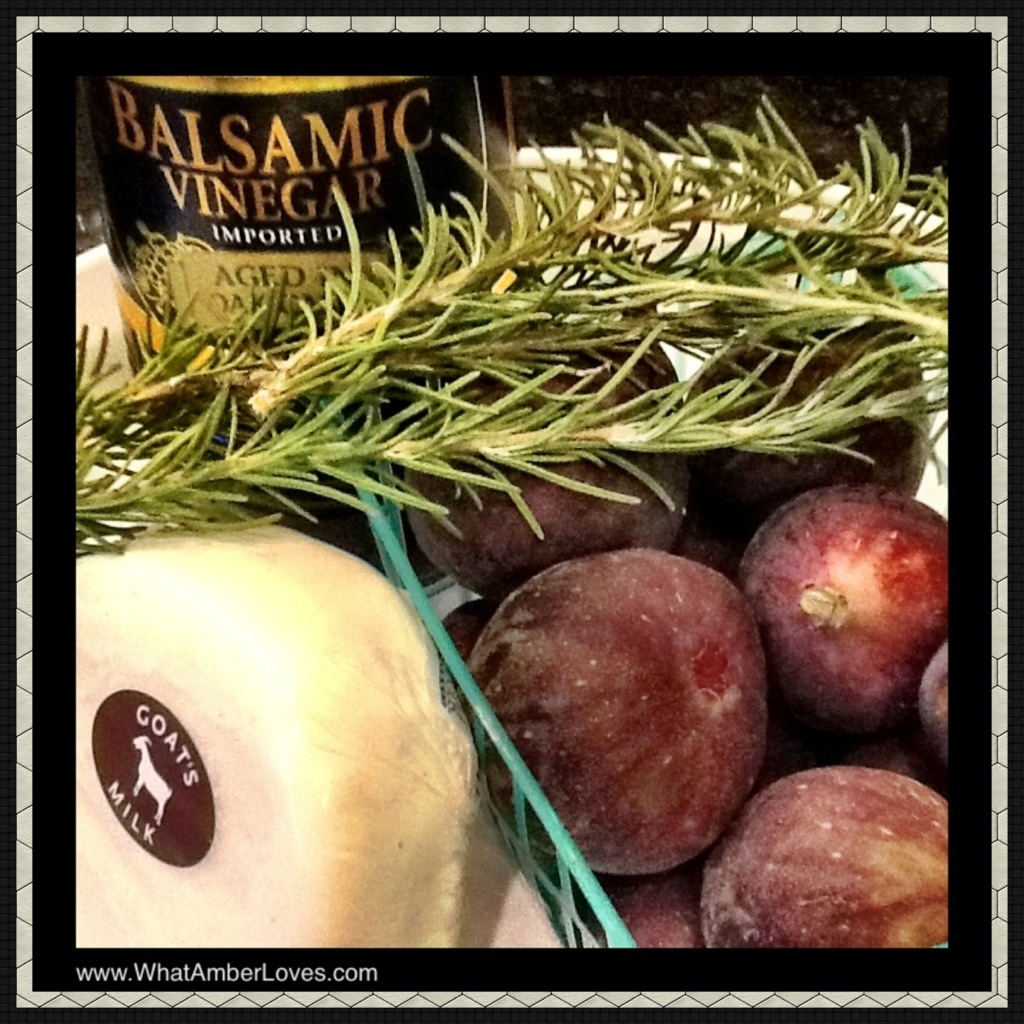
Fig, Rosemary, Goat Cheese Tart

Fig, Rosemary, Goat Cheese Tart:
What happens when fig, rosemary, goat cheese, balsamic, and honey party together in a tart? OMG. Crazy yumminess. Words fail me when trying to describe just how much I enjoy the combination of these flavors.
First, I’ll tell you how it’s made, then add a few photos! K? K!
INGREDIENTS:
1 unbaked pastry pie shell of your choice
figs, cut into thin slices (about 2-3 cups)
3 Tbsp sugar
1/8th cup good balsamic vinegar
1/8th cup local honey
2 tsp finely chopped rosemary
1 Tbsp cornstarch
goat cheese (about .33 lb.)
DIRECTIONS:
Preheat oven to 425 F.
Sprinkle small crumbles of cool goat cheese across the pastry shell.
Combine balsamic vinegar, honey, sugar, and rosemary, stir, and pour over sliced figs in a bowl (I used a large measuring cup).
Allow the mix to macerate the figs for about 15 minutes.
Carefully pour about 1/8 cup juice out of the mix and stir in 1 Tablespoon of cornstarch, then return to mix of figs, carefully coating all slices.
Pour fig mix over goat cheese into pastry shell.
Bake at 425 F for five minutes, reduce heat to 350 F and bake an additional 15 minutes.
Enjoy warm! (We did!)
Now the photos:
Click on photos to enlarge them into a new window!


Your Friend,
~Amber Hamilton Henson
PS
This post will link with other blogs; visit the link up parties:
Arkansas Women Bloggers’ Sunday Link Up
iShouldBeMoppingTheFloor’s Inspiration Monday
Pineapple~Cheddar~Ritz Bake!
Pineapple-Cheddar-Ritz Bake! Yum!
Here is a recipe given to me by my sister-in-law. The very first time I tasted it at her house during the holidays, I knew I needed this recipe in my collection! (…a little sweet from the pineapple, a little rich from the cheddar, and a bit buttery with great texture from the Ritz… YUM!)This recipe is exactly as she gave it to me, no modification. We love it and love serving it to dinner guests. I was recently asked for the recipe and realized that I hadn’t posted it onto this site, so now, with no further adieu, here it is! It is really quick to prepare. When we have guests for a dinner party, it is a great dish to prepare earlier in the day, then just pop it in the oven 30 minutes before dinner. It is just sweet enough, you could also almost consider it a dessert. It is also great as a breakfast dish. Just trust me and try it. It is wonderful AND unique. You’ll be pleased to have your guests ask for the recipe, too!

The RECIPE:
1/2 cup Sugar
3 tbsp Flour
4-5 tablespoons of Pineapple Juice (from the next ingredient)
20 oz Crushed pineapple in its own juice (saving juice)
2 cups Sharp Cheddar cheese, grated
1 stick of Butter (sweet, salted)
1 tube of Ritz brand crackers
1) Preheat the oven to 350F.
2) Mix the first three ingredients (sugar, flour, and juice) in a small bowl.
3) Add the rest of the can of pineapple into the above, stir, and pour into a 9″ x 13″ greased baking dish.
4) Evenly spread cheese across the top.
5) Crumble/crush the tube of Ritz crackers and mix with the stick of melted butter. Layer evenly across the top of the baking dish.
6) Bake at 350F for 30 minutes.
Serve warm! . . . It is also great re-warmed as leftovers, if there are any!!
Enjoy!
Your Friend,
~Amber Hamilton Henson
PS
This post will link to a few blog parties! Visit the parties
iShouldBeMoppingTheFloor’s “Inspiration Monday”
ArkansasWomenBloggers’ Sunday Link Up
Mom’s Test Kitchen ~ Wonderful Food Wednesday #47
RattlebridgeFarm’s Foodie Friday
Broccoli Salad ~Sweet & Tangy
On a Facebook page, there was a call for viewers to submit their favorite BROCCOLI recipes. I realized I didn’t have a favorite of my own to submit. I usually serve BROCCOLI steamed or just lightly sautéed with butter, unless I’m putting BROCCOLI into a casserole or quiche. In a casserole or quiche, my broccoli usually is just a supporting ingredient. However, someone else submitted a recipe for BROCCOLI SALAD. With just slight modification, we’ve fallen in love with this recipe. The original poster referred to the recipe as, “An oldie, but Goodie.” You’ll see why! With still crunchy broccoli, raw sweet onion, and a really sweet tangy sauce, this salad is ABSOLUTELY A KEEPER for us.

(Thanks for the original written recipe go to someone I’ve never met, Carol Chambers Thompson.)
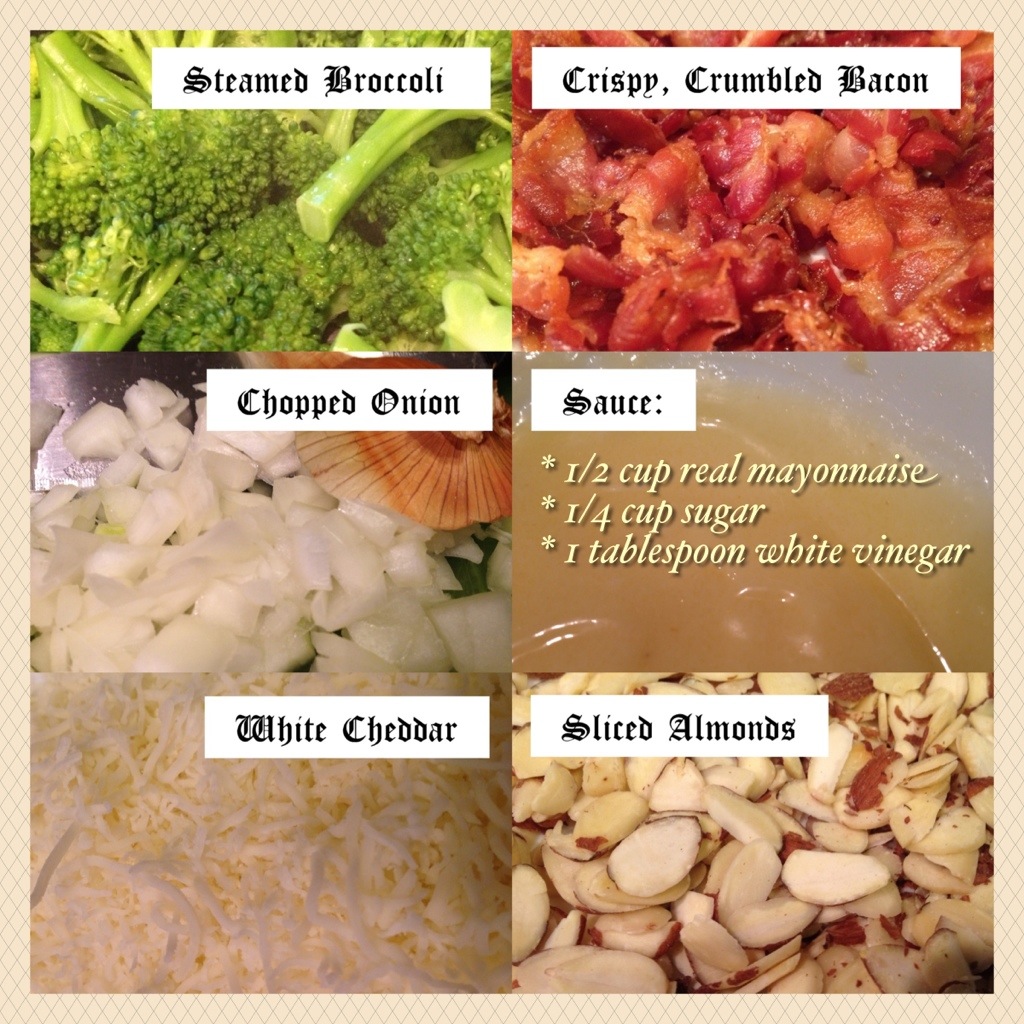
THE RECIPE FOR BROCOLLI SALAD Sweet and Tangy:
* 2 lbs. Fresh broccoli cut into small florets, discarding stalks, and lightly steamed to retain crunch
* Grated cheddar cheese; (6-8oz)
* 8 slices of bacon fried crispy and crumbled
* 1 small sweet onion. (Vidalia onions are my preference)
Mix the ingredients together.
Refrigerate.
Just before serving add dressing Sauce, coating thoroughly.
For dressing Sauce:
* 1/2 cup real mayonnaise
* 1/4 cup sugar,
* 1 tablespoon white vinegar.
Then, gently mix almond slices or cashews into the salad before serving.
Enjoy!!
I don’t post a lot of recipes, primarily because I only want to post favorites. I’m an experimental cooker. We try lots of different things. This one is among only a handful of new recipes I’ve discovered in the last year that wasn’t already a staple in our house that my husband and I both truly, truly enjoyed thoroughly. As an homage to being an oldie, but goodie, I’m serving in my vintage FireKing bowl covered in gold decoration. LOVE IT!
Do you have a favorite BROCOLLI SALAD recipe? If not, you might want to give this one a try!
Your Friend,
~Amber Hamilton Henson
PS: This post will link to a few blog parties! Visit the link-ups here:
iShouldBeMoppingTheFloor’s “Inspiration Monday
ArkansasWomenBloggers’ Sunday Link Up
Mom’s Test Kitchen ~ Wonderful Food Wednesday #47
RattlebridgeFarm’s Foodie Friday
FoodieFridayDailyDish’s Foodie Friends Friday #53
This article was also published within international Hat Trick Magazine! To read an online copy of the magazine, just click on the magazine cover below this text!

Culantro Lime Rice
Prepare to fall in love with your food. Really. Don’t doubt me. Do it. You’ll see!
CULANTRO LIME RICE!
We’re growing CULANTRO this year and loving using it in a variety of recipes where we would have otherwise used cilantro. As I mentioned in a previous post, the appearance of cilantro and culantro are very different, but the flavor profiles are similar, except that culantro is a bit deeper. We’re really enjoying using Culantro. Of all of the ways we’re using it, this is one of my favorite recipes.

CULANTRO LIME RICE: make it in two easy steps!
2.5 cups white rice
5 cups of water
2 bouillon cubes (chicken)
2-4 limes (for zest, then 1/3 cup of juice, later)
10+ medium-large CULANTRO leaves
1/4 cup of sugar
1/2 to 3/4 stick of butter (preference)
1) In a large pot, add 2-3 cups white rice using twice as much water as rice, adding 2 large chicken bouillon cubes into the pot with the rice, zest of 1-2 limes, and several CULANTRO leaves that have been cut into slivers. Do not lift lid of the pot until the rice is done cooking, as steam is essential for rice to finish properly. (Cooking rice should be done according to package directions,
2) When the rice is done cooking, pour a mixture of salted butter (melted in a glass measuring cup in the microwave), 1/4 cup of sugar, and juice of 2-4 limes over the rice and fluff/stir it all with a fork. Garnish with additional CULANTRO and lime slice for best presentation!
(Click on photo to enlarge.)

I served this CULANTRO LIME RICE beside chicken roasted with a Mango Ginger Chutney. It was amazing.

Your turn!
~Amber Hamilton Henson
This recipe will link to blog parties:
Shabby Nest’s “Frugal Friday”
Arkansas Women Bloggers’ “Sunday Link up”
Elizabeth and Co.’s “Be Inspired #76”
The Trendy Treehouse’s “Share Wednesday”
P.S. Le Creuset Thursday!! Hey friends, I just posted a recipe link to P. Allen Smith’s Facebook page (https://www.facebook.com/GardenHomeRetreat)
Pickled Okra & Ham Roll-Ups
Sometimes, you just need an easy finger food to set out. These fit that need! If you haven’t tried pickled okra, cream cheese, ham roll ups, you should.

Ham coated in cream cheese spread is wrapped around a pickled okra!
Slice about one inch thick, sprinkle with seasoning, and serve.
Easy, easy!
We LOVE pickled okra, but we especially love THIS pickled okra, Old South Pickled Okra. Bonus, they’re an Arkansas company. Please, click around their website and take a look at their wonderful local products! Hopefully, if you’re in Arkansas, you can already find their products in your grocery store, if not, speak up and support local agriculture! (We bought ours at our neighborhood WalMart.)
Enjoy!
Your Friend,
~Amber Hamilton Henson
Black Eyed Peas for New Years Day

Do you eat Black Eyed Peas on New Year’s Day? Is it for good luck, tradition, both? I eat them on New Year’s Day, every year. My mom always made them. My mother in law made them. My grandmothers both still make them. I’m sure they’re fine from a can, but I wouldn’t know. I’m from the school of “For-New-Years,-Dried-Beans-Get-Soaked-Overnight!” Whether you call it “comfort food” or “soul food,” it is definitely a Southern tradition. Most people I know are eating them, today, and most of the local restaurants are serving them, even if they aren’t usually on the menu. It’s New Year’s Day. The Day of the Black Eyed Pea.
I like flavorful beans.( Despite their name, Black Eyed Peas are a bean.) I like to infuse as much flavor as possible into beans. This dish is a meal in itself. Featuring Chunks of Petit Jean Peppered Ham, Onions, Celery, Rotel, and creole seasoning, it pairs well with sweet yellow cornbread.

Here is How I make my New Year’s Black Eyed Peas:
*I start with a pound of dryed blackeyedpeas, pick out all of the “stones” and broken beans, then soak them overnight in the refrigerator in 8 cups of water.
*Next morning, I drain and rinse them a few times, being careful not to remove their paper-like shell.
*I put them in a large pot with a chopped yellow onion, chopped purple onion, can of “hot” Rotel, a few stalks of chopped celery, and a pound of chopped black pepper ham. I add just enough water to barely cover them.
*I bring it to a rolling boil, then reduce heat to a simmer for 2-3 hours! I season with Tony Chachere’s Creole Seasoning as I serve!
Mmmmm… Spicy!! Perfect with sweet cornbread!

Happy New Year!
May this New Year bring lots of luck to you and yours!
Your Friend,
~Amber Hamilton Henson
This recipe post is featured in Hat Trick Magazine, beginning on page 74!
Click on the magazine’s cover photo (below) to be redirected to the online magazine:

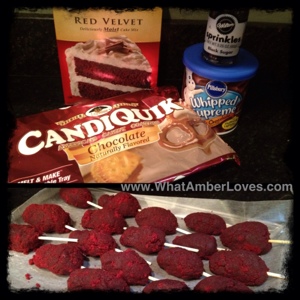
Zombie Rats for Dessert!
It is definitely a Halloween tradition of ours to let the kids make a few crazy treats each Halloween. Last year, we made witch cupcakes, that was before I started blogging. Maybe I’ll upload a round-up of old Halloween pics? That would be fun! Regardless, here is what we made tonight, ZOMBIE RATS!!!
The “zombie rats” are actually red velvet cake balls coated in a hard chocolate shell! They have almond slivers for ears, red hot candy eyes, and candy tails!

I saw the “creepy cake ball lab mice” tutorial on Polish The Star’s Blog, and decided to try it, with a twist! 🙂 Instead of white lab mice, we went for big brown rats with red velvet filling! Mice + Rats + Halloween at its best! Yum!
My husband, Mitch, and our daughters really get all of the credit for actually assembling our yummy little rats; I was in the room, though, so that counts, right?!
Here’s how they did it:
Bake a cake, let it cool, crumble it up, mix it with icing, form balls (mice bodies).
Put in freezer for ten minutes with a skewer to use for dipping.
Melt coating. Dip bodies. Return to freezer for 10 minutes to firm the coating.
Remove skewer, insert twizzler tails, and affix red hot candy eyes with addition chocolate.
🙂


Happy Halloween!
~Amber Hamilton Henson
Spider Eggs!

(click on photos to enlarge)

Devilled Eggs embellished with black olive spiders are an addition to our brunch on this Sunday before Halloween!
Easy to Make:
Hard boiled eggs, split in half.
Yolks removed and blended with mayo, sweet pickle relish, garlic powder, salt, and pepper.
Refilled and Dressed with black olives!
“Spider Eggs!”
Happy Halloween!
~Amber Hamilton Henson
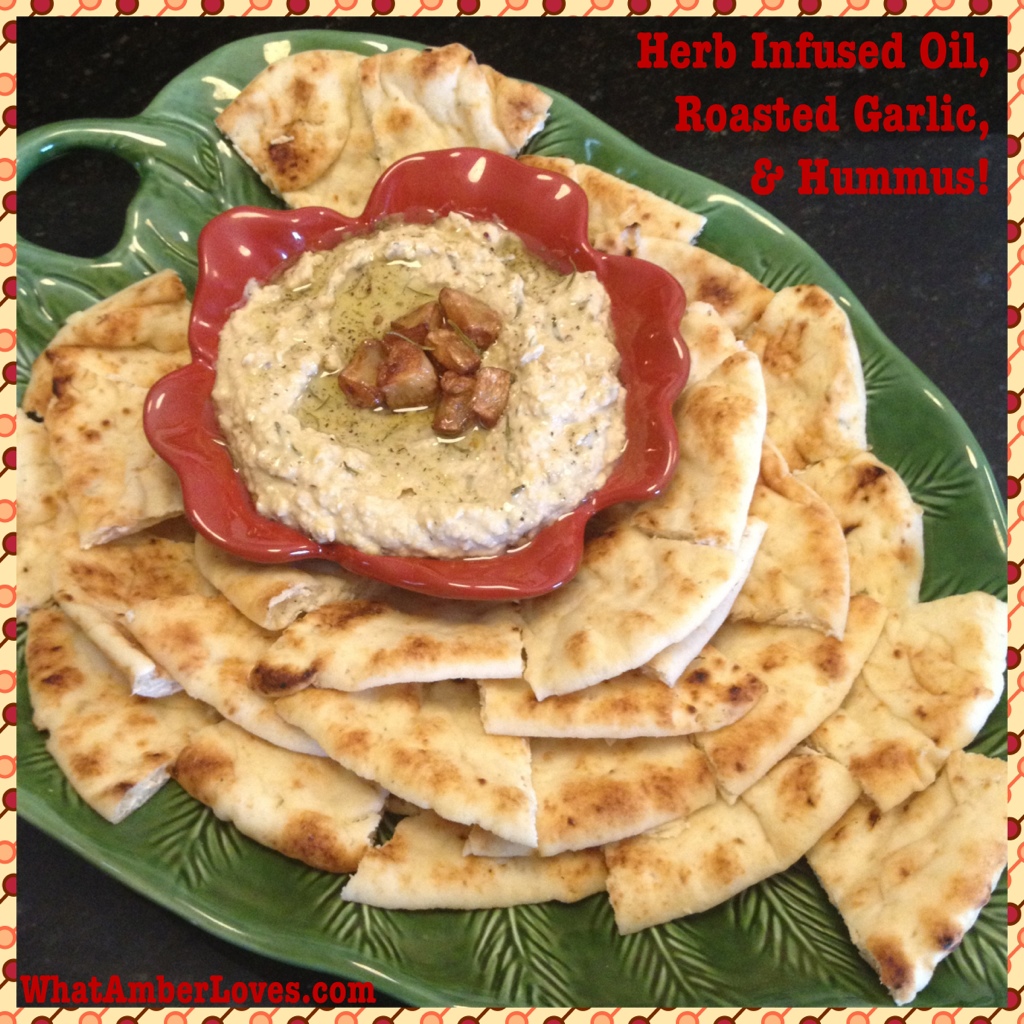
Herb Infused Olive Oil, Roasted Garlic, and Hummus!


How do you hummus? Some people add roasted peppers or olives. I let my roasted garlic cloves and herb infused oil star in my hummus show. Here’s how I do it, in three parts: 1) oil, 2) roasted garlic, 3) hummus)


1) “My Herb-Infused Olive Oil” with Rosemary from my garden:
Herb Infused Olive Oil is kind of one of my favorite things. Seriously. A great bread + oil with herbs = yummy. Pretty much the best/only way to have herb infused oil is to make it yourself and use it within a few days. From what I understand, most restaurants make their’s daily. Whenever you see the pretty bottles of oil in stores packed with herbs and peppers, it always says, “For Decorative Use, Only.” The reason is bacteria; while the oil won’t grow the bacteria, any water content in the herbs or peppers will grow the bacteria with time, potentially resulting in serious illness. (article) So, to make infused oils edible, I heat my oil and infusers to 250F, consume within a few days, keeping it well sealed and refrigerated when not in use. (Note: other recipes online recommend a minimum of 180F, but I always go to 250F. Our three little girls will also sample this oil on hummus, so I prefer to play it REALLY safe! I use a candy thermometer in my oil to verify temp!)
The tools you’ll need to duplicate my oil:
A sauce pan,
a wooden spoon/spatula,
candy thermometer,
blender,
funnel,
bottle with spout for the finished oil.
The ingredients you’ll need:
*Extra virgin olive oil,
*Sprigs of fresh rosemary (remove the leaves from the stems),
*Onion that is minced and dehydrated (spice section at the grocery store),
*Dried Red pepper flakes (spice section at the grocery store),
*Dried Thyme
*Cracked Black Pepper (I use a pepper mill instead of shakers, pretty much ALWAYS)
*Minced Garlic
Easy, add the ingredients to the oil, heat to 250F, stirring constantly to muddle the spices. Using a food-safe funnel, transfer into a food-safe oil bottle with spout. (Notes: if your rosemary leaves are still too big, even after heating them in oil, just quickly run it through the blender and return to heat. Also, when transferring from the hot pan to the bottle, using a food-safe oil bottle is really importantf! If you transfer your hot oil into a regular decorative bottle you are running the risk that it will shatter instantly from the heat! Use a food safe bottle!)
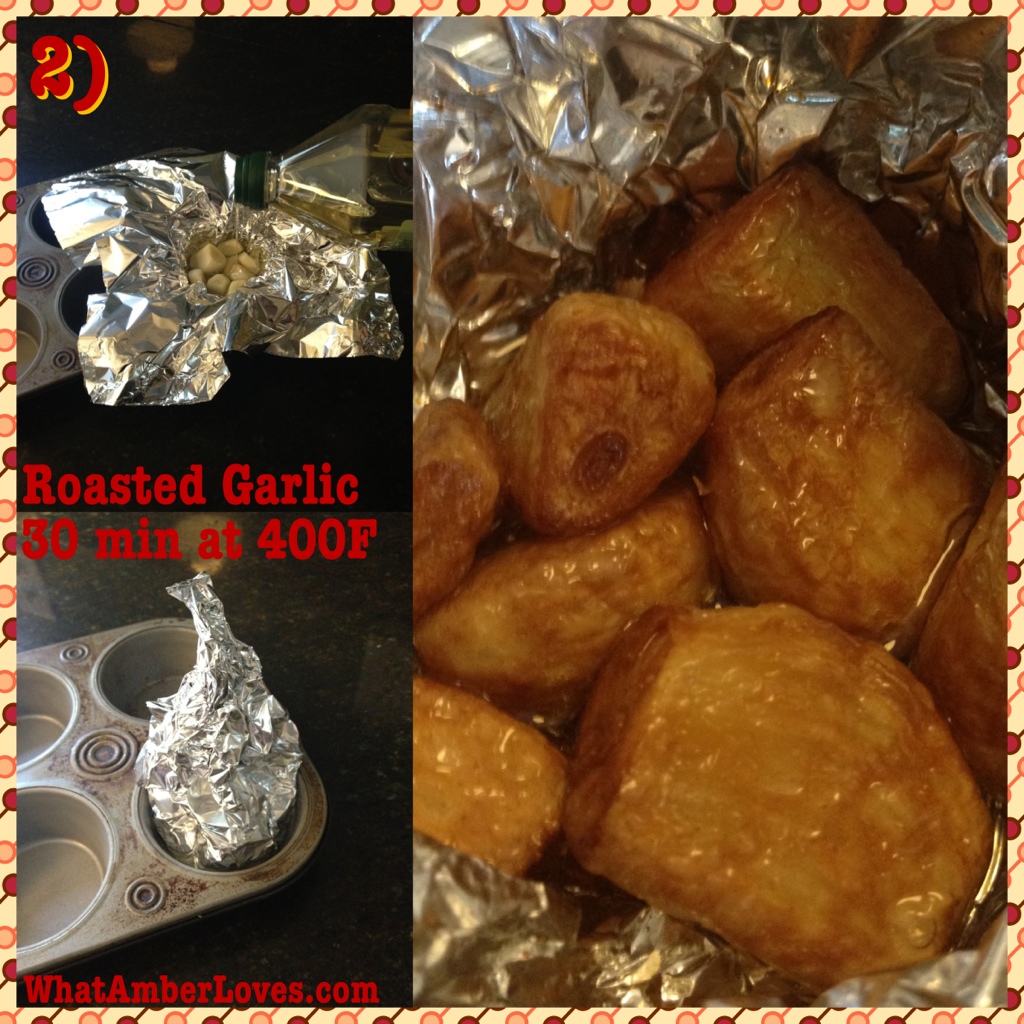
2) “My Roasted Garlic”
I use a muffin tin, aluminum foil, a head of garlic, and a few Tablespoons of olive oil.
Simply, cut the ends if your head of garlic, remove the excess “paper” around each clove.
Using your aluminum foil, create a pocket in the muffin tin, place garlic, cover with oil, pinch top of aluminum foil closed, and bake in preheated 400F oven for 30 minutes.

3) Hummus is really easy to make, and in my opinion, is always better than premade versions in the store. Furthermore, you get a larger quantity for less money. Win. Win.
Pretty much all you do is combine your ingredients and put it in the food processor or blender. If it is too thick, thin it with oil or water. I thin mine with water, because I’m topping mine with the my infused oil, and I don’t want it to get too oily! 😉
I used two cans of Chick Peas, aka Garbonzo beans, rinsed (see photo)
3 Tbsp of Tahini (you know, sesame seed paste, see photo)
Juice of half a lemon
Salt, to taste
and the dry spices that I used earlier to make the oil (note: did not include the fresh rosemary or fresh garlic. I used DRY spices, only, inside the hummus, because there will be plenty of garlic and rosemary on top of the hummus.)
Now, after purée is made, top with fresh roasted garlic, and drizzle with the rosemary and spice infused oil! LOVE IT!!!

Now, you know how we hummus; how do YOU hummus?
Your Friend,
~Amber Hamilton Henson
PS
Like this post? Be sure to check “my Kitchen” for links to more of my recipes!
Wonder to which parties I’m linking? I have a page dedicated to “shares”, too!
Love Linking! (as always, if this post is featured,the hostess’s button will be attached to this post AND my shares page!)
WEDNESDAY
Whole Foods Wednesday @ ThisChickCooks
THURSDAY
Tutorials, Tips, and Tidbits @ StoneGableBlog
Transformation Thursdays @ TheShabbyCreekCottage
Hookin’ Up With HOH @ HouseOfHepworths
Fantastic Thursday @ FiveLittleChefs
Full Plate Thursday @ MizHelensCountryCottage
FRIDAY
Foodie Friday @ Rattlebridge Farm
SATURDAY
Saturday Nite Special @ FunkyJunkInteriors


