Monthly Archives: August 2012

Wall Collage of Frames, Mirrors, & Quotes

Do you have excess empty frames and perhaps a spare mirror or two that doesn’t really have a proper place to hang because it isn’t of the proper scale? If so, I suggest grouping them all together; then, it reads as one comprehensive vignette rather than as lone pieces creating clutter. Our ceiling height throughout the first floor of our home is 10′. Hanging mirrors and art that are only 24″ or so just doesn’t make enough of an impact for my taste. I like “statement” scale art and installations. Thus, I grouped/collaged the mirrors and frames. There are a few options for creating your own display in this style, you can hang them all really close together, or you can do like I did and actually OVERLAP them. It was easy.

20120830-161610.jpg

Here is another angle where you can see the frame collage reflected in another mirror in our living room. Btw, in this photo, you can also see the smaller of my two belt chairs!

20120830-161651.jpg

I laid out the mirrors and empty frames on the floor to arrange them. I snapped a pic of the arrangement on my phone. Then, I just started hanging them on the wall while referring to my pic. For the frames that overlap on top, we just used our finish nail gun (tiny, small nails shot through the pneumatic nail gun via portable air compressor) to nail them together as inconspicuously as possible. Finally, to tie it all together, I’ve added a few quotes that were cut using my sign machine. For a complete tutorial on how to install vinyl sign graphics, check out my tutorial for installing graphics on furniture.

The quotes that I chose to use are kind of a variety… an art quote, one from Dr. Seuss, one from Ayn Rand, one from Wayne Gretzsky, one from Thomas Edison … you know, just general interest quotes that I found interesting for one reason or another… I’ll continue adding quotes as the moods strike! 😉

Here a few photos of the quotes: (Side note, photographing mirrors is tricky! It was actually quite a challenge to get a semi-decent looking photo that doesn’t show me holding the camera, that doesn’t reflect light, that doesn’t have a busy reflection, etc. Yikes!)

20120830-161805.jpg

20120830-161819.jpg

Thanks for taking time to read this post and check out our little “I’ve Been Framed” project! I’ll be back tomorrow with a post about a crazy old door that we’ve been working on!

Your Friend,
Amber Hamilton Henson

20120830-161910.jpg

PS
As, always feel free to repost an image, pin it, fb it, tweet it, etc, so long as the image clearly links back to here! 🙂 I Love blog party Linking!! If this post is “featured” on your blog/site/zine, please let me know and I’ll add your link into this post and my “shares” page!

Fabulous Mirrors Category @ FunkyJunkInteriors

Happy Hour Friday @ HappyHourProjects
Weekend Showoff @ LadyBirdLn
It’s Inspiration Friday @ AtThePicketFence
Potpourri Friday @ 2805
Catch as Catch Can @ MyRePurposedLife
ReDoux Link Party @ ReDouxInteriors
Furniture Feature Friday @ MissMustardSeed
Weekend WrapUp @ TatorTotsAndJello
DIY Home Projects @ The36thAvenue
Get Schooled Saturdays @ TooMuchTime
Saturday Nite Special @ FunkyJunkInteriors
Sunday’s Best @ My1929Charmer
Make The Scene Monday @ AlderBerryHill
Masterpiece Monday @ BoogieBoardCottage
Mod Mix Monday @ ModVintageLife
Craft o Maniac Monday @ Craft-o-Maniac
Mop It Up Mondays @ IShouldBeMoppingTheFloor
Nifty Thrify Tuesday @ CoastalCharm
Be Inspired @ ElizabethAndCo
Wow Us Wednesdays @ SavvySouthernStyle
Time Travel Thursday @ TheBrambleberryCottage
Thursdays are Your Days” @ 52Mantels
Transformation Thursday @ TheShabbycreekCottage
Home and Garden Thursday @ BlissfulRythym
Tutorials, Tips, and Tidbits @ StoneGableBlog
Hookin’ Up With HOH @ HouseOfHepworths

New Hot Pink Bedroom

YaY!! We’ve updated our oldest daughter’s new room!!

20120828-142914.jpg

(Click on any photo to enlarge it into a new window/tab.)

For the first time since our middle daughter was born, our oldest is no longer sharing a bedroom. We’ve always lived in houses with more enough bedrooms that they didn’t have to share; it was always our choice to have them share a room. We collectively decided that it was time for them each to have a little more space and chance to personalize their own spaces. It is a really big change for the two of them. Our oldest is 10, now, and our middle daughter will be 8, soon. They had shared a room for 8 years.

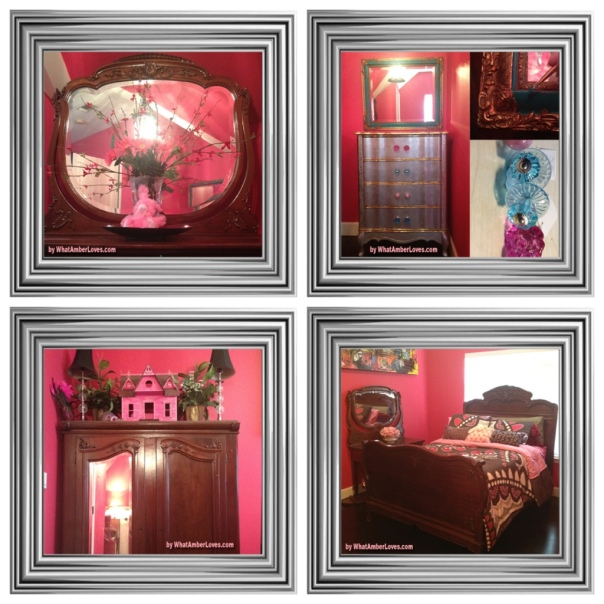
In the name of truly personalizing the space for our daughter, we let her pick her new bedding, the paint color for the walls, etc. Transforming the room was quite a project. Since the former owners of the house used it as a “music room” I believe, it was carpeted, had white walls, and didn’t have a closet for clothes. We changed all that. It now has new hardwood floors, bright pink walls, plenty of closet space, and unique furniture.

We still have a few small projects left to do in here, but I can’t wait to show you the BIG projects that we’ve already tackled. Mitch, our daughter, and I worked together to make this a great space for her to use and continue to grow into for the next few years.

Now, for the reveal! I took a few pictures of the room as it is now! I’ll update again, when the accessorized vignettes are complete, too!

20120828-143105.jpg

Architecturally, it is a really interesting room with neat angles on the ceiling, and it is really big. In her room, she has a full size bed, a dresser, a vanity, an armoire, a desk, an armchair, a neat silver chest, and room to spare. Seriously, it is a BIG room for a 10 year old girl, I think. One of my favorite features is that we moved a light fixture that was formerly in our foyer, spraypainted it black, and installed it in a way that it really shows off the ceiling angles with how it bounces light around through its beveled glass panels.

20120828-143205.jpg

So, here is the fun silver chest that I mentioned. It is a gift from my grandmother. It has been in the family for a long time, but had been in storage for many years which ruined most of its original pale colored wooden finish. Awhile back, I coated the whole thing in silver rub’n’buff and gold leaf. (everything but the top surface.) Yes, really; all silver and gold!! Haha! Even though the package of craft product is labeled “Gold Leaf” in bold letters, it is in fact a metal leaf, not “GOLD,” as would be defined by a scientific periodic table of elements! As for the Rub’n’Buf, I don’t know whether there are any precious metals in there or not, but it is pretty! It is so easy to use! Just like the product says, I just rubbed the product onto the surface of the chest with a scrap of a old tshirt and buffed with another scrap; rub’n’buff. (Gold leaf: glue-ish medium known as sizing + leaf transferred using wax paper + spray sealer.) To personalize the chest for our daughter’s new room, we added a mix of new glass knobs in shades of pink and teal. (found them on sale at Hobby Lobby) And, I repainted an old framed mirror to coordinate. She LOVES the set! YAY!!

Our daughter’s new (antique) primary suite of furniture is also a gift from my grandmother. I slept in it at my great grandparents house as a child. It has been in the family too many generations to count! It dates back into early 1800s in Memphis, I believe, I’d have to re-read the provenace that my grandmother wrote for me in order to confirm. Regardless, I have great memories of the set having always been a part of my life… Now, my oldest daughter is using it. It will one day belong to one of my grandchildren or great grandchildren, I predict. Here are few pics of the dresser, armoire, vanity, and bed that are the set.
Click on photo to enlarge it.
20120828-143308.jpg
Click on photo to enlarge it.
20120828-143320.jpg
Click on photo to enlarge it.
20120828-143329.jpg
Click on photo to enlarge it.
20120828-143337.jpg
Click on photo to enlarge it.
You may have noticed a few pieces of colorful art in a couple of pictures. They are original works of art, actual paintings, not prints. The one hanging above her vanity is HUGE. The pictures don’t really do justice to the fact that it is 6 ft x 3 ft. Big, right?! It is by a Canadian artist, Sarah Kinan. I bought it directly from the artist, online and she shipped it to us rolled. We built the frame and stretched it onto the frame. The second little name painting is by Veronique Perron. When I update this post with photos showing the vignettes and curtains, I’ll make sure that I add links to the artists…

20120828-143444.jpg
Click on photo to enlarge it.
Update: In other hot pink bedroom news, I also finished sewing all of the sheers and curtain panels. See next photo…. Aaaaand, for her hot pink bedroom, we bought her the little glittery mosquito net type canopy that she wanted…Ten year old girl, she is, indeed, wanting such a sparkly thing! Love her!!

20120916-220925.jpg
Click on photo to enlarge it.
Our daughter made the “no sew duck tape and grommet curtains” for her closet.
Click on photo to enlarge it.

20120916-220241.jpg

20120916-220424.jpg

Well, that’s all! As we complete new projects, I’ll add them to this post! 🙂

20120828-143550.jpg

I hope y’all are having a great day! Thanks for reading our post and visiting our new project!

Your friend,
~Amber Hamilton Henson

20120828-183208.jpg

Lastly, before you go, here is a “behind the scenes” photos during the process:

20120828-142958.jpg

UPDATE!!
We have a few other project posts related to this room!

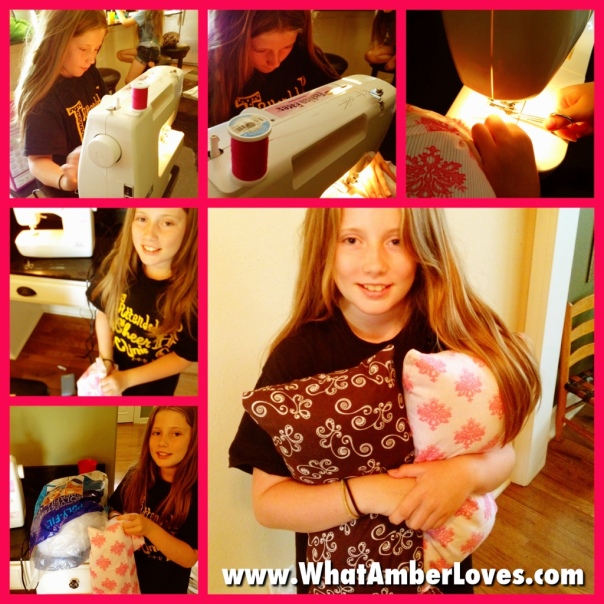
  • Daughter Sews Pillows
  • (click on photo to see full post with details)
    Files for New WhatAmberLoves Button

    I created my own “blog button,” like all of the ones you see on my SHARES page. Now, I just need to review how to create a text space for it… I think I’ve figured it out! (maybe) If you do not see the HTML code to “grab” my button on this post, PLEASE let me know! From my computer, it’s working; it’s hard to guess how other operating systems will see it. 😉

    Grab my new button, if you have room!

    The code to copy is on my left sidebar.

    Your Friend,

    ~AmberHamiltonHenson

    20120823-192955.jpg

    20120826-205809.jpg

    WordPress users: help with “truncating your posts” can be found at HomeStoriesAtoZ!

    Linking:
    Weekend WrapUp @ TatorTotsAndJello
    Saturday Nite Special @ FunkyJunkInteriors
    WowUsWednesdays @ Savvy Southern Style

    More ways to find me and follow:
    (click on images to find us!)

    WhatAmberLoves_Sidebar_Twitter_NEW2

    Herb Infused Olive Oil, Roasted Garlic, and Hummus!

    20120822-130037.jpg

    20120822-130056.jpg

    How do you hummus? Some people add roasted peppers or olives. I let my roasted garlic cloves and herb infused oil star in my hummus show. Here’s how I do it, in three parts: 1) oil, 2) roasted garlic, 3) hummus)

    20120822-130159.jpg

    20120822-130222.jpg

    1) “My Herb-Infused Olive Oil” with Rosemary from my garden:

    Herb Infused Olive Oil is kind of one of my favorite things. Seriously. A great bread + oil with herbs = yummy. Pretty much the best/only way to have herb infused oil is to make it yourself and use it within a few days. From what I understand, most restaurants make their’s daily. Whenever you see the pretty bottles of oil in stores packed with herbs and peppers, it always says, “For Decorative Use, Only.” The reason is bacteria; while the oil won’t grow the bacteria, any water content in the herbs or peppers will grow the bacteria with time, potentially resulting in serious illness. (article) So, to make infused oils edible, I heat my oil and infusers to 250F, consume within a few days, keeping it well sealed and refrigerated when not in use. (Note: other recipes online recommend a minimum of 180F, but I always go to 250F. Our three little girls will also sample this oil on hummus, so I prefer to play it REALLY safe! I use a candy thermometer in my oil to verify temp!)

    The tools you’ll need to duplicate my oil:
    A sauce pan,
    a wooden spoon/spatula,
    candy thermometer,
    blender,
    funnel,
    bottle with spout for the finished oil.

    The ingredients you’ll need:
    *Extra virgin olive oil,
    *Sprigs of fresh rosemary (remove the leaves from the stems),
    *Onion that is minced and dehydrated (spice section at the grocery store),
    *Dried Red pepper flakes (spice section at the grocery store),
    *Dried Thyme
    *Cracked Black Pepper (I use a pepper mill instead of shakers, pretty much ALWAYS)
    *Minced Garlic

    Easy, add the ingredients to the oil, heat to 250F, stirring constantly to muddle the spices. Using a food-safe funnel, transfer into a food-safe oil bottle with spout. (Notes: if your rosemary leaves are still too big, even after heating them in oil, just quickly run it through the blender and return to heat. Also, when transferring from the hot pan to the bottle, using a food-safe oil bottle is really importantf! If you transfer your hot oil into a regular decorative bottle you are running the risk that it will shatter instantly from the heat! Use a food safe bottle!)

    20120822-130602.jpg

    2) “My Roasted Garlic”

    I use a muffin tin, aluminum foil, a head of garlic, and a few Tablespoons of olive oil.
    Simply, cut the ends if your head of garlic, remove the excess “paper” around each clove.
    Using your aluminum foil, create a pocket in the muffin tin, place garlic, cover with oil, pinch top of aluminum foil closed, and bake in preheated 400F oven for 30 minutes.

    20120822-130706.jpg

    3) Hummus is really easy to make, and in my opinion, is always better than premade versions in the store. Furthermore, you get a larger quantity for less money. Win. Win.

    Pretty much all you do is combine your ingredients and put it in the food processor or blender. If it is too thick, thin it with oil or water. I thin mine with water, because I’m topping mine with the my infused oil, and I don’t want it to get too oily! 😉

    I used two cans of Chick Peas, aka Garbonzo beans, rinsed (see photo)
    3 Tbsp of Tahini (you know, sesame seed paste, see photo)
    Juice of half a lemon
    Salt, to taste
    and the dry spices that I used earlier to make the oil (note: did not include the fresh rosemary or fresh garlic. I used DRY spices, only, inside the hummus, because there will be plenty of garlic and rosemary on top of the hummus.)

    Now, after purée is made, top with fresh roasted garlic, and drizzle with the rosemary and spice infused oil! LOVE IT!!!

    20120822-130819.jpg

    Now, you know how we hummus; how do YOU hummus?
    20120822-130839.jpg

    Your Friend,

    ~Amber Hamilton Henson

    PS
    Like this post? Be sure to check “my Kitchen” for links to more of my recipes!

    Wonder to which parties I’m linking? I have a page dedicated to “shares”, too!

    Love Linking! (as always, if this post is featured,the hostess’s button will be attached to this post AND my shares page!)

    WEDNESDAY
    Whole Foods Wednesday @ ThisChickCooks
    THURSDAY
    Tutorials, Tips, and Tidbits @ StoneGableBlog
    Transformation Thursdays @ TheShabbyCreekCottage
    Hookin’ Up With HOH @ HouseOfHepworths
    Fantastic Thursday @ FiveLittleChefs
    Full Plate Thursday @ MizHelensCountryCottage
    FRIDAY
    Foodie Friday @ Rattlebridge Farm
    SATURDAY
    Saturday Nite Special @ FunkyJunkInteriors

    App Happy!

    Yes, I LOVE iPhone and iPad photo editing apps, but I also LOVE appetizers… You know, appetizers… “apps!” 😉

    Do you use Athens Fillo (phyllo) mini shells to create apps and desserts? I do! They’re sold in the freezer section at the grocery store, usually near pie crusts. This particular app recipe quickly became a favorite!! (There are A LOT more recipes on the Athens site for appetizers and desserts, too!)

    Ever had a bacon, cheese, and tomato sandwich with mayo? Well, the flavor profile of this is similar, just amped up!

    Important note: you’ll need at least TWO packages of the Athens “Fillo” Mini Shells, or THREE, if you don’t want your shells as full.

    Easy, recipe:
    2-3 pkgs of Athens Fillo mini shells
    1 can of Hot Rotel (tomatoes and peppers)
    3/4 cup of real Mayo
    2.5 cups of shredded cheese blend (Cheddar, Colby, Monterey Jack, etc)
    1 pkg of bacon, cooked crispy and crumbled
    Preheat oven to 350F. Mix all ingredients and fill shells. Bake 10-15 minutes (until bubbly.) Enjoy!!

    20120821-201437.jpg

    Your Friend,

    ~Amber Hamilton Henson

    PS
    Like this post? Be sure to check “my Kitchen” for links to more of my recipes!

    Wonder to which parties I’m linking? I have a page dedicated to “shares”, too!

    Love Linking! (as always, if this post is featured,the hostess’s button will be attached to this post AND my shares page!)

    WEDNESDAY
    What’s Cooking Wednesday @ TheKingsCourt4
    THURSDAY
    Tutorials, Tips, and Tidbits @ StoneGableBlog
    Transformation Thursdays @ TheShabbyCreekCottage
    What Have You Made This Week @GooseberryPatch
    Hookin’ Up With HOH @ HouseOfHepworths
    Fantastic Thursday @ FiveLittleChefs
    Full Plate Thursday @ MizHelensCountryCottage
    FRIDAY
    Foodie Friday @ Rattlebridge Farm
    Weekend WrapUp @ TatorTotsAndJello
    SATURDAY
    Get Schooled Saturdays @ TooMuchTime
    Saturday Nite Special @ FunkyJunkInterior
    MONDAY
    Mop It Up Mondays @ IShouldBeMoppingTheFloor

    Arkansas:
    Snack Attack Blog Hop @ Big Pitt Stop

    I Make Necklaces, Too!

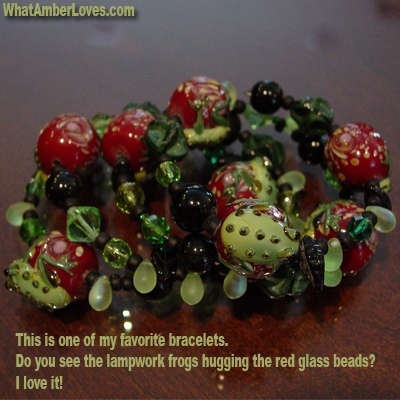
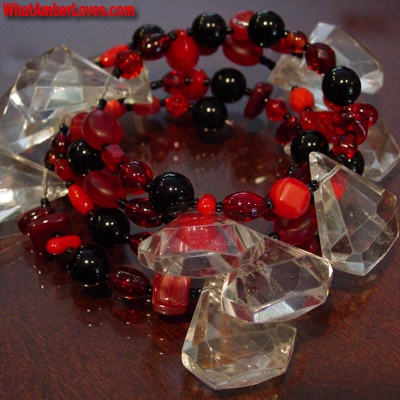
    I’ve already shown you the memory wire bracelets that I make, here.

    I also make necklaces on memory wire, however, due to their weight, I always include a clasp, unlike on my bracelets.

    I usually only wear one or two pieces of statement jewelry at a time. Given the pictures I’m showing in this post and the previous, you can see that I like statement jewelry. Since my bracelet post featured primarily lampwork and glass beads, I thought perhaps this would be a great opportunity to turn a corner and show you a bit of nature. I love natural history museums. I’d live in one, if I could. My grandmother, a.k.a. “Gram,” has accused me of being a “rock hound” more than once. She says it with love as she takes me exploring Hot Springs, AR. There is this really cool crystal cavern/wishing well within a block of where her high school boyfriend lived… I digress. I’m a “rock hound.” I’d call a natural history museum, “Home,” if I could. So, here we go; photos of a few of the necklaces that I assemble:

    This first necklace pictured individually features slices of geodes that have been set with amethyst and citrine crystals. I purchased the geode slices online from a store in Hong Kong that was selling them individually as pendants. In my mind, if one is great as a pendant, then MANY are even better as a full necklace. Love it!!

    Here is another necklace that I made using seashell pendants:

    Next is a necklace where I used memory wire threaded through a silver chain and then attached gobs of artisan pendants that each feature natural stone, bone, or shell. It took me awhile to be able to dedicate the time and effort and ability to afford to collect them all, because those are real topaz, malachite, jasper, and so forth that are set in each pendant. I love the finished result, and I’ve yet to where it and not be complimented and asked where I purchased it.

    Here is one that is made using lucite pendants that encase actual insects. Yes, real bugs. Do you know about me and my fascination with entomology? Well, its true. Actually, I’m interested enough that I think I’ll save that topic for a separate post. For now, here is my insect necklace:

    I assemble jewelry. A link to this post will be maintained on my “Decor and Crafts” page. Check that page for more of what keeps me occupied, or check “my Kitchen” for links to my recipes.

    “Later, Gators!” and “Afterwhile, Crocodiles!”

    Your Friend,

    ~Amber Hamilton Henson

    If you’ve been following my site, you know that I like linking to parties:

    TUESDAY
    Be Inspired @ ElizabethAndCo

    I make bracelets!

    I make jewelry. I make A LOT of jewelry. I don’t sell it, ever. I just make it to wear and give as gifts.

    By comparison to those of you that are silversmith-ing and lampwork-ing to actually fabricate these beautiful beads, perhaps I don’t “make” jewelry. I “assemble” jewelry. There we go, I assemble jewelry. I assemble jewelry!! 😀

    My materials of choice are almost always glass beads, preferably lampwork glass, stone beads, and memory wire. I like working with memory wire because of the simplicity of wearing memory wire jewelry. No clasp is required on memory wire bracelets! How awesome is that?! Given that I keep my nails fairly long most of the time, I have zero interest in fumbling with a clasp on a bracelet. Memory wire is the perfect solution, and it is available pretty much everywhere: big box chain stores, local bead stores, online, etc.

    So, like I said, I work primarily with stone and glass. There is something really fantastic about feeling the coolness of stone against my wrist or neck that makes it a really desirable material to work with, and I am absolutely fascinated by the attention to detail that is used to create little lampwork beads. Seriously, an artisan uses a torch and little, tiny rods of glass and makes each bead by hand. They are like little bitty unique works of art.

    Where do I buy my beads? For my stone beads, I shop at a local, small business pretty regularly: Argenta Bead Company in North Little Rock, AR. For my artisan lampwork beads, I use ebay to buy directly from the artist, whenever possible.

    With lampwork beads, you can find beads to suit any sort of theme. Some of the handmade beads are more massed produced and ship internationally, but some are truly spectacular little one of a kind works of art being created in people’s at-home-studio-spaces. Prices vary.

    You’ll notice that I like use both really big and really tiny beads on every bracelet, and I try to use a contrast of matte and shiny beads, as well. Here are a few examples of some of the bracelets I’ve created :

    20120820-105717.jpg

    20120820-105731.jpg

    20120820-105739.jpg

    20120820-105747.jpg

    20120820-105753.jpg

    20120820-105802.jpg

    20120820-105809.jpg

    20120820-105817.jpg

    20120820-105826.jpg

    20120820-105833.jpg

    20120820-105841.jpg

    Okay, that is all. I assemble jewelry. A link to this post will be maintained on my “Decor and Crafts” page. Check that page for more of what keeps me occupied, or check “my Kitchen” for links to my recipes.

    “Later Gators!” and “Afterwhile Crocodiles!”

    Your Friend,

    ~Amber Hamilton Henson

    If you’ve been following my site, you know that I like linking to parties:

    MONDAY
    Make the Scene Mondays @ AlderBerryHill
    Masterpiece Monday @ BoogieBoardCottage
    Mod Mix Monday @ ModVintageLife
    Mad Skills Tutorials @ MadInCrafts
    Party Time @ Craft-O-Maniac
    TUESDAY
    Be Inspired @ ElizabethAndCo
    THURSDAY
    Tutorials, Tips, and Tidbits @ StoneGableBlog
    Transformation Thursdays @ TheShabbyCreekCottage

    Quiche Lorraine: Bacon and Asparagus!

    I really don’t intend for this to be a “food” blog, it’s just that right now, several projects are at midway points! …and, when I’m ready, I’d rather show THOSE projects as COMPLETE stories, instead of as bits and pieces. However, cooking meals is something that I do start and finish EVERYDAY; thus, posts are quick and easy to create. Tomorrow, I promise I’ll talk about something other than food. Maybe, I’ll talk about the jewelry I make or the crazy antique door that I bought, today. Idk. We’ll see… Tonight, though, we’re talking Quiche.

    20120816-193916.jpg

    Tonight, I made Quiche for dinner, again, and liked it. Despite all of the “Great Value” staples that you see in my next photo, I’m actually NOT sponsored by WalMart (or anyone/company)for these posts. As of today, this is an un-monetized post. If that changes, I’ll let you know. WHY “great value” ptoducts? Easy: WalMart super center is like a block from my house, their products are sometimes like half the price of other brands, and for the most part, they’re more than satisfactory. When I prefer a “brand”, you’ll know via my link.;) k? K!
    Tonight’s Dinner is Starring: Bacon, Asparagus, White Cheddar, Spinach, and Feta!!
    I’m attaching my recipe, with photos.

    20120816-194004.jpg

    QUICHE CRUST:
    1 cup of all-purpose flour, sift
    3/4 teaspoon salt
    1/3 cup butter room temperature
    4 Tablespoons milk
    * I combine the flour and salt. Using my hand, I cut the butter into the flour mixture until the butter seems to disappear, creating sort of a damp sand texture. I gradually pour the milk in, one tablespoon at a time while stirring the mixture with my hand. I grab the dough (still in the bowl) and mix with my hands, gently. I put the dough on my heavily floured countertop, put flour over entire rolling pin surface and roll it out, gently until it’s about ¼ inch thick and large enough for my pie dish. Carefully, I roll the dough around the rolling pin then roll it out over the greased glass pie dish. I then fold under the excess around the edges and press a fork around the edges. Repeat for the second crust.

    20120816-194024.jpg

    QUICHE FILLING: (steps A, B, and C)
    Part A:
    2 packages of bacon, cooked thoroughly, and crumbled
    (note: I use a cast iron skillet that was given to me by my Gram and an iron Bacon Press that I bought in Eureka Springs, AR, for best results. My Gram presses each piece of bacon individually with a fork while she cooks it. I wish I had her patience; I love using my bacon press. I wonder if she knows about bacon presses. The way she does it is great, always crispy; but a press would should give her back a few minutes of the day. Maybe I should get a bacon press for her, soon.)
    1 diced onion, cooked in the remaining bacon grease
    1 pkg of frozen spinach
    1 bundle of fresh asparagus
    (note: I steam my spinach and most of the asparagus, chopped, together in a steamer pot. I saved 12 spears per pie for decoration on top, after snapping off the coarse/fibrous bases of the spears.)
    1 pkg of crumbled feta cheese
    1 block of sharp white cheddar, shredded (save some to top the Quiches)
    * Next, I combine all of the above ingredients in a mixing bowl, and transfer half into each crust.

    Part B:
    Mix together 8 eggs, 2 cups of milk and salt/pepper. Pour half over each quiche.

    Part C:
    Sprinkle remaining cheddar cheese on top of each Quiche and arrange decorative asparagus spears.

    BAKE at 375F for 45 minutes. Love!!

    20120816-194048.jpg

    I make quiche pretty frequently, while I vary the ingredients of Part A according to what I’m in the mood for (bacon&asparagus or chicken&brocolli or ham&peppers or…), I always keep Part B the same. It’s a mix that works well for me.

    Enjoy! Your Friend,

    ~Amber Hamilton Henson

    PS
    Like this post? Be sure to check “my Kitchen” for links to more of my recipes!

    Wonder to which parties I’m linking? I have a page dedicated to “shares”, too!

    Guess what?! My quiche was featured!! 😀 😀 😀

    Love Linking! (as always, if this post is featured,the hostess’s button will be attached to this post AND my shares page!)

    FRIDAY
    Foodie Friday @ Rattlebridge Farm
    Tickled Pink @ 504 Main
    PotPourri Friday @ 2805
    SATURDAY
    Saturday Nite Special @ Funky Junk Interiors (recipes)
    Get Schooled Saurday” @ Too Much Time
    SUNDAY
    Sundae Scoop @ I Heart Naptime
    Scrumptious Sunday @ I’m Addicted to Recipes
    Sunday Linky Party @ PetiteHermine
    Sunday’s Best @ My 1929 Charmer
    MONDAY
    Mad Skills Tutorials @ MadInCrafts
    Mealtime Monday @ CouponingNCooking
    WEDNESDAY
    What’s Cooking Wednesday @ TheKingsCourt4
    THURSDAY
    Full Plate Thursday @ MizHelensCountryCottage

    SassyTailgating Sandwiches really ARE “Sassy!”

    We try A LOT of different recipes. Some make big promises, but only deliver mediocre results. Some have rave reviews but require an enormous amount of time and dirty dishes to create. These little sandwiches are easy, quick, award winners that deliver the sass the recipe promises.

    It’s the Philadelphia Chive & Onion Cream Cheese Spread inside combined with the buns soaked in a blend of butter, Worcestershire, Parmesan, and minced onion that really and truly makes these little sandwiches pretty sassy!

    1 package of Hawaiian bread rolls or potato rolls
    1 pound shaved Black Forest ham or smoked deli ham of your choice
    12 slices Provolone cheese
    1 (8 ounce) tub PHILADELPHIA Chive & Onion Cream Cheese Spread
    1/2 cup butter, melted
    1 tablespoon Worcestershire sauce
    1/2 tablespoon dried minced onion
    1/4 cup grated Parmesan cheese
    Directions
    *Cut each roll in half, sandwich style. Place bottom halves in a glass 9″x13″ casserole dish.
    *Place equal amounts of ham on each roll bottom. Top with Provolone.
    *Spread a generous amount of the cream cheese spread on the inside of each of the remaining roll halves and place on top, making sandwiches.
    *In a separate bowl, mix together the butter, Worcestershire sauce, onion and Parmesan cheese. Pour this over your sandwiches and let sit for at least 20 minutes. (I make these in the morning and allow to sit in fridge until lunch or dinner.)
    *Place sandwiches in casserole dish covered in foil, in a preheated 350 degrees F oven. Bake for 20 minutes.

    A similar recipe: here.

    Yummy, Yummy, YUMMY!!

    ~Amber Hamilton Henson

    PS: 
Like this post? Be sure to check “my Kitchen” for links to more of my recipes!

    20120815-163450.jpg

    Funky Deco Vanity!

    Even though our home decor overall is primarily a range of contemporary and traditional, if you read my belt chair tutorial, then you’ve heard that I like to have a few interesting “character” pieces of furniture in each room, too. In addition to our “regular” furniture, I try to have something antique, something mid century mod, and something a little funky in each room. I like contrast. Well, our master suite is not an exception. Our chests of drawers are contemporary, lamps are traditional, flooring style is modern, dark espresso, and the settee that we reupholstered is antique. Really antique; like early 19th century Italian antique. Also in our master suite is a vanity, now a funkier vanity. I’ll get around to photographing the rest of the room soon, but for now, I just want to talk about this deco vanity.

    20120813-200054.jpg

    This vanity isn’t from a resale shop; it’s actually been handed down through the family. Perhaps my grandmother could tell us what its original stained finish looked like, but I’m pretty sure it had long since been painted over prior to my lifetime. By the time it was given to me, it was wearing a coat of pea green paint and had spent its last several years in my dad’s garage storing my little sister’s costumy “dress-up” stuff from her childhood. I really liked the lines and heft of the vanity. It’s BIG for a deco age vanity, and structurally it is in great shape, especially for being almost a hundred years old! Shortly after receiving it, several years ago, I painted it black. The sides and drawer fronts are FLAT black latex, and the top surface and hardware are HIGH GLOSS enamel.

    Recently, I saw a few dresser conversions that really caught my eye and I just KNEW I had to add a bit of typography to a piece of furniture. (If you want to see what inspired me, hop over to Bliss Ranch and check out Bliss’s Libation Station created from an old dresser and her Kodak dresser! Amazing aren’t they?! Love it!) I was inspired by Bliss, but given that I have a one year old daughter underfoot, finding the time and space to paint by hand the way she does is difficult impossible for me at this stage. So, I did it MY way, with vinyl sign lettering that I cut using my sign machine. You know that in addition to being a stay at home mom, I freelance, selling and installing vinyl signs and vehicle graphics, right?

    I wanted to stick with the “vanity” theme on the “vanity.” I brainstormed:
    Vanity. Primp. Groom. Beautify. Smarten. …with a dashing flourish… Then, I created and installed the graphic. If you were just wanting to see the dresser and hear the history, you can stop reading now. However, if you want to see the sign vinyl process, here you go:

    20120813-200134.jpg

    20120813-200147.jpg

    20120813-200200.jpg

    1) I designed the graphic in Adobe Illustrator.
    2) I put the design in FlexiSign and sent it to my cutter.
    3) Here is my machine cutting. It can cut any graphic up to 30 feet wide by 300 feet long. We keep our sign cutter in an armoire that used to hold our tv, but now all of our tvs are mounted to walls. It is a great way to hideaway the machine when it’s not in use, this is especially important to me, since it is in our front room/library/office at home.
    4) I “weed” the cut image. See, the machine doesn’t print; it cuts. The material is like big roll of stickers on a sheet of waxed paper backing. Through precision adjustment, the machine’s blade is set at an exact pressure that it will cut through the sticker (sign vinyl) without cutting the paper backing. So, I pull the excess away, by hand, leaving only the cut graphic on the waxed paper backing.
    5) Here is what it looks like after the weeding process.
    6) I “mask” the image. I cover the entire graphic in masking tape. Really wide masking tape. This is an essential step. It would be impossible to move and install each little piece individually and expect it all to line up properly. Covering it in masking tape allows me to move ALL of the letters at once.
    7) It is a total of three layer at this point: paper, sign vinyl, and masking tape.
    8) I peel away the waxed paper backing. Now, it is just the sticky sign vinyl and masking tape.
    9) I stuck it to the side of the furniture and used a squeegee to smooth it all into place.
    10) I slowly pull away the top layer of masking tape. See, the sign vinyl’s adhesive is MUCH stronger than the adhesive on the masking tape, so the masking tape pulls away leaving the sign vinyl stuck in place. Neat, huh? Now, you know.
    11) The glittery, gold sign vinyl lettering is permanently adhered to the vanity!

    At home, non-commercial, I use my sign machine for quotes on mirrors, labeling, kids’ projects, etc. I’ll show you some of that stuff later; for now, I’m tired of typing. 😉

    20120813-200222.jpg

    Later!
    Your Friend,
    ~Amber Hamilton Henson

    PS
    Like this post? If so, check out my DECOR & CRAFTS page and click on links to my other projects.
    I’m linking this post to a few, fun linking parties that showcase other great projects! The links to the parties will be updated everyday this week: (as always, if this post is featured,the hostess’s button will be attached to this post AND my shares page!)

    MONDAY
    Make The Scene Monday @ AlderBerryHill
    Masterpiece Monday @ BoogieBoard Cottage
    More the Merrier Monday @ DIY Home Sweet Home
    CraftOManiac Monday @ Craft O Maniac
    Tutorial Link Party @ Mad in Crafts
    Mod Mix Monday @ Mod Vintage Life
    TUESDAY
    Be Inspired @ Elizabeth and Co.
    Talent Tuesday @ Vintage Wanna Bee
    Nifty Thrifty Tuesday @ Coastal Charm
    All Star Block Party @ Full Circle Creations
    Twirl and Take a Bow @ House on the Way
    WEDNESDAY
    Wow Us Wednesday @ Savvy Southern Style
    Primp Your Stuff @ Primp Junktion
    Whatever Goes Wednesday @ Someday Crafts
    Link Party @ Lil Luna
    Wicked Awesome Wednesday @ HandyManCraftyWoman
    THURSDAY
    Transformation Thursday @ The Shabby Creek Cottage
    Creative Juice Thursday @ Momnivore’s Dilemma
    Time Travel Thursday @ The Brambleberry Cottage
    FRIDAY
    Catch as Catch Can @ My Repurposed Life
    Link Party and Mes Preferes @ ReDoux Interiors
    Tickled Pink @ 504 Main
    PotPourri Friday @ 2805
    Furniture Feature Friday @ Miss MustardSeed
    SATURDAY
    Saturday Nite Special @ Funky Junk Interiors
    Weekend WrapUp Party @ TatorTots and Jello
    Get Schooled Saurday” @ Too Much Time
    SUNDAY
    Sunday’s Best @ My 1929 Charmer
    Sunday Linky Party @ PetiteHermine
    Sunday’s Best @ My 1929 Charmer