Blog Archives

Scones!!

Trust me this once and just go with it!
It’s a fabulous flavor combo!!
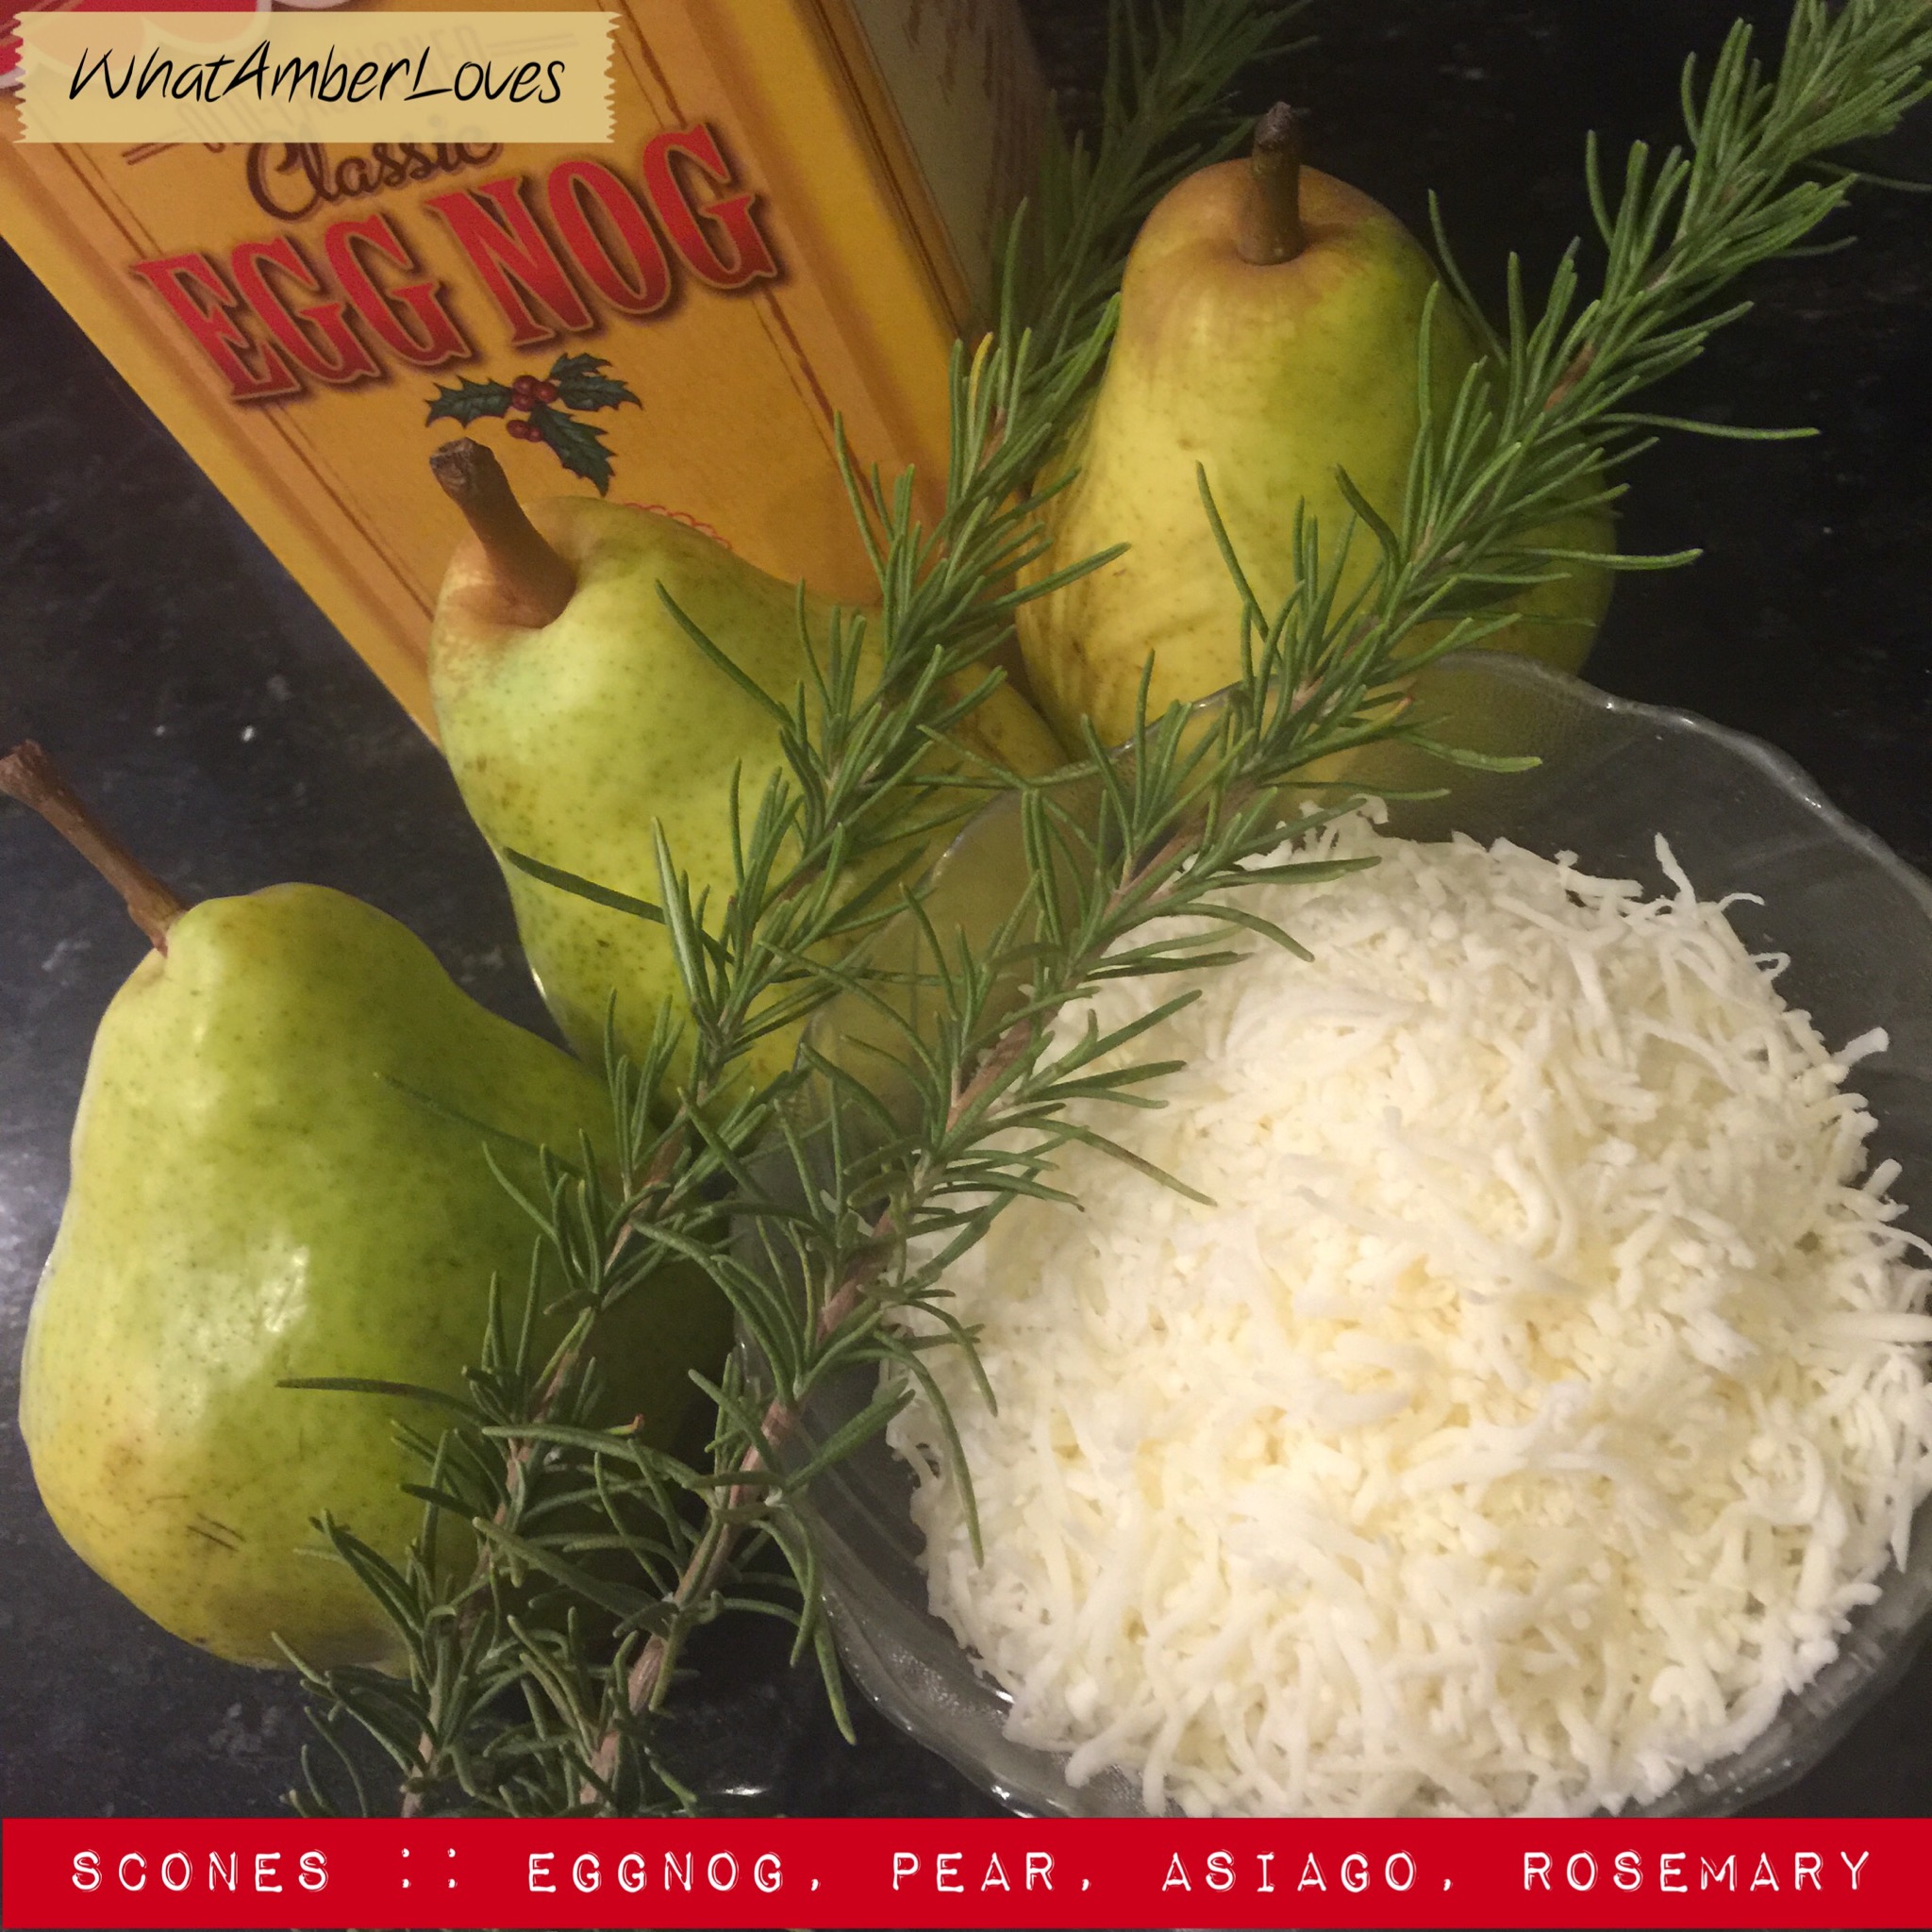
Ingredients for these scones:
2 cups all-purpose flour
1 tablespoon baking powder
0.5 teaspoon salt
0.5 cup cold butter, cut into 1/2-inch cubes
1 cup Eggnog
1.5 cups finely chopped fresh pear
1+ cup grated Asiago cheese
1 teaspoon chopped fresh rosemary
Wax paper
Total: 33 Minutes
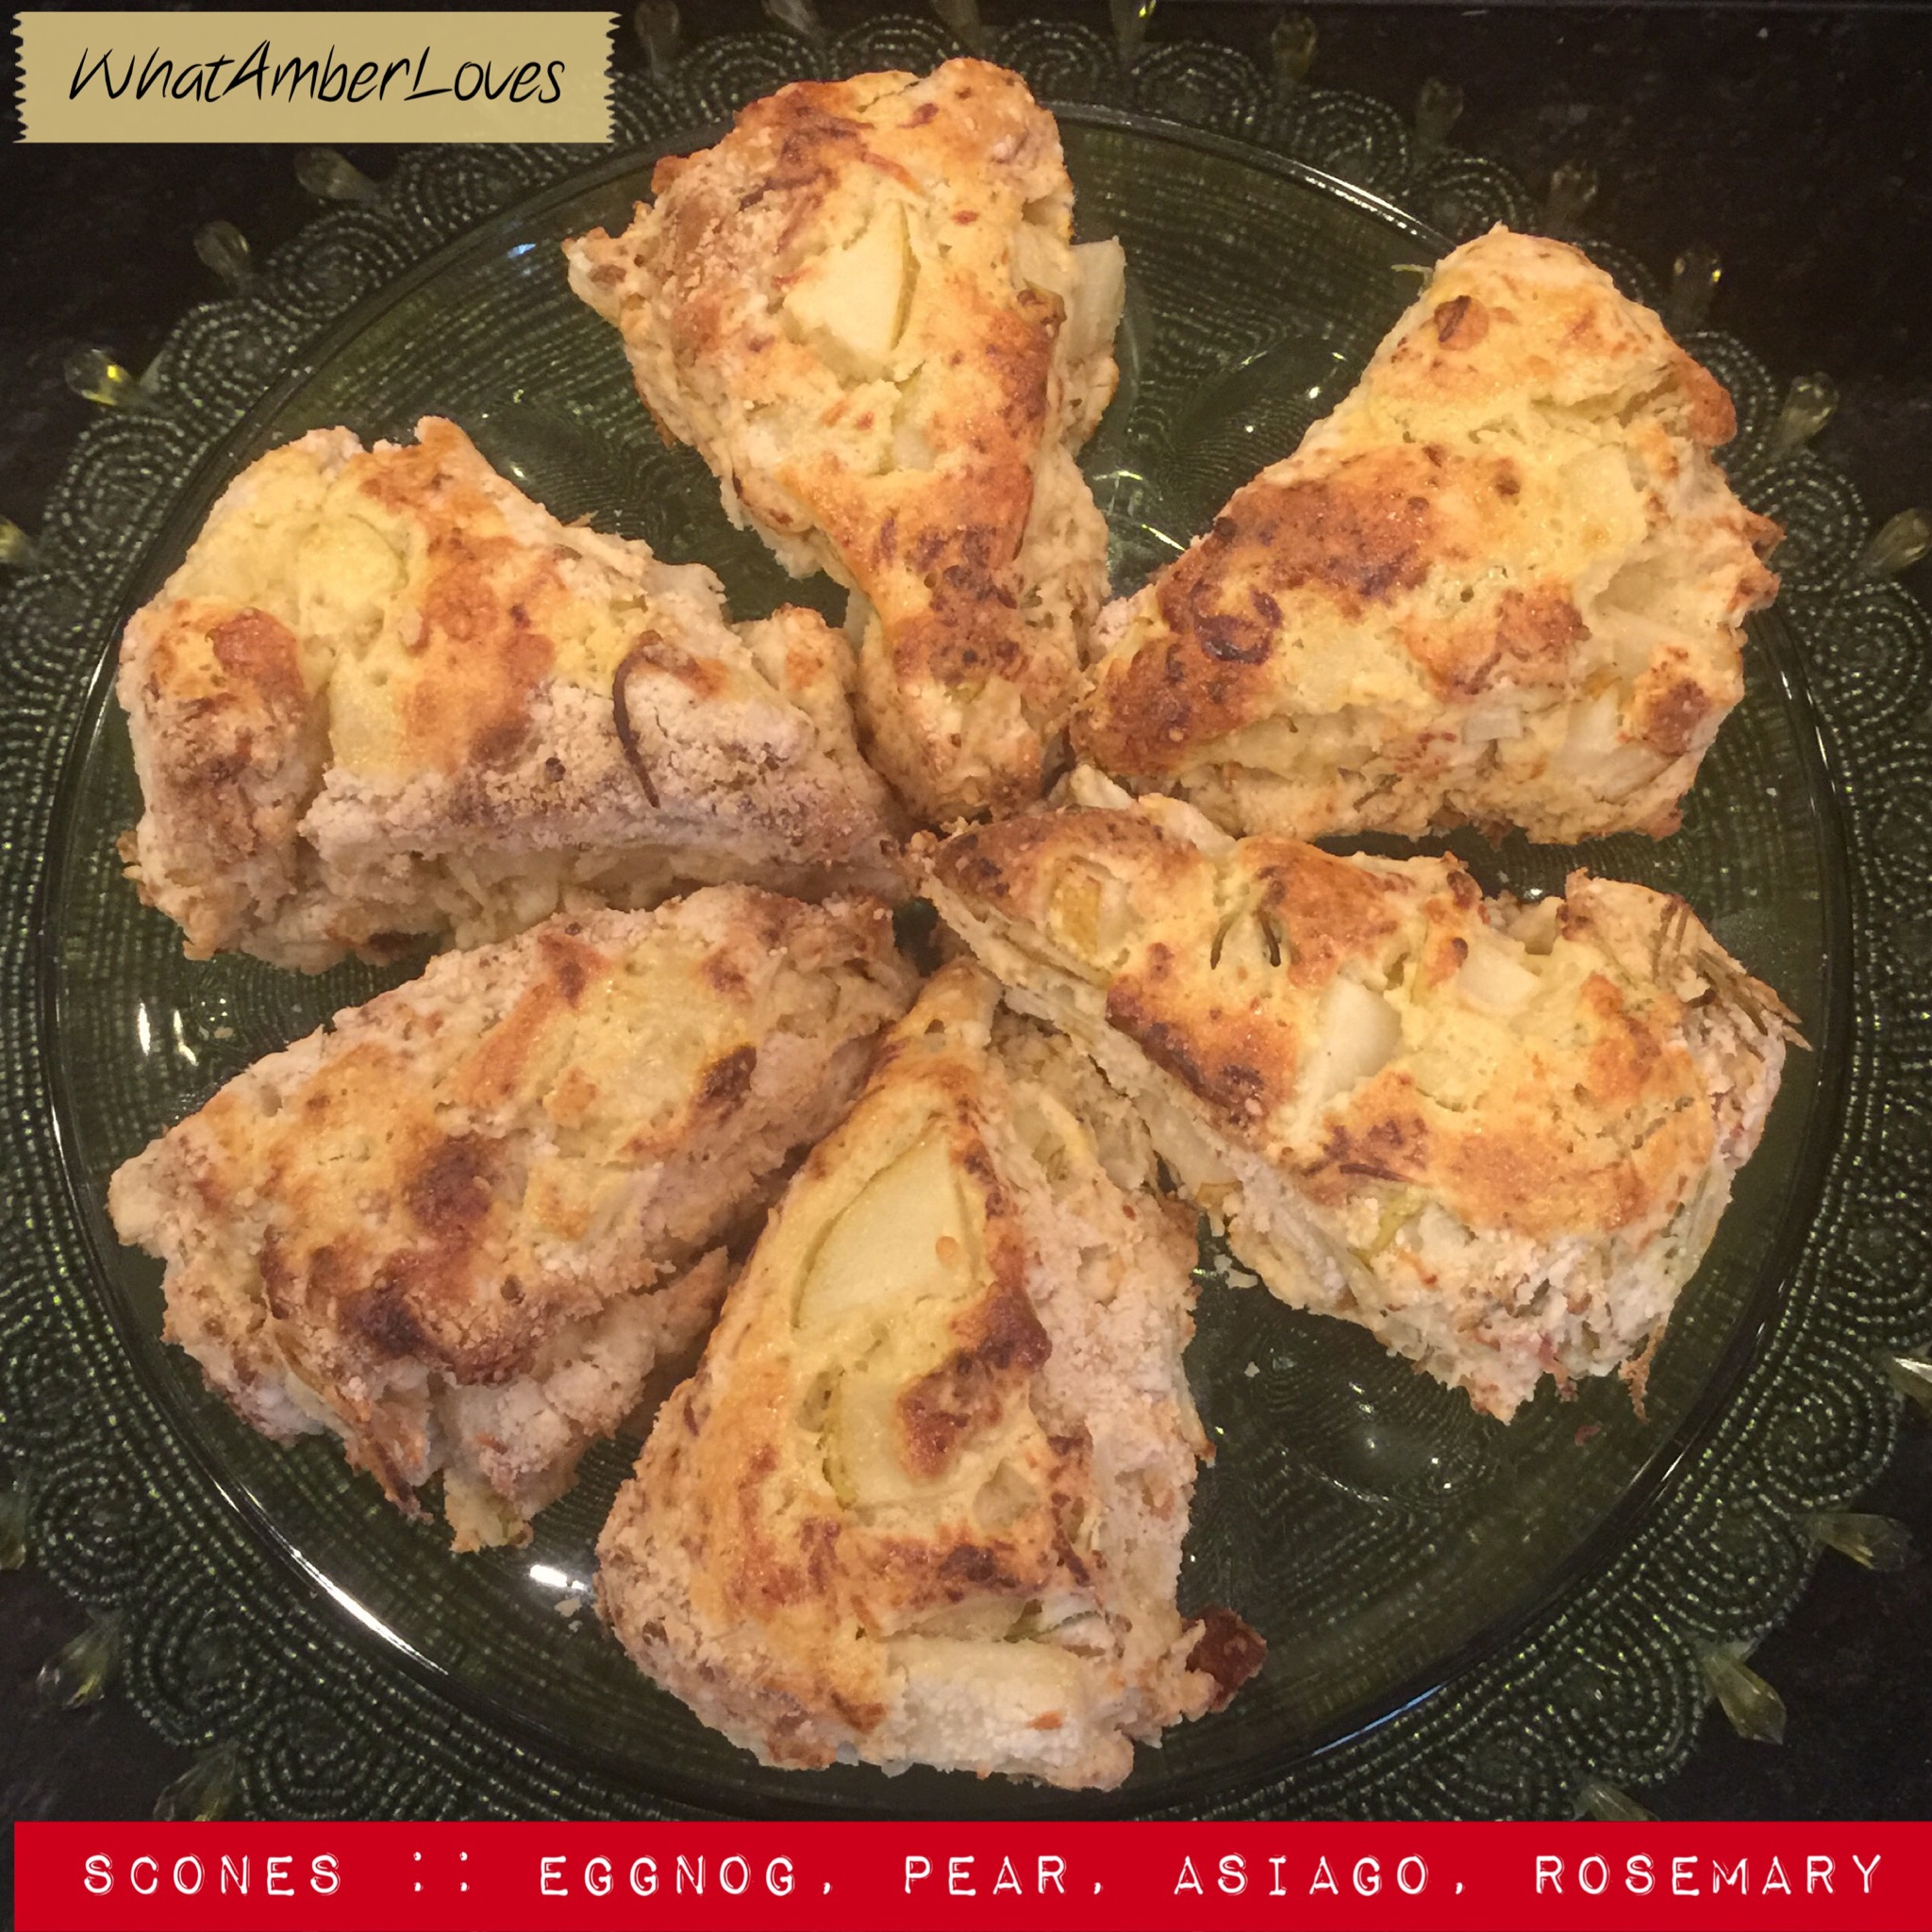
1. Preheat oven to 450°. Stir together first 3 ingredients in a large bowl. Cut butter into flour mixture with a pastry blender until crumbly and mixture resembles small peas. Freeze 5 minutes. Add 3/4 cup plus 2 Tbsp. eggnog, pear, cheese, and rosemary, stirring just until dry ingredients are moistened.
2. Turn dough out onto wax paper; gently press or pat dough into a 7-inch round (mixture will be crumbly). Cut round into 8 wedges. Place wedges 2 inches apart on a lightly greased baking sheet. Brush tops of wedges with remaining 2 Tbsp. cream just until moistened.
3. Bake at 450° for 13 to 15 minutes or until golden.
Made them? You LOVE them, don’t you? 😊
Me, too!!
Your Friend,
~Amber Hamilton Henson

Rosemary Water

Click on photo to enlarge it.
Surrounding myself with a favorite scent, such as Rosemary, that brings back fond memories is an excellent way to make myself feel clarity, well, at peace, and carefree.
I heart Rosemary. A Lot. I heart Rosemary so much, in fact, I have planted and been raising quite a hedge of Rosemary about 15′ long along the path to our front door.
We always seem to have sprigs of Rosemary laying about in the kitchen. Every week or so, I just cut more sprigs to keep the scent in the kitchen, and as I pass by them, I run my fingertips across the Rosemary to carry the scent with me as I go.

(Photo of book, Aromatic Herbs, by Jill Norman. Click on it to enlarge.)
When I read, I’m known to keep a sprig nearby to use as a bookmark. When I take a break from reading to tend a few chores, I’m greeted with a wonderfully invigoratingly fresh scent as I reopen my book. For me, it’s such a fresh, welcoming scent.
On that note, I thought it might also be nice make a bit of Rosemary Water for ironing . . . and freshening up linens . . . and so forth. So, let’s do that, shall we? We shall!
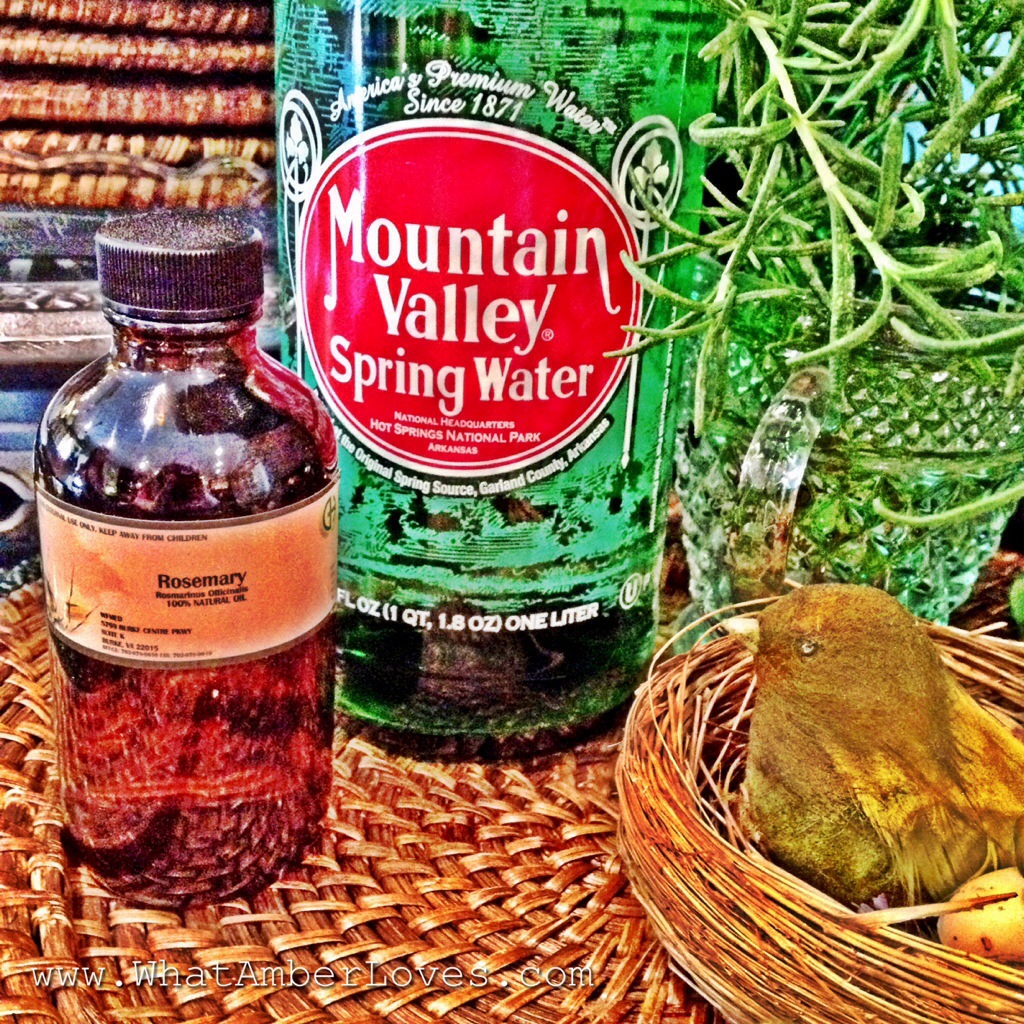
Click on photo to enlarge it.
I’m using distilled water, Mountain Valley Spring Water from Hot Springs, Arkansas, specifically, of course, since I’m an Arkansas girl. 🙂 I’m also using Rosemary essential oil.
The cost: less than $5.00
The time: less than 2 minutes to “make” this
Directions: just add 5 drops essential oil to every 5 oz of water. Easy! Then, spritz with joy!
Note:
While fresh rosemary sprigs are beautiful in the water, they are organic and will make the water cloudy pretty quickly, so do I did it for myself only because I’m anticipating that I’ll use it all pretty quickly! Otherwise, the distilled water and essential oil lasts longer without becoming cloudy if the fresh Rosemary is omitted.

Take care to see which things are spritz-able (is that a word?) . . . able to be spritzed . . . and those which are not.
I’m spritz-ing the lining (backside) of my draperies, under couch cushions, all around the middle of the room as I twirl singing a little too loudly, and then race out to my car and mist all around the carpet floor mats, and . . . Oh, yeah, I’m supposed to save some to spritz the ironing! (I spray the inside of garments, then iron the right side. It makes ironing a pleasure!) Then, I also spritz . . . 🙂 Well, I just spritz and spritz . . . 🙂 🙂
I heart Rosemary and its scent so much. You’ve seen (read) me talk about it before as I use rosemary branches as skewers for chicken, too, yes? and I have a whole board dedicated to Rosemary on Pinterest that perhaps you’ve seen?
My next feat may be to try making a Rosemary jelly! It sounds so lovely to me! (Recipe is in book, Medicinal Herbs, by Patricia Turcotte.)

Click on photo to enlarge it.
Or, I may try extracting my own Rosemary essential oil. I found instructions on eHow.
Or, as an alternative to making Rosemary water in the method described above, I may try boiling it somehow and straining it to create Rosemary Water for my laundry. We’ll see. I’ll be here, just happily playing amongst my rosemary. 🙂
Your Friend,
~Amber Hamilton Henson
PS
It’s raining heavily here, tonight, which makes this spray extra lovely. It seems to just linger in the humid air. Love.

PPS
Love linking:
Arkansas Women Bloggers ~ Sunday Link Up
SavvySouthernStyle ~ Wow Us Wednesday
FromMyFrontPorchToYours ~ Treasure Hunt Thursdays
ADelightsomeLife ~ Home Garden Thursday
MyRepurposedLife ~ Catch as Catch Can
my1929charmer ~ Sunday’s Best #63 ParTay

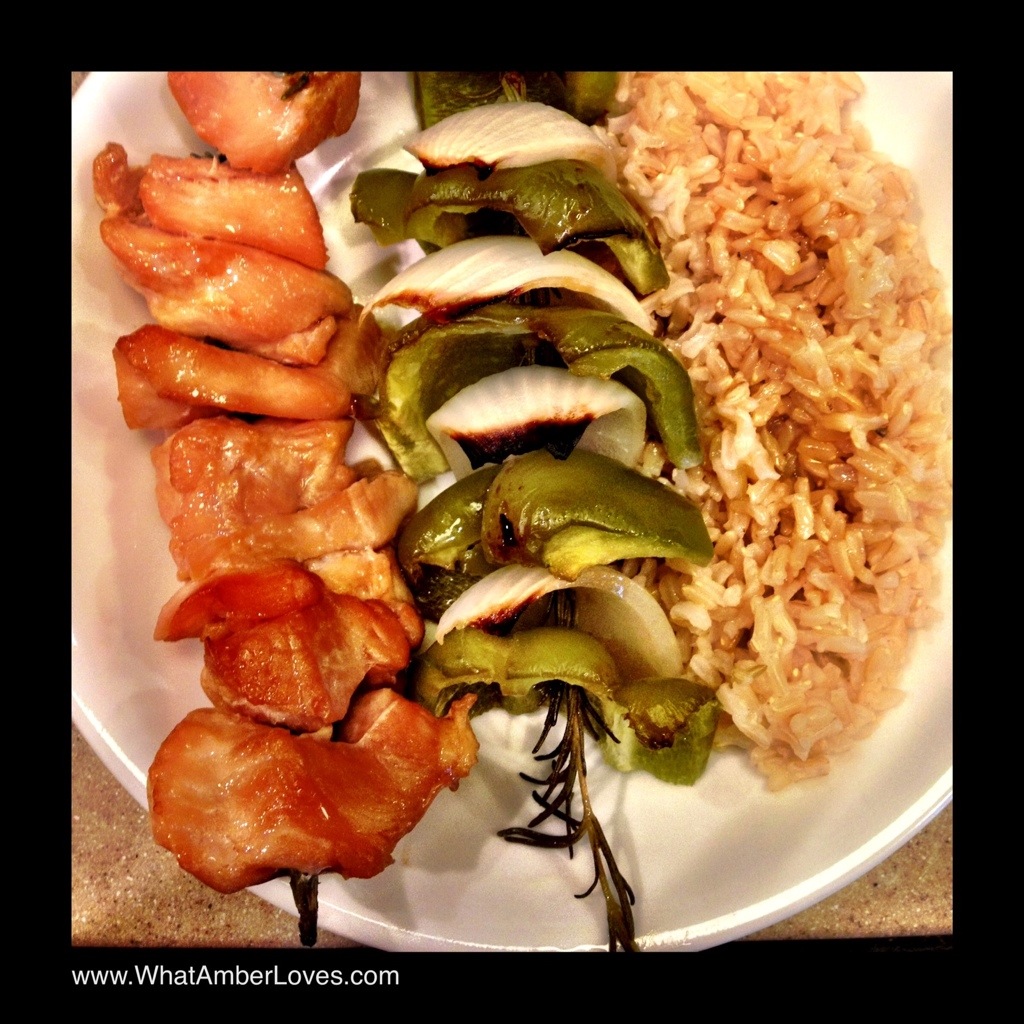
Chicken Kabobs on Rosemary Branches
Do you grow your own Rosemary? In USDA zones 4-6, Rosemary grows as an evergreen. Being in zone 7, Rosemary makes an absolutely lovely hedge. Our Rosemary hedge is in front of our house near the pathway leading to the front door. When the wind blows, the fragrance is sooooo refreshing. I’m always looking for more ways to use Rosemary, and here is one of my favorites: Using rigid branches as skewers for kabobs! It lends a wonderful hint of Rosemary flavor to the chicken without adding Rosemary to the marinade, even more so, if you leave the Rosemary leaves on the branches!
(Clicking on photos will enlarge them.)


RECIPE
1/4 cup vegetable oil
1/3 cup honey
1/3 cup soy sauce
1/4 teaspoon ground black pepper or red pepper (preference)
8 skinless, boneless chicken breast halves – cut into cubes
2 cloves garlic
5 small onions, cut into 2 inch pieces
2 red bell peppers, cut into 2 inch pieces
Rosemary Branches or skewers
In a large bowl, whisk together oil, honey, soy sauce, and pepper. Before adding chicken, reserve a small amount of marinade to brush onto kabobs while cooking and more to use as sauce for brown rice, if desired as a side dish. Place the chicken, garlic, onions and peppers in the bowl, and marinate in the refrigerator at least 2 hours (the longer the better). Skewer onto rosemary branches right before baking!
I bake the kabobs in the oven at 350F on a pan that drains or raised rack. I cover the entire pan with foil and bake until the chicken is done, brushing with reserved marinade occasionally. (The length of time needed for baking will vary according to the size you cut your chicken cubes; larger cubes will need longer cooking times.) Wen the chicken is done, I remove the foil and turn on the top broiler for 3-5 minutes to finish the edges! 🙂 YUM!
Enjoy!

^a selfie photo of me and our Rosemary hedge (edited on iPhone, using PicBlender app)
This blog is still currently being created and written via iPhone and iPad!
(Clicking on photos will enlarge them into a new window.)
Your Friend,
~Amber Hamilton Henson
PS
This post will link to blog linkup parties, the party links:
Arkansas Women Bloggers’ Sunday Link Up
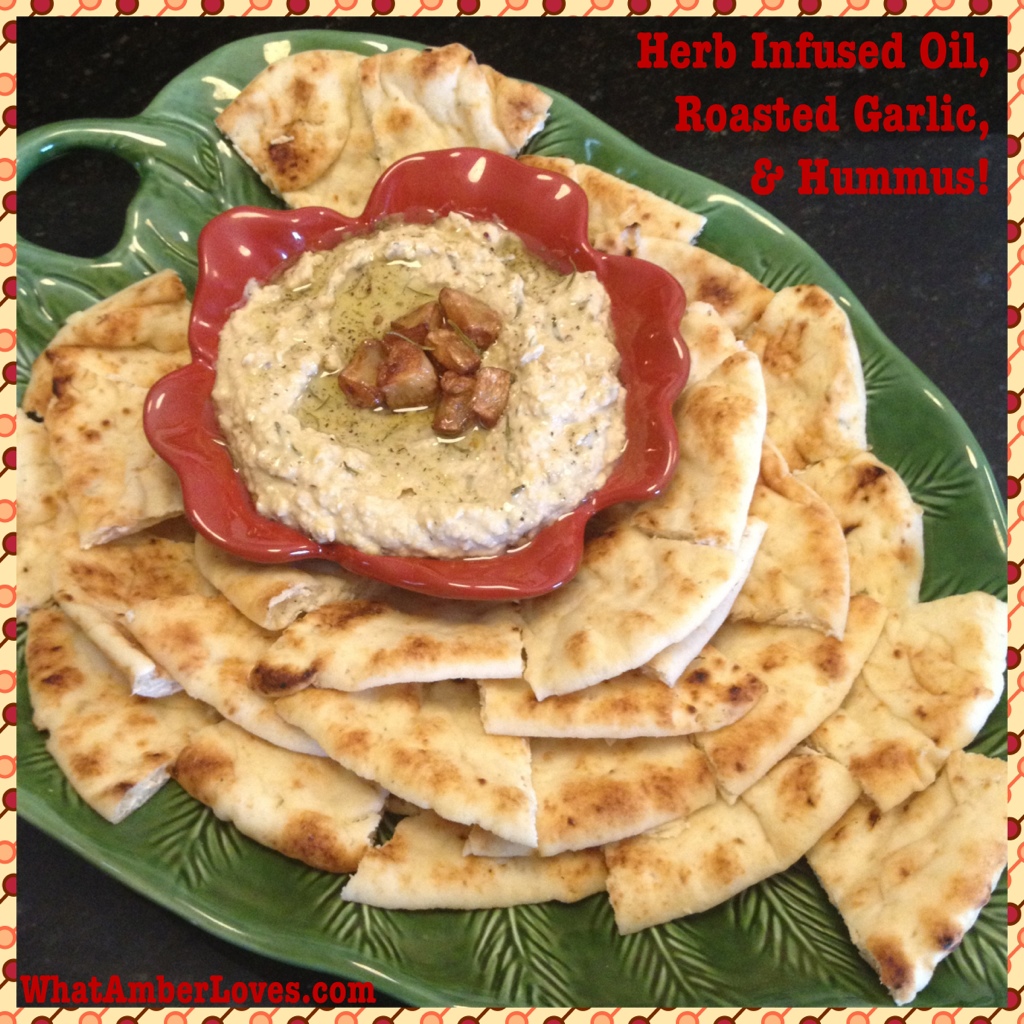
Herb Infused Olive Oil, Roasted Garlic, and Hummus!


How do you hummus? Some people add roasted peppers or olives. I let my roasted garlic cloves and herb infused oil star in my hummus show. Here’s how I do it, in three parts: 1) oil, 2) roasted garlic, 3) hummus)


1) “My Herb-Infused Olive Oil” with Rosemary from my garden:
Herb Infused Olive Oil is kind of one of my favorite things. Seriously. A great bread + oil with herbs = yummy. Pretty much the best/only way to have herb infused oil is to make it yourself and use it within a few days. From what I understand, most restaurants make their’s daily. Whenever you see the pretty bottles of oil in stores packed with herbs and peppers, it always says, “For Decorative Use, Only.” The reason is bacteria; while the oil won’t grow the bacteria, any water content in the herbs or peppers will grow the bacteria with time, potentially resulting in serious illness. (article) So, to make infused oils edible, I heat my oil and infusers to 250F, consume within a few days, keeping it well sealed and refrigerated when not in use. (Note: other recipes online recommend a minimum of 180F, but I always go to 250F. Our three little girls will also sample this oil on hummus, so I prefer to play it REALLY safe! I use a candy thermometer in my oil to verify temp!)
The tools you’ll need to duplicate my oil:
A sauce pan,
a wooden spoon/spatula,
candy thermometer,
blender,
funnel,
bottle with spout for the finished oil.
The ingredients you’ll need:
*Extra virgin olive oil,
*Sprigs of fresh rosemary (remove the leaves from the stems),
*Onion that is minced and dehydrated (spice section at the grocery store),
*Dried Red pepper flakes (spice section at the grocery store),
*Dried Thyme
*Cracked Black Pepper (I use a pepper mill instead of shakers, pretty much ALWAYS)
*Minced Garlic
Easy, add the ingredients to the oil, heat to 250F, stirring constantly to muddle the spices. Using a food-safe funnel, transfer into a food-safe oil bottle with spout. (Notes: if your rosemary leaves are still too big, even after heating them in oil, just quickly run it through the blender and return to heat. Also, when transferring from the hot pan to the bottle, using a food-safe oil bottle is really importantf! If you transfer your hot oil into a regular decorative bottle you are running the risk that it will shatter instantly from the heat! Use a food safe bottle!)
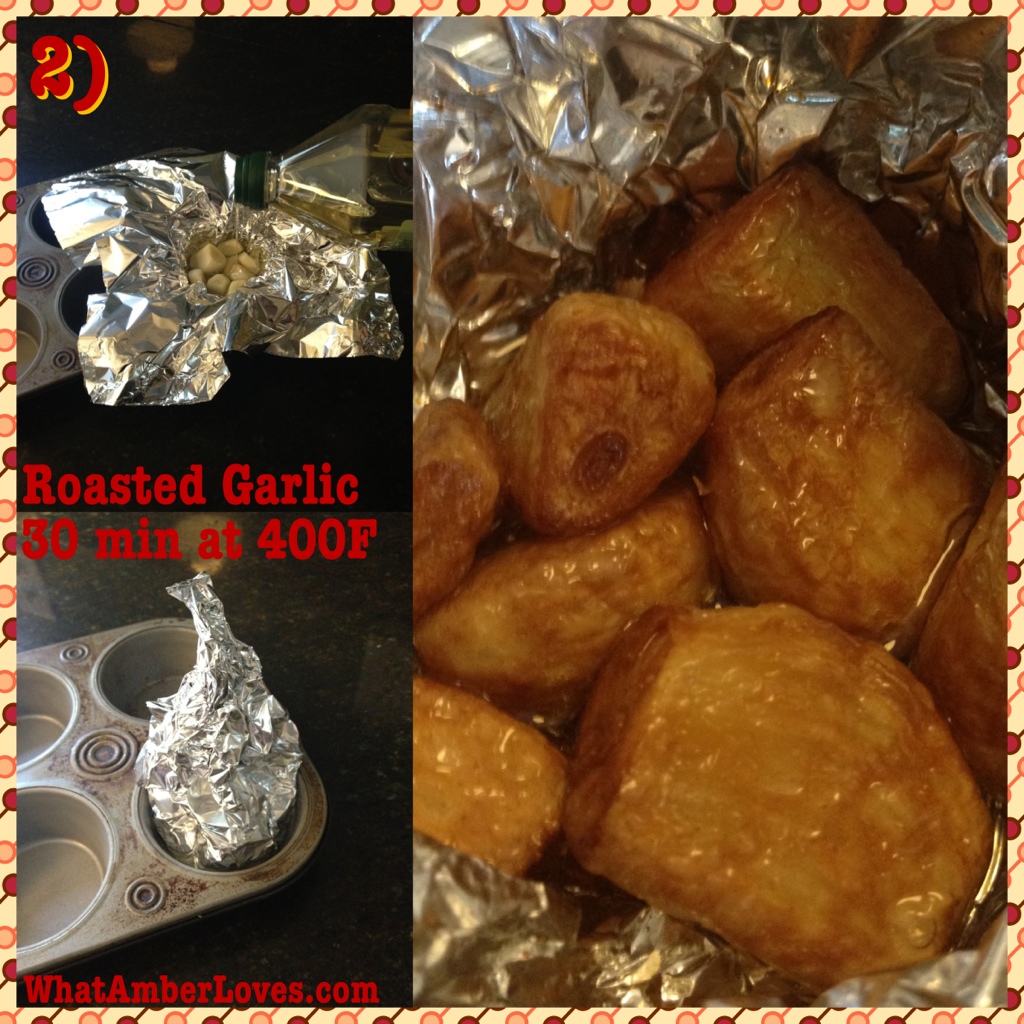
2) “My Roasted Garlic”
I use a muffin tin, aluminum foil, a head of garlic, and a few Tablespoons of olive oil.
Simply, cut the ends if your head of garlic, remove the excess “paper” around each clove.
Using your aluminum foil, create a pocket in the muffin tin, place garlic, cover with oil, pinch top of aluminum foil closed, and bake in preheated 400F oven for 30 minutes.

3) Hummus is really easy to make, and in my opinion, is always better than premade versions in the store. Furthermore, you get a larger quantity for less money. Win. Win.
Pretty much all you do is combine your ingredients and put it in the food processor or blender. If it is too thick, thin it with oil or water. I thin mine with water, because I’m topping mine with the my infused oil, and I don’t want it to get too oily! 😉
I used two cans of Chick Peas, aka Garbonzo beans, rinsed (see photo)
3 Tbsp of Tahini (you know, sesame seed paste, see photo)
Juice of half a lemon
Salt, to taste
and the dry spices that I used earlier to make the oil (note: did not include the fresh rosemary or fresh garlic. I used DRY spices, only, inside the hummus, because there will be plenty of garlic and rosemary on top of the hummus.)
Now, after purée is made, top with fresh roasted garlic, and drizzle with the rosemary and spice infused oil! LOVE IT!!!

Now, you know how we hummus; how do YOU hummus?
Your Friend,
~Amber Hamilton Henson
PS
Like this post? Be sure to check “my Kitchen” for links to more of my recipes!
Wonder to which parties I’m linking? I have a page dedicated to “shares”, too!
Love Linking! (as always, if this post is featured,the hostess’s button will be attached to this post AND my shares page!)
WEDNESDAY
Whole Foods Wednesday @ ThisChickCooks
THURSDAY
Tutorials, Tips, and Tidbits @ StoneGableBlog
Transformation Thursdays @ TheShabbyCreekCottage
Hookin’ Up With HOH @ HouseOfHepworths
Fantastic Thursday @ FiveLittleChefs
Full Plate Thursday @ MizHelensCountryCottage
FRIDAY
Foodie Friday @ Rattlebridge Farm
SATURDAY
Saturday Nite Special @ FunkyJunkInteriors
An ORANGE day!
Today’s post is sponsored by the color Orange!! Okay, well a color can’t sponsor a post, but if it could, I think it would sponsor this post. I’m in the mood for ORANGE: the look, the feeling, and the flavors!
If you’ve been too serious lately and want an easy way to lighten up, then spread a little ORANGE around your life. As a blend of the physicality and raw energy of red and the sheer happiness of yellow, orange becomes truly the color of joy, creativity, and playfulness. Thought to be one of the most energizing colors on the plant, it is often tied to fun times, happy and energetic days, warmth, and organic products. It also a color of choice for many communication companies. Furthermore, orange is known to be associated with a new dawn in attitude. Arkansas has been experiencing higher than average temperatures and extreme drought this summer, but it is finally raining this morning. It feels great! I think that is reason to enough to celebrate by dedicating a post to one of my favorite colors, orange. I actually like the color so much, it is the color that we painted our last house. Seriously, multiple shades of orange. Click here to see my Historic House post. Now, onto more orange-y-ness.
(Click on photo to enlarge into a new window for readability of recipe!)
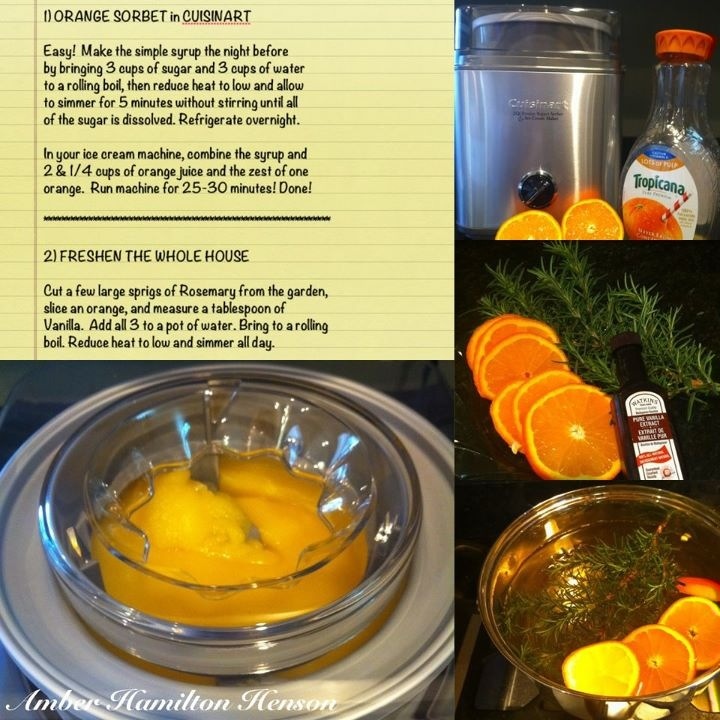

Let’s start by cleansing our palettes with an orange sorbet using my CuisinArt ice cream machine. It’s a great little machine. Beyond the fact that it’s really quiet, I really enjoy that it is electric and you don’t even have to add rock salt to a bucket, like most machines. Simplicity. Love it!
Let’s also make the house smell great by simmering a pot full of orange slices, rosemary, vanilla and cinnamon sticks, if you have them on hand. I always have more than enough rosemary on hand. One of the first things I did when we bought this new house 2 years ago was plant Rosemary en masse along the front of the house beside the pathway leading to our front door. 20+ Rosemary tiny plants are now growing into a Rosemary hedge. Love it!


ORANGE CHICKEN IN MY CROCKPOT
6 boneless chicken breasts, chopped into small chunks
1/3 cup flour
1/2 Tbsp. of salt
1/4 Tbsp. of cayenne pepper (adjust for more or less heat, depending on preferences)
peanut oil
1 teaspoon balsamic vinegar
3 Tbl. ketchup
6 oz. frozen orange juice concentrate, thawed
1/4 cup of soy sauce
8-12 Tablespoons of brown sugar (adjust according to how bitter vs. sweet your juice is)
red pepper flakes (I have a heavy hand with these, because we really enjoy the heat)
*Pour the flour, salt, and cayenne in a small bowl. Cover the chicken breast chunks in flour and shake off the excess.
*Pour a small amount of peanut oil in a skillet and brown the small bites of flour-covered chicken. After the chicken is done cooking, pour the pieces into the crock pot.
*Mix the orange juice, brown sugar, vinegar, salt, ketchup, soy, and red pepper flakes in a bowl. Then cover the chicken with your sauce mixture and give the pot a stir.
*Cook on low for 5-6 hours or on high for 2.
*I serve this with white rice and steamed broccoli!
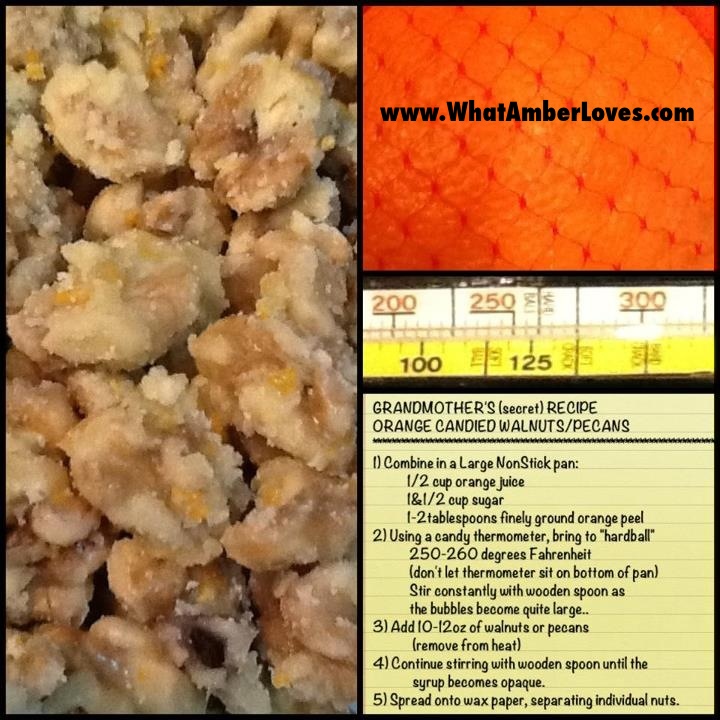

CANDIED ORANGE PECANS!
^(click on photo to enlarge into a new window for easier readability!)
Now, for dessert: (actually, we kind of snack on these all throughout the day, too!) This is absolutely one of our favorite recipes; it is from my Gram! I’ve labeled the recipe “secret” recipe, because I don’t usually share this recipe. It’s not a rule to keep it secret, like Mommaw’s praline recipe, you know how some Southern Traditions are, but I usually don’t share this one either. Everyone that has ever tasted these always raves about them and asks for the recipe, to which I reply “Family Secret.” However, I’m just feeling generous, today, so I’m sharing.

We’re having an orange day. I hope you have a happy, orange kind of day, today, too!!
“Later Gators!” and “Afterwhile Crocodiles!”
Your Friend,
~Amber Hamilton Henson
PS
Like this post? Be sure to check “my Kitchen” for links to more of my recipes!
Wonder to which parties I’m linking? I have a page dedicated to “shares”, too!
Linked:
Mom’s Test Kitchen
Miz Helen’s Country Cottage
ChickenScratchNY
FullCircleCreations
Mandatory Mooch
SavvySouthernStyle
TheKingsCourt4
Mom’s Test Kitchen
Five Little Chefs
ArkansasWomenBloggers’ Foodie Friday


