Monthly Archives: August 2013
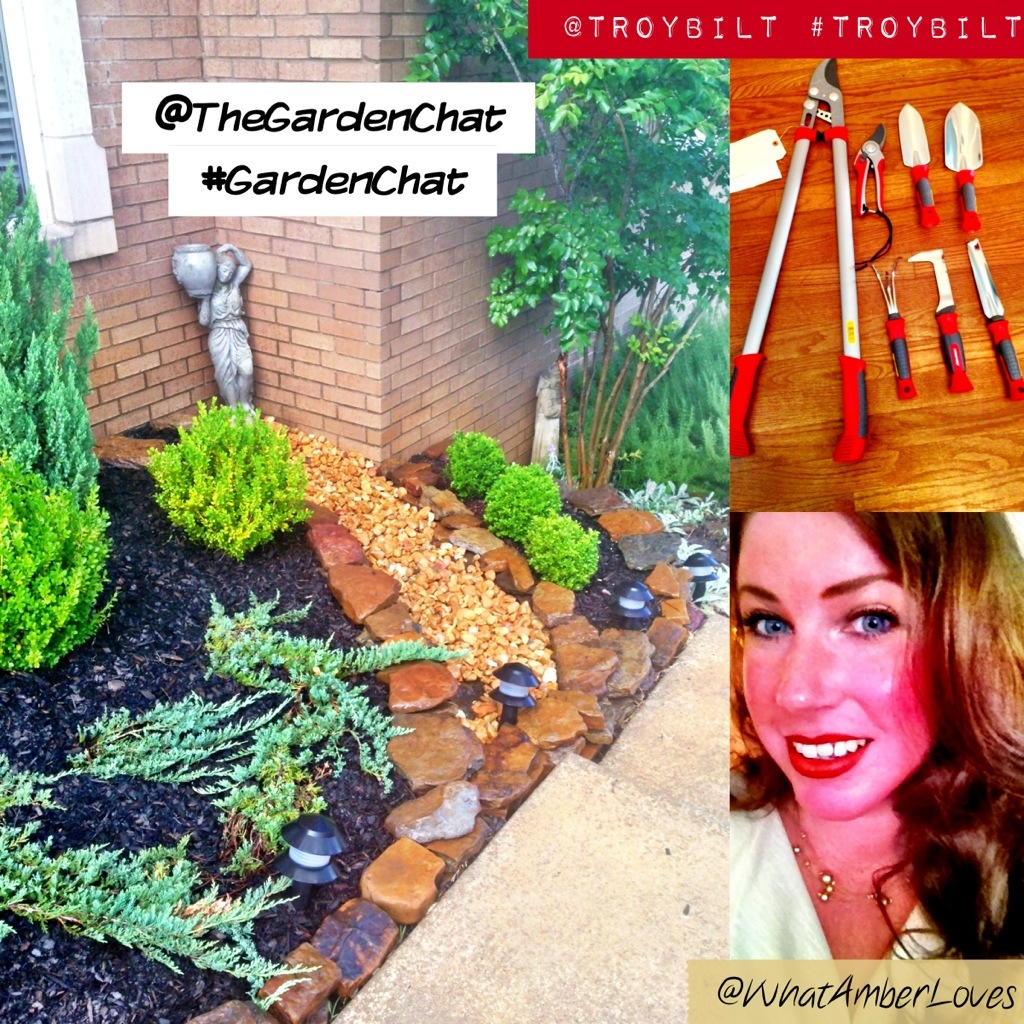
TroyBilt Tools!
I won! I won! AND I received additional free gifts!

On August 12th, 2013, the twitter chat forum, #gardenchat, was hosted by @TroyBilt and there were a few easy rules to follow for a chance to win. I heard via other tweeters that the prize being offered was a pair of pruners and loppers! Needing a new pair of pruners and loppers and having always heard great things about TroyBilt products, I was eager to participate!
The question that began the #gardenchat and entered participants for a chance to win: “What do you love most about summer gardening?” Me: “I love the garden to table experience!” Then, there were several questions that focused on specific topics, one of which was about deadheading flowers, to which I responded, “A4: I never deadhead flowers from my Rosemary hedge, here in zone 7, and it thrives as an evergreen. I prune for kabob skewers!” It is a true answer. You’ve seen my post about Chicken Kabobs on Rosemary Branches? Love!
The next day, I was notified that I’d been chosen at random as the winner by Bren of BGgarden.com and @BG_Garden, the admin and number1 fan of #gardenchat and @TheGardenChat.
A few days later, I received two big boxes! TroyBilt sent the fabulous pair of bypass pruners and bypass loppers from the contest, and to my total surprise, they also sent additional tools, including: weeding knife, hand cultivator, flower trowel, planting trowel, and weeding blade!
I cannot say enough good things about the tools I received! They are wonderful!! Beyond having sharp blades and sturdy construction, they are so comfortable to use and look great! The grips on the tools feel great in my hand, and the angle of the handles is just perfect! I’ve been working in my garden everyday since receiving the new tools!

Here, (^), you can see that my apple tree has suffered some branch breakage due to the weight of its apples that are ripening. Those splintered, broken branches certainly weren’t healthy for the little tree, but my new TroyBilt bypass loppers made nice, clean cuts for me that are much better for the tree! With such great leverage, sharp blades, and comfortable grips, I swear it was as easy as cutting softened butter!! I will no longer look at pruning my fruit trees the same! 🙂

Here, (^), you can see how happy my roses are after deadheading with my new TroyBilt bypass pruners! I wish I’d of thought to get a “before” photo of the roses, but I’ll certainly show you how it will have a new flush of blooms, later, as they continue to perform!
As I’ve become more familiar with Twitter, I’ve discovered just how wonderful and supportive the #gardenchat community is with eachother It is such a great group of gardeners! . . . so eager to share eachothers’ pretty pictures and bounce around ideas! You’ll definitely see my new TroyBilt tools continue to appear in my photos and gardening posts!
In this new age, word of mouth marketing matters when you trust the source, and I assure you, I am SO PLEASED with my TroyBilt tools! I highly recommend TroyBilt to help you meet your gardening needs!
To order your TroyBilt Tools directly from TroyBilt, visit:
TroyBilt.com
I believe you’ll appreciate the quality as much as I do!! Love!!
Later ‘gators and afterwhile crocodiles!
Your Friend,
~Amber Hamilton Henson
The post will link to other blogs; you can find the links:
Arkansas Women Bloggers’ Sunday Link Up
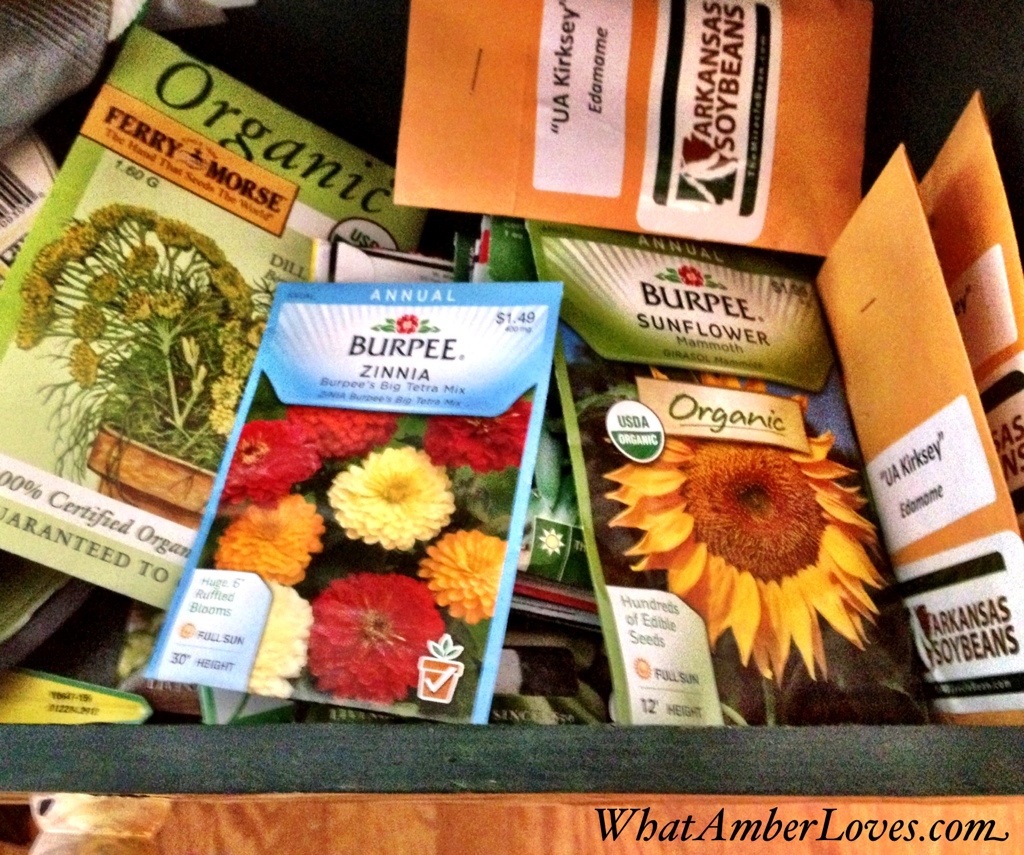
Seed Storage
I like themes. I like organization. So, when I recently found this primitively painted garden theme wood cabinet at a thrift store, I knew I had to have it, and I knew exactly what I would store inside the decoratively painted cabinet: SEEDS!
(You can click on photos to enlarge them into a new window.)
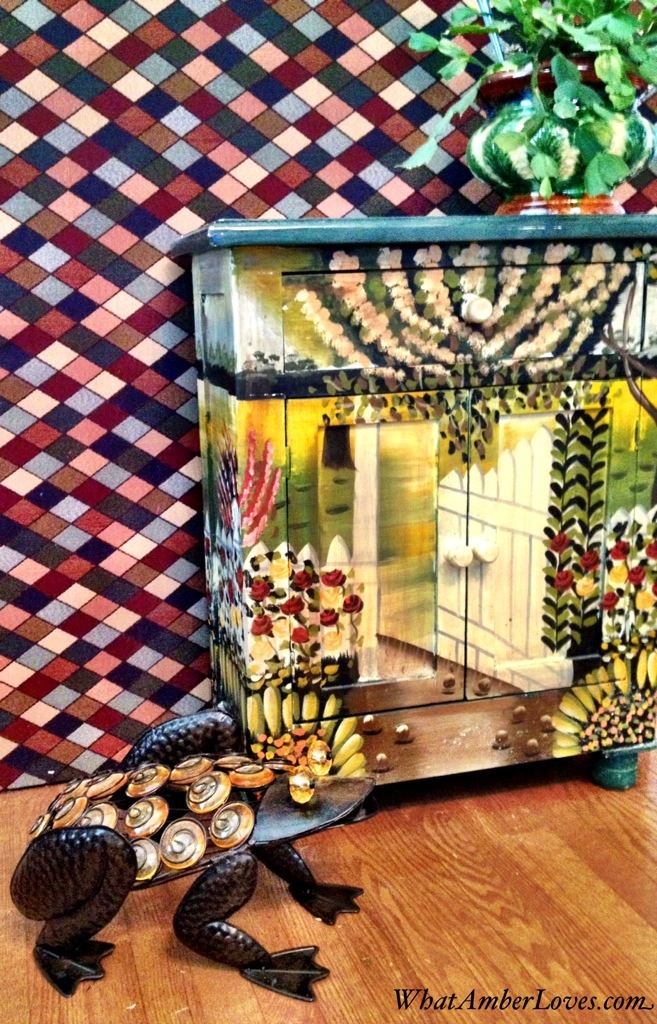
Isn’t it something?! It’s quite colorful, isn’t it?!

The top drawer holds all of my seed packets that I’ve yet to plant, and the doors hide away tags from plants and seeds that I gather (save) each season for re-planting. Speaking of seed saving, do you see my University of Arkansas (UA) soybeans? I didn’t make space soon enough to plant them this year, but I will next May, hopefully? Did you know that the UA is now the nation’s leading traditional soybean breeder? There are non-GMO, traditionally bred UA Kirksey Edamame (young, green) soybean seeds in my drawer, here! Yes, that’s right! UA is breeding varieties of soybeans that compete with the biotechs in that UA seeds have the huge advantage of allowing farmers to save their seed for re-planting without having to pay annual royalties for saving the seeds to re-plant, I hear! Awesome, right?! 🙂 🙂 You can find links and a lot more information about these and a wide variety of other soybean industry links at the Arkansas’ Soybean Promotion Board’s site, TheMiracleBean.com and on their Facebook Page, Arkansas Soybeans.
This painted cabinet also holds my seeds and findings for seed jewelry. Yes, jewelry. I’ll show you my seed saver necklace in another post, sometime! Remember, I assemble lots of jewelry; you can see it here and here.

Want to see the rest of my library? If so, see it here, and here is a photo of some of my absolute favorite gardening books and P. Allen Smith cards on one of the library shelves:

Do you keep seeds?
If so, where?
I’d love to see your organization solution in the blogosphere!
Your Friend,
~Amber Hamilton Henson
Self photo of the day:

This article was also published within international Hat Trick Magazine! To read an online copy of the magazine, just click on the magazine cover below this text!

Sunday Stroll 1
. . . just enjoying a leisurely walk in the neighborhood this afternoon. “Sunday Stroll” ~Amber


Linking to:
Arkansas Women Bloggers’ “Sunday Link Up”
Wordless Wednesday
Wordless Wednesday 1

(My garden, me, and a statue in front of a painting by me; edited on iPhone with picblender app and picframe app.) ~Amber
Chicken Kabobs on Rosemary Branches
Do you grow your own Rosemary? In USDA zones 4-6, Rosemary grows as an evergreen. Being in zone 7, Rosemary makes an absolutely lovely hedge. Our Rosemary hedge is in front of our house near the pathway leading to the front door. When the wind blows, the fragrance is sooooo refreshing. I’m always looking for more ways to use Rosemary, and here is one of my favorites: Using rigid branches as skewers for kabobs! It lends a wonderful hint of Rosemary flavor to the chicken without adding Rosemary to the marinade, even more so, if you leave the Rosemary leaves on the branches!
(Clicking on photos will enlarge them.)


RECIPE
1/4 cup vegetable oil
1/3 cup honey
1/3 cup soy sauce
1/4 teaspoon ground black pepper or red pepper (preference)
8 skinless, boneless chicken breast halves – cut into cubes
2 cloves garlic
5 small onions, cut into 2 inch pieces
2 red bell peppers, cut into 2 inch pieces
Rosemary Branches or skewers
In a large bowl, whisk together oil, honey, soy sauce, and pepper. Before adding chicken, reserve a small amount of marinade to brush onto kabobs while cooking and more to use as sauce for brown rice, if desired as a side dish. Place the chicken, garlic, onions and peppers in the bowl, and marinate in the refrigerator at least 2 hours (the longer the better). Skewer onto rosemary branches right before baking!
I bake the kabobs in the oven at 350F on a pan that drains or raised rack. I cover the entire pan with foil and bake until the chicken is done, brushing with reserved marinade occasionally. (The length of time needed for baking will vary according to the size you cut your chicken cubes; larger cubes will need longer cooking times.) Wen the chicken is done, I remove the foil and turn on the top broiler for 3-5 minutes to finish the edges! 🙂 YUM!
Enjoy!

^a selfie photo of me and our Rosemary hedge (edited on iPhone, using PicBlender app)
This blog is still currently being created and written via iPhone and iPad!
(Clicking on photos will enlarge them into a new window.)
Your Friend,
~Amber Hamilton Henson
PS
This post will link to blog linkup parties, the party links:
Arkansas Women Bloggers’ Sunday Link Up
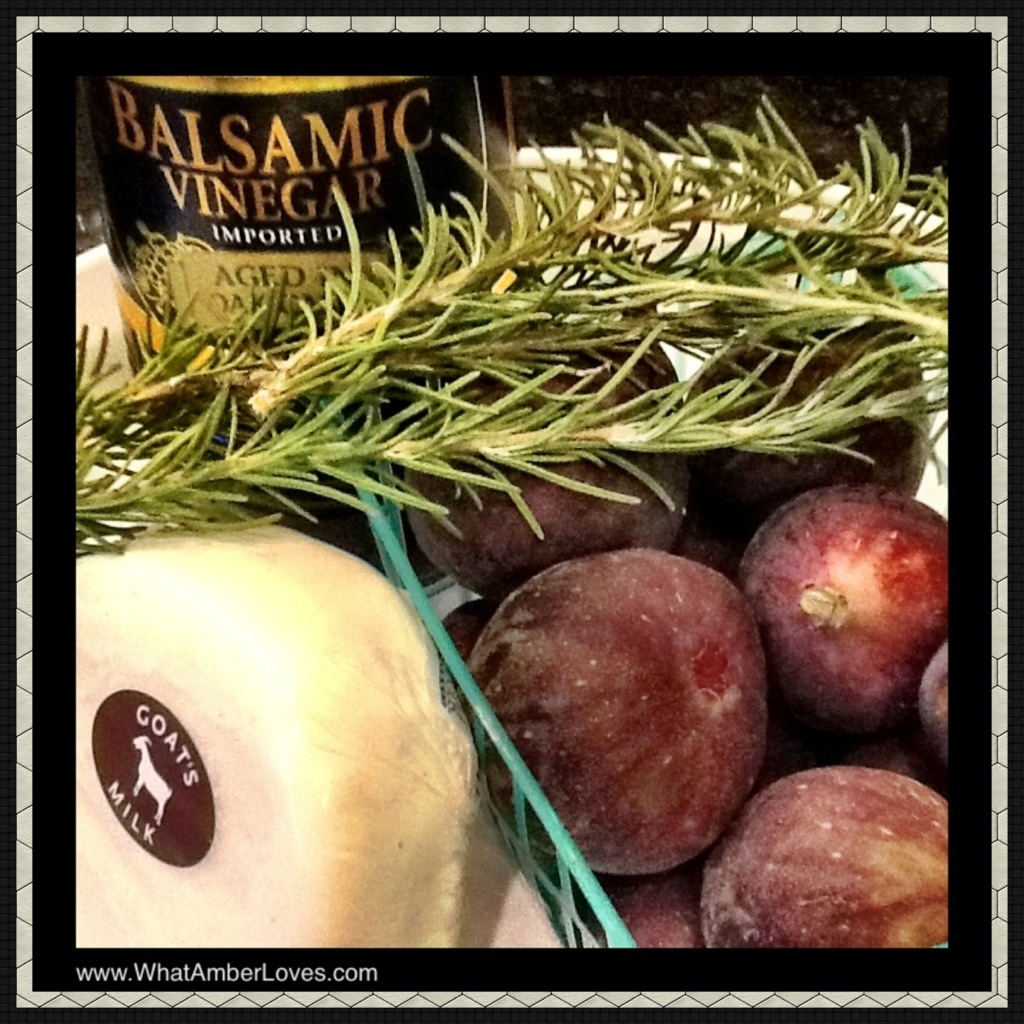
Fig, Rosemary, Goat Cheese Tart

Fig, Rosemary, Goat Cheese Tart:
What happens when fig, rosemary, goat cheese, balsamic, and honey party together in a tart? OMG. Crazy yumminess. Words fail me when trying to describe just how much I enjoy the combination of these flavors.
First, I’ll tell you how it’s made, then add a few photos! K? K!
INGREDIENTS:
1 unbaked pastry pie shell of your choice
figs, cut into thin slices (about 2-3 cups)
3 Tbsp sugar
1/8th cup good balsamic vinegar
1/8th cup local honey
2 tsp finely chopped rosemary
1 Tbsp cornstarch
goat cheese (about .33 lb.)
DIRECTIONS:
Preheat oven to 425 F.
Sprinkle small crumbles of cool goat cheese across the pastry shell.
Combine balsamic vinegar, honey, sugar, and rosemary, stir, and pour over sliced figs in a bowl (I used a large measuring cup).
Allow the mix to macerate the figs for about 15 minutes.
Carefully pour about 1/8 cup juice out of the mix and stir in 1 Tablespoon of cornstarch, then return to mix of figs, carefully coating all slices.
Pour fig mix over goat cheese into pastry shell.
Bake at 425 F for five minutes, reduce heat to 350 F and bake an additional 15 minutes.
Enjoy warm! (We did!)
Now the photos:
Click on photos to enlarge them into a new window!


Your Friend,
~Amber Hamilton Henson
PS
This post will link with other blogs; visit the link up parties:
Arkansas Women Bloggers’ Sunday Link Up
iShouldBeMoppingTheFloor’s Inspiration Monday
Saving CHIVE Seeds

Tonight, I shook and sorted my CHIVE seeds. Soon I’ll lift and divide my chives. Here in US zone 7, there are two easy ways to propagate edible CHIVES: by seed and by division. Lifting and dividing them is pretty much the same process as ornamental grasses, except that I divide my chives in the fall! 🙂
If you’re new to seed saving, Chives are a great seed for beginners to save!
As soon as the chives begin blooming, hopefully you’ll see lots of bee activity! The flowers are great on salads, but if you refrain from eating all of the CHIVE flowers, you’ll enjoy lots of seeds for future planting!
Here in Zone 7, even in a container, my chives behave as perennials. They lay flat and lose some color during a hard winter, but dependably send an abundance of new stalks up each spring! Even though I have plenty of chives, I enjoy saving the seeds, since it so easy. Chive seeds are great to bake into bread, take to seed swaps in the spring, give to friends, or make new little plants in pots as gifts! So many uses!!
Here is photo that shows how I save chive seeds in a few easy steps!
(Click on photo to enlarge into a new window for easier readability:)

Wait for flowers to dry on the plant.
Cut.
Place in paper bag and put it somewhere away from direct sunlight.
Wait a few weeks.
Shake the bag, allowing seeds to fall out of dried flowers.
Then, Poke small holes in the bottom of the bag and
Shake out the tiny seeds into a bowl.
Store seeds until ready to cook (or plant them in early spring!)
Easy, right? Easy!!
🙂
Your Friend,
~Amber Hamilton Henson


