Funky Deco Vanity!

Even though our home decor overall is primarily a range of contemporary and traditional, if you read my belt chair tutorial, then you’ve heard that I like to have a few interesting “character” pieces of furniture in each room, too. In addition to our “regular” furniture, I try to have something antique, something mid century mod, and something a little funky in each room. I like contrast. Well, our master suite is not an exception. Our chests of drawers are contemporary, lamps are traditional, flooring style is modern, dark espresso, and the settee that we reupholstered is antique. Really antique; like early 19th century Italian antique. Also in our master suite is a vanity, now a funkier vanity. I’ll get around to photographing the rest of the room soon, but for now, I just want to talk about this deco vanity.
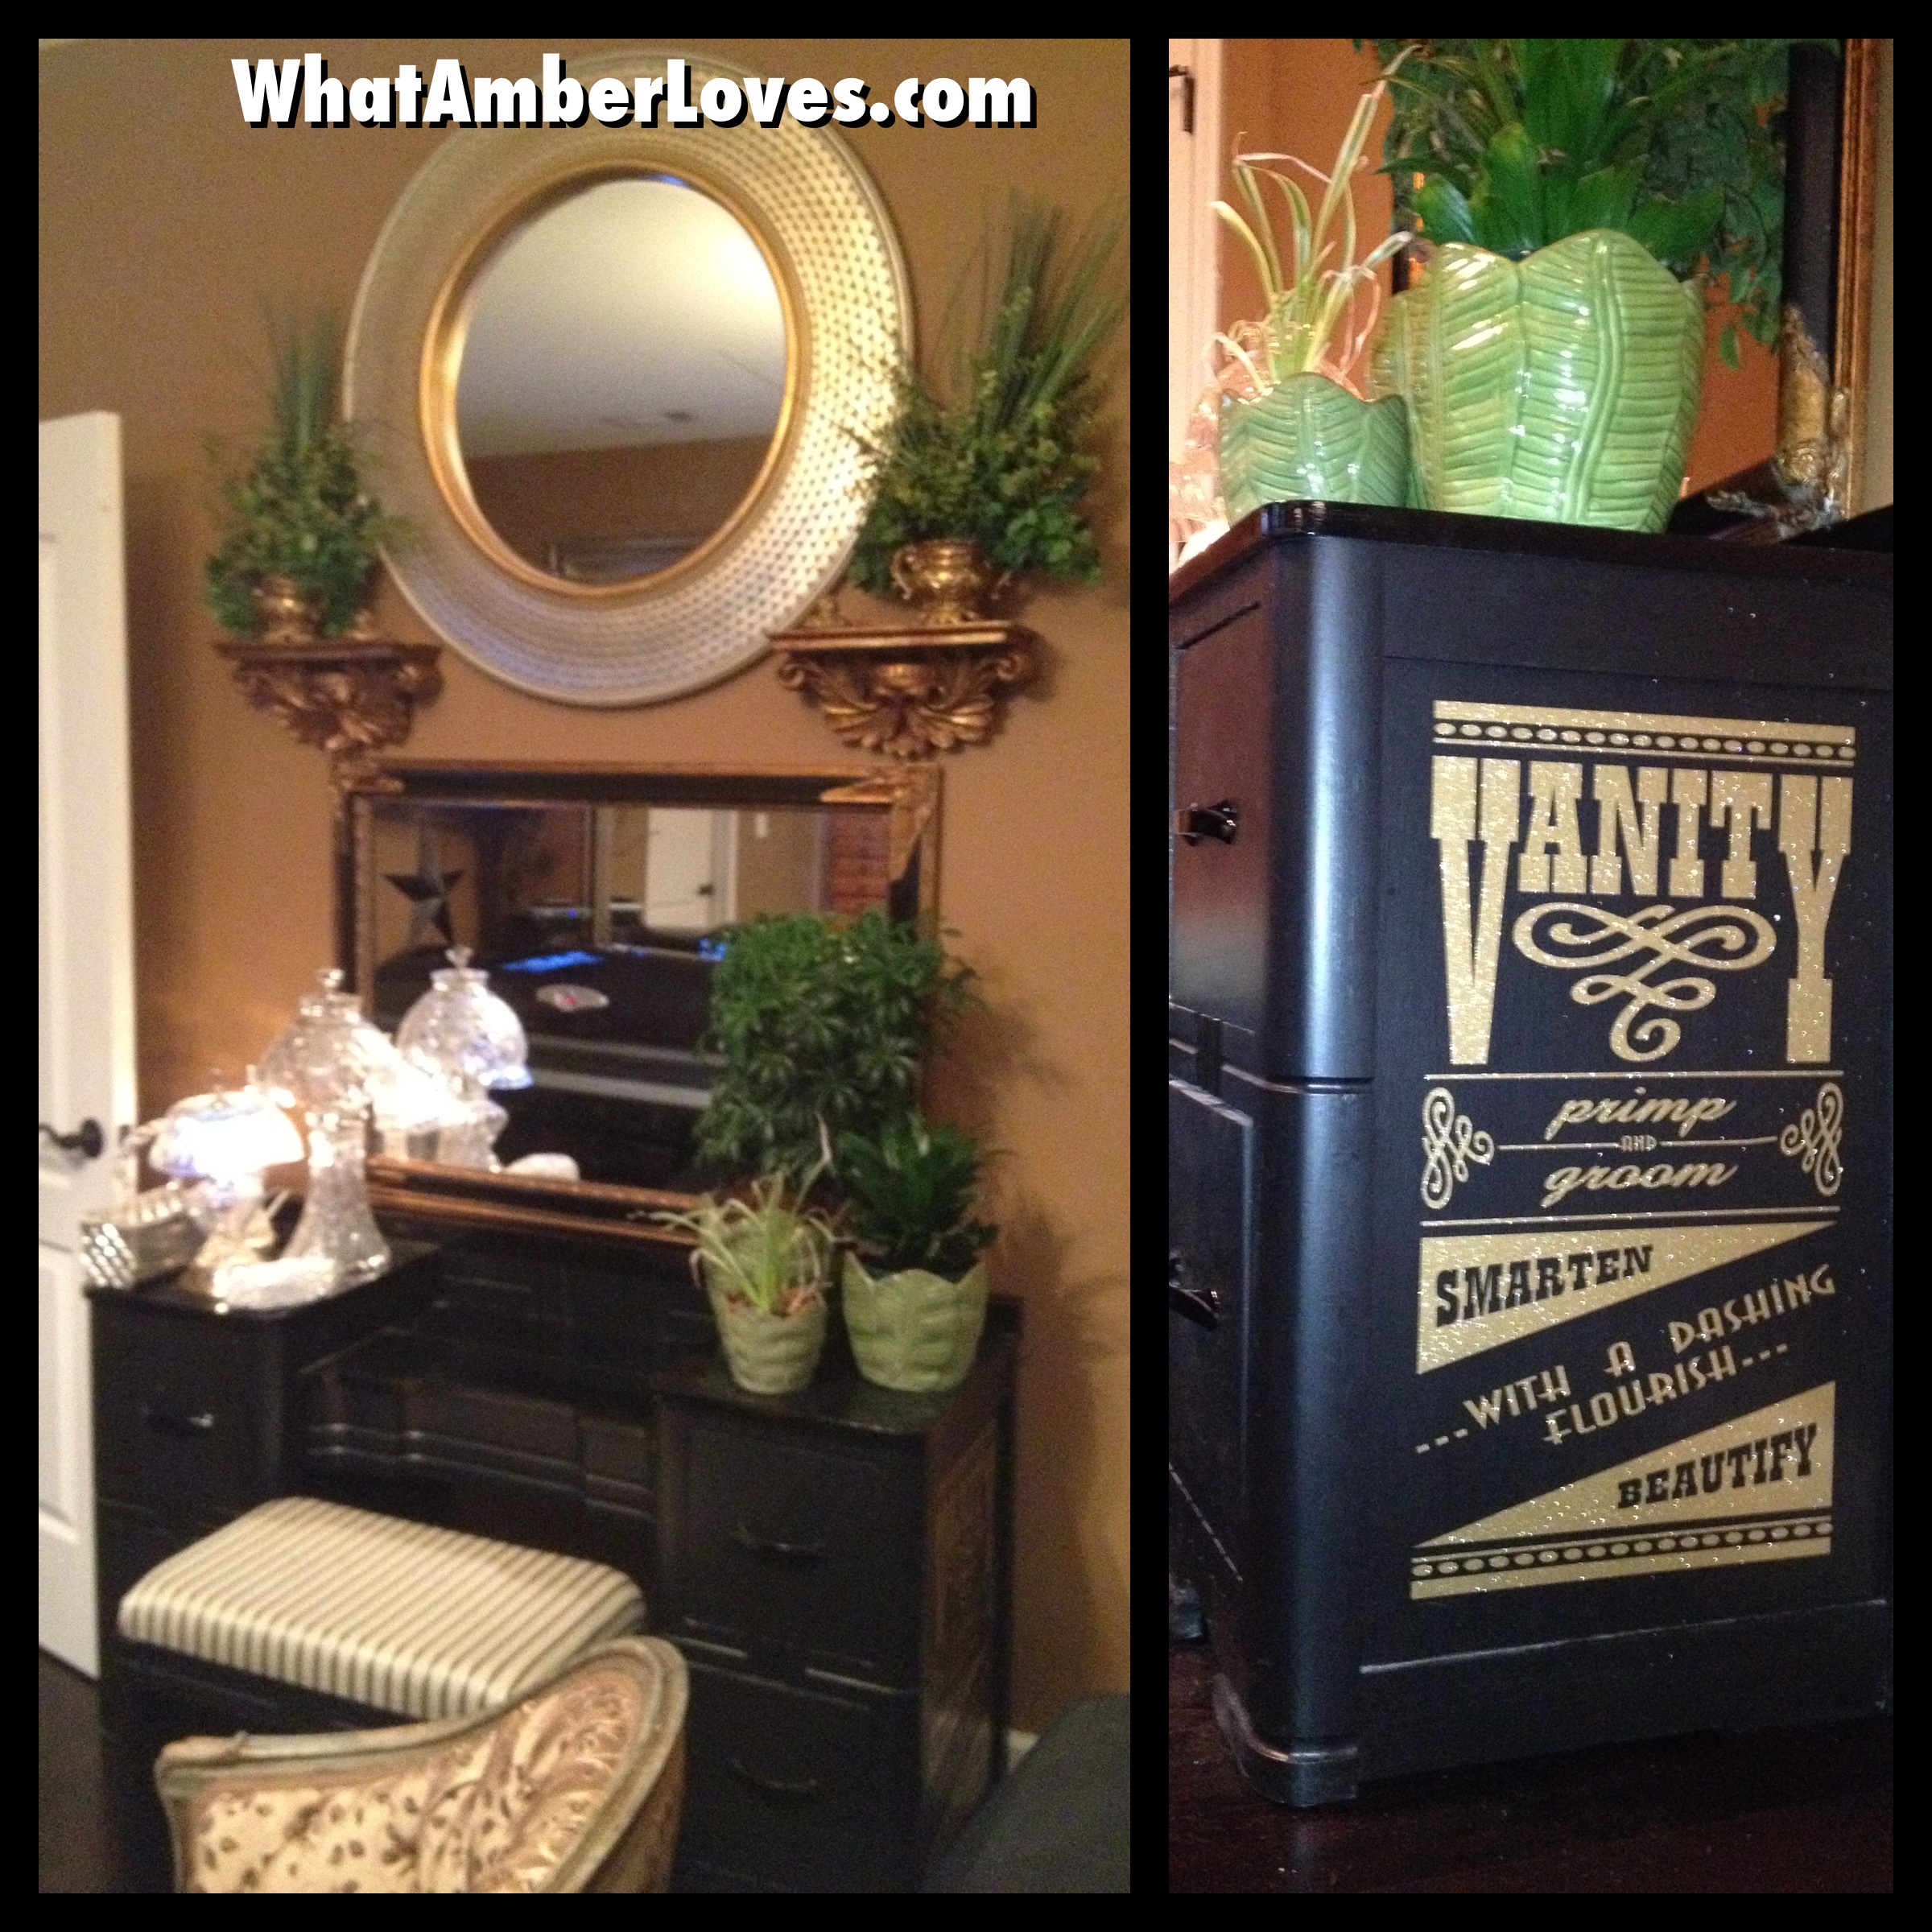
This vanity isn’t from a resale shop; it’s actually been handed down through the family. Perhaps my grandmother could tell us what its original stained finish looked like, but I’m pretty sure it had long since been painted over prior to my lifetime. By the time it was given to me, it was wearing a coat of pea green paint and had spent its last several years in my dad’s garage storing my little sister’s costumy “dress-up” stuff from her childhood. I really liked the lines and heft of the vanity. It’s BIG for a deco age vanity, and structurally it is in great shape, especially for being almost a hundred years old! Shortly after receiving it, several years ago, I painted it black. The sides and drawer fronts are FLAT black latex, and the top surface and hardware are HIGH GLOSS enamel.
Recently, I saw a few dresser conversions that really caught my eye and I just KNEW I had to add a bit of typography to a piece of furniture. (If you want to see what inspired me, hop over to Bliss Ranch and check out Bliss’s Libation Station created from an old dresser and her Kodak dresser! Amazing aren’t they?! Love it!) I was inspired by Bliss, but given that I have a one year old daughter underfoot, finding the time and space to paint by hand the way she does is difficult impossible for me at this stage. So, I did it MY way, with vinyl sign lettering that I cut using my sign machine. You know that in addition to being a stay at home mom, I freelance, selling and installing vinyl signs and vehicle graphics, right?
I wanted to stick with the “vanity” theme on the “vanity.” I brainstormed:
Vanity. Primp. Groom. Beautify. Smarten. …with a dashing flourish… Then, I created and installed the graphic. If you were just wanting to see the dresser and hear the history, you can stop reading now. However, if you want to see the sign vinyl process, here you go:
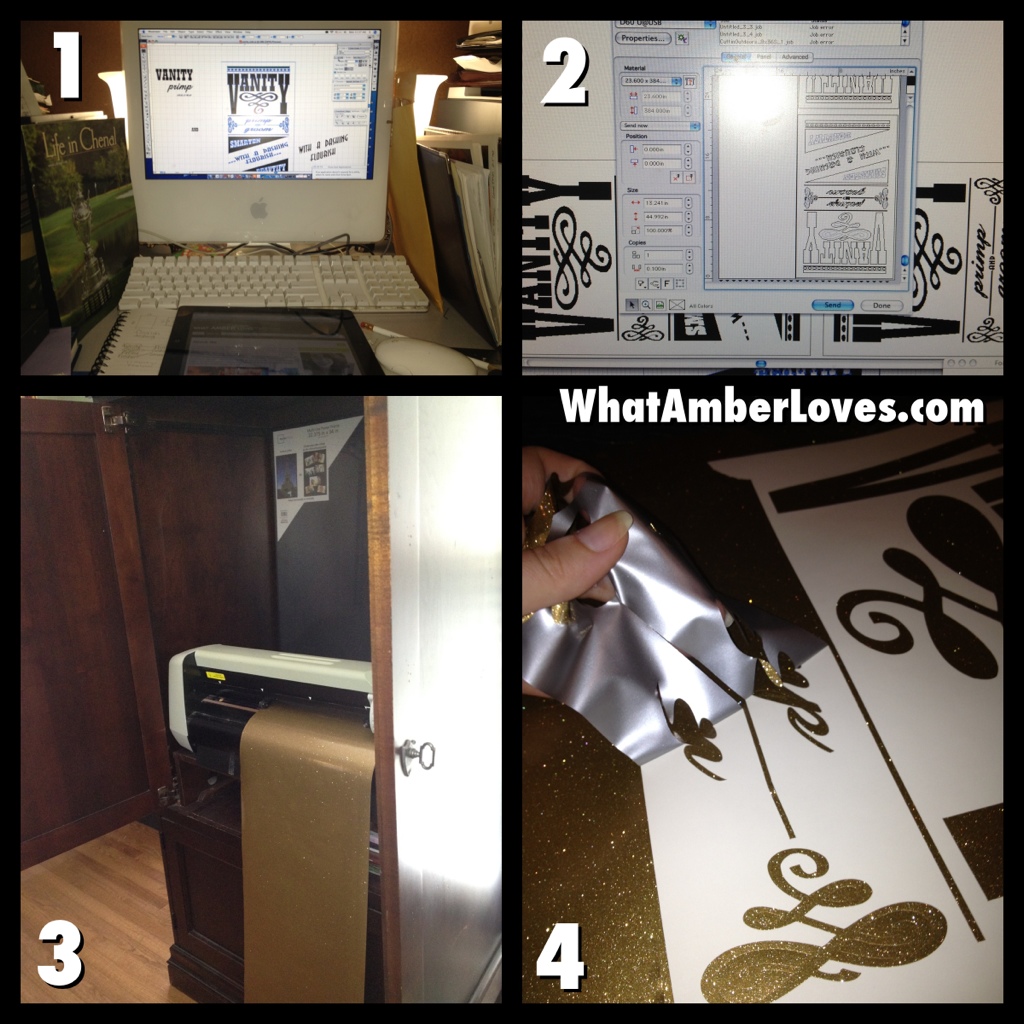
1) I designed the graphic in Adobe Illustrator.
2) I put the design in FlexiSign and sent it to my cutter.
3) Here is my machine cutting. It can cut any graphic up to 30 feet wide by 300 feet long. We keep our sign cutter in an armoire that used to hold our tv, but now all of our tvs are mounted to walls. It is a great way to hideaway the machine when it’s not in use, this is especially important to me, since it is in our front room/library/office at home.
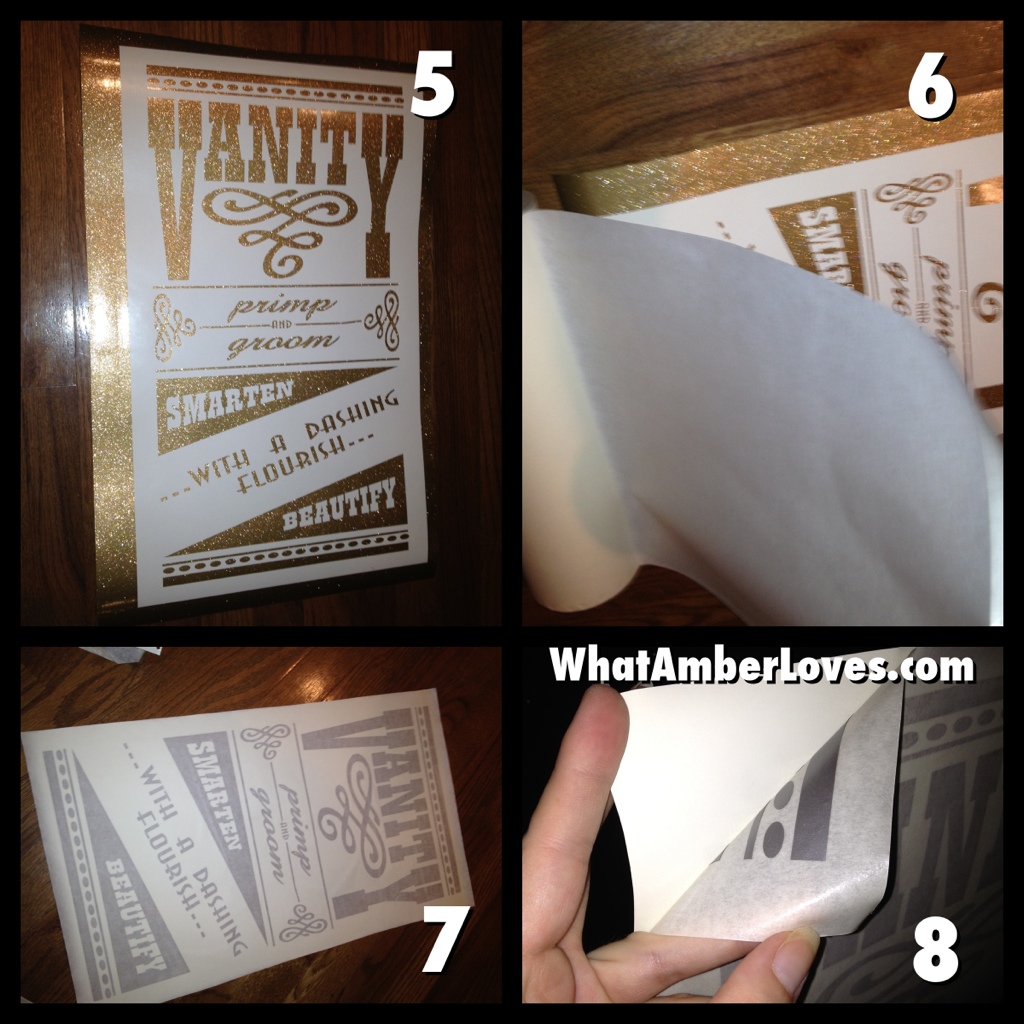
4) I “weed” the cut image. See, the machine doesn’t print; it cuts. The material is like big roll of stickers on a sheet of waxed paper backing. Through precision adjustment, the machine’s blade is set at an exact pressure that it will cut through the sticker (sign vinyl) without cutting the paper backing. So, I pull the excess away, by hand, leaving only the cut graphic on the waxed paper backing.
5) Here is what it looks like after the weeding process.
6) I “mask” the image. I cover the entire graphic in masking tape. Really wide masking tape. This is an essential step. It would be impossible to move and install each little piece individually and expect it all to line up properly. Covering it in masking tape allows me to move ALL of the letters at once.
7) It is a total of three layer at this point: paper, sign vinyl, and masking tape.
8) I peel away the waxed paper backing. Now, it is just the sticky sign vinyl and masking tape.
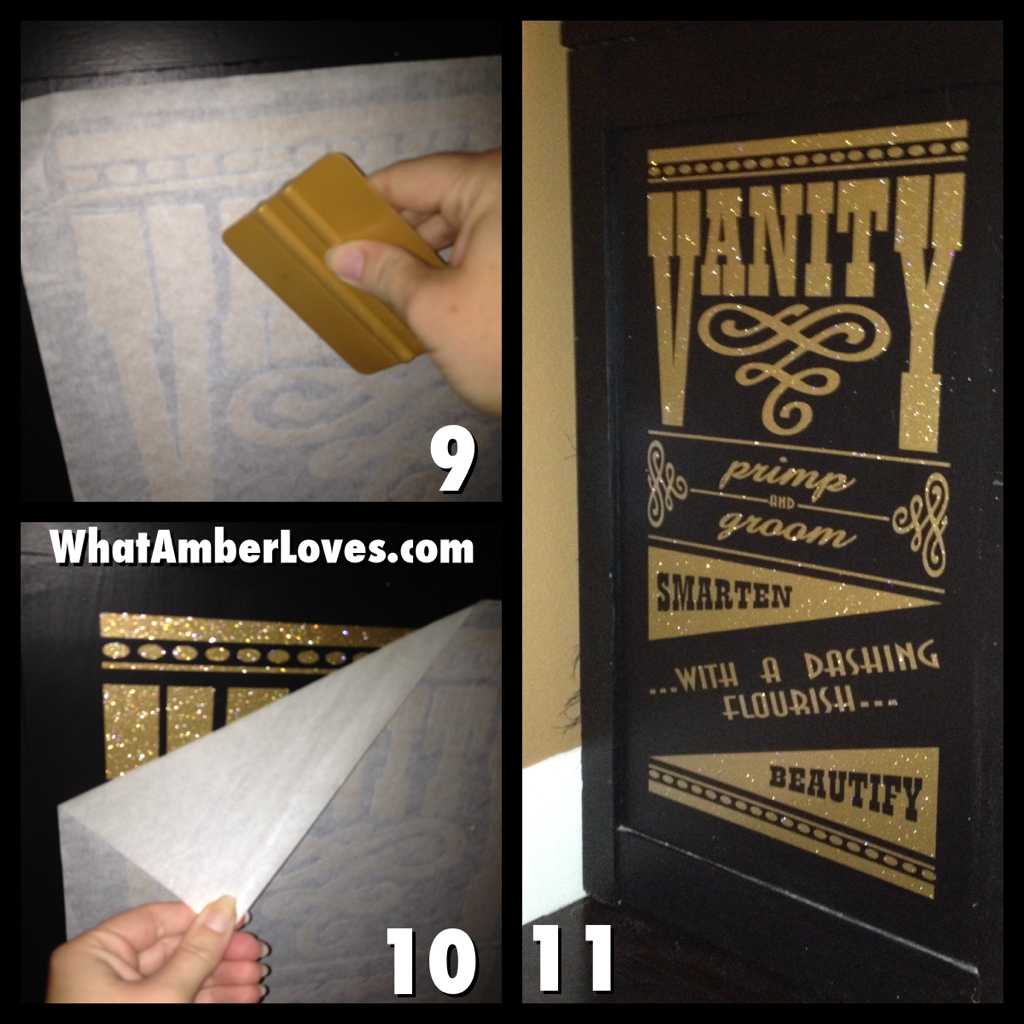
9) I stuck it to the side of the furniture and used a squeegee to smooth it all into place.
10) I slowly pull away the top layer of masking tape. See, the sign vinyl’s adhesive is MUCH stronger than the adhesive on the masking tape, so the masking tape pulls away leaving the sign vinyl stuck in place. Neat, huh? Now, you know.
11) The glittery, gold sign vinyl lettering is permanently adhered to the vanity!
At home, non-commercial, I use my sign machine for quotes on mirrors, labeling, kids’ projects, etc. I’ll show you some of that stuff later; for now, I’m tired of typing. 😉

Later!
Your Friend,
~Amber Hamilton Henson
PS
Like this post? If so, check out my DECOR & CRAFTS page and click on links to my other projects.
I’m linking this post to a few, fun linking parties that showcase other great projects! The links to the parties will be updated everyday this week: (as always, if this post is featured,the hostess’s button will be attached to this post AND my shares page!)
MONDAY
Make The Scene Monday @ AlderBerryHill
Masterpiece Monday @ BoogieBoard Cottage
More the Merrier Monday @ DIY Home Sweet Home
CraftOManiac Monday @ Craft O Maniac
Tutorial Link Party @ Mad in Crafts
Mod Mix Monday @ Mod Vintage Life
TUESDAY
Be Inspired @ Elizabeth and Co.
Talent Tuesday @ Vintage Wanna Bee
Nifty Thrifty Tuesday @ Coastal Charm
All Star Block Party @ Full Circle Creations
Twirl and Take a Bow @ House on the Way
WEDNESDAY
Wow Us Wednesday @ Savvy Southern Style
Primp Your Stuff @ Primp Junktion
Whatever Goes Wednesday @ Someday Crafts
Link Party @ Lil Luna
Wicked Awesome Wednesday @ HandyManCraftyWoman
THURSDAY
Transformation Thursday @ The Shabby Creek Cottage
Creative Juice Thursday @ Momnivore’s Dilemma
Time Travel Thursday @ The Brambleberry Cottage
FRIDAY
Catch as Catch Can @ My Repurposed Life
Link Party and Mes Preferes @ ReDoux Interiors
Tickled Pink @ 504 Main
PotPourri Friday @ 2805
Furniture Feature Friday @ Miss MustardSeed
SATURDAY
Saturday Nite Special @ Funky Junk Interiors
Weekend WrapUp Party @ TatorTots and Jello
Get Schooled Saurday” @ Too Much Time
SUNDAY
Sunday’s Best @ My 1929 Charmer
Sunday Linky Party @ PetiteHermine
Sunday’s Best @ My 1929 Charmer
Share this:

Posted on August 13, 2012, in Uncategorized and tagged art deco, deco, gold glitter, Vanity, vinyl lettering. Bookmark the permalink. 23 Comments.


Awesome Amber, i love it! Being able to add graphics your way is one reason I want a vinyl cutting machine. Thank you for the shout out.
Bliss
So cool!! You are so talented, Amber!!
P.S. I can’t reply to the email you sent me as you are a no-reply blogger and there is no place on your blog listing your email address.
Bliss
That vanity is FABULOUS! I love the pop of the gold graphics against the shiny black. You did a great job on this transformation.
Love what you did with this! It looks so classy!
Very cool! You did a great tutorial. I wish I had a silhouette now! I’d love for you to share this at my blog party, Twirl & Take a Bow at http://www.houseontheway.com. It’s every Tuesday. I hope you can stop by!
Leslie
Gorgeous. I think I need one of those machines!! Thanks for sharing at the All Star Block Party.
It looks great! I love it. Thanks for sharing at the All Star Block Party.
Beautiful look, love your transfers.
I have a deco vanity in my garage right now that has been nagging me about what to do. I love this and I hope you don’t mind my “copy”.
I love it….how I wish I had a vinyl cutting machine, nothing would be safe around me if I did…lol I just love it… thanks for sharing at the ALL STARS BLOCK PARTY!!! 😉
Carri
simplydonewright.blogspot.com
Oh wow. that came out fantastic!! Come link it up with us: http://www.finecraftguild.com/party/
Rose
Your vanity is fantastic! You cutting machine really works wonders, doesn’t it? Thank you for sharing your project at Potpourri Friday at 2805!
What a clever transformation!
I really like that! So cool how you did it!
Very cool! And thanks for sharing the details!
Gorgeous, love how you added the graphics. So want a cutting machine but are so expensive! Love how the gold graphics pop against the black! Thanks for sharing your creative inspiration with Sunday’s Best – you helped make the party a success!
Wow – this is extraordinary – beautiful job!
Nicely done, Amber! Found you through Bliss.
How cute! Thanks for sharing! -K
Saved as a favorite, I love your site!
Pingback: Wall Collage of Frames, Mirrors, & Quotes « what AMBER loves
Pingback: Master Bedroom Tour « what AMBER loves