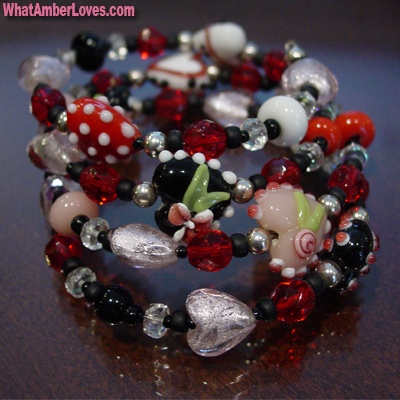
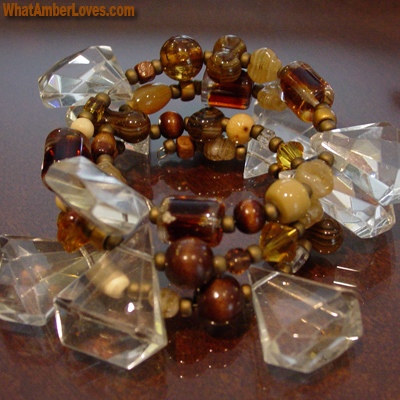
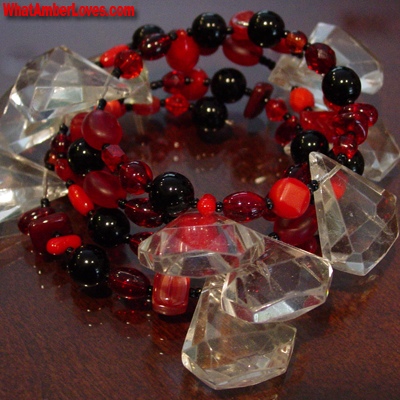
I make bracelets!
I make jewelry. I make A LOT of jewelry. I don’t sell it, ever. I just make it to wear and give as gifts.
By comparison to those of you that are silversmith-ing and lampwork-ing to actually fabricate these beautiful beads, perhaps I don’t “make” jewelry. I “assemble” jewelry. There we go, I assemble jewelry. I assemble jewelry!! 😀
My materials of choice are almost always glass beads, preferably lampwork glass, stone beads, and memory wire. I like working with memory wire because of the simplicity of wearing memory wire jewelry. No clasp is required on memory wire bracelets! How awesome is that?! Given that I keep my nails fairly long most of the time, I have zero interest in fumbling with a clasp on a bracelet. Memory wire is the perfect solution, and it is available pretty much everywhere: big box chain stores, local bead stores, online, etc.

So, like I said, I work primarily with stone and glass. There is something really fantastic about feeling the coolness of stone against my wrist or neck that makes it a really desirable material to work with, and I am absolutely fascinated by the attention to detail that is used to create little lampwork beads. Seriously, an artisan uses a torch and little, tiny rods of glass and makes each bead by hand. They are like little bitty unique works of art.
Where do I buy my beads? For my stone beads, I shop at a local, small business pretty regularly: Argenta Bead Company in North Little Rock, AR. For my artisan lampwork beads, I use ebay to buy directly from the artist, whenever possible.
With lampwork beads, you can find beads to suit any sort of theme. Some of the handmade beads are more massed produced and ship internationally, but some are truly spectacular little one of a kind works of art being created in people’s at-home-studio-spaces. Prices vary.
You’ll notice that I like use both really big and really tiny beads on every bracelet, and I try to use a contrast of matte and shiny beads, as well. Here are a few examples of some of the bracelets I’ve created :


Okay, that is all. I assemble jewelry. A link to this post will be maintained on my “Decor and Crafts” page. Check that page for more of what keeps me occupied, or check “my Kitchen” for links to my recipes.
“Later Gators!” and “Afterwhile Crocodiles!”
Your Friend,
~Amber Hamilton Henson
If you’ve been following my site, you know that I like linking to parties:
MONDAY
Make the Scene Mondays @ AlderBerryHill
Masterpiece Monday @ BoogieBoardCottage
Mod Mix Monday @ ModVintageLife
Mad Skills Tutorials @ MadInCrafts
Party Time @ Craft-O-Maniac
TUESDAY
Be Inspired @ ElizabethAndCo
THURSDAY
Tutorials, Tips, and Tidbits @ StoneGableBlog
Transformation Thursdays @ TheShabbyCreekCottage
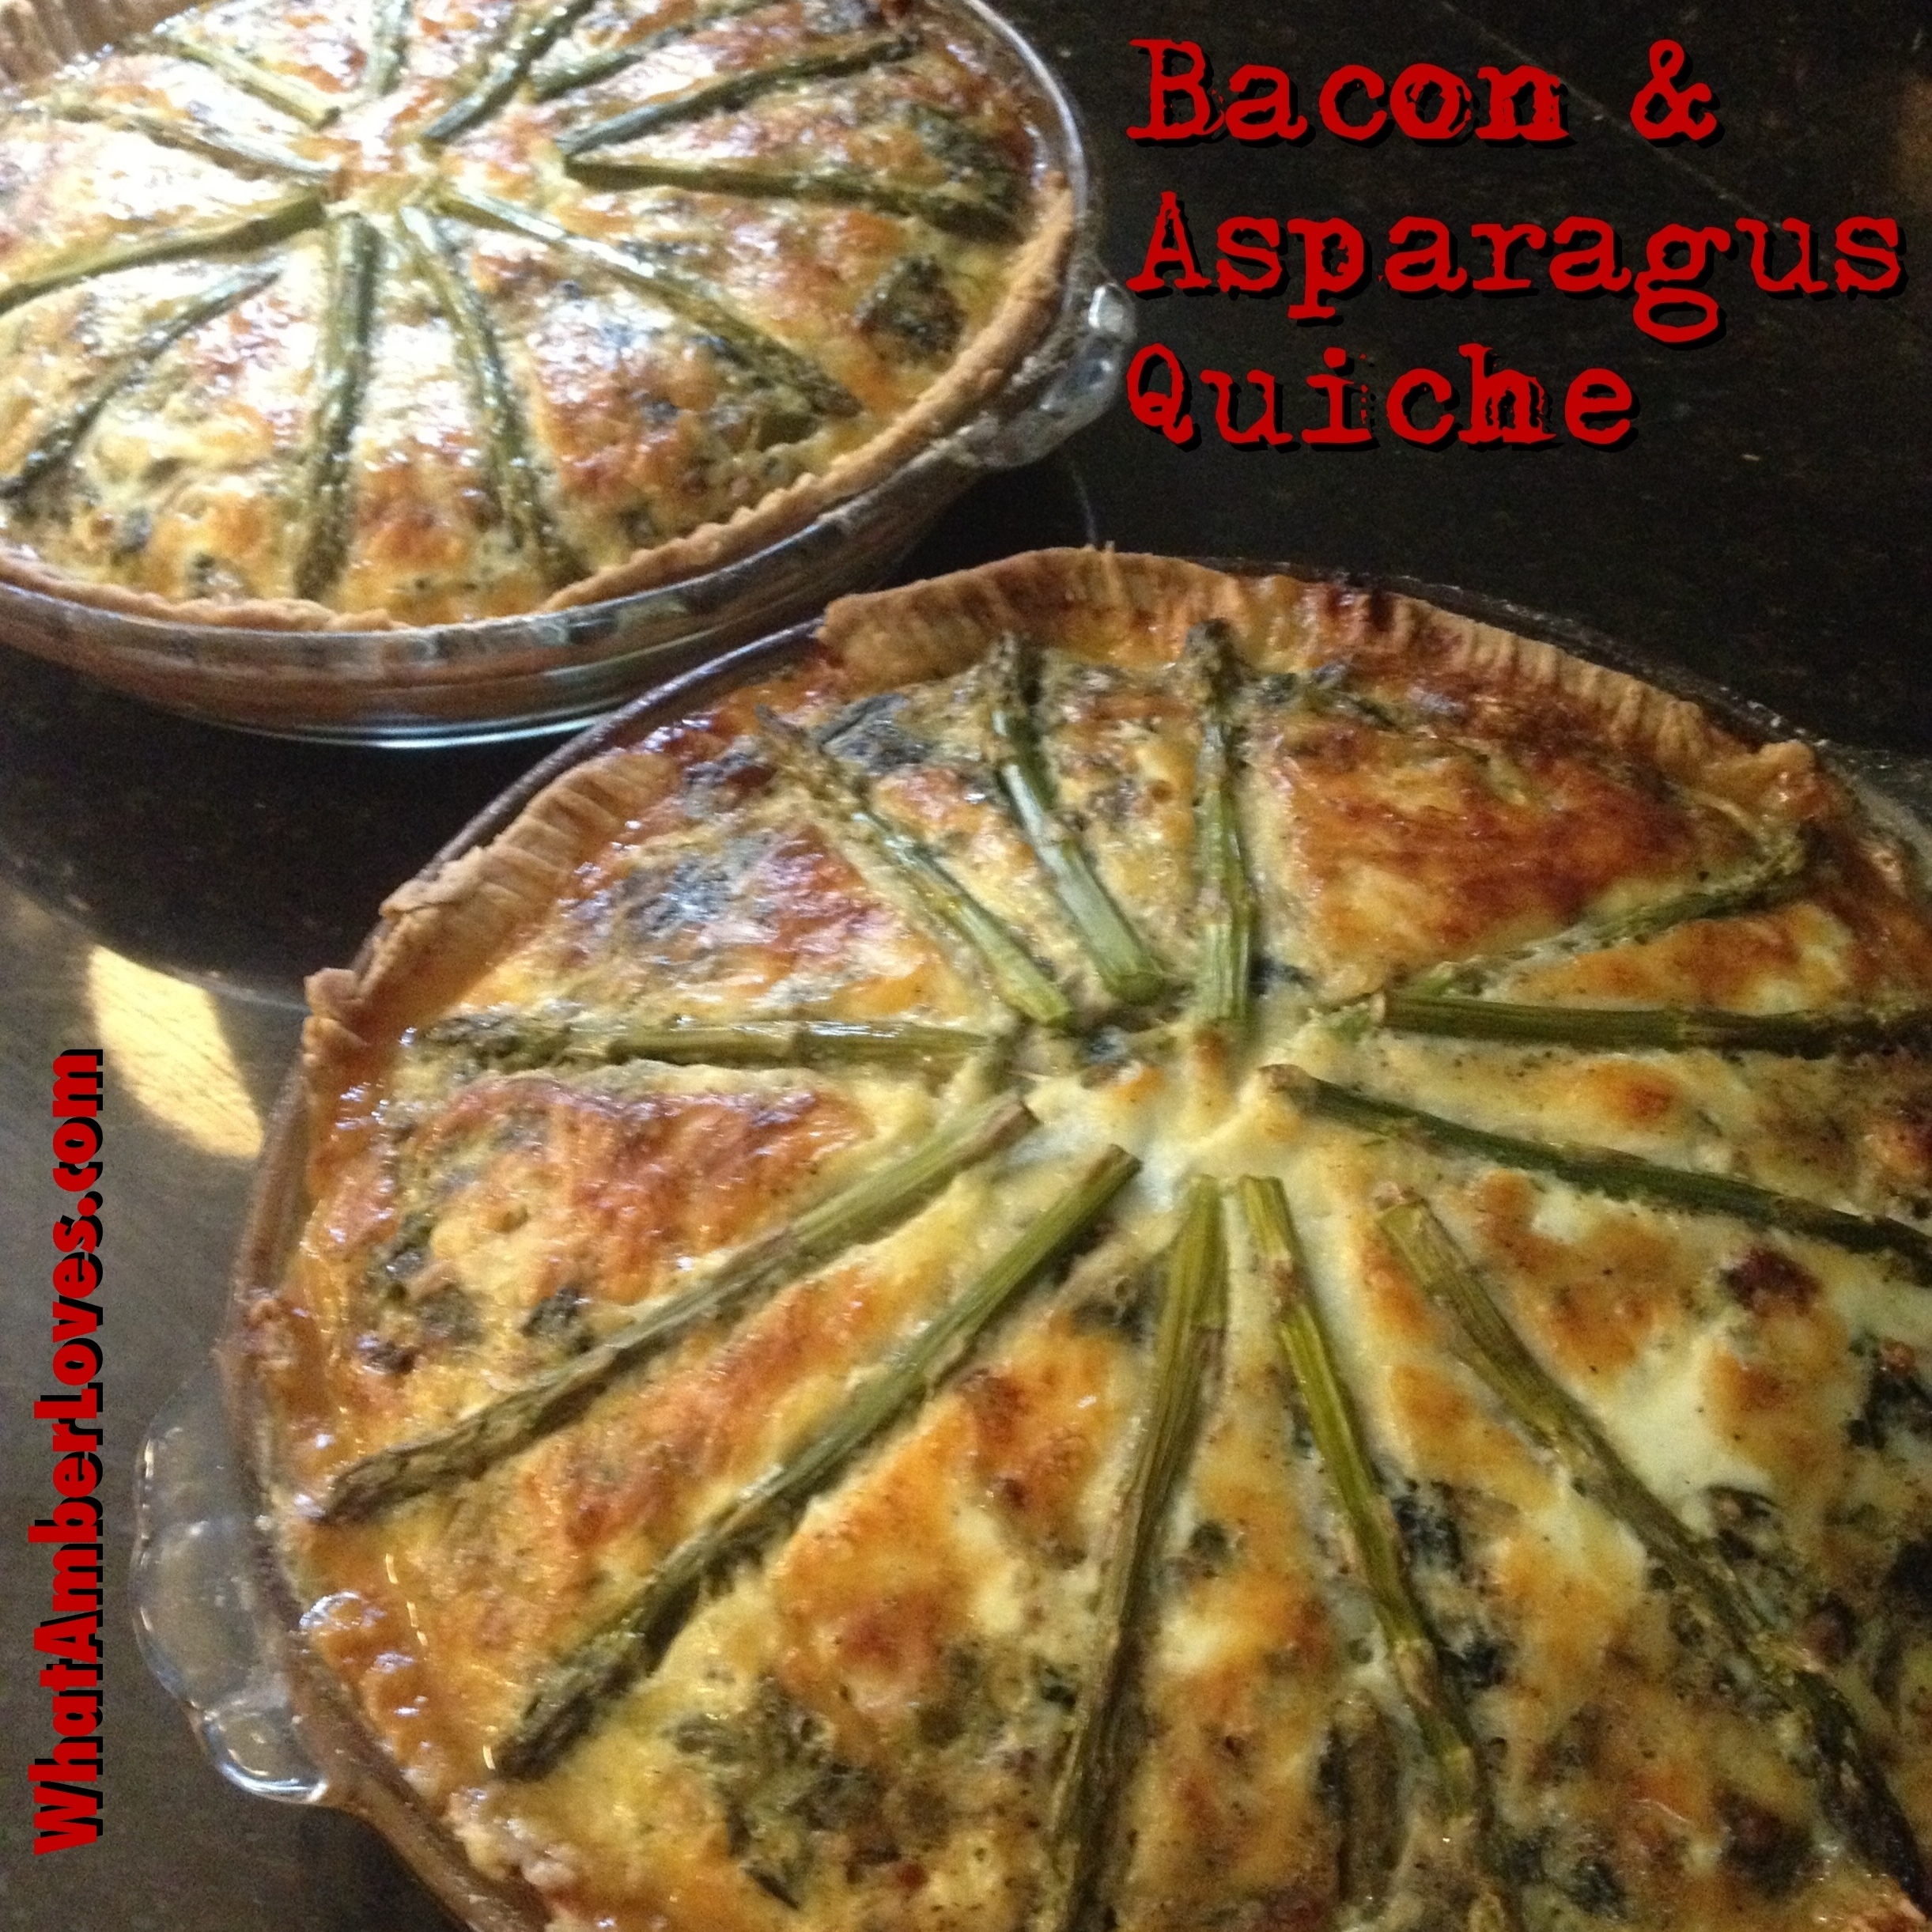
Quiche Lorraine: Bacon and Asparagus!
I really don’t intend for this to be a “food” blog, it’s just that right now, several projects are at midway points! …and, when I’m ready, I’d rather show THOSE projects as COMPLETE stories, instead of as bits and pieces. However, cooking meals is something that I do start and finish EVERYDAY; thus, posts are quick and easy to create. Tomorrow, I promise I’ll talk about something other than food. Maybe, I’ll talk about the jewelry I make or the crazy antique door that I bought, today. Idk. We’ll see… Tonight, though, we’re talking Quiche.
Tonight, I made Quiche for dinner, again, and liked it. Despite all of the “Great Value” staples that you see in my next photo, I’m actually NOT sponsored by WalMart (or anyone/company)for these posts. As of today, this is an un-monetized post. If that changes, I’ll let you know. WHY “great value” ptoducts? Easy: WalMart super center is like a block from my house, their products are sometimes like half the price of other brands, and for the most part, they’re more than satisfactory. When I prefer a “brand”, you’ll know via my link.;) k? K!
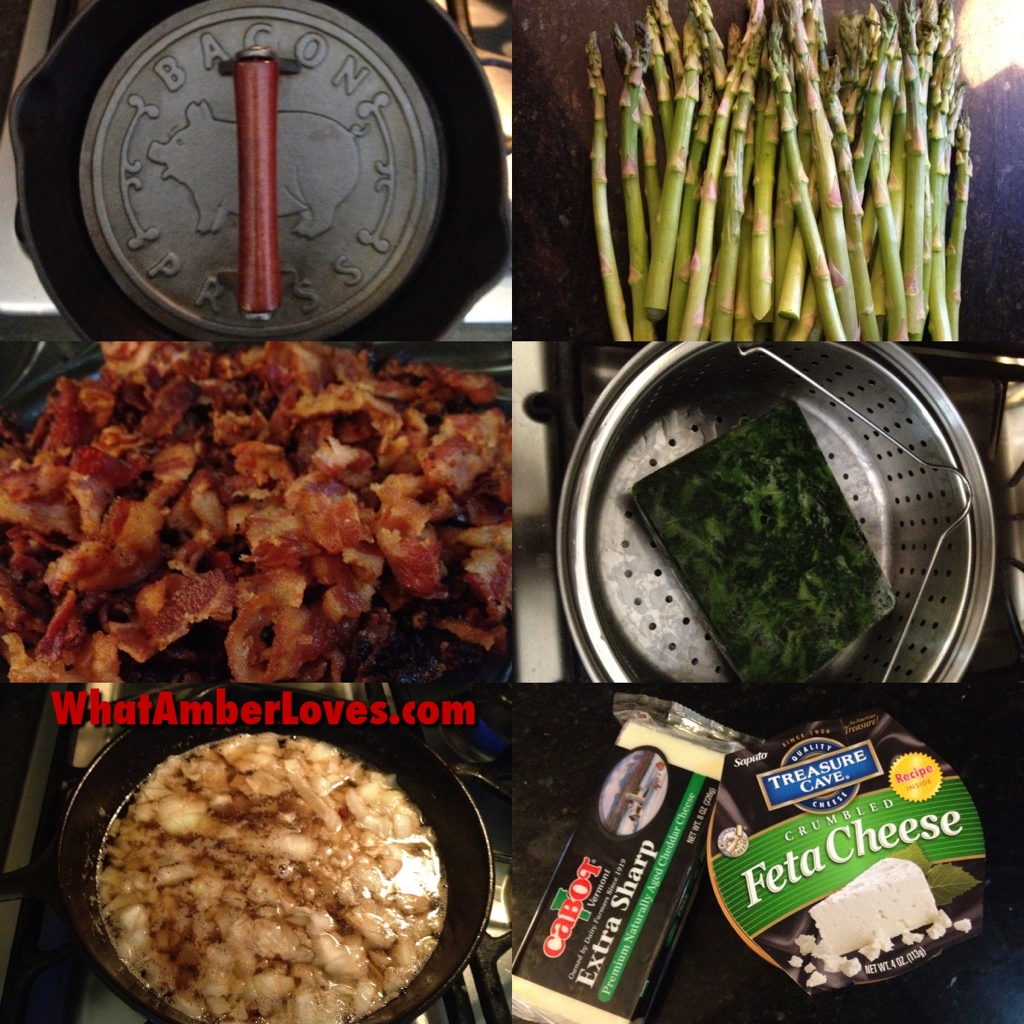
Tonight’s Dinner is Starring: Bacon, Asparagus, White Cheddar, Spinach, and Feta!!
I’m attaching my recipe, with photos.
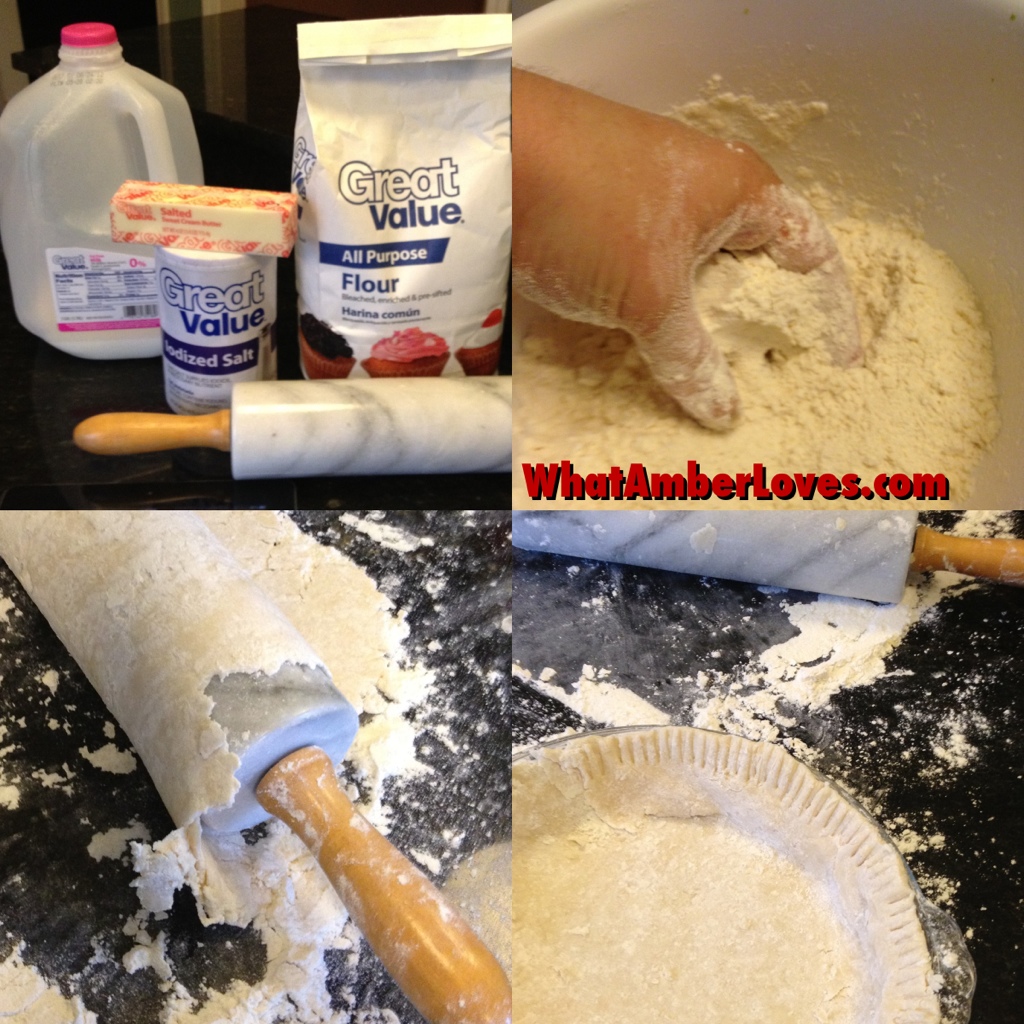
QUICHE CRUST:
1 cup of all-purpose flour, sift
3/4 teaspoon salt
1/3 cup butter room temperature
4 Tablespoons milk
* I combine the flour and salt. Using my hand, I cut the butter into the flour mixture until the butter seems to disappear, creating sort of a damp sand texture. I gradually pour the milk in, one tablespoon at a time while stirring the mixture with my hand. I grab the dough (still in the bowl) and mix with my hands, gently. I put the dough on my heavily floured countertop, put flour over entire rolling pin surface and roll it out, gently until it’s about ¼ inch thick and large enough for my pie dish. Carefully, I roll the dough around the rolling pin then roll it out over the greased glass pie dish. I then fold under the excess around the edges and press a fork around the edges. Repeat for the second crust.
QUICHE FILLING: (steps A, B, and C)
Part A:
2 packages of bacon, cooked thoroughly, and crumbled
(note: I use a cast iron skillet that was given to me by my Gram and an iron Bacon Press that I bought in Eureka Springs, AR, for best results. My Gram presses each piece of bacon individually with a fork while she cooks it. I wish I had her patience; I love using my bacon press. I wonder if she knows about bacon presses. The way she does it is great, always crispy; but a press would should give her back a few minutes of the day. Maybe I should get a bacon press for her, soon.)
1 diced onion, cooked in the remaining bacon grease
1 pkg of frozen spinach
1 bundle of fresh asparagus
(note: I steam my spinach and most of the asparagus, chopped, together in a steamer pot. I saved 12 spears per pie for decoration on top, after snapping off the coarse/fibrous bases of the spears.)
1 pkg of crumbled feta cheese
1 block of sharp white cheddar, shredded (save some to top the Quiches)
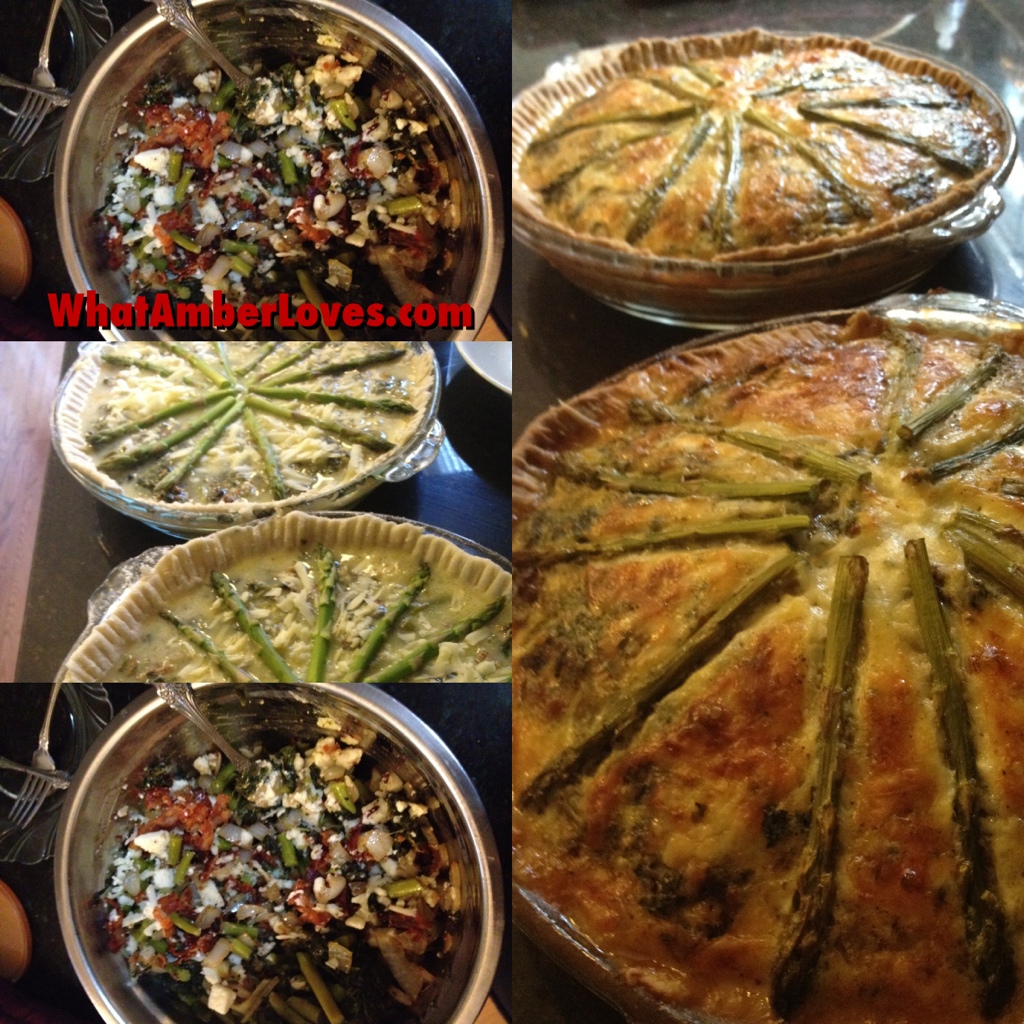
* Next, I combine all of the above ingredients in a mixing bowl, and transfer half into each crust.
Part B:
Mix together 8 eggs, 2 cups of milk and salt/pepper. Pour half over each quiche.
Part C:
Sprinkle remaining cheddar cheese on top of each Quiche and arrange decorative asparagus spears.
BAKE at 375F for 45 minutes. Love!!
I make quiche pretty frequently, while I vary the ingredients of Part A according to what I’m in the mood for (bacon&asparagus or chicken&brocolli or ham&peppers or…), I always keep Part B the same. It’s a mix that works well for me.
Enjoy! Your Friend,
~Amber Hamilton Henson
PS
Like this post? Be sure to check “my Kitchen” for links to more of my recipes!
Wonder to which parties I’m linking? I have a page dedicated to “shares”, too!
Guess what?! My quiche was featured!! 😀 😀 😀

Love Linking! (as always, if this post is featured,the hostess’s button will be attached to this post AND my shares page!)
FRIDAY
Foodie Friday @ Rattlebridge Farm
Tickled Pink @ 504 Main
PotPourri Friday @ 2805
SATURDAY
Saturday Nite Special @ Funky Junk Interiors (recipes)
Get Schooled Saurday” @ Too Much Time
SUNDAY
Sundae Scoop @ I Heart Naptime
Scrumptious Sunday @ I’m Addicted to Recipes
Sunday Linky Party @ PetiteHermine
Sunday’s Best @ My 1929 Charmer
MONDAY
Mad Skills Tutorials @ MadInCrafts
Mealtime Monday @ CouponingNCooking
WEDNESDAY
What’s Cooking Wednesday @ TheKingsCourt4
THURSDAY
Full Plate Thursday @ MizHelensCountryCottage
SassyTailgating Sandwiches really ARE “Sassy!”
We try A LOT of different recipes. Some make big promises, but only deliver mediocre results. Some have rave reviews but require an enormous amount of time and dirty dishes to create. These little sandwiches are easy, quick, award winners that deliver the sass the recipe promises.
It’s the Philadelphia Chive & Onion Cream Cheese Spread inside combined with the buns soaked in a blend of butter, Worcestershire, Parmesan, and minced onion that really and truly makes these little sandwiches pretty sassy!
1 package of Hawaiian bread rolls or potato rolls
1 pound shaved Black Forest ham or smoked deli ham of your choice
12 slices Provolone cheese
1 (8 ounce) tub PHILADELPHIA Chive & Onion Cream Cheese Spread
1/2 cup butter, melted
1 tablespoon Worcestershire sauce
1/2 tablespoon dried minced onion
1/4 cup grated Parmesan cheese
Directions
*Cut each roll in half, sandwich style. Place bottom halves in a glass 9″x13″ casserole dish.
*Place equal amounts of ham on each roll bottom. Top with Provolone.
*Spread a generous amount of the cream cheese spread on the inside of each of the remaining roll halves and place on top, making sandwiches.
*In a separate bowl, mix together the butter, Worcestershire sauce, onion and Parmesan cheese. Pour this over your sandwiches and let sit for at least 20 minutes. (I make these in the morning and allow to sit in fridge until lunch or dinner.)
*Place sandwiches in casserole dish covered in foil, in a preheated 350 degrees F oven. Bake for 20 minutes.
A similar recipe: here.
Yummy, Yummy, YUMMY!!
~Amber Hamilton Henson
PS: Like this post? Be sure to check “my Kitchen” for links to more of my recipes!

Funky Deco Vanity!

Even though our home decor overall is primarily a range of contemporary and traditional, if you read my belt chair tutorial, then you’ve heard that I like to have a few interesting “character” pieces of furniture in each room, too. In addition to our “regular” furniture, I try to have something antique, something mid century mod, and something a little funky in each room. I like contrast. Well, our master suite is not an exception. Our chests of drawers are contemporary, lamps are traditional, flooring style is modern, dark espresso, and the settee that we reupholstered is antique. Really antique; like early 19th century Italian antique. Also in our master suite is a vanity, now a funkier vanity. I’ll get around to photographing the rest of the room soon, but for now, I just want to talk about this deco vanity.
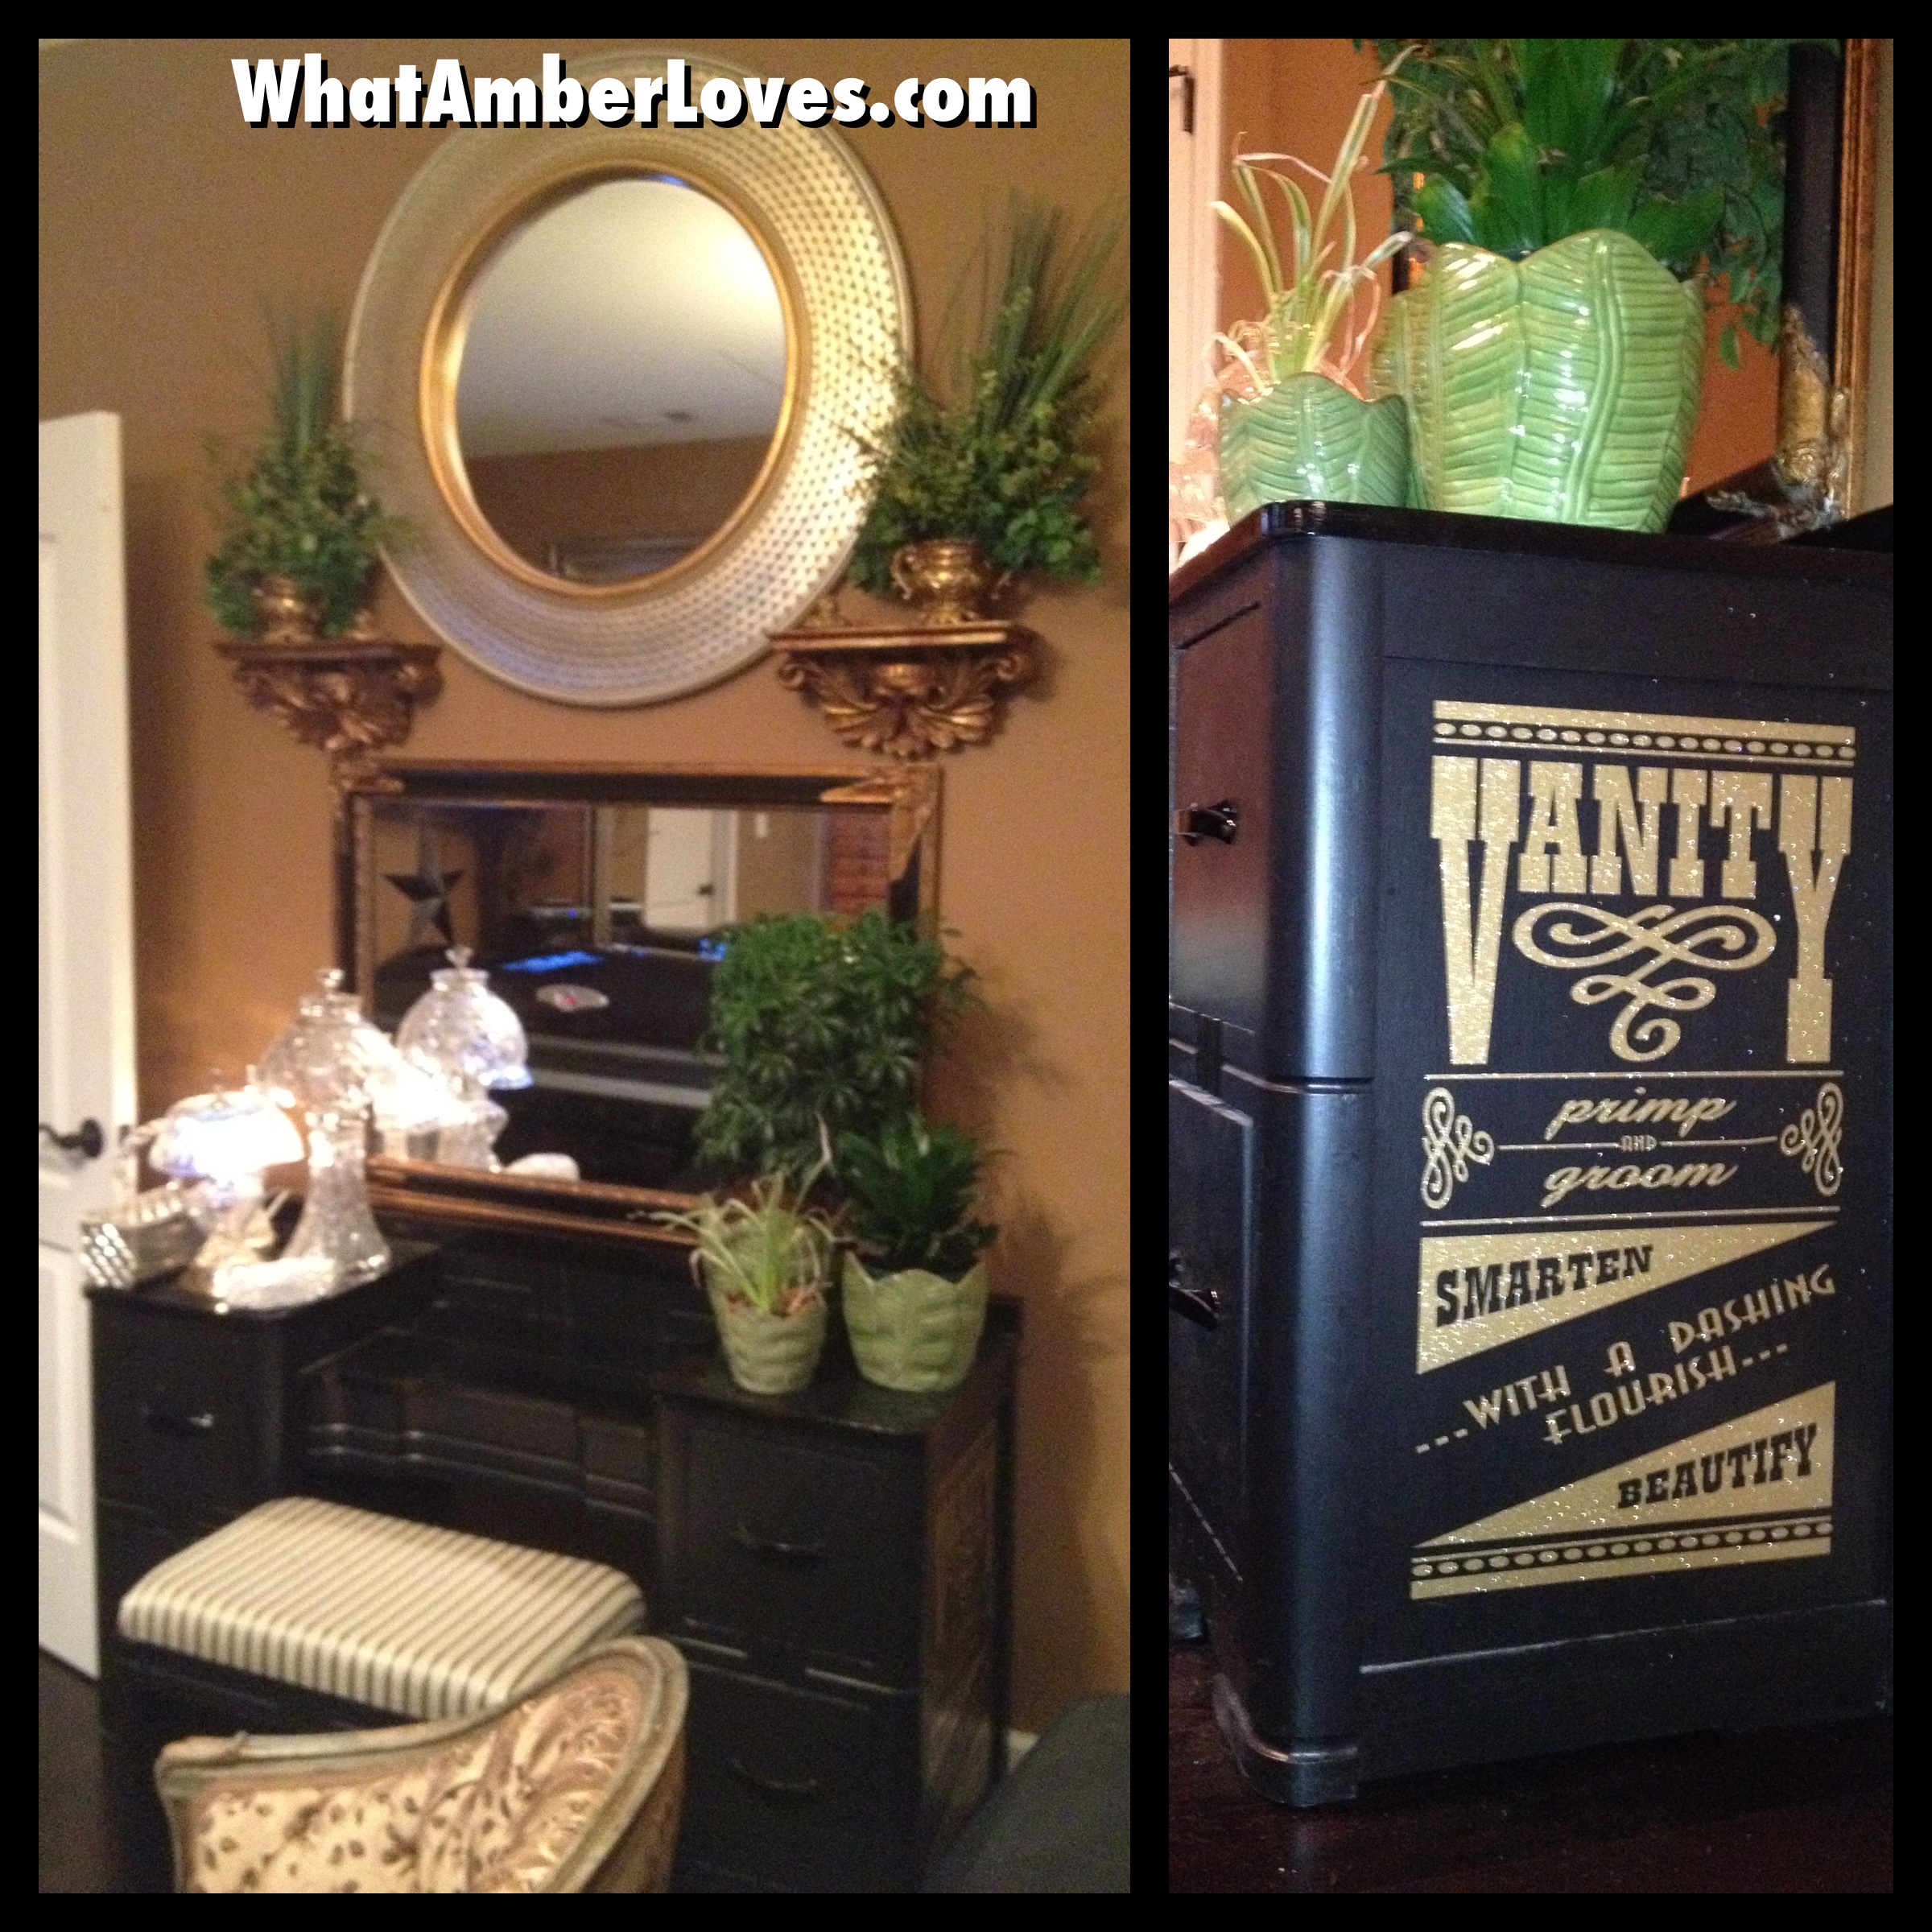
This vanity isn’t from a resale shop; it’s actually been handed down through the family. Perhaps my grandmother could tell us what its original stained finish looked like, but I’m pretty sure it had long since been painted over prior to my lifetime. By the time it was given to me, it was wearing a coat of pea green paint and had spent its last several years in my dad’s garage storing my little sister’s costumy “dress-up” stuff from her childhood. I really liked the lines and heft of the vanity. It’s BIG for a deco age vanity, and structurally it is in great shape, especially for being almost a hundred years old! Shortly after receiving it, several years ago, I painted it black. The sides and drawer fronts are FLAT black latex, and the top surface and hardware are HIGH GLOSS enamel.
Recently, I saw a few dresser conversions that really caught my eye and I just KNEW I had to add a bit of typography to a piece of furniture. (If you want to see what inspired me, hop over to Bliss Ranch and check out Bliss’s Libation Station created from an old dresser and her Kodak dresser! Amazing aren’t they?! Love it!) I was inspired by Bliss, but given that I have a one year old daughter underfoot, finding the time and space to paint by hand the way she does is difficult impossible for me at this stage. So, I did it MY way, with vinyl sign lettering that I cut using my sign machine. You know that in addition to being a stay at home mom, I freelance, selling and installing vinyl signs and vehicle graphics, right?
I wanted to stick with the “vanity” theme on the “vanity.” I brainstormed:
Vanity. Primp. Groom. Beautify. Smarten. …with a dashing flourish… Then, I created and installed the graphic. If you were just wanting to see the dresser and hear the history, you can stop reading now. However, if you want to see the sign vinyl process, here you go:
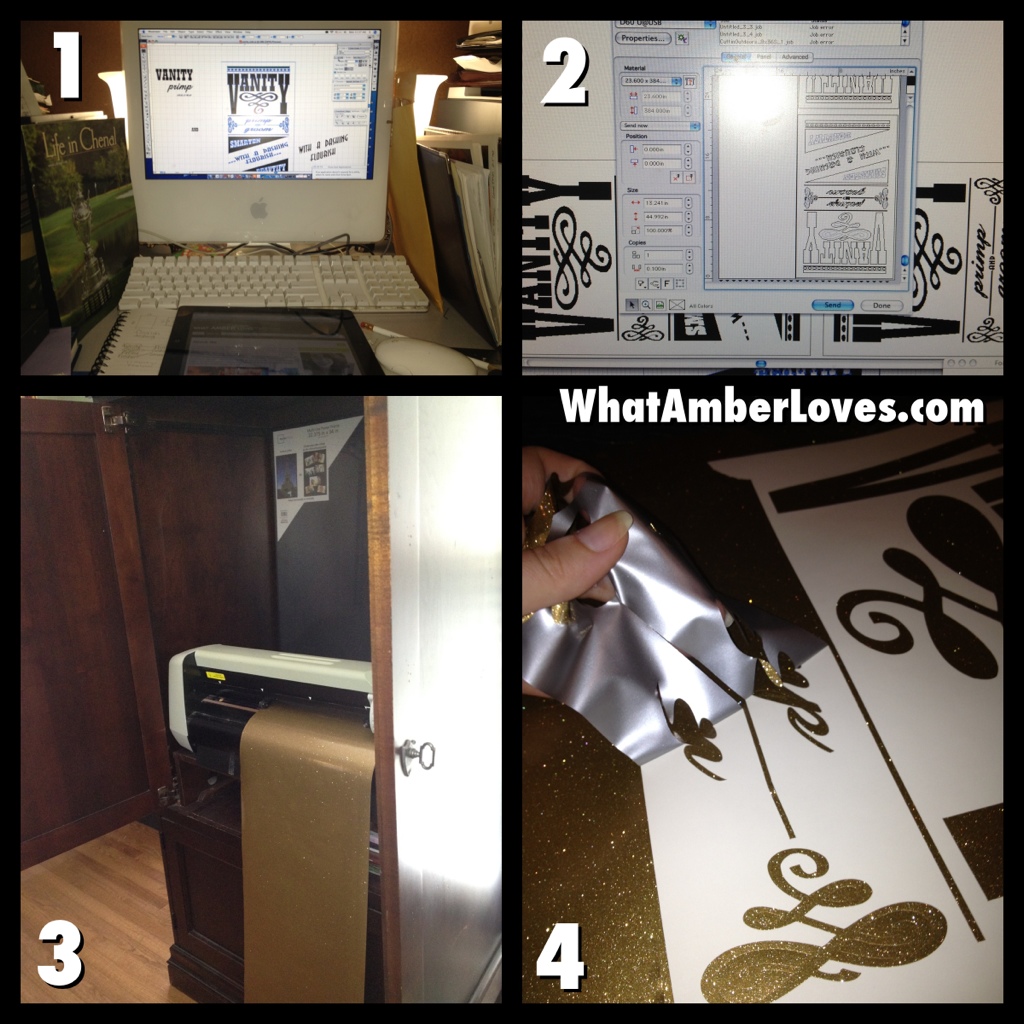
1) I designed the graphic in Adobe Illustrator.
2) I put the design in FlexiSign and sent it to my cutter.
3) Here is my machine cutting. It can cut any graphic up to 30 feet wide by 300 feet long. We keep our sign cutter in an armoire that used to hold our tv, but now all of our tvs are mounted to walls. It is a great way to hideaway the machine when it’s not in use, this is especially important to me, since it is in our front room/library/office at home.
4) I “weed” the cut image. See, the machine doesn’t print; it cuts. The material is like big roll of stickers on a sheet of waxed paper backing. Through precision adjustment, the machine’s blade is set at an exact pressure that it will cut through the sticker (sign vinyl) without cutting the paper backing. So, I pull the excess away, by hand, leaving only the cut graphic on the waxed paper backing.
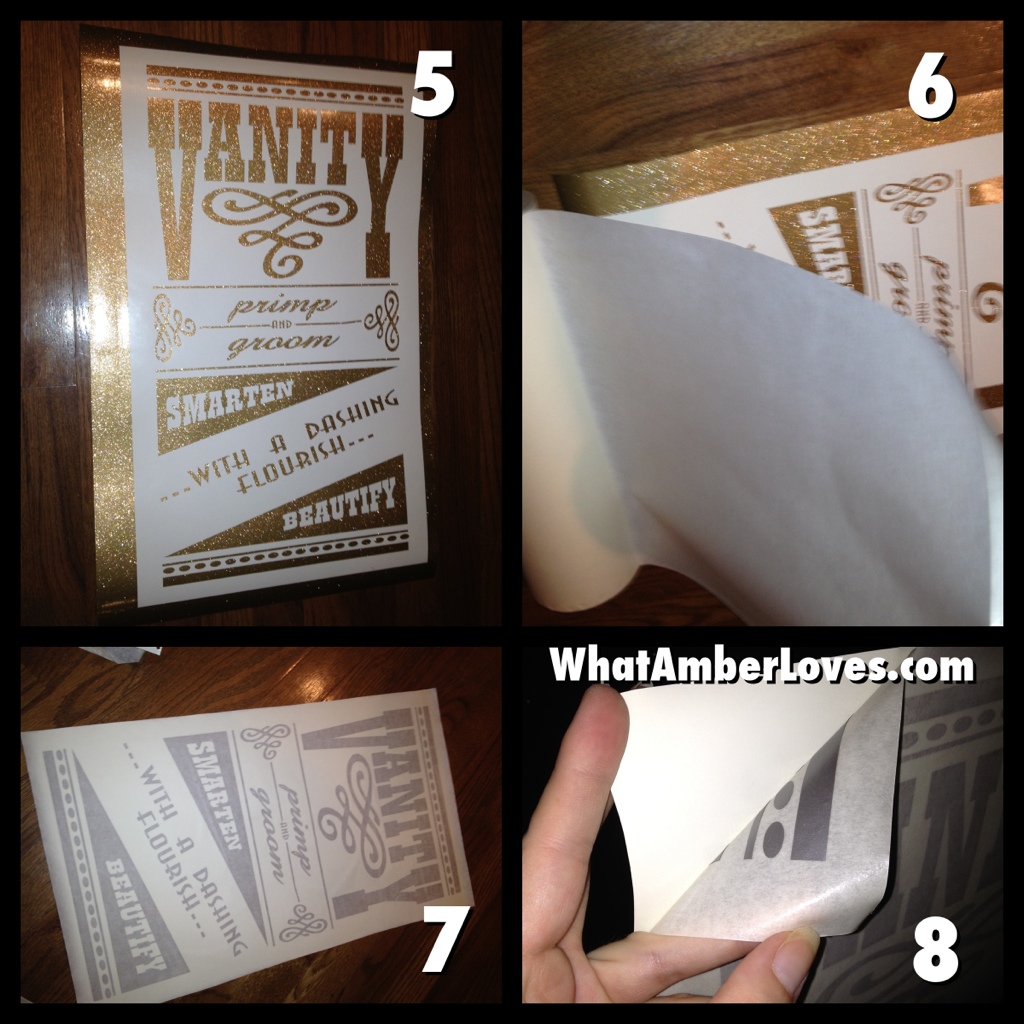
5) Here is what it looks like after the weeding process.
6) I “mask” the image. I cover the entire graphic in masking tape. Really wide masking tape. This is an essential step. It would be impossible to move and install each little piece individually and expect it all to line up properly. Covering it in masking tape allows me to move ALL of the letters at once.
7) It is a total of three layer at this point: paper, sign vinyl, and masking tape.
8) I peel away the waxed paper backing. Now, it is just the sticky sign vinyl and masking tape.
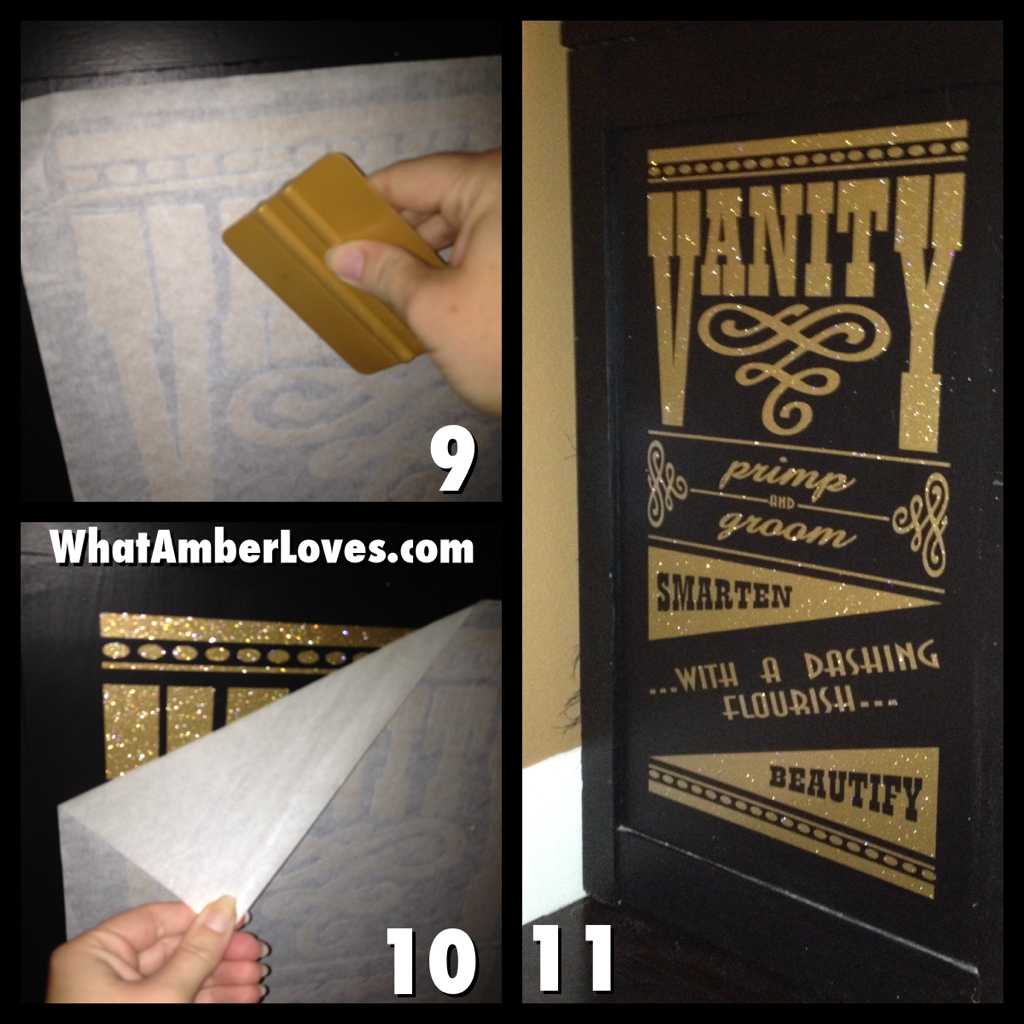
9) I stuck it to the side of the furniture and used a squeegee to smooth it all into place.
10) I slowly pull away the top layer of masking tape. See, the sign vinyl’s adhesive is MUCH stronger than the adhesive on the masking tape, so the masking tape pulls away leaving the sign vinyl stuck in place. Neat, huh? Now, you know.
11) The glittery, gold sign vinyl lettering is permanently adhered to the vanity!
At home, non-commercial, I use my sign machine for quotes on mirrors, labeling, kids’ projects, etc. I’ll show you some of that stuff later; for now, I’m tired of typing. 😉

Later!
Your Friend,
~Amber Hamilton Henson
PS
Like this post? If so, check out my DECOR & CRAFTS page and click on links to my other projects.
I’m linking this post to a few, fun linking parties that showcase other great projects! The links to the parties will be updated everyday this week: (as always, if this post is featured,the hostess’s button will be attached to this post AND my shares page!)
MONDAY
Make The Scene Monday @ AlderBerryHill
Masterpiece Monday @ BoogieBoard Cottage
More the Merrier Monday @ DIY Home Sweet Home
CraftOManiac Monday @ Craft O Maniac
Tutorial Link Party @ Mad in Crafts
Mod Mix Monday @ Mod Vintage Life
TUESDAY
Be Inspired @ Elizabeth and Co.
Talent Tuesday @ Vintage Wanna Bee
Nifty Thrifty Tuesday @ Coastal Charm
All Star Block Party @ Full Circle Creations
Twirl and Take a Bow @ House on the Way
WEDNESDAY
Wow Us Wednesday @ Savvy Southern Style
Primp Your Stuff @ Primp Junktion
Whatever Goes Wednesday @ Someday Crafts
Link Party @ Lil Luna
Wicked Awesome Wednesday @ HandyManCraftyWoman
THURSDAY
Transformation Thursday @ The Shabby Creek Cottage
Creative Juice Thursday @ Momnivore’s Dilemma
Time Travel Thursday @ The Brambleberry Cottage
FRIDAY
Catch as Catch Can @ My Repurposed Life
Link Party and Mes Preferes @ ReDoux Interiors
Tickled Pink @ 504 Main
PotPourri Friday @ 2805
Furniture Feature Friday @ Miss MustardSeed
SATURDAY
Saturday Nite Special @ Funky Junk Interiors
Weekend WrapUp Party @ TatorTots and Jello
Get Schooled Saurday” @ Too Much Time
SUNDAY
Sunday’s Best @ My 1929 Charmer
Sunday Linky Party @ PetiteHermine
Sunday’s Best @ My 1929 Charmer
Chewy Peanut Butter Cookies

2 cups all purpose flour
1/2 tsp baking soda
1/4 tsp salt
1 1/4 cups dark brown sugar, firmly pack
1 1/4 cups white sugar
1 cup salted butter, softened
3 large eggs
1 cup creamy peanut butter
2 tsp pure vanilla extract
Preheat oven to 300°F. In a medium bowl combind flour, soda and salt. Mix well with a wire whisk. Set aside. In a large bowl blend sugars using electric mixer at medium speed. Add butter and mix to form grainy paste, scraping the sides of the bowl. Add eggs, peanut butter and vanilla, and mix at medium speed until light and fluffy. Add the flour mixture and mix at low speed until just mixed. Do not overmix. Drop by rounded table spoons onto an ungreased cookie sheet, 1 1/2 inches apart. With a wet fork gently press a crisscross pattern on top of cookies. Bake for 18-22 minutes until cookies are slightly brown along edges. Transfer cookies immediatly to cool surface with spatula.
The cookie jars are restocked. My day is done! lol. Not really, dinner is yet to be made, the baby to be bathed, laundry to be done. Mitch is midway through re-flooring our bedroom, so furniture is everywhere. Hopefully, when the kids are in bed, there will be a few minutes left to work on the pair of chairs we’re re-upholstering.
Later Gators! ~Amber
PS
Like this post? Be sure to check “my Kitchen” for links to more of my recipes!
Wonder to which parties I’m linking? I have a page dedicated to “shares”, too!
Linked:
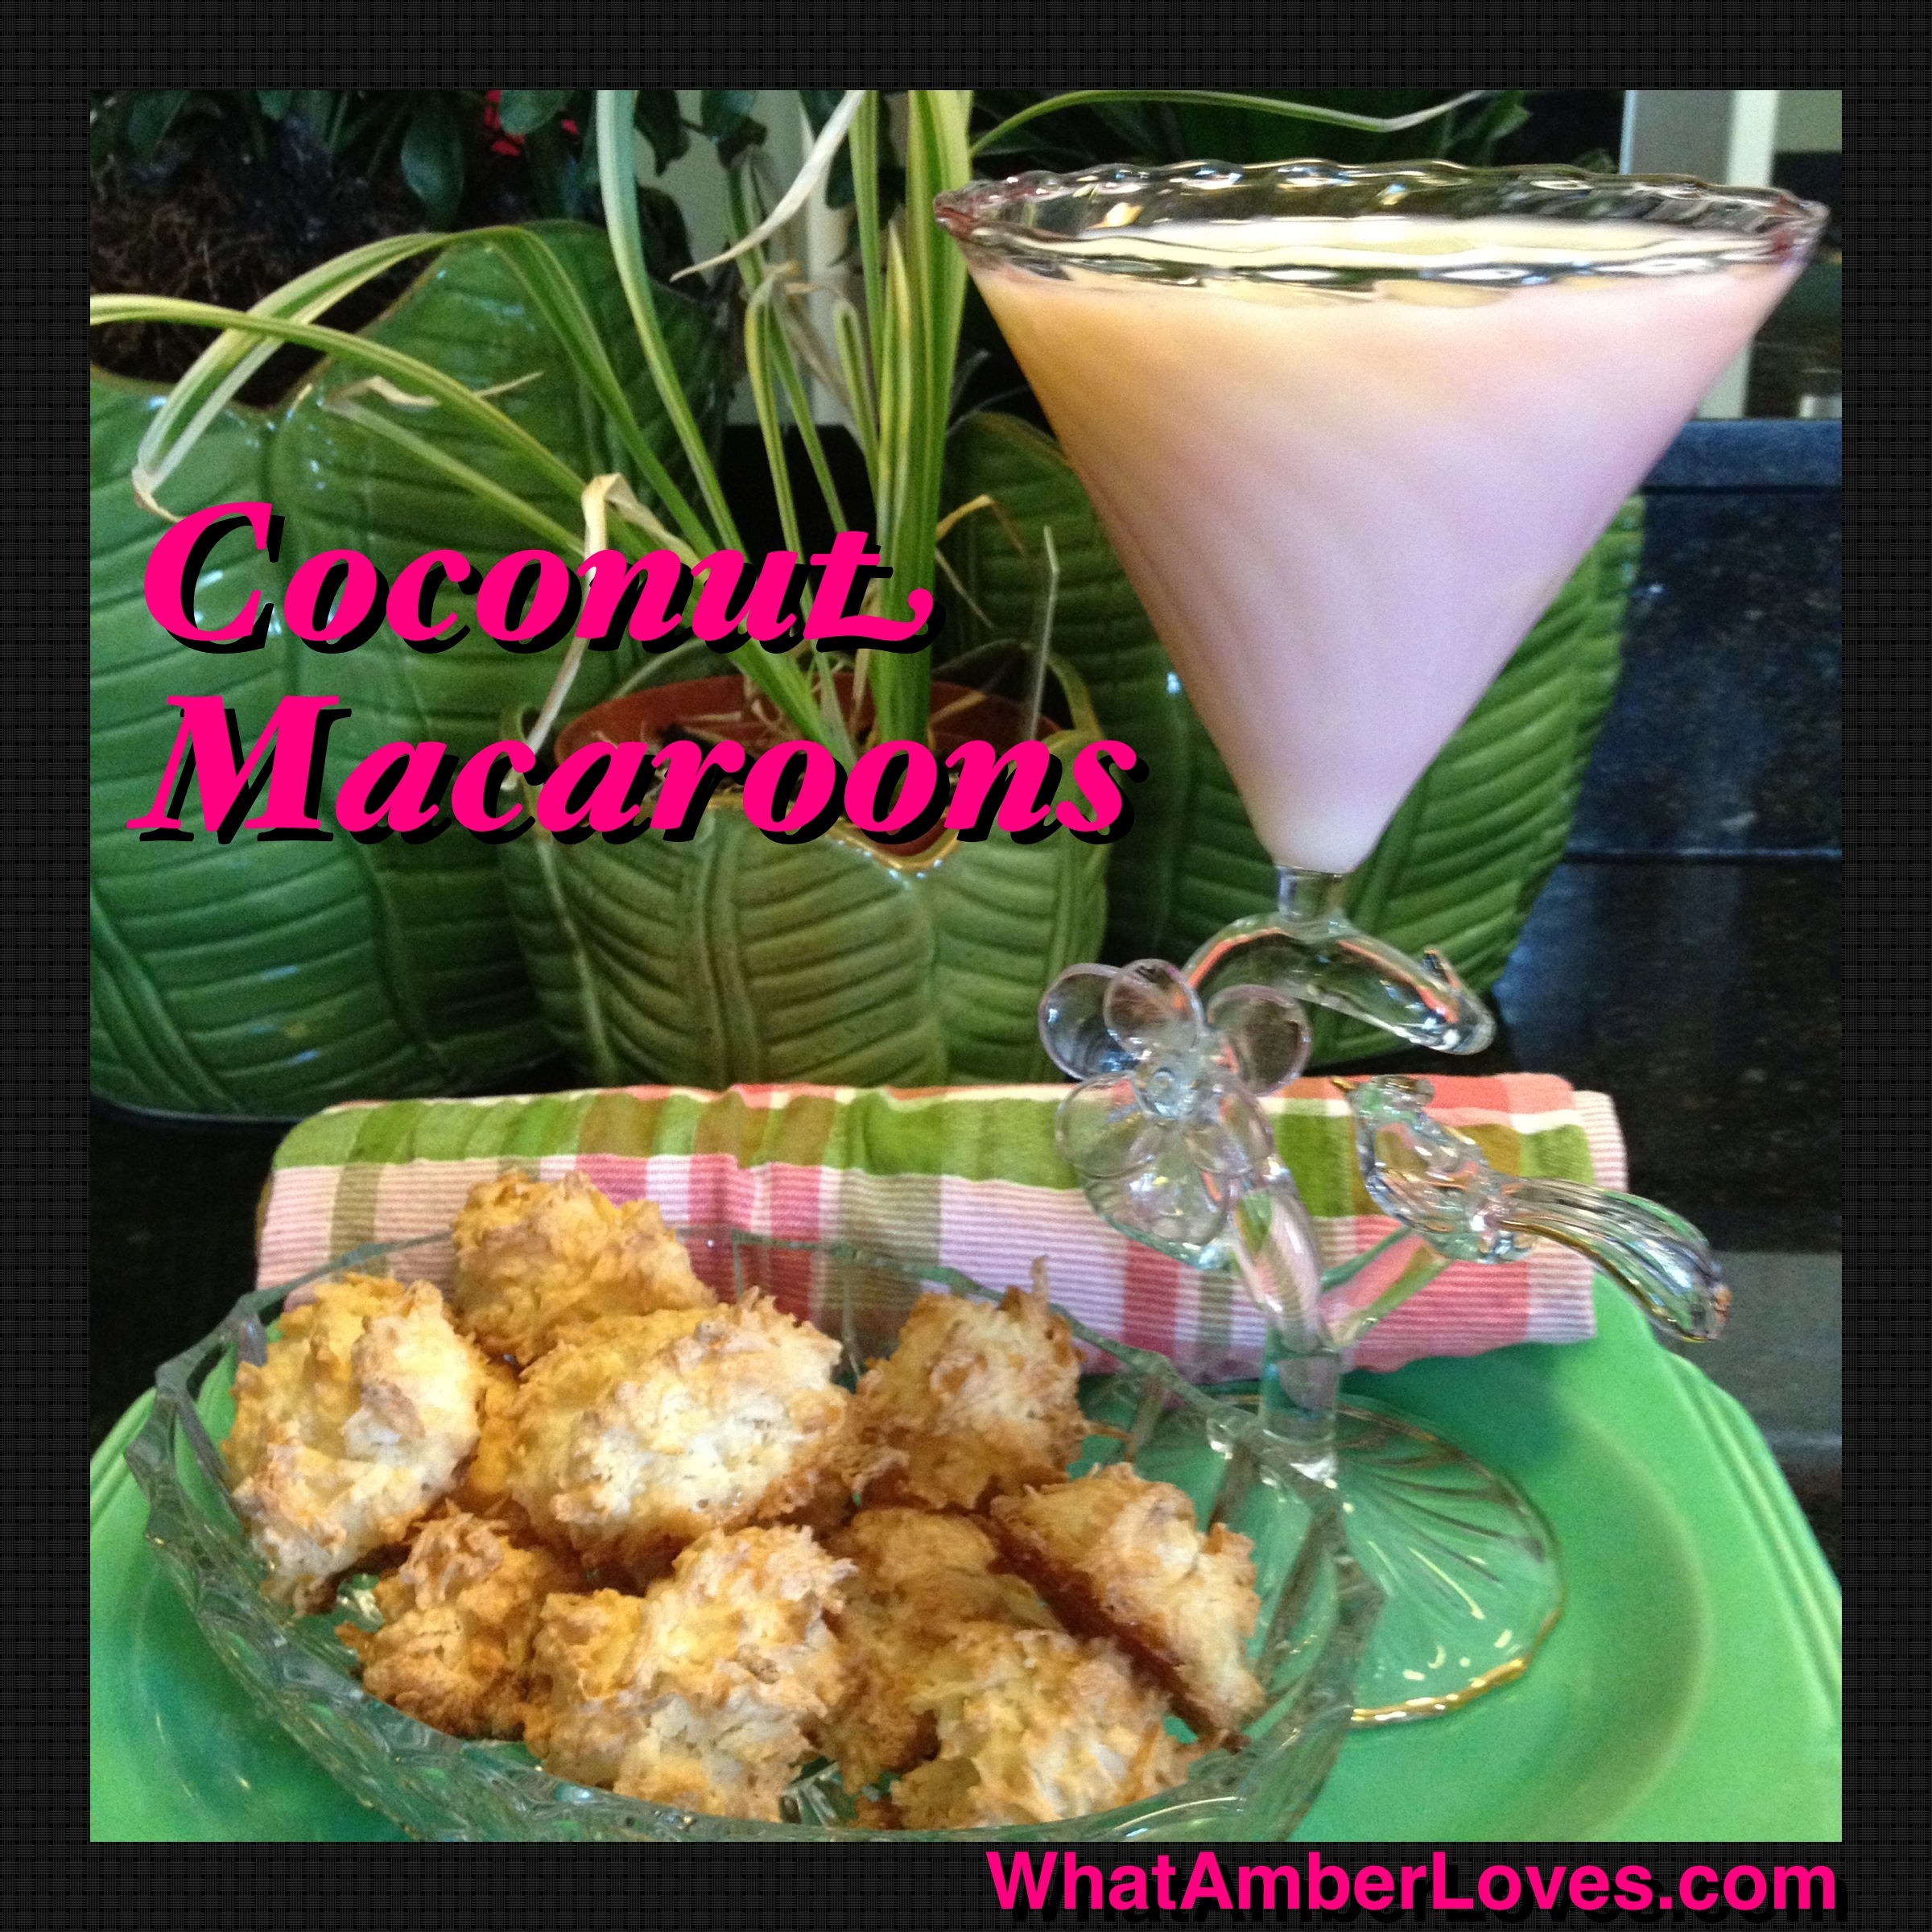
Coconut Macaroons and Milk in Martini Glasses

1 and 1/2 cups sweetened coconut flakes
2/3 cup granulated sugar
2 egg whites
1/4 tsp vanilla
dash salt
*Beat egg whites, salt, and vanilla until soft peaks form. Gradually add sugar, beating until very stiff and glossy. Fold in coconut; drop by rounded teaspoons about 2″ apart onto greased cookie sheets.Bake at 325°F about 20 minutes or until set and lightly brown.
Our daughters LOVED them. Per usual, they wanted to drink their milk from some of my favorite stemware… blown glass martini glasses featuring little birds and blossoms. lol. At least the set of martini glasses are getting used, even if it’s not for my Martinis. 😉 Love.
Your Friend,
~Amber Hamilton Henson
PS
Like this post? Be sure to check “my Kitchen” for links to more of my recipes!
Wonder to which parties I’m linking? I have a page dedicated to “shares”, too!
Linked with love at these parties:
TatorTots and Jello Weekend Wrap Up
Too Much Time Get Schooled Saturdays
I Heart Naptime Sunday Scoop Link Party
TwiggStudios Sunday Showoff
Momnivore’s Dilemma
Chicken Scratch NY “What’s Cluckin?”
All Star Block Party @ Full Circle Creations
Time to Shine @ A Diamond in the Stuff
Sunday Linky Party @ PetiteHermine
Muddy Worms for Dessert
My oldest daughter wrote a sewing tutorial a couple of days ago, and now our middle daughter wants to have an appearance all her own as a featured participant on a post, too!
“Of course, you may!” was my response.
I promise this isn’t going to turn into an ALL child posting blog, since i have plenty of my own craft projects and home renovation projects happening. However, probably once a month, I will let each of them post from time to time. Since I’ve been devoting a few minutes per day to this site, I’m THRILLED that they want to be involved! More bonding time, you know…
Here she is!

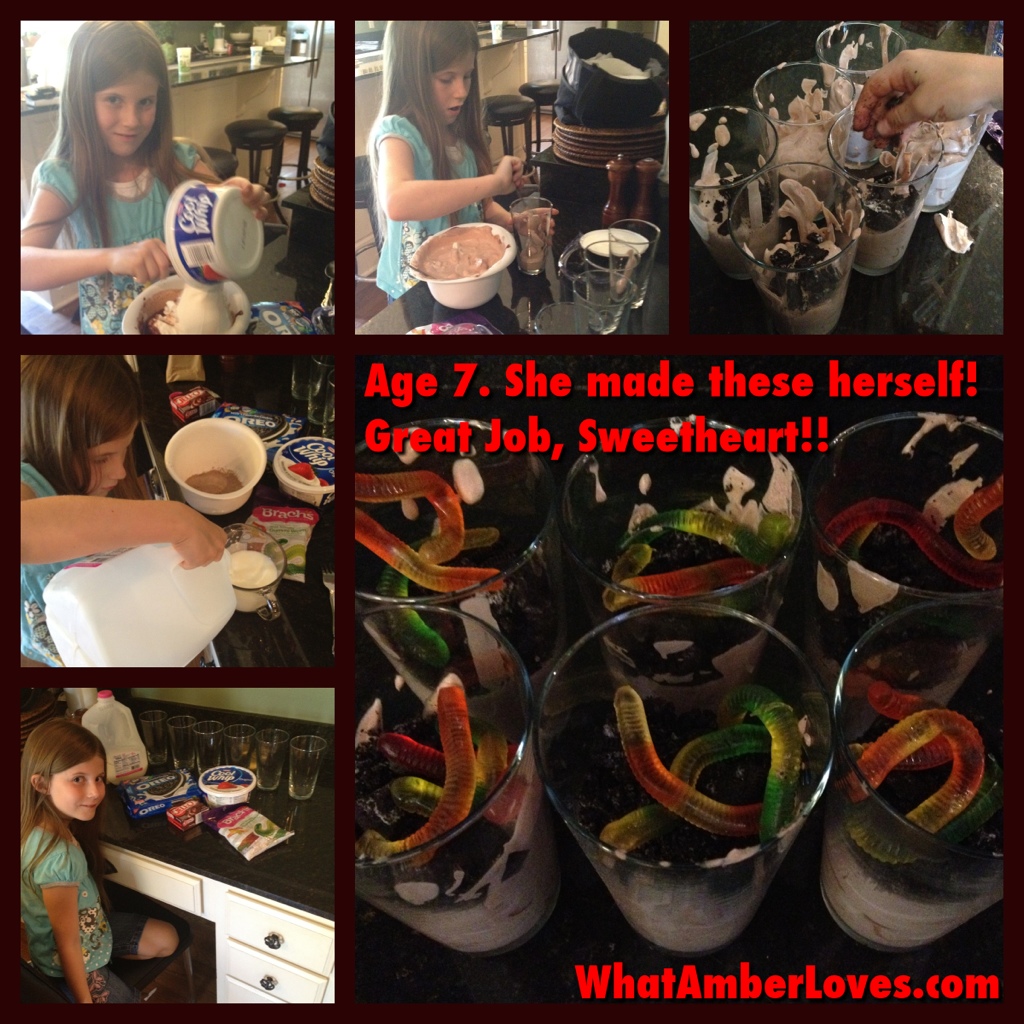
The Recipe:
1 pkg. (3.9 oz.) JELL-O Chocolate Instant Pudding
2 cups of cold milk
1 tub (8 oz.) COOL WHIP Whipped Topping, thawed
15 OREO Cookies, finely crushed (about 1-1/4 cups), divided
18 Brach’s gummy worms candy
BEAT pudding mix and milk in large bowl with whisk 2 min. Let stand 5 min.
Stir in COOL WHIP and 1/2 cup cookie crumbs.
SPOON into 10 (6- to 7-oz.) paper or plastic cups; top with remaining cookie crumbs.
REFRIGERATE 1 hour. Top with fruit snacks just before serving.
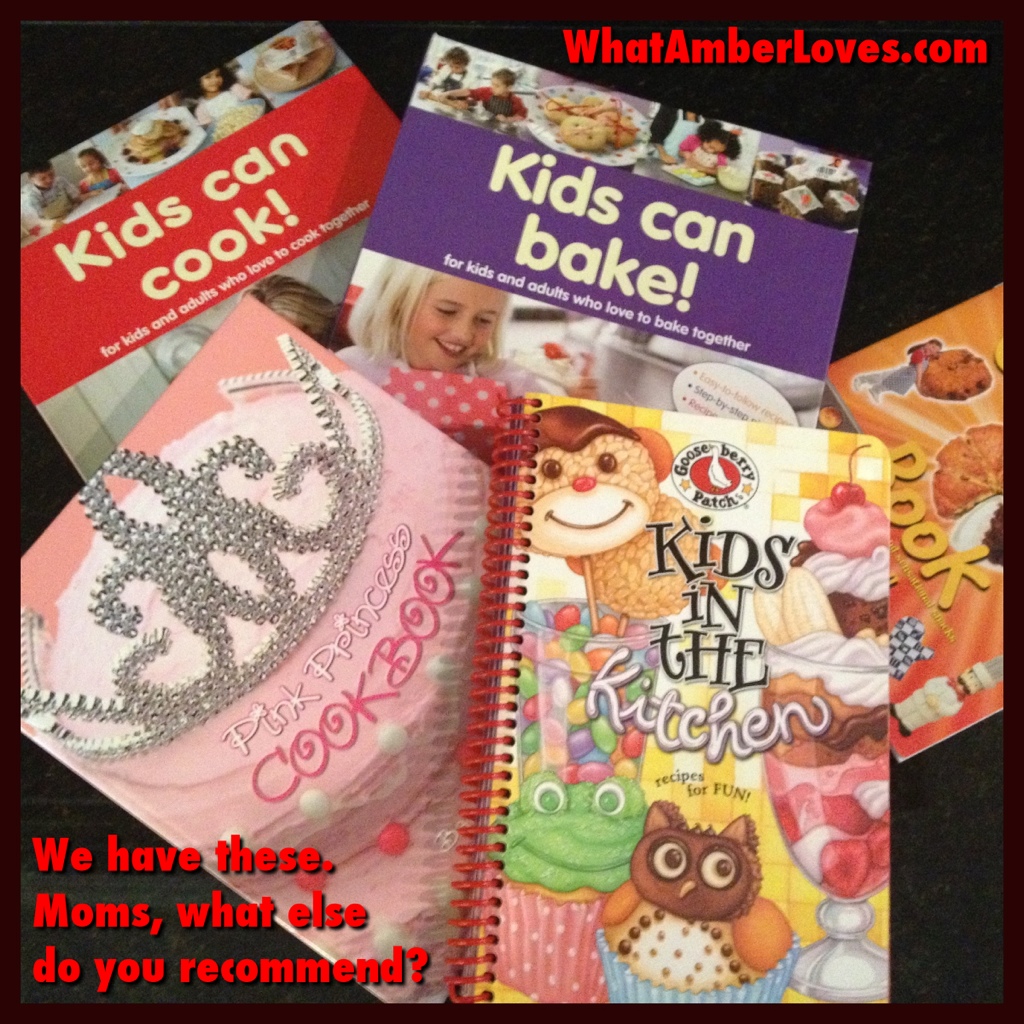
This recipe (no brand names used) is from the cookbook shown on top by Gooseberry Patch. It’s a really cute, illustrated, easy to follow cookbook for kids!
Does your family have a favorite cookbook for kids? or a site you recommend? We’d love to hear!!
Your Friend,
~Amber (and daughters!)
This post is linking to great parties! The links:
Gooseberry Patch
We Made That! (linky just for kids!) @ WeMadeThat
Chicken ‘n’ Dumplings for Dinner with Family

So, there are options. There is always a trade off. You can make Chicken ‘n’ Dumplings the fast easy way or love making them from scratch.
What’s the fast easy way? Run into the grocery store and grab a Rotisserie Chicken, Box/Can of Chicken Broth, and a can of Buttermilk Biscuit dough. Bring the broth to a boil, drop in biscuits that you tear into four pieces per biscuit. Add chicken that you tear from the Rotisserie chicken. It’s actually a fairly decent solution for a semi-homemade meal. I’ve made it that way a time or two when I was pressed for time and didn’t want to wait at a restaurant or be forced into serving my kids fast food chains. It happens. You didn’t know you could make it that way? Well, now you do. You’re welcome.
However, if you want a true made-from-scratch, better-than-you-could-ever-hope-to-find-in-a-restaurant style of Chicken ‘n’ Dumplings, then you’ll need to invest a little bit of time. It is worth it. It makes a large pot, so there are leftovers, and it costs far less than the “quicky” way, assuming you keep a few staples on hand in the pantry.

Here’s how I make my Chicken ‘n’ Dumplings from scratch:

*Start a whole chicken boiling in a large pot over medium heat, and boil it until the meat is literally falling off the bone. (3-4 hours)
*Pull the chicken and bones from the pot and place in a colander by using a screen/lg slotted spoon/etc, ensuring that you save the broth in the pot.
*Cut up 3-4 medium new potatoes into 1/2″-1″ cubes and drop into the broth with a generous amount of salt and ground black pepper to simmer for an hour while your chicken is cooling.
*Mix 2 cups of flour and 1/2 tsp baking powder and crumble in 3-4 Tbsp of salted butter. (I use my hands to work the butter into the flour mix.) Add one cup of milk. Mix until a dough forms.
*Spread flour on your counter (lots) and roll your dough until it is about 1/4″ thick. Be generous with the flour on the counter and on top, because this flour is part of thickening your broth.
*Cut your dough into 1-2″ squares; I just use a pizza cutter, because it is fast.
*Raise the temperature of your broth and potatoes to a boil and drop in your dough squares one at a time into the broth. Gently stir once or twice, but do not mush them. Wait 5 minutes.
*After removing all of the bones from your chicken, add the meat into the pot. Stir once or twice. Serve.
(I always get rave reviews on them… “Better than Cracker Barrel”… “How did you make your dumplings?!”…) Now, you know.
The reason I made them today? Mitch requested them. His dad joined us for dinner. Since it is summertime and I usually only make this dish in the winter, I just served it with a salad and iced tea. Brownies for dessert were made by our middle daughter. Love. Here is a pic of Mitch’s dad and our girls, his granddaughters. Love.

See y’all later! Good Night!
Your friend,
~Amber Hamilton Henson
PS:
Like this post? Be sure to check “my Kitchen” for links to more of my recipes!
Wonder to which parties I’m linking? I have a page dedicated to “shares”, too, that links to the best parties around!
If this post is featured, please let me know and I’ll add your “featured” button to this post and my “shares” page! 😀
This post is linked:
Mom’s Test Kitchen
Miz Helen’s Country Cottage
Momnivore’s Dilemma
Daughter Sews Pillows
We’re in the process of redecorating our oldest daughter’s bedroom: new paint, new flooring, new bedding, new curtains, etc. So, of course, she’s helping, too!! (She’s 10 years old, now.)
I invited her to write a post/tutorial for this blog, describing what she made, today. Here’s her email to me describing her process of sewing new decorative pillows for her bed:
“First, I have to thread the needle. Then, I have to get the fabric and put the pattern sides together. I put the fabric under the needle and put the foot down. I sew until there is just a hole big enough for my hand. I flip inside out. After that, I stuff it. I sew the hole up, and I’m done.”
Concise and to the point, I say! Well done! Truth of the matter, threading her sewing machine is actually trickier than threading MY machine. (She has her OWN real sewing machine.) The sewing machine was on her wishlist to Santa a couple of years ago. 😉 She’s getting pretty good at sewing on it!
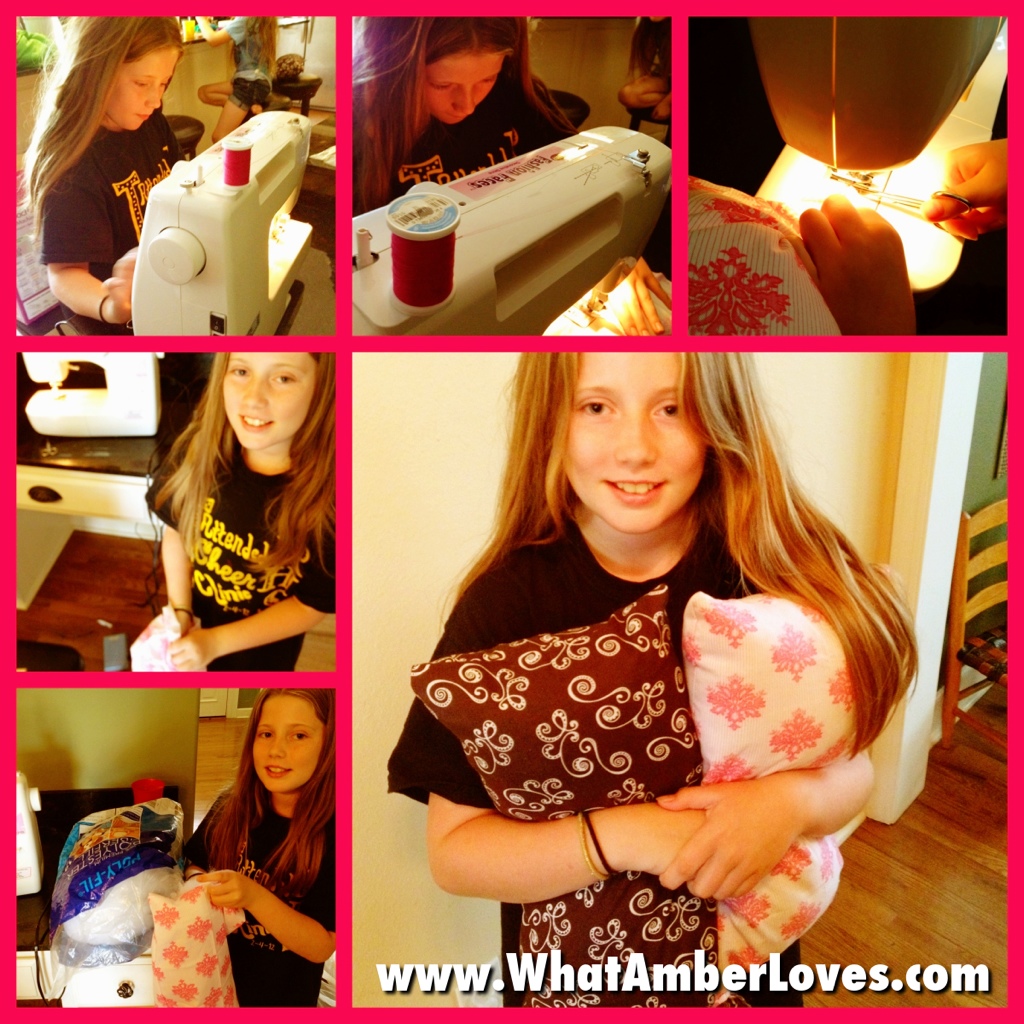
Again, “GREAT JOB, SWEETHEART!!” I’m so proud of her! Love.
~Amber Hamilton Henson
PS. This post is linked with love:
Scissors and Spatulas
House of Hepworths
Made In A Day
Johnny In A Dress
We Made That! (linky just for kids! @ WeMadeThat
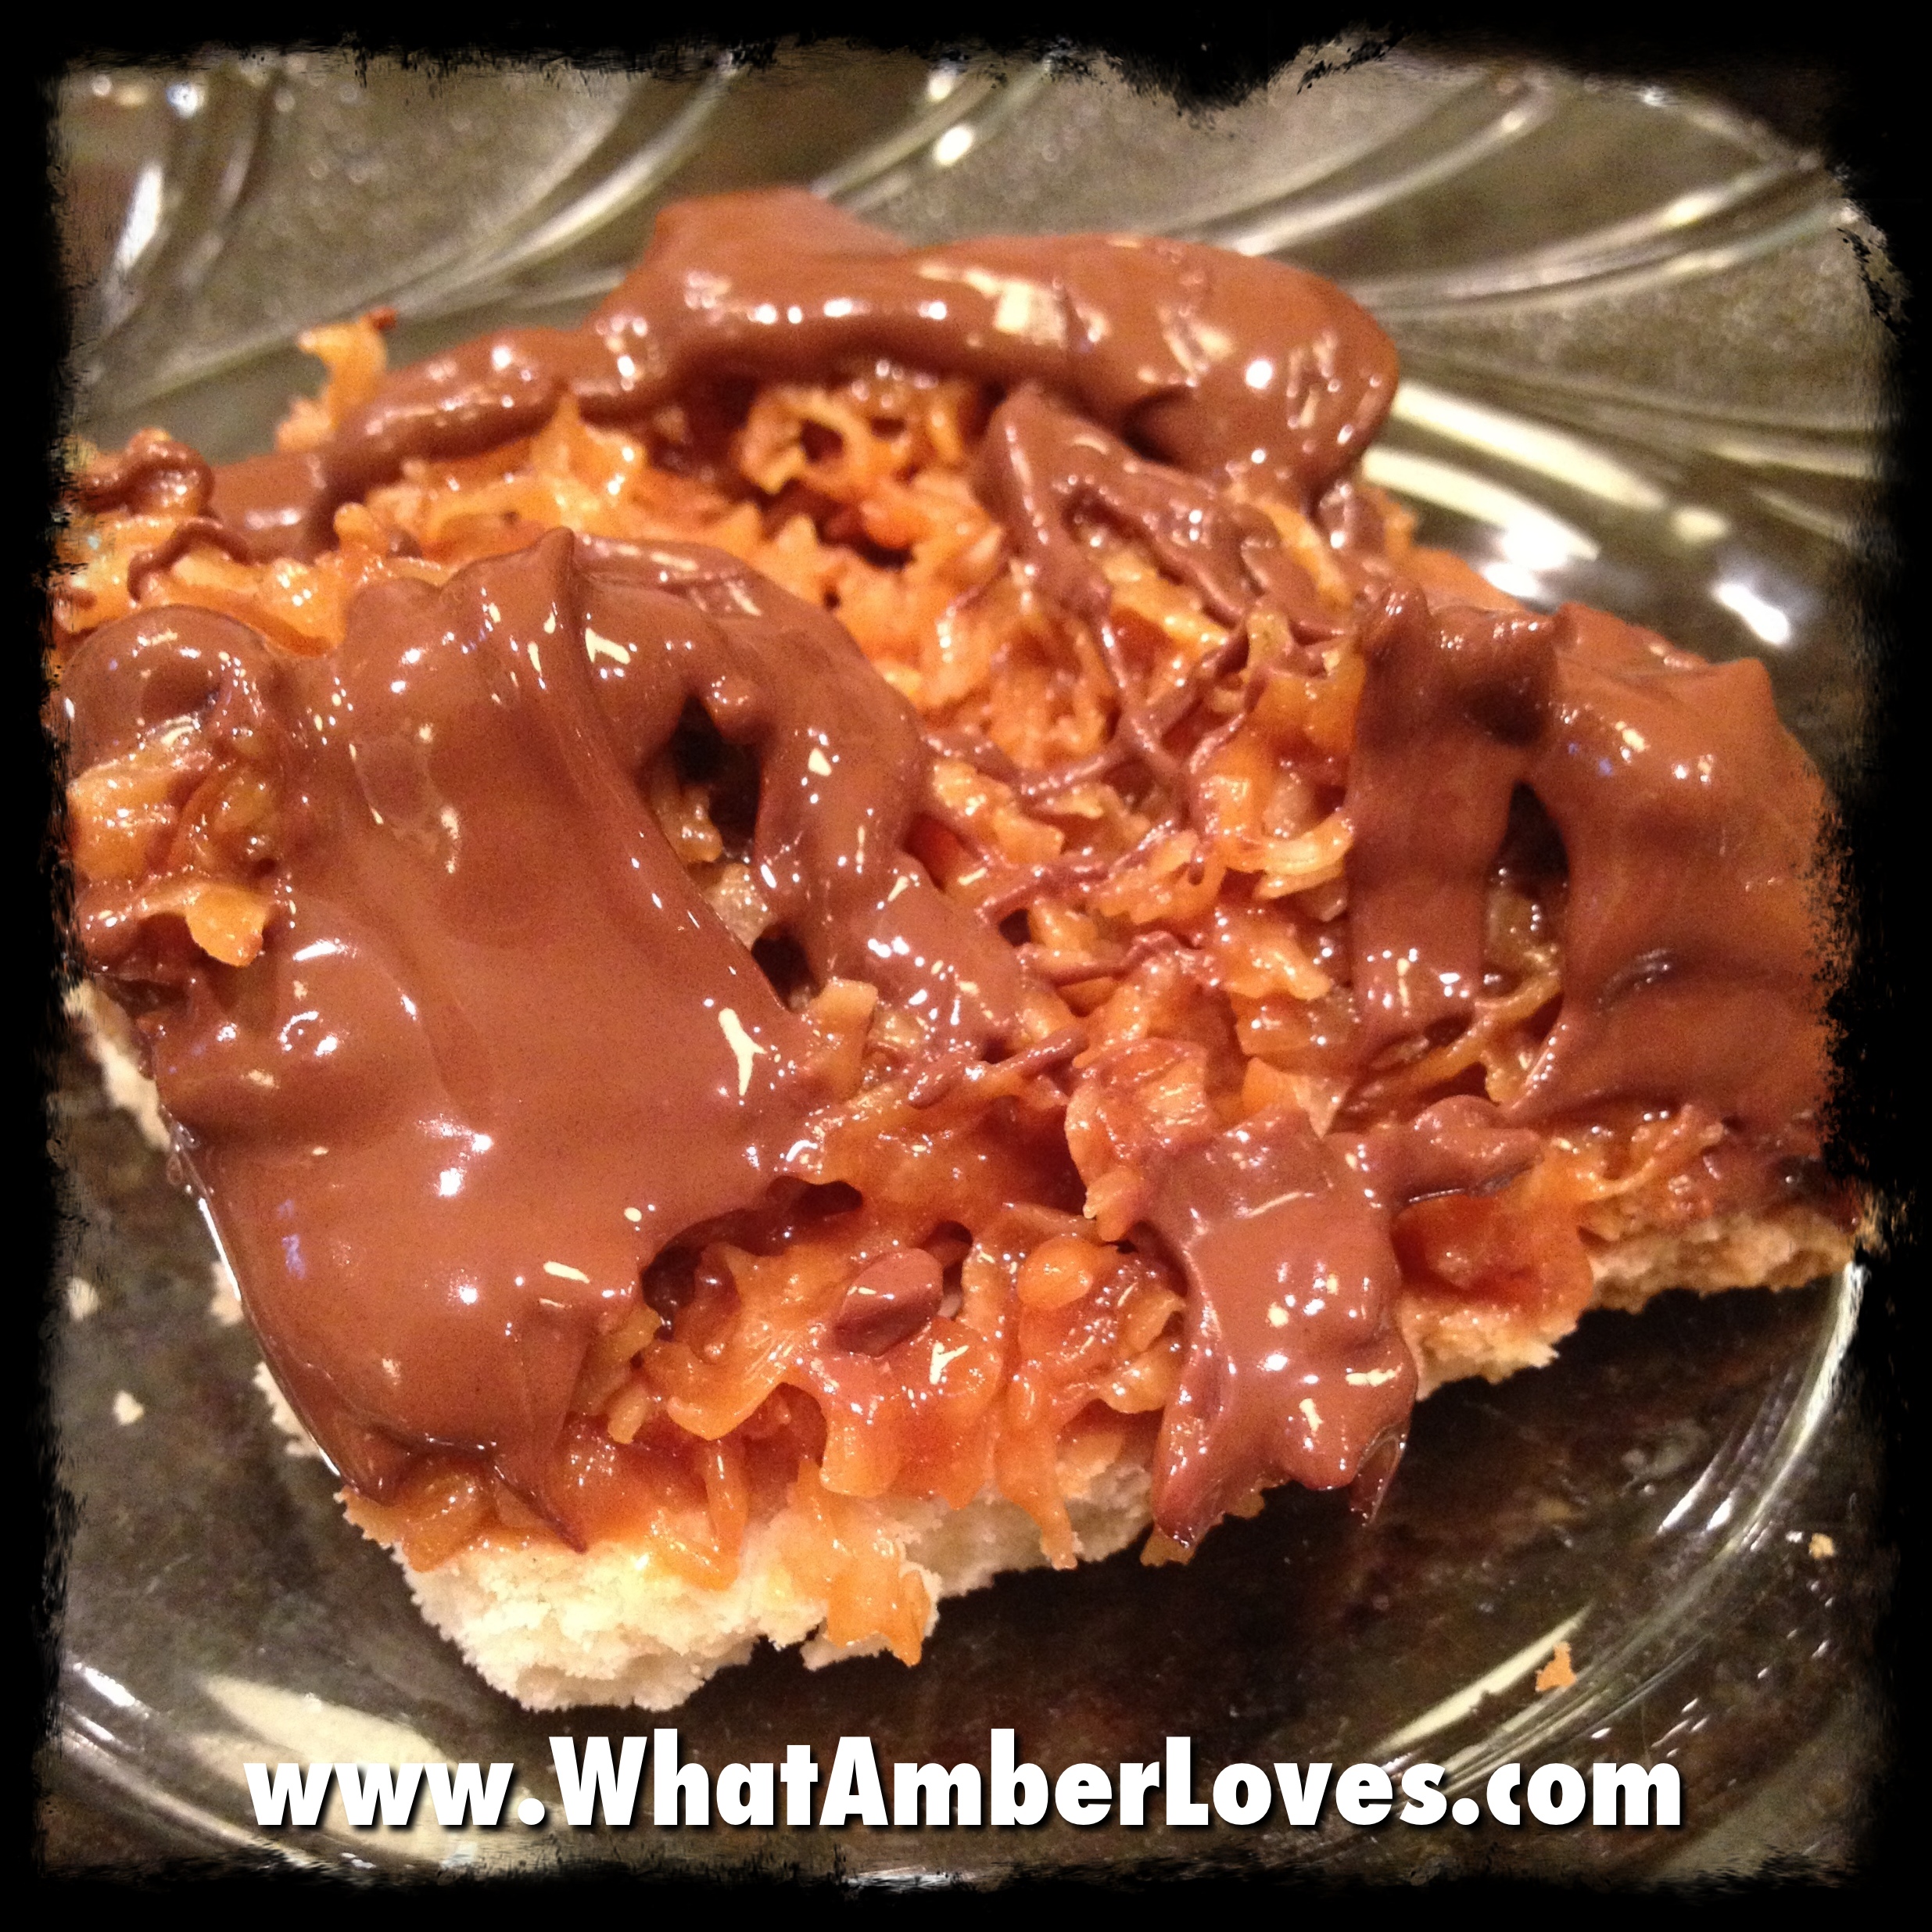
Samoa Cookie Bars
Hey, Internet!

So, tonight after dinner (taco night at home), I spent a few minutes looking at social media. My facebook feed sure had lots of pictures of sweet treats, tonight. Cookie Dough stuffed Cupcakes, Cookies, and I’m really curious about how Heather’s Nutella Cheesecake turned out! Who’s Heather? Heather is Arkansas’s very own “Planner in Pearls!” Whether you’re planning a wedding of your own, or know someone who will soon, go check out her page if you have a minute!
Tonight, my choices were to either sit there drooling at the fb newfeed or go raid the pantry and food blog scene in order to find something to bake for MY family, too. Here’s what I came up with: “Samoa Cookie Bars”
They’re kind of a knock-off of the Girl Scout Samoa Cookies. They turned out great!
Basically, you bake a short bread cookie sheet, and while it’s cooling, you toast coconut, melt caramel, and melt chocolate. Then, assemble it all and consume. Yum!!
For the Shortbread Cookie:
1/2 cup of sugar
3/4 cup of butter, softened
1 egg
1/2 tsp vanilla extract
2 cups of all purpose flour
1/4 tsp salt
*We used a 9″x13″ cookie sheet, sprayed with non-stick spray. Cream together the sugar, butter, egg, and vanilla. Gradually, beat in the flour and salt. It is a dense batter that you press into the cookie sheet in a thin layer. Bake for 25 minutes. Set sheet on wire rack to cool.
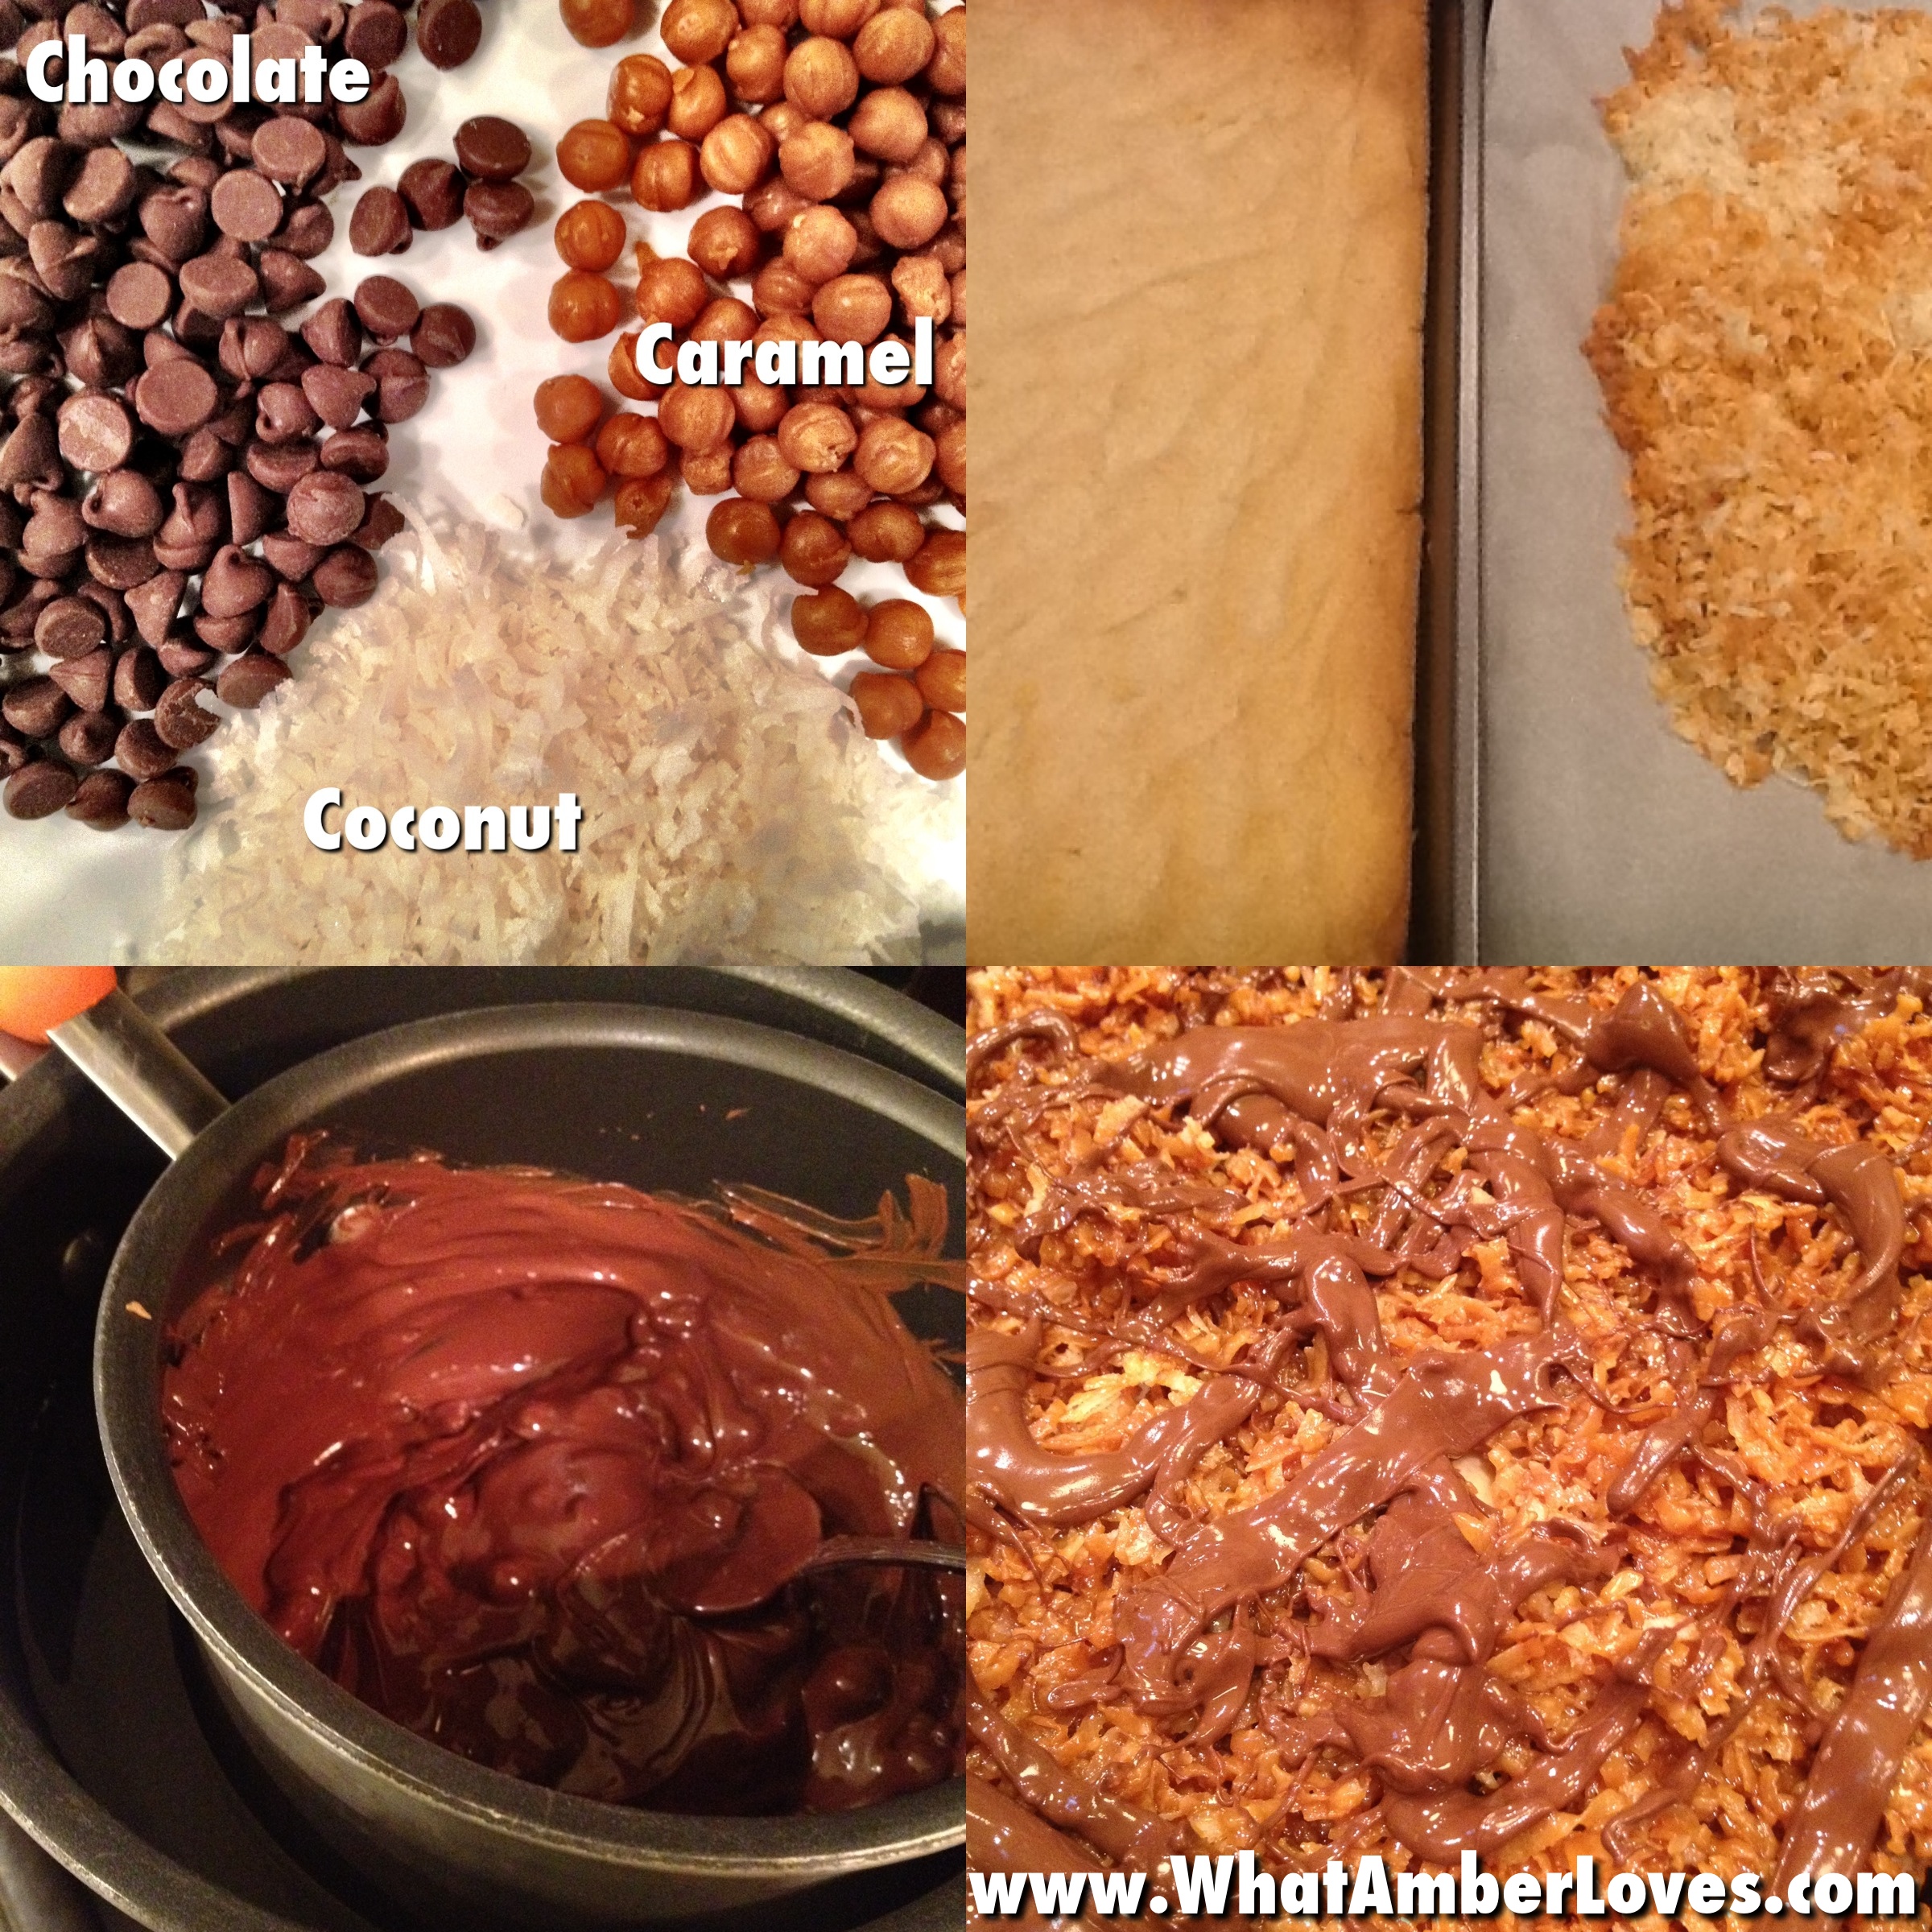
While your cookie base is cooling, turn the oven down to 300F and start toasting your coconut. My coconut took about 20 minutes total, stirring every 5 minutes. Also happening: Melt 12oz of caramel with 3 Tbs milk and 1/4 tsp salt in the microwave. I ran my microwave in 90 second increments, stirring and repeating, until done.
Simultaneously, use a double boiler (pot in a pot of water) to melt your chocolate.
When your coconut is done toasting, mix it into your melted caramel. Spread it across your shortbread cookie base. Drizzle with your melted chocolate. Consume. Done!
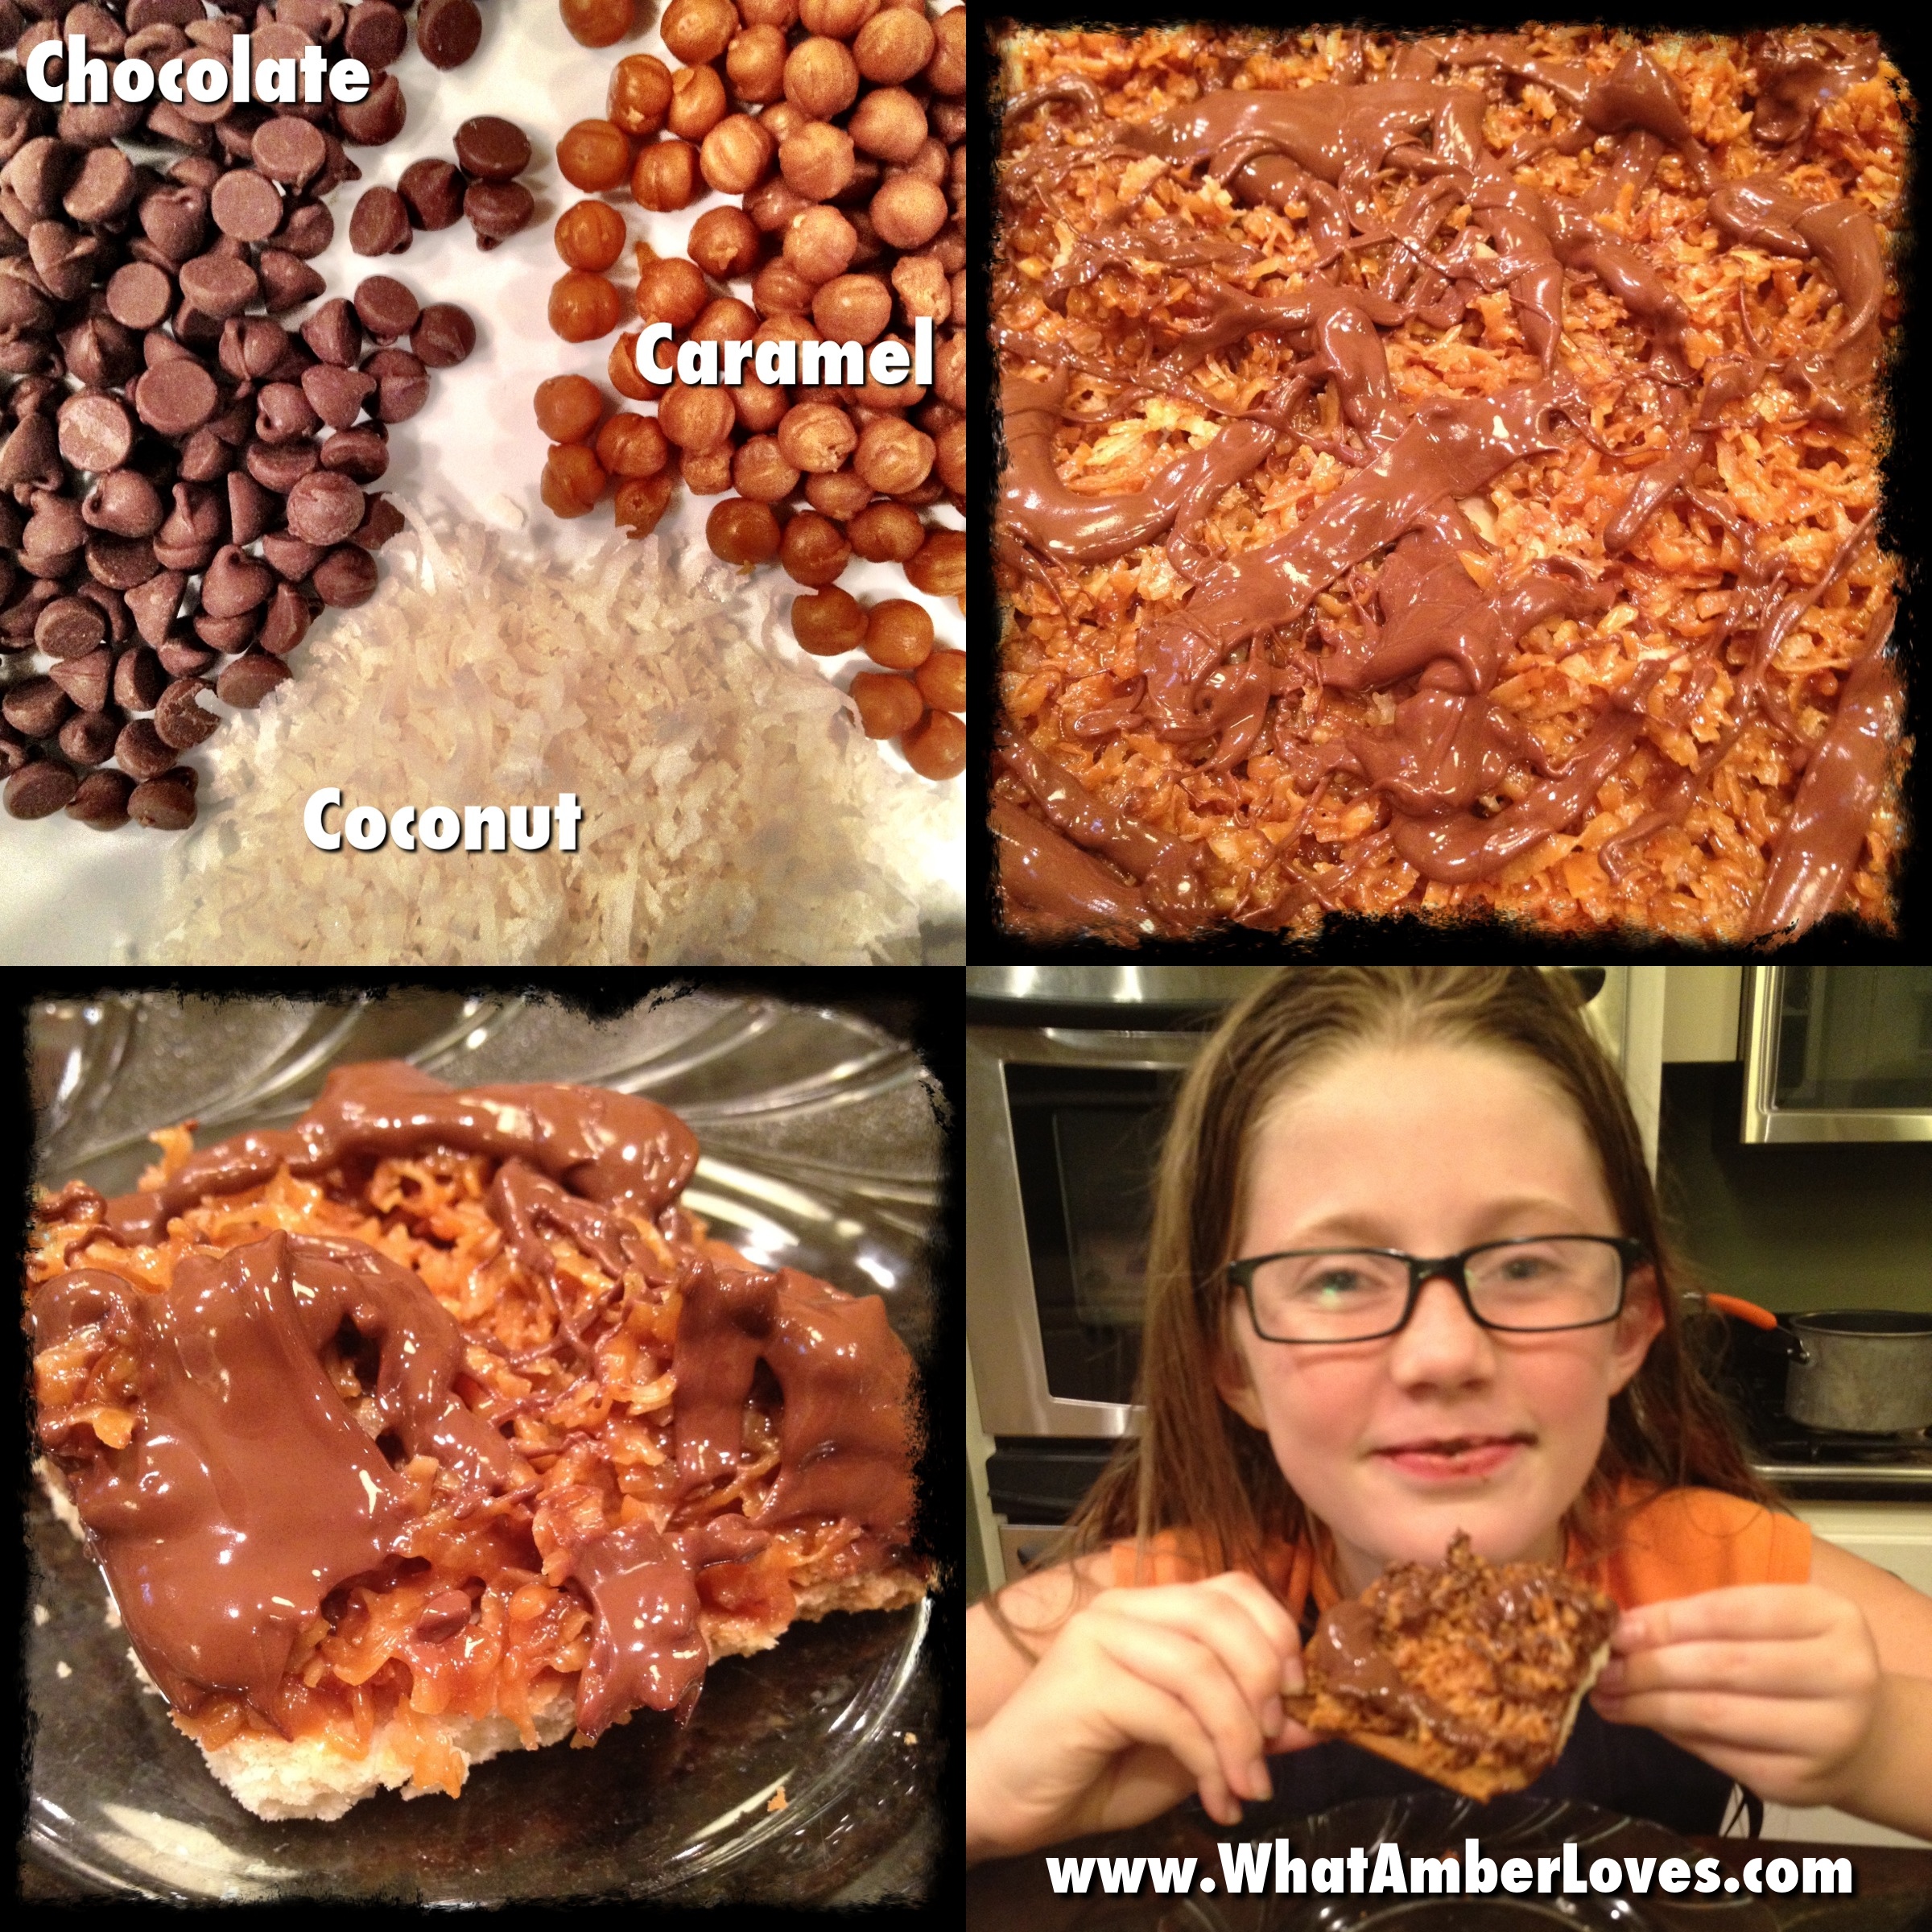
Dear facebook, the kids and hubby loved these, but for my sake, please show more diet friendly foods in the news feed tomorrow. lol. Please and Thank You!
Your Friend,
~Amber Hamilton Henson
PS:
Like this post? Be sure to check “my Kitchen” for links to more of my recipes!
Wonder to which parties I’m linking? I have a page dedicated to “shares”, too, that links to the best parties around!
Guess what?! I was featured!! 😀
![]()
This post is linked:
Bizzy Bakes
Love Bakes Good Cakes
Creations by Kara
AlderBerryHill
At Home With Mrs.M
Couponing n Cooking
I’m Addicted To Recipes
SavvySouthernStyle
TheKingsCourt4
DJ’s Sugar Shack
my1929Charmer
No Minimalist Here
Miz Helen’s Country Cottage
Mandatory Mooch
House of Hepworths
The Ease of Freeze
2805
(As always, if this post is featured on your blog, the Party Hostesses’ Links/Buttons will be pasted on my “shares” page AND on this actual post.)


