Master Bedroom Tour
Welcome to our Our Master Bedroom Suite!
(At any point, you can click on a photo, and an enlarged copy will open in a new window/tab!)

Pinning Welcome!
On this site, bits and pieces of different rooms are visible in my project posts and recipe posts, but this is my VERY FIRST “finished” whole room reveal in Blogland! YAY!
We’ve had a hand in creating A LOT of what is in the room you are about to see.
Specifically:
*We put in new hardwood Sapele floors.
*We painted the walls using Home Depot’s flat Behr “Smokey Topaz.”
*We built and upholstered the headboard.
*We built and upholstered the valance.
*We painted the antique dress form and covered her in leather.
*We painted and applied vinyl graphics to a vanity.
*We painted and upholstered the stool for the vanity.
*We reupholstered the antique Italian settee.
*We decoupaged an antique door and hung it above the bed.
*We created the “floral” arrangements and potted the plants.
*We accessorized using pieces passed down through the family, gifts, and a few unique finds from specialty boutiques.
I’m sure I’m forgetting things in the list, but you get the gist of it, right? This isn’t a catalog room by any stretch of the imagination. It is ours, just ours, and we worked for it. Several of these projects happened just prior to beginning of this blog, since I just started two months ago, but a few have happened recently. For example, you can read more about the door in my “Crazy Old Door” post, or read a tutorial about applying vinyl graphics to furniture in my “Vanity” post by clicking on those links.
Have you signed up to receive my updates or “liked” the Facebook page, yet?

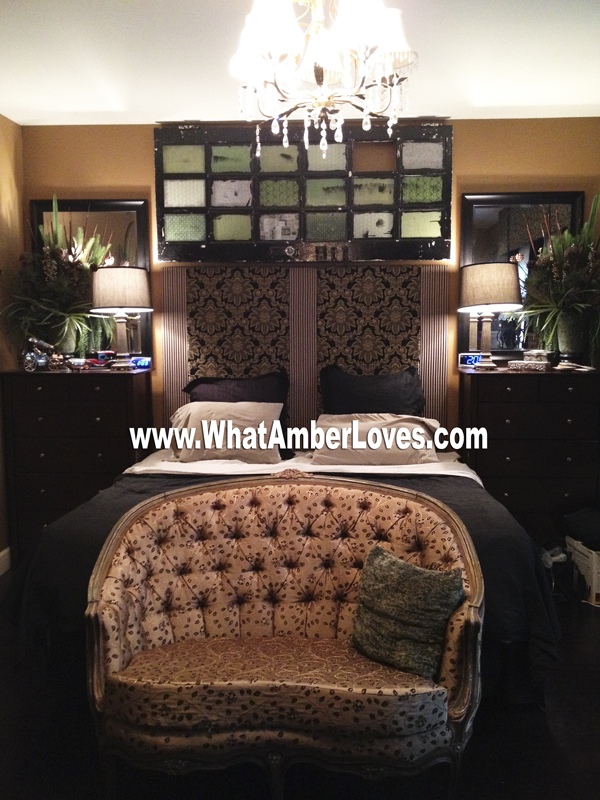
In this first area that I’m showing in the next photos, you’re looking to the far end of the room. You see the door we decoupaged, headboard we built, the bed, a pair of contemporary chests, and the antique settee we re-upholstered:


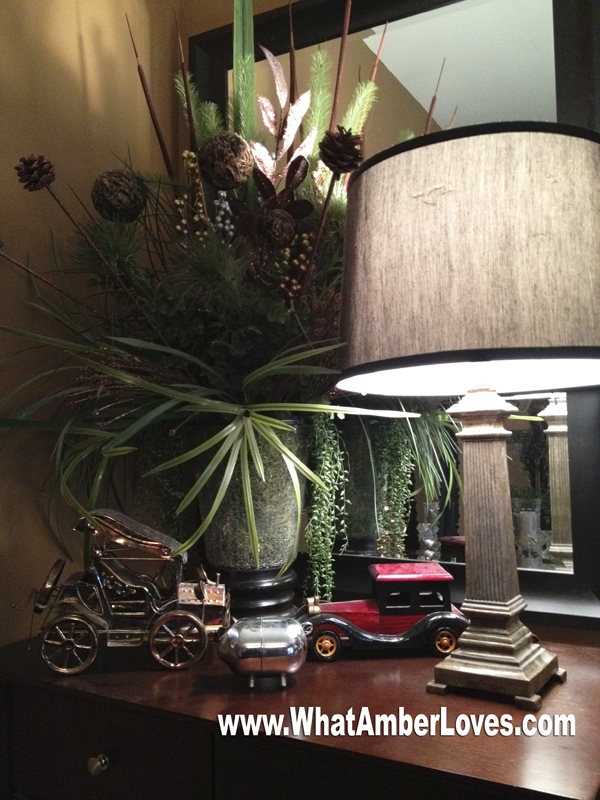
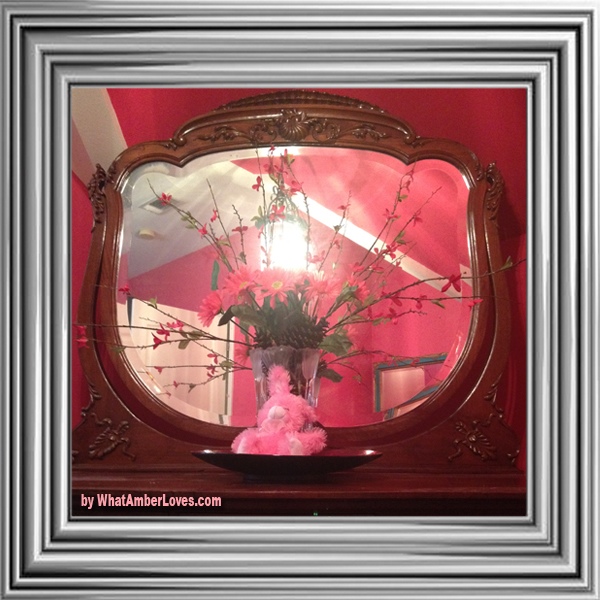
The next photo is the top of the chest on “his” side of the bed, topped by a floral arrangement, lamp, copper car musicbox, wooden car storage box, and a little piggy bank from his childhood:
The next photo shows the top of the chest on “her” (my) side: Similar to his, except that instead of cars, I have pieces of silver handed down to me from my grandmother and a silver plate trinket box given to me by a friend:

Next, also on my side, you see my re-vamped antique dress form that was in terrible condition when I purchased it. We painted it gloss black and covered the crumbling, tattered paper-ish form of the body in real black leather. She is fully functional, now, spinning, widening and compressing as needed. You can also see a red lacquered jewelry box from my mother in-law and one of my many vintage lucite purses from the ’50s:

Next, you’ll see my deco vanity vignette with stacked mirrors, wall shelves, with arrangements, crystal lamps and clocks, houseplants, & crystal candleholders on top of the vanity.


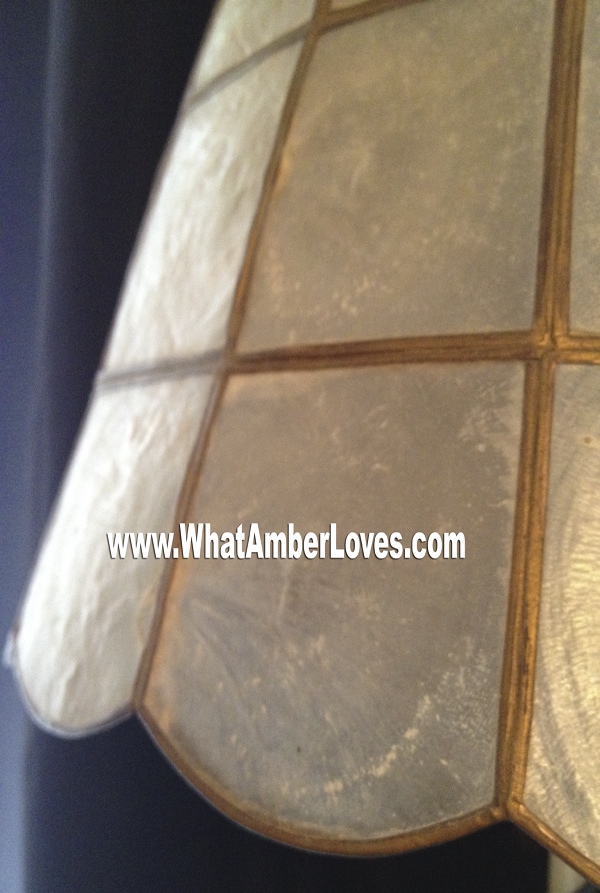
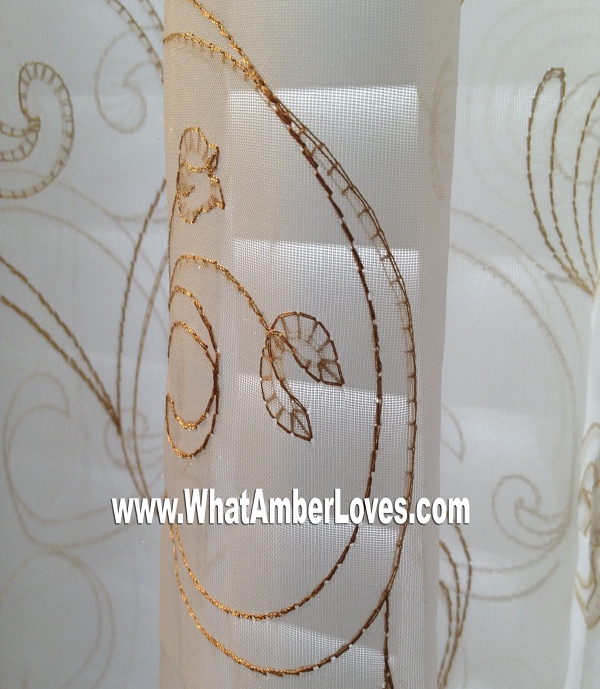
Next, you’re seeing the “window wall” area of our bedroom. Basically, it is a large pair of windows adorned by curtains, embroidered sheers, and custom valance that coordinates with the headboard. The window is flanked by a pair of HUGE 7 foot tall mirrors. Other items visible include a pair of multi-drawer jewelry chests that hold my collection of bracelets and necklaces that I make. A little shelf holding a capiz shell lamp, other little decor, and my tanning bed that I hardly ever use, because I have decided to embrace my paleness. Actually, from this point forward, I’m not going refer to myself as pale, but “porcelain,” instead. There.


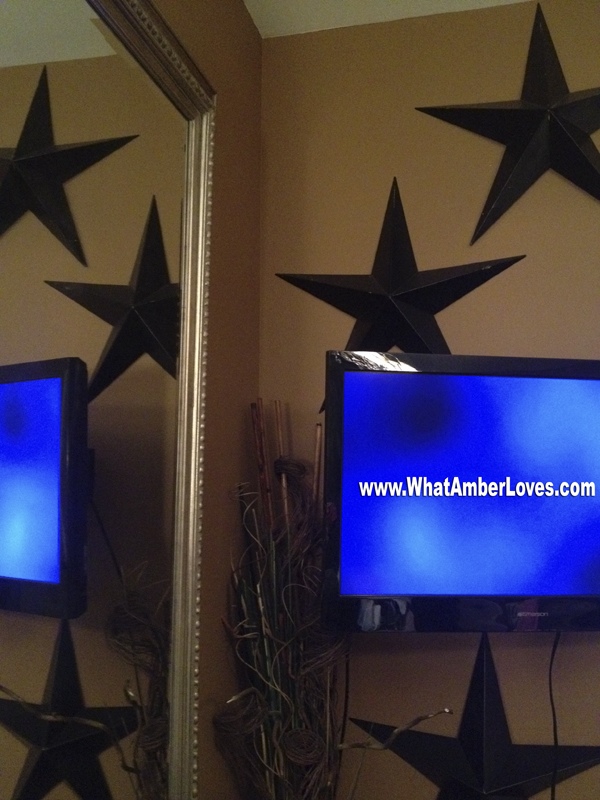
Now, in the next four photos, you’re looking at the “window wall” from the other direction, you see the tanning bed, tv, a few stars painted black, a mirror, and the rug. Do you see the rug? The rug is made entirely of scraps left over from neck-tie manufacturing. Each little piece of necktie is individually stuffed and sewn onto a backing. Neat, right? The international manufacturer’s import/export home office is here in Little Rock, and, once upon a time, they would open their warehouse one day per month to us locals and sell their overstock at wholesale prices! Perhaps, they still open once a month. I don’t know because it has been several months since I’ve been there. The pictures:


Well, that concludes my tour.

Thanks for taking the time to look around our room! I may be proud of the space, but I’m also quite flattered that you took the time to look! I’ll get around to photographing other rooms in our home at some point soon, as we complete several more projects that are midpoints!
Your Friend,
~Amber Hamilton Henson
PS
Enjoy my projects or links? Please, pin it, tweet it, like it, whatever… just be social and feel free to share as long it links back to here! Also, if you do feature this room in some way on your blog/site/’zine, please let me know, and I’ll add your link into this post!
This room will go on tour with other rooms at a few blog parties!
Daily Links:
Weekend WrapUp @ TatorTotsAndJello
Get Schooled Saturday @ TooMuchTime
DIY projects @ The36thAvenue
Saturday Nite @ FunkyJunkInteriors
Sunday’s Best @ My1929Charmer
Make The Scene Mondays @ AlderBerryHill
Masterpiece Monday @ BoogieBoardCottage
Mod Mix Monday @ ModVintageLife
Nifty Thrifty Tuesday @ CoastalCharm
Be Inspired @ ElizabethAndCo
Wow Us Wednesdays @ SavvySouthernStyle
All Star Block Party @ SimplyDoneWright
PotPourri Party #42 @ 2805
Inspiration Friday #83 @ AtThePicketFence
What’s Cluckin’ @ ChickenScratchNY
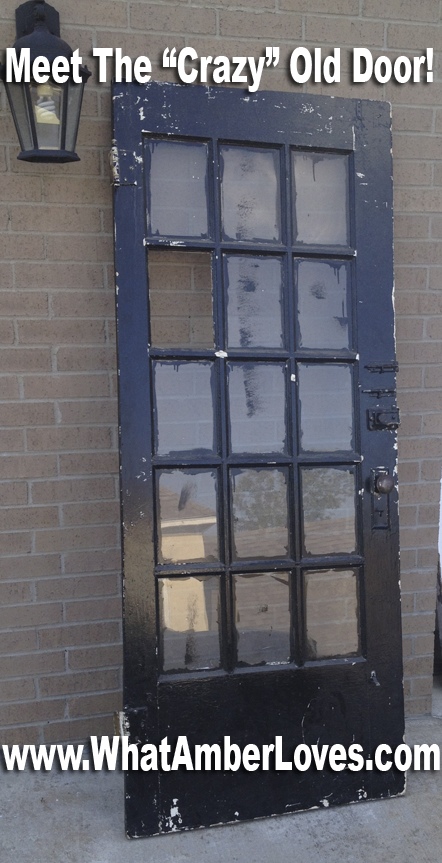
Crazy Old Door
We bought a door, a really, really old door, from an architectural salvage booth at a thrift market, here in Little Rock. The door reminds me of my old, historic house that we sold. In that house, I loved adding really modern elements into the turn of the century home, because I loved the contrast. I still love contrast, so now I find myself adding historic pieces to our much newer (built in ’04-’05) modern house decor in order to achieve the contrast. This crazy old door is my newest addition to help provide the contrast that I love so much.
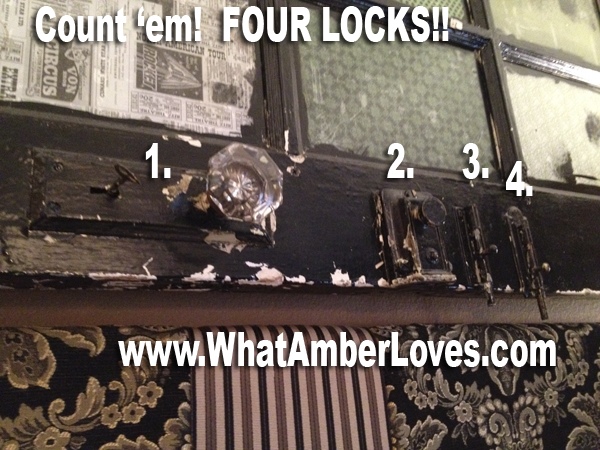
Did you notice that I threw the word “crazy” into the description of the old door? Well, it is a wood door, full of brittle, hand blown glass panes, with four, yes FOUR, locks on it. Crazy, right?! I’m thinking that if a person needs four locks on a door, perhaps they ought not have a glass exterior door in the first place. Alas, perhaps they finally realized this, too, which is why I was able to purchase it from amidst architectural salvage! 😉
So, with no further adieu, here is the “before” picture of the door as it was:
(click on photos to see enlarged views in a new window/tab)
You may notice that it is covered in glossy black enamel paint, over layers of white glossy enamel, over black, over black, etc. The paint, in general, is really well adhered, so I gave it a good old-fashioned scrubbing with a sponge and soapy water. I considered scraping the black-paint-gone-wild drips, runs, and roller marks from the glass panes, but ultimately decided that I like the character it adds to this old door. Furthermore, I decided not to replace the one missing pane of glass. Inexpensive, modern glass just wouldn’t look right beside the wavy panes with all of their wonderful ripples that show the age of the glass in the other panes.
We are not using it as a functional door; we decided to hang it on the wall as a decorative art piece in our master bedroom. In order to have it “fit” the room and be a little bit more than just a door hanging on a wall, we made a few changes. First, we trimmed it top and bottom on the table saw in order to make it fit its intended space. By the way, when trimming it, we discovered that it is a cedar door! Score!! Then, we decoupaged it with scrapbook paper and ModPodge. When I say “we decoupaged” it, what I actually mean to say is that my middle daughter, age 7, did all the work! She loves crafts and was more than eager to volunteer for the project! She did the work by our back door in the kitchen, and I just supervised while I was cooking dinner.
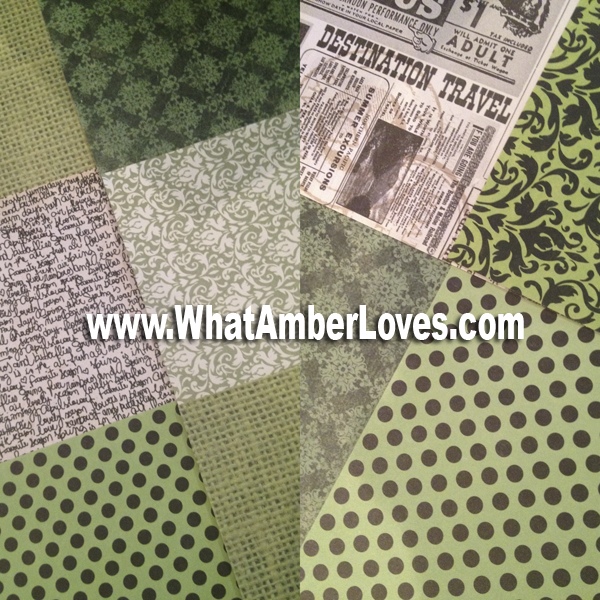
Here is a photo of the papers we used, followed by a photo of her working:
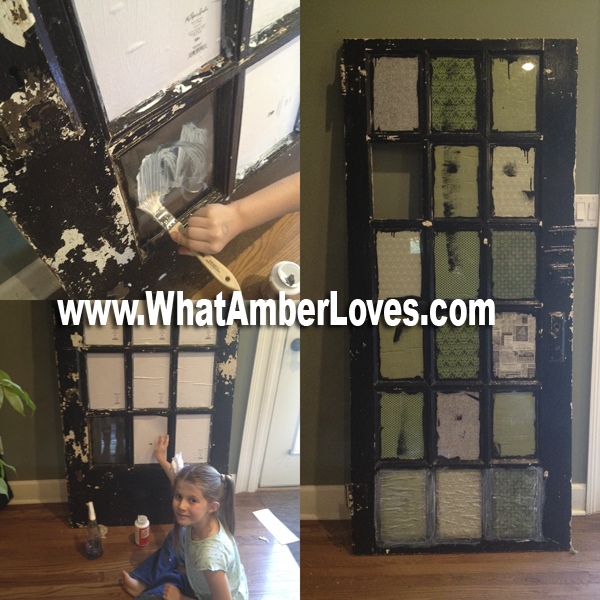

Okay, here is the part where the door is no longer “crazy,” and I become the “crazy” one. Do you notice how much wood is at the base of the door compared to the top? Here comes my crazy: Just as much as I love contrast, I also have this strong gravitation/desire for symmetry. This door is going to hang sideways. It can’t look too busy at one end and as if it is lacking something at the other end. I NEED for it to feel balanced. So, since the ModPodge is gloss, I decided to “fake” three panes at the bottom of the door!! Look at the photo above this paragraph; see the three “panes” with wet whitish-looking glue on the papers. Yep, we inked the edged of the paper with an ink pad intended for stamping, measured proper gaps, and ModPodge’d those papers right onto the wood in order to give the illusion of three more panes!! Fortunately, ModPodge dries really clear and glossy! The desire for symmetry was important enough to me that I did actually create FAKE panes in order to have visual balance. See, told you, “crazy”, right? Regardless, I love the way it turned out! It’s just another layer of interest on this art piece, I hope!
Here is a close-up photo of the four locks on the crazy old door, followed by a photo of it hanging above our headboard in our master bedroom:
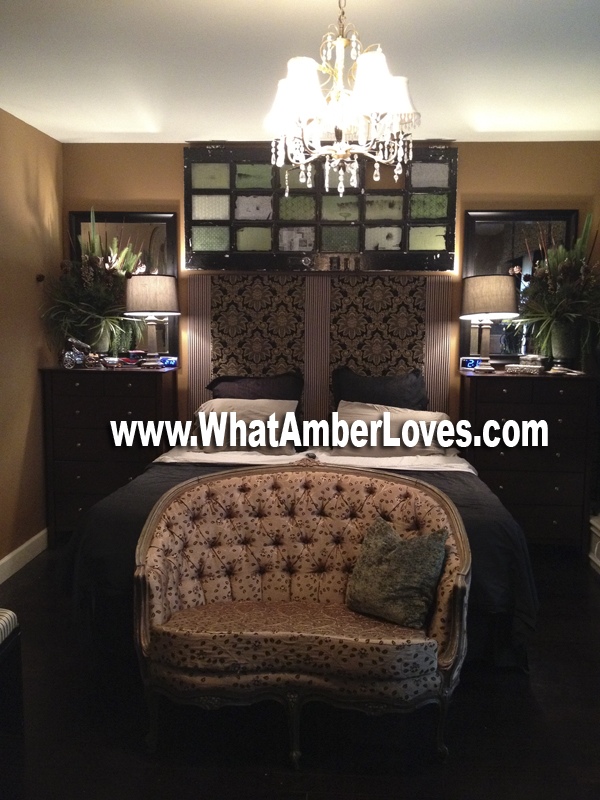

We love it! We think it adds just the right amount of character, sense of history, and coordination with other pieces in our room. What do you think?
Want to see a few more neat projects using repurposed/upcycled doors & windows? Easy, click over to Dishfunctional Design’s project round-up posts here and here. Each of the photos she shows has a text link below the photo for even more info, some of which may be story/tutorial style similar to this post!
Your Friend,
~Amber Hamilton Henson
PS
My next post will show our master bedroom in it’s entirety. I already took the pictures! I think we have accumulated and created some neat pieces in our room. Stay tuned to see the rest of the room!
“Later ‘gators!” and “Afterwhile Crocodiles!” 😉
Enjoy my projects or links? Please, pin it, tweet it, like it, whatever… just be social and feel free to share as long it links back to here! Also, if you do feature this room in some way on your blog/site/’zine, please let me know, and I’ll add your link into this post!
This article appears in Hat Trick Magazine, beginning on page 40! Read an online copy by clicking on the Hat Trick Magazine cover:

This door was a “linky party feature, too!”
Neat! The links to see the features:
 |
 |
This door will be hanging out in some great parties! Check my shares page for details! The daily links:
THURSDAY:
Home and Garden Thursdays @ Blissful Rhythm
Thursdays are Your Days @ 52Mantels
Tutorials, Tips, & Tidbits @ StoneGableBlog
Transformation Thursdays @ TheShabbyCreekCottage
Time Travel Thursday @ TheBrambleberryCottage
POWW Furniture Link Party @ PrimitiveAndProper
Treasure Hunt Thursday @ FromMyFrontPorchToYours
Hookin’ Up With HOH @ House of Hepworths
FRIDAY
Happy Hour Friday @ HappyHourProjects
Inspiration Friday @ AtThePicketFence
Vintage Inspiration @ CommonGround
Potpourri Party @ 2805
Link Party & Mes Preferes @ ReDouxInteriors
Catch As Catch Can @ MyRepurposedLife
Frugal Friday @ ShabbyNest
Furniture Feature Friday @ MissMustardSeed
DIY projects @ The36thAvenue
SATURDAY
Get Schooled Saturday @ TooMuchTime
Weekend WrapUp @ TatorTotsAndJello
Saturday Nite @ FunkyJunkInteriors
SUNDAY
Sunday’s Best @ My1929Charmer
MONDAY
Mop It Up Mondays @ IShouldBeMoppingTheFloor
TUESDAY
Be Inspired @ ElizabethAndCo
WEDNESDAY
Wow Us Wednesdays @ SavvySouthernStyle
All Star Block Party @ SimplyDoneWright
Autumn Joy Wreath! (+ DIY home happenings)
Good Morning!!


Labor Day has come and gone; it’s time for me to switch wreaths. This is one of my favorite wreaths. I purchased a fairly simple grapevine wreath with a little sign already attached that said “Autumn Joy”. It also had a few faux leaves attached. Then, every year for the last several years I’ve added little tidbits. The wreath has grown and grown! It now includes 5 little scarecrow dolls of various sizes, a garland of leaves, lucite grapes, and … 🙂

Each year, I use this wreath from Labor Day through Thanksgiving. This year, I may make a “scary” Halloween wreath to use for 2-3 weeks near Halloween, too. We’ll see whether or not I can find the time and supplies between now and then.
Here is a brief update about other recent events since my last post: Because we created a new Hot Pink Bedroom for our oldest daughter, our middle daughter was feeling like she was left behind in the “old room” that they used to share as opposed to having her “own room”, so we decided we needed to update that room for her to make it her own. She chose a dark, yet vibrant, purple paint. I’m still sewing for our oldest daughter’s room, but now I have A LOT more to do for our middle daughter’s room as well. Here’s a peek at the new purple bedroom progress:

During the last couple of months, we removed all of the carpet from the 4 bedrooms and closets that the previous owners had enjoyed. We’ve replaced the floor covering with my preference, hardwood floors. Now, other than bathrooms, ALL of the upstairs will be floored in a dark espresso finished hardwood!
Now, I’m heading away from this page to look around the blogosphere at other great Autumn project happenings! Later!
Your Friend,
~Amber Hamilton Henson
PS: (Be sure to check my “shares” page for upcoming blog parties and events!)
Oh, and I FINALLY made a Facebook page for my blog!! Hop over there and “like” it, please!!
Linking this post:
PARTIES:
Funky Fall Decorating @ FunkyJunkInteriors
MopItUpMondays, NiftyThriftyTuesday, WowUsWednesdays
Wreaths Feature @ Funky Junk Interiors
Home and Garden Thursdays @ Blissful Rhythm
Thursdays are Your Days @ 52Mantels
Transformation Thursdays @ TheShabbyCreekCottage
Time Travel Thursday @ TheBrambleberryCottage
Hookin’ Up With HOH @ House of Hepworths
Happy Hour Friday @ HappyHourProjects
Tour Our House!
Hello, Internet! Good Evening!! Welcome to our home!

(click on photo to enlarge)
I have written a couple of posts during the last couple of days, but I haven’t published them, yet. The reason? Well, they are posts about interior design projects that are happening, and I felt like my readers needed more context in which to visualize the spaces as they relate to one another. So, here it is! A labeled “floorplan” of our house!
If you read my post about our last house, the old house that became a historic house, then you already know that I truly believe in value of a good set of floorplans for helping everyone be able to visualize space and how spaces flow from one another! So, I will definitely publish a set for this house if/when we sell it, too!
The room by room tours of this house:
Dining Room – set for a “Mad Tea Party!”
Bonus Room – the room over the garage!
Library/Office – our library and homework area!
Master Bedroom – a full tour of this room!
Bedroom 4 – daughter’s “Hot Pink Bedroom!”
Other bits and pieces of interior decor can be accessed through my “Decor and Crafts” page!
Yay! 🙂
Your Friend,
~Amber
Wall Collage of Frames, Mirrors, & Quotes
Do you have excess empty frames and perhaps a spare mirror or two that doesn’t really have a proper place to hang because it isn’t of the proper scale? If so, I suggest grouping them all together; then, it reads as one comprehensive vignette rather than as lone pieces creating clutter. Our ceiling height throughout the first floor of our home is 10′. Hanging mirrors and art that are only 24″ or so just doesn’t make enough of an impact for my taste. I like “statement” scale art and installations. Thus, I grouped/collaged the mirrors and frames. There are a few options for creating your own display in this style, you can hang them all really close together, or you can do like I did and actually OVERLAP them. It was easy.


Here is another angle where you can see the frame collage reflected in another mirror in our living room. Btw, in this photo, you can also see the smaller of my two belt chairs!

I laid out the mirrors and empty frames on the floor to arrange them. I snapped a pic of the arrangement on my phone. Then, I just started hanging them on the wall while referring to my pic. For the frames that overlap on top, we just used our finish nail gun (tiny, small nails shot through the pneumatic nail gun via portable air compressor) to nail them together as inconspicuously as possible. Finally, to tie it all together, I’ve added a few quotes that were cut using my sign machine. For a complete tutorial on how to install vinyl sign graphics, check out my tutorial for installing graphics on furniture.
The quotes that I chose to use are kind of a variety… an art quote, one from Dr. Seuss, one from Ayn Rand, one from Wayne Gretzsky, one from Thomas Edison … you know, just general interest quotes that I found interesting for one reason or another… I’ll continue adding quotes as the moods strike! 😉
Here a few photos of the quotes: (Side note, photographing mirrors is tricky! It was actually quite a challenge to get a semi-decent looking photo that doesn’t show me holding the camera, that doesn’t reflect light, that doesn’t have a busy reflection, etc. Yikes!)


Thanks for taking time to read this post and check out our little “I’ve Been Framed” project! I’ll be back tomorrow with a post about a crazy old door that we’ve been working on!
Your Friend,
Amber Hamilton Henson

PS
As, always feel free to repost an image, pin it, fb it, tweet it, etc, so long as the image clearly links back to here! 🙂 I Love blog party Linking!! If this post is “featured” on your blog/site/zine, please let me know and I’ll add your link into this post and my “shares” page!
Fabulous Mirrors Category @ FunkyJunkInteriors
Happy Hour Friday @ HappyHourProjects
Weekend Showoff @ LadyBirdLn
It’s Inspiration Friday @ AtThePicketFence
Potpourri Friday @ 2805
Catch as Catch Can @ MyRePurposedLife
ReDoux Link Party @ ReDouxInteriors
Furniture Feature Friday @ MissMustardSeed
Weekend WrapUp @ TatorTotsAndJello
DIY Home Projects @ The36thAvenue
Get Schooled Saturdays @ TooMuchTime
Saturday Nite Special @ FunkyJunkInteriors
Sunday’s Best @ My1929Charmer
Make The Scene Monday @ AlderBerryHill
Masterpiece Monday @ BoogieBoardCottage
Mod Mix Monday @ ModVintageLife
Craft o Maniac Monday @ Craft-o-Maniac
Mop It Up Mondays @ IShouldBeMoppingTheFloor
Nifty Thrify Tuesday @ CoastalCharm
Be Inspired @ ElizabethAndCo
Wow Us Wednesdays @ SavvySouthernStyle
Time Travel Thursday @ TheBrambleberryCottage
Thursdays are Your Days” @ 52Mantels
Transformation Thursday @ TheShabbycreekCottage
Home and Garden Thursday @ BlissfulRythym
Tutorials, Tips, and Tidbits @ StoneGableBlog
Hookin’ Up With HOH @ HouseOfHepworths
New Hot Pink Bedroom
YaY!! We’ve updated our oldest daughter’s new room!!


(Click on any photo to enlarge it into a new window/tab.)
For the first time since our middle daughter was born, our oldest is no longer sharing a bedroom. We’ve always lived in houses with more enough bedrooms that they didn’t have to share; it was always our choice to have them share a room. We collectively decided that it was time for them each to have a little more space and chance to personalize their own spaces. It is a really big change for the two of them. Our oldest is 10, now, and our middle daughter will be 8, soon. They had shared a room for 8 years.
In the name of truly personalizing the space for our daughter, we let her pick her new bedding, the paint color for the walls, etc. Transforming the room was quite a project. Since the former owners of the house used it as a “music room” I believe, it was carpeted, had white walls, and didn’t have a closet for clothes. We changed all that. It now has new hardwood floors, bright pink walls, plenty of closet space, and unique furniture.
We still have a few small projects left to do in here, but I can’t wait to show you the BIG projects that we’ve already tackled. Mitch, our daughter, and I worked together to make this a great space for her to use and continue to grow into for the next few years.
Now, for the reveal! I took a few pictures of the room as it is now! I’ll update again, when the accessorized vignettes are complete, too!
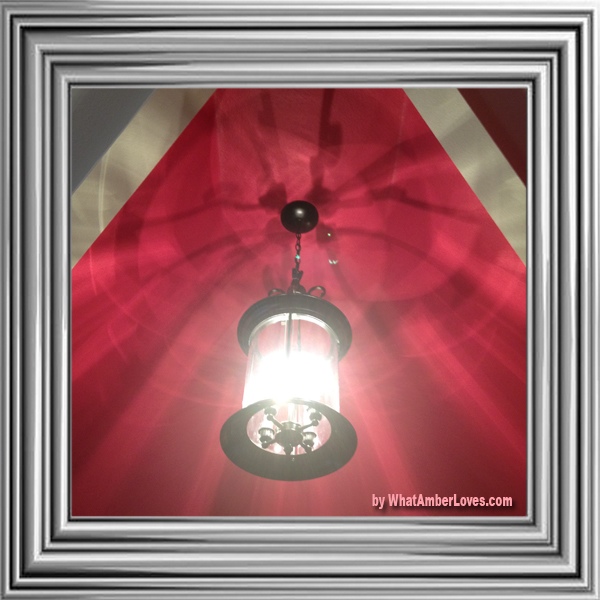
Architecturally, it is a really interesting room with neat angles on the ceiling, and it is really big. In her room, she has a full size bed, a dresser, a vanity, an armoire, a desk, an armchair, a neat silver chest, and room to spare. Seriously, it is a BIG room for a 10 year old girl, I think. One of my favorite features is that we moved a light fixture that was formerly in our foyer, spraypainted it black, and installed it in a way that it really shows off the ceiling angles with how it bounces light around through its beveled glass panels.
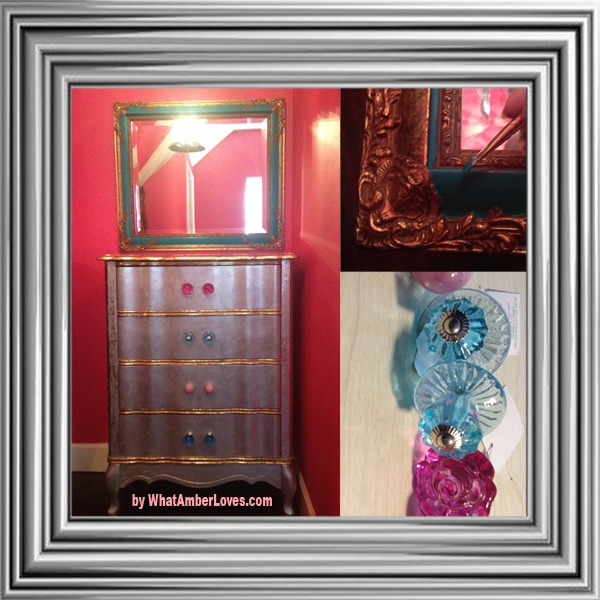
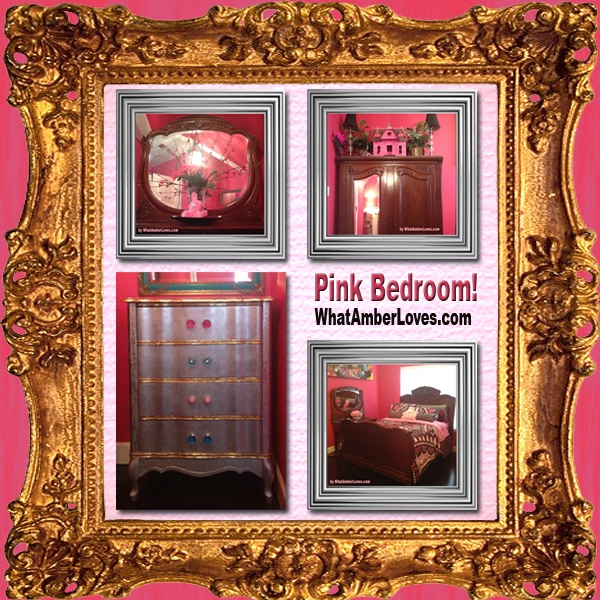
So, here is the fun silver chest that I mentioned. It is a gift from my grandmother. It has been in the family for a long time, but had been in storage for many years which ruined most of its original pale colored wooden finish. Awhile back, I coated the whole thing in silver rub’n’buff and gold leaf. (everything but the top surface.) Yes, really; all silver and gold!! Haha! Even though the package of craft product is labeled “Gold Leaf” in bold letters, it is in fact a metal leaf, not “GOLD,” as would be defined by a scientific periodic table of elements! As for the Rub’n’Buf, I don’t know whether there are any precious metals in there or not, but it is pretty! It is so easy to use! Just like the product says, I just rubbed the product onto the surface of the chest with a scrap of a old tshirt and buffed with another scrap; rub’n’buff. (Gold leaf: glue-ish medium known as sizing + leaf transferred using wax paper + spray sealer.) To personalize the chest for our daughter’s new room, we added a mix of new glass knobs in shades of pink and teal. (found them on sale at Hobby Lobby) And, I repainted an old framed mirror to coordinate. She LOVES the set! YAY!!
Our daughter’s new (antique) primary suite of furniture is also a gift from my grandmother. I slept in it at my great grandparents house as a child. It has been in the family too many generations to count! It dates back into early 1800s in Memphis, I believe, I’d have to re-read the provenace that my grandmother wrote for me in order to confirm. Regardless, I have great memories of the set having always been a part of my life… Now, my oldest daughter is using it. It will one day belong to one of my grandchildren or great grandchildren, I predict. Here are few pics of the dresser, armoire, vanity, and bed that are the set.
Click on photo to enlarge it.
Click on photo to enlarge it.

Click on photo to enlarge it.

Click on photo to enlarge it.

Click on photo to enlarge it.
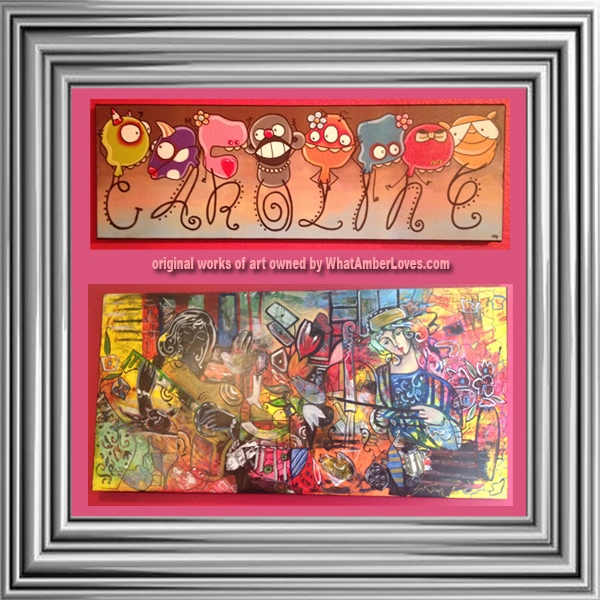
You may have noticed a few pieces of colorful art in a couple of pictures. They are original works of art, actual paintings, not prints. The one hanging above her vanity is HUGE. The pictures don’t really do justice to the fact that it is 6 ft x 3 ft. Big, right?! It is by a Canadian artist, Sarah Kinan. I bought it directly from the artist, online and she shipped it to us rolled. We built the frame and stretched it onto the frame. The second little name painting is by Veronique Perron. When I update this post with photos showing the vignettes and curtains, I’ll make sure that I add links to the artists…
Click on photo to enlarge it.
Update: In other hot pink bedroom news, I also finished sewing all of the sheers and curtain panels. See next photo…. Aaaaand, for her hot pink bedroom, we bought her the little glittery mosquito net type canopy that she wanted…Ten year old girl, she is, indeed, wanting such a sparkly thing! Love her!!

Click on photo to enlarge it.
Our daughter made the “no sew duck tape and grommet curtains” for her closet.
Click on photo to enlarge it.


Well, that’s all! As we complete new projects, I’ll add them to this post! 🙂
I hope y’all are having a great day! Thanks for reading our post and visiting our new project!
Your friend,
~Amber Hamilton Henson

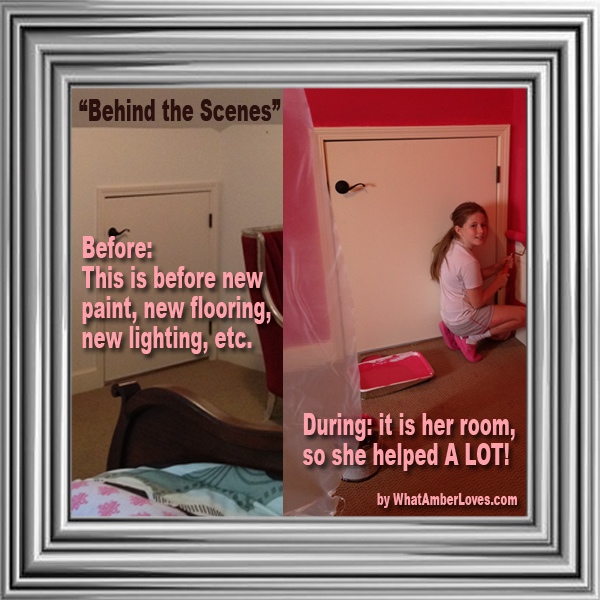
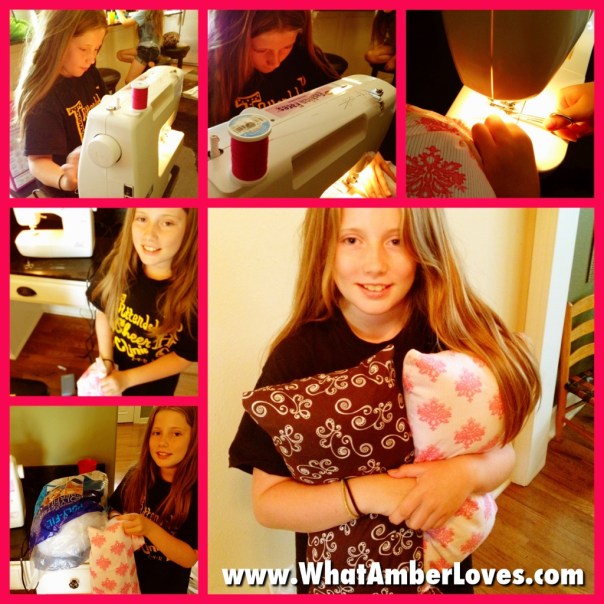
Lastly, before you go, here is a “behind the scenes” photos during the process:
UPDATE!!
We have a few other project posts related to this room!
(click on photo to see full post with details)
 |