Blog Archives
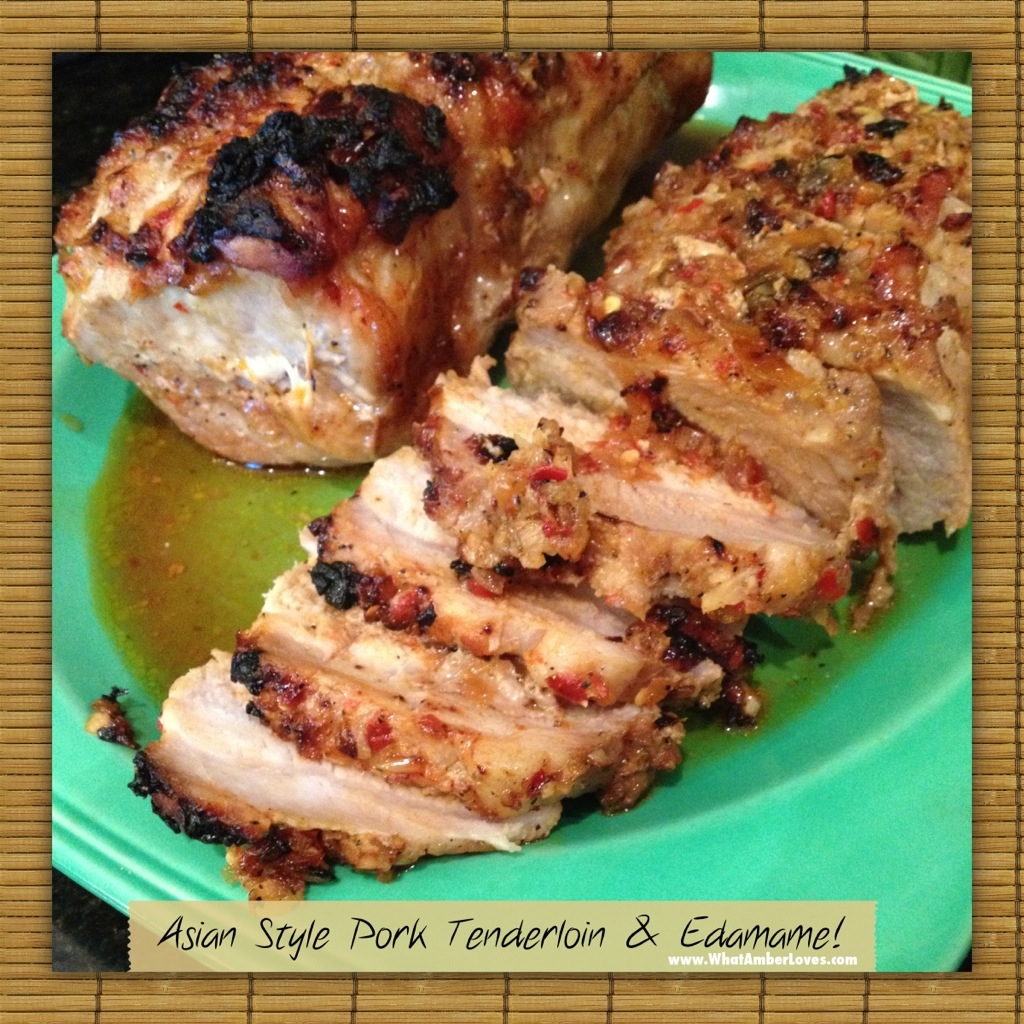
Asian style tenderloin and edamame!

These are simple, yet super flavorful recipes! You’ll marinate the tenderloin overnight, bake, and then prepare the young soybeans, also known as Edamame, during the pork tenderloin’s 10 minute “rest.” So easy!
FOR THE TENDERLOIN: from AllRecipes.com
For best results, marinate the pork at least 8 hours (overnight is best) and flip it after 4 hours.
1/3 cup lite soy sauce
1/4 cup sesame oil
2 tablespoons Worcestershire sauce
1/8 cup packed light brown sugar
3 green onions, chopped
4 cloves garlic, crushed
1.5 tablespoons Asian chile paste
1 .5 teaspoons pepper
1 (3 pound) fat-trimmed pork tenderloin
Pour into a medium bowl the soy sauce, sesame oil, and Worcestershire sauce. Then whisk in brown sugar, green onions, garlic, chile paste, and pepper. Place the tenderloin in a shallow dish. Pour sauce over tenderloin, turning the meat a few times to coat. Cover dish, and refrigerate at least 8 hours.
Preheat oven to 450 degrees F (230 degrees C). Transfer pork with marinade into an aluminum foil-lined baking pan.
Roast in a preheated oven 30-45 minutes.
Remove, and let stand 5 to 10 minutes before carving.
During the 10 minute “rest,” prepare the soybeans!
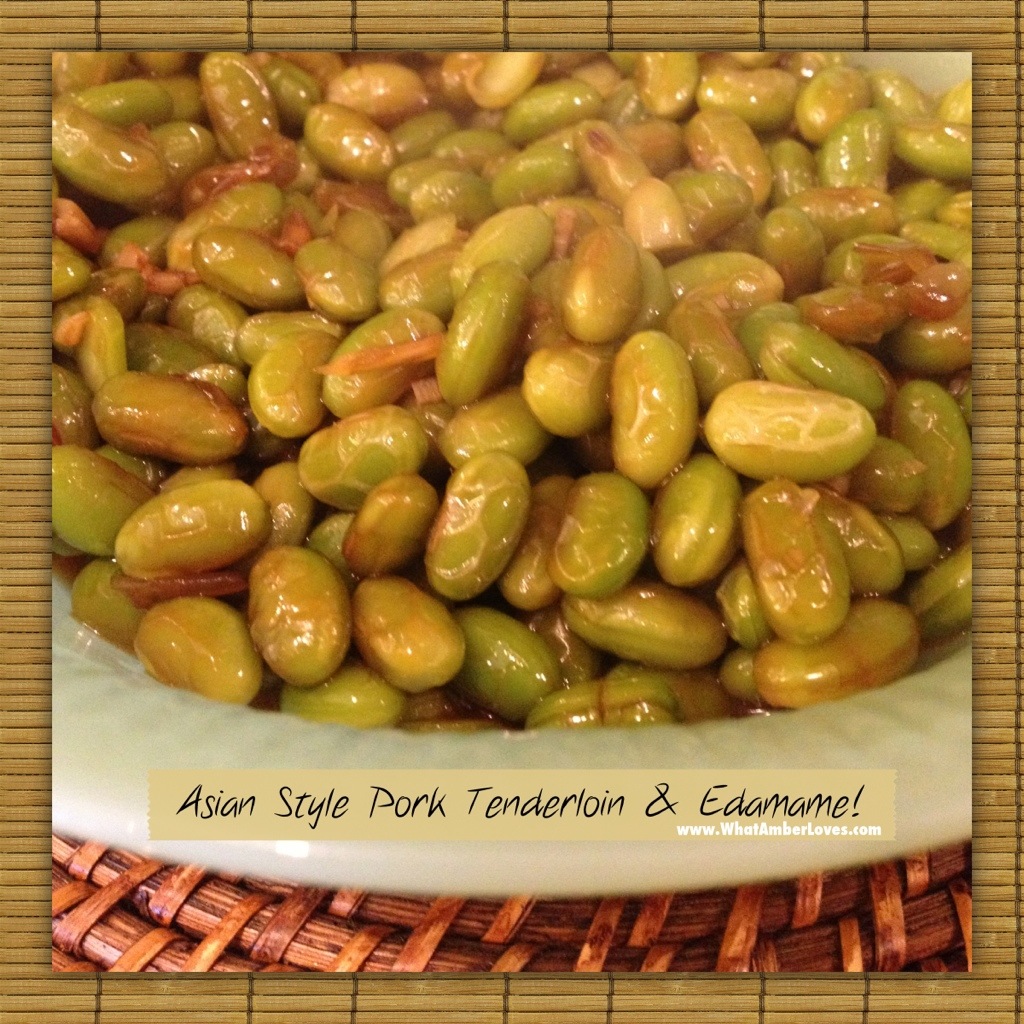
FOR THE YOUNG SOYBEANS (EDAMAME): from AllRecipes.com
1/4 cup water
3 cloves garlic, minced
1 (16 ounce) package frozen edamame with or without the pod
1/4 cup teriyaki sauce
2 tablespoons brown sugar
2 tablespoons rice vinegar
1 tablespoon sesame oil
2 tablespoons sesame seeds
Directions
Bring the water and garlic to a boil in a saucepan over high heat. Stir in the edamame, cover with a tight fitting lid, and cook until the edamame are hot, and the liquid has nearly evaporated, about 5 minutes. Reduce the heat to medium-high and stir in the teriyaki sauce, brown sugar, vinegar, and sesame oil. Stir constantly until the sauce has thickened and coats the edamame, about 4 minutes. *Optional: Sprinkle with sesame seeds or sunflower kernels to serve!

********
I hope you enjoy these recipes as much as we do! While I wasn’t familiar with “Edamame” growing up, I’ve always been familiar with soybeans and seeing them grow throughout our State. Soybeans are an important crop in Arkansas. For recipes for diy soymilk, edamame, soy nuts, tofu, and more, watch P. Allen Smith via TheMiracleBean.com.

See you in the blogosphere!
Your Friend,
~Amber Hamilton Henson

P.S.
This link was tweeted by the Arkansas Soybean Promotion board; find them on Twitter at Twitter.com/ArkansasSoybean!
This post will be updated as it links with other sites.
Visit the blog linkups, here:
arkansaswomenbloggers’ Sunday LinkUp
Mom’s Test Kitchen ~ Wonderful Food Wednesday #47
RattlebridgeFarm’s Foodie Friday
Pineapple~Cheddar~Ritz Bake!
Pineapple-Cheddar-Ritz Bake! Yum!
Here is a recipe given to me by my sister-in-law. The very first time I tasted it at her house during the holidays, I knew I needed this recipe in my collection! (…a little sweet from the pineapple, a little rich from the cheddar, and a bit buttery with great texture from the Ritz… YUM!)This recipe is exactly as she gave it to me, no modification. We love it and love serving it to dinner guests. I was recently asked for the recipe and realized that I hadn’t posted it onto this site, so now, with no further adieu, here it is! It is really quick to prepare. When we have guests for a dinner party, it is a great dish to prepare earlier in the day, then just pop it in the oven 30 minutes before dinner. It is just sweet enough, you could also almost consider it a dessert. It is also great as a breakfast dish. Just trust me and try it. It is wonderful AND unique. You’ll be pleased to have your guests ask for the recipe, too!

The RECIPE:
1/2 cup Sugar
3 tbsp Flour
4-5 tablespoons of Pineapple Juice (from the next ingredient)
20 oz Crushed pineapple in its own juice (saving juice)
2 cups Sharp Cheddar cheese, grated
1 stick of Butter (sweet, salted)
1 tube of Ritz brand crackers
1) Preheat the oven to 350F.
2) Mix the first three ingredients (sugar, flour, and juice) in a small bowl.
3) Add the rest of the can of pineapple into the above, stir, and pour into a 9″ x 13″ greased baking dish.
4) Evenly spread cheese across the top.
5) Crumble/crush the tube of Ritz crackers and mix with the stick of melted butter. Layer evenly across the top of the baking dish.
6) Bake at 350F for 30 minutes.
Serve warm! . . . It is also great re-warmed as leftovers, if there are any!!
Enjoy!
Your Friend,
~Amber Hamilton Henson
PS
This post will link to a few blog parties! Visit the parties
iShouldBeMoppingTheFloor’s “Inspiration Monday”
ArkansasWomenBloggers’ Sunday Link Up
Mom’s Test Kitchen ~ Wonderful Food Wednesday #47
RattlebridgeFarm’s Foodie Friday
Broccoli Salad ~Sweet & Tangy
On a Facebook page, there was a call for viewers to submit their favorite BROCCOLI recipes. I realized I didn’t have a favorite of my own to submit. I usually serve BROCCOLI steamed or just lightly sautéed with butter, unless I’m putting BROCCOLI into a casserole or quiche. In a casserole or quiche, my broccoli usually is just a supporting ingredient. However, someone else submitted a recipe for BROCCOLI SALAD. With just slight modification, we’ve fallen in love with this recipe. The original poster referred to the recipe as, “An oldie, but Goodie.” You’ll see why! With still crunchy broccoli, raw sweet onion, and a really sweet tangy sauce, this salad is ABSOLUTELY A KEEPER for us.

(Thanks for the original written recipe go to someone I’ve never met, Carol Chambers Thompson.)

THE RECIPE FOR BROCOLLI SALAD Sweet and Tangy:
* 2 lbs. Fresh broccoli cut into small florets, discarding stalks, and lightly steamed to retain crunch
* Grated cheddar cheese; (6-8oz)
* 8 slices of bacon fried crispy and crumbled
* 1 small sweet onion. (Vidalia onions are my preference)
Mix the ingredients together.
Refrigerate.
Just before serving add dressing Sauce, coating thoroughly.
For dressing Sauce:
* 1/2 cup real mayonnaise
* 1/4 cup sugar,
* 1 tablespoon white vinegar.
Then, gently mix almond slices or cashews into the salad before serving.
Enjoy!!
I don’t post a lot of recipes, primarily because I only want to post favorites. I’m an experimental cooker. We try lots of different things. This one is among only a handful of new recipes I’ve discovered in the last year that wasn’t already a staple in our house that my husband and I both truly, truly enjoyed thoroughly. As an homage to being an oldie, but goodie, I’m serving in my vintage FireKing bowl covered in gold decoration. LOVE IT!
Do you have a favorite BROCOLLI SALAD recipe? If not, you might want to give this one a try!
Your Friend,
~Amber Hamilton Henson
PS: This post will link to a few blog parties! Visit the link-ups here:
iShouldBeMoppingTheFloor’s “Inspiration Monday
ArkansasWomenBloggers’ Sunday Link Up
Mom’s Test Kitchen ~ Wonderful Food Wednesday #47
RattlebridgeFarm’s Foodie Friday
FoodieFridayDailyDish’s Foodie Friends Friday #53
This article was also published within international Hat Trick Magazine! To read an online copy of the magazine, just click on the magazine cover below this text!

Pie Crust Basics
We improved our pie crust making skills today at Eggshells Kitchen Co.!
Earlier this week, I would have told you that I was spending Saturday morning at an organic gardening seminar, but it has been re-scheduled until March. Not wanting to waste an opportunity to spend a Saturday morning learning to do something fun with my two oldest daughters, we jumped at the chance to attend a Pie Crust Basics class at Eggshells Kitchen Co., here in Little Rock. We’re so glad we did! It was a great class, our first time in the store, and we’ll definitely be back!
Want to know what we learned? I’ll do my best to tell you! See photos as well!
Recently, I had been using pre-made frozen pie crusts and refrigerated pie crust dough because I just wasn’t really happy with my crusts. Now, I see where I was going wrong!!

For starters, in the past I was mixing my dough too dry and it was crumbling as I rolled it. Today, we started with a much moister dough, and because we were constantly adding flour to roll it, flip and add more flour to roll it, flip and add more flour to roll it, repeat 8-12 times, the finished dough was perfect!
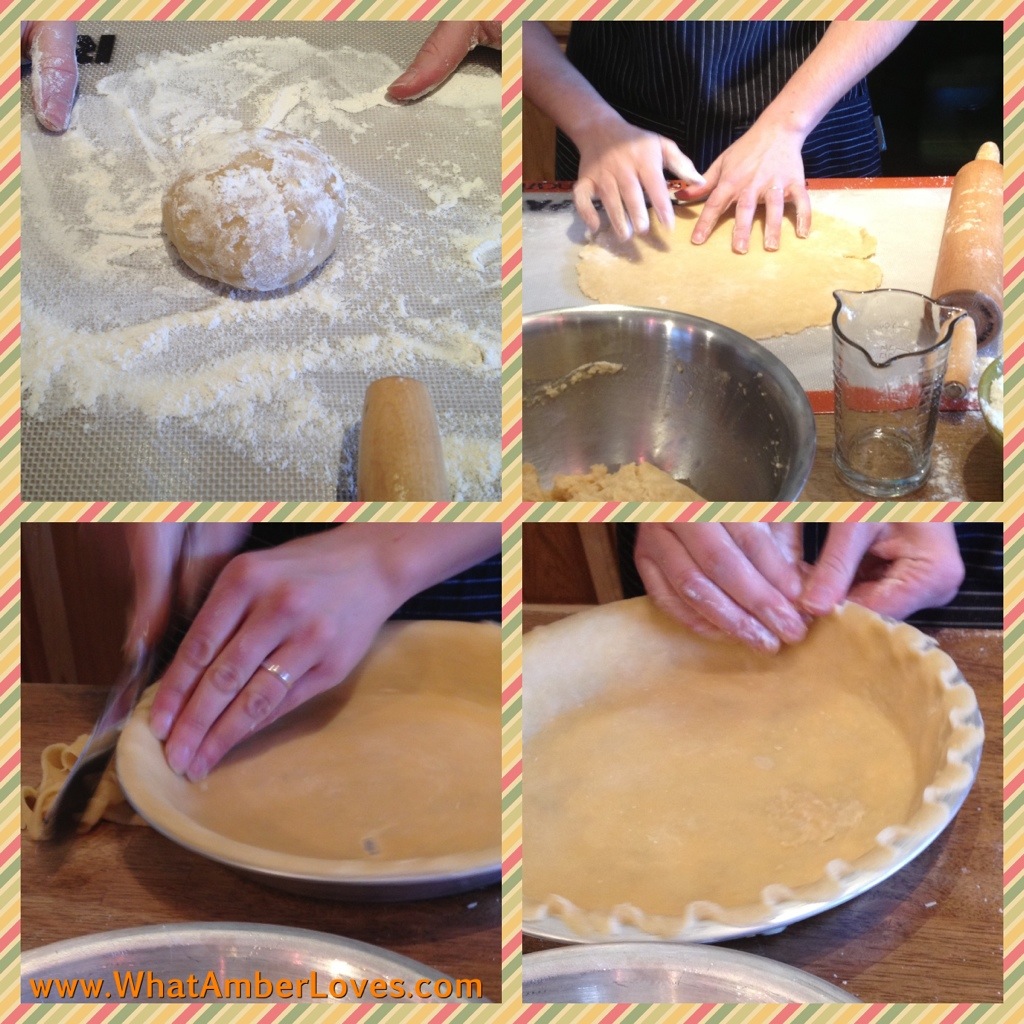
Mix ingredients.
Form hockey puck shape.
Roll on floured surface.
Flip, coat lightly with flour, roll. (Repeat 8-10x)
until it is translucent and large enough to cover pie pan.
Transfer into ungreased pie pan and press into the bottom crease.
Trim excess from top edge.
Using thumb of one hand and index finger of the other hand, create a decorative edge!
Poke holes with a fork to prevent air pocket bubbles when baking.

After a demonstration, we were given an opportunity to try it! While other women attending the class jumped in to try, so did my oldest daughter! She’s only in 5th grade, but did a GREAT job. I’m confident we can repeat the process at home, now that we’ve had training by a culinary genius!
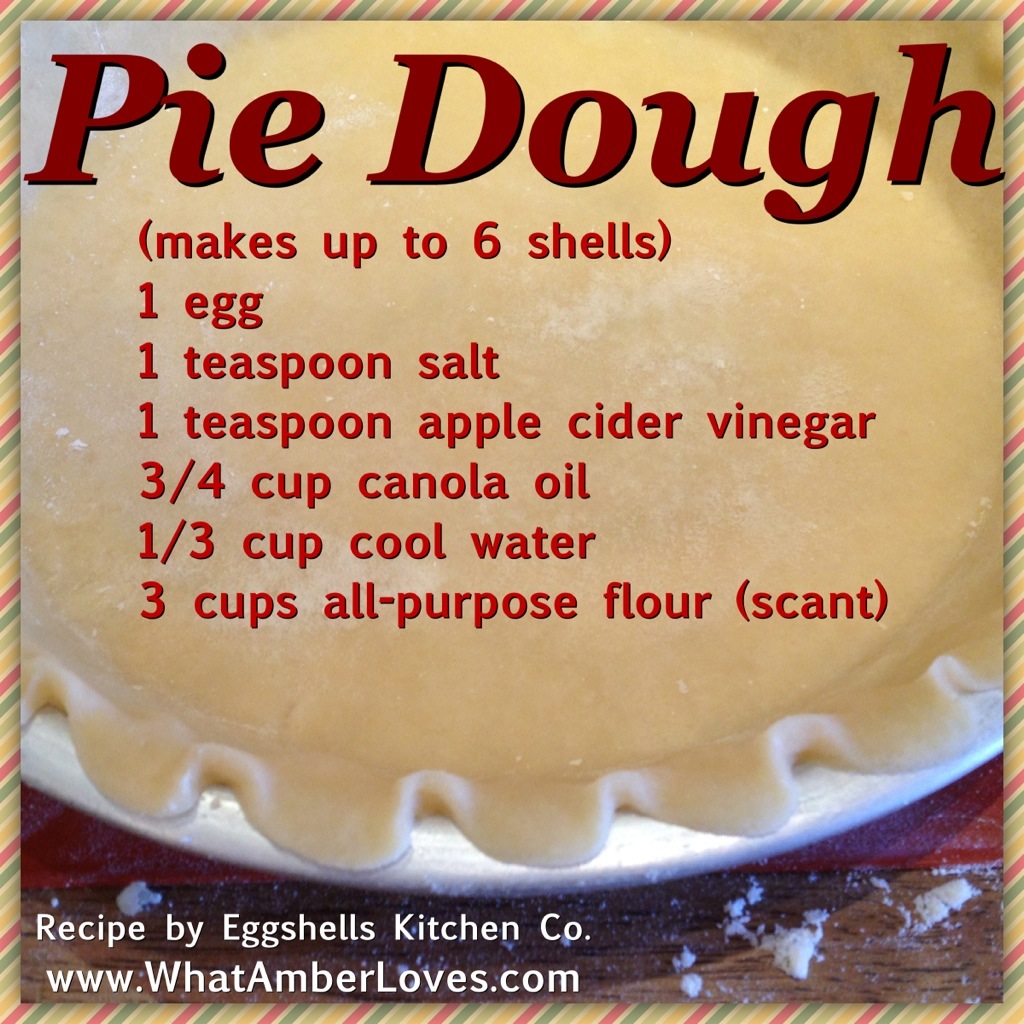
Here is the recipe for the crust we made in class today:
DOUGH (makes up to 6 shells)
1 egg
1 teaspoon salt
1 teaspoon apple cider vinegar
3/4 cup canola oil
1/3 cup cool water
3 cups all-purpose flour (scant)
*If you’re not baking 6 pies at once, the unbaked pie shells will freeze and keep well; just line with wax paper between each! 🙂

Eggshells Kitchen Co. is hosting pie classes every Saturday during the month of February, 2013.
(10am and 2:30pm)
They also have lots of other classes scheduled on their board, a beautiful store stocked full of every gadget and utensil you could dream of for your kitchen, and a great selection of sauces, pickles, spice blends, and more!
Stop by there! Remember to shop local, the sense of well-being is free. But, if you’re not local, you’ll enjoy their online store as well! You’ll be glad you did! We loved the experience!
Your Friend,
~Amber Hamilton Henson
End of 2012!
End of the year! It is New Year’s Eve! Today, we cleaned house a bit and put away the Christmas tree in order to facilitate a FRESH new year for 2013! Not wanting to leave any project undone, now is as good of a time as any to update this blog, too! Right? Right! The last time I wrote on here, we were making Halloween projects! Wow! We’ve done a lot since then, here a few photo highlights:


We’re looking forward to 2013 and hope that you are too!
Your Friends,
Mitch and Amber Henson
email: WhatAmberLoves@att.net
Library/Home Office Tour
When you walk through our front door, standing in the foyer, look to your left. Our home library is the room you see. You can see other rooms by visiting my “decor” page and selecting a room to tour. This blog is a work in progress, one room per post.
(click on photo to enlarge it)

We painted the room green, built the bookshelves, sewed the curtains, covered all the chairs.
The bookshelves cover an entire wall, however, despite recently donating most of my novels, we still have WAY TOO MANY books to fit onto the bookshelves. Right now, we have a couple stacks of books that are four feet tall beside the shelves, all of my cookbooks are kept in the kitchen, etc. We have plans to build a couple more sets of shelves soon. Really soon.
What’s on the bookshelves? Well, my rolls of sign vinyl are on the bottom, then a row of kid books, then reference books, gardening books, decorating, DIY, college textbooks, Mitch’s childhood encyclopedia set, and books that have passed to me by family. Sounds like a lot of books? Nope. Not nearly as many as some of my family members.
Just like in the rest of the house, I keep real plants anywhere I can reach them, and i only use artificial plants for areas I can only reach with a ladder. (10 foot ceilings, here)
Here’s the top of the bookshelves: (click to enlarge)

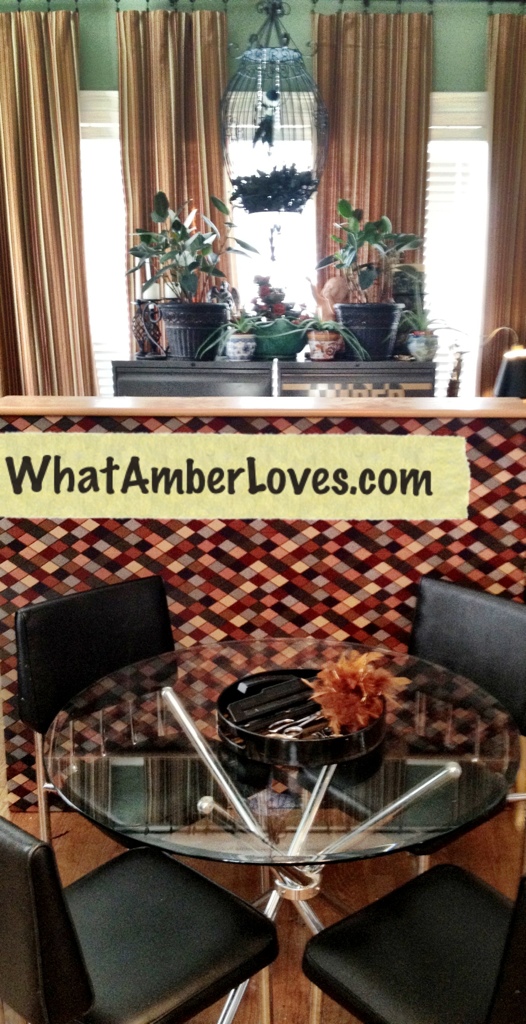
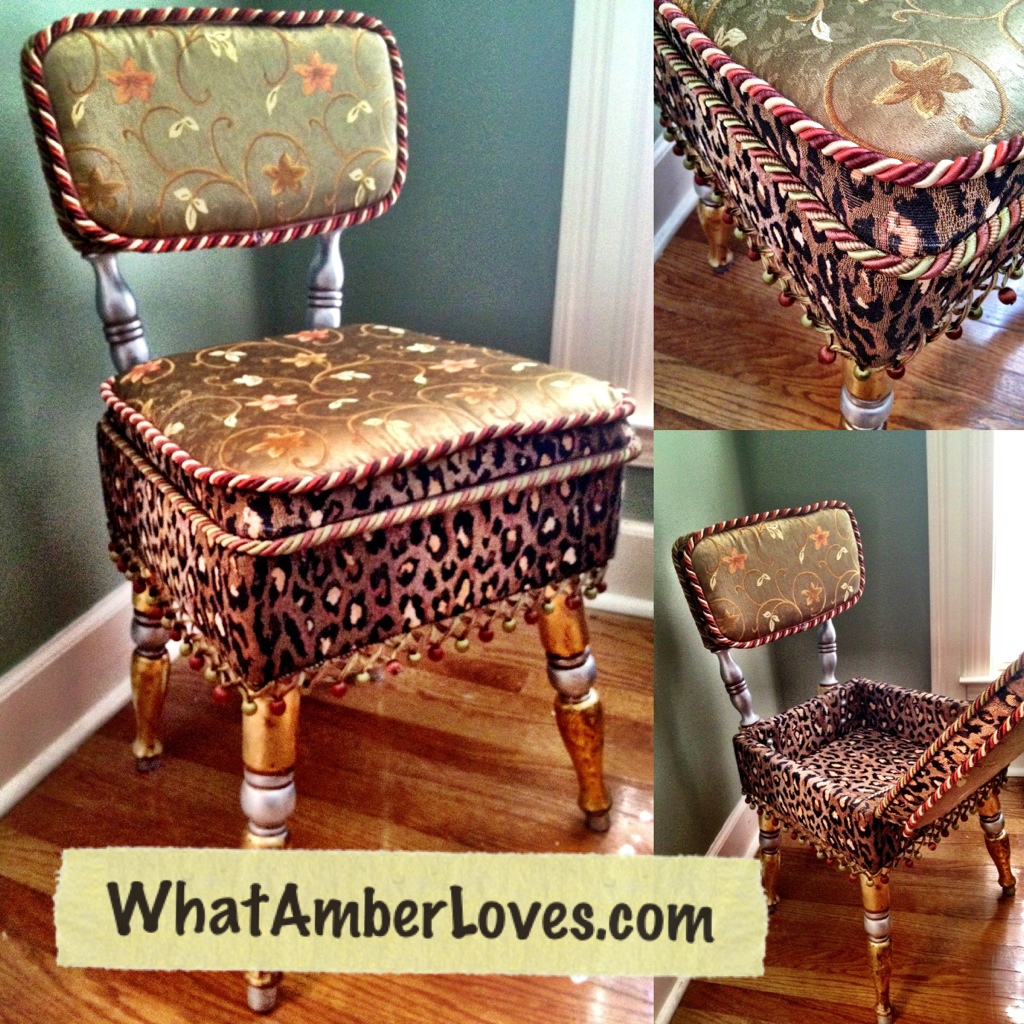
Here are a couple views around the room: showing the bookshelf wall; big birdcage hanging in front of the windows; elephant and bird collection that sits on top of the armoire that holds my Summa sign cutter; our wacky old sewing chair with built-in storage that we found at a thrift market and re-upholstered: (click to enlarge)

Here are a few more views around the room: the industrial file cabinets that I’ve labeled for myself and our girls to keep their schoolwork through the years and vital records (the other four drawers on the 2nd file cabinet are on my “to do” list); the 1930s “satellite” chair that we re-upholstered; aloe vera and houseplants; fountain; decorative pieces: (click to enlarge)

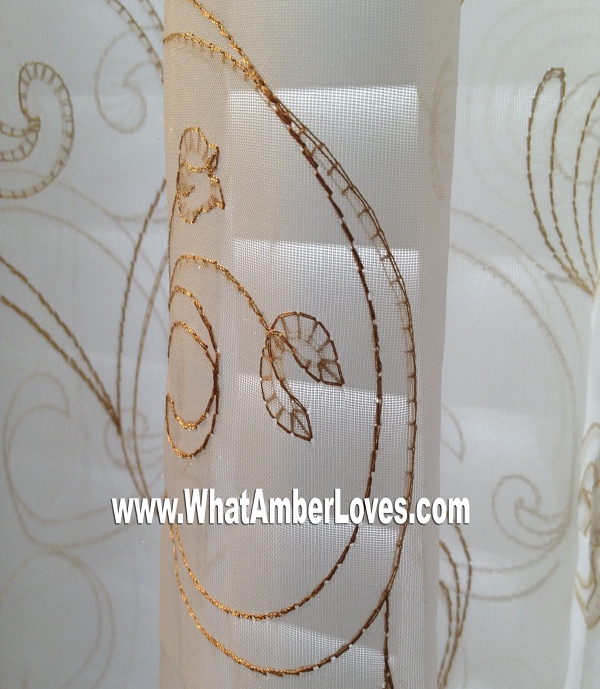
Here are a few more views around the room: the diamond fabric covered screen/shroud hides my old metal steel tanker desk, so that you’re not looking at the backside of the computer/printer/hub/etc; our chrome glass-topped “Sputnik” table for our daughters’ afternoon homework with our chrome chairs from the 70s, topped by a tray that holds a few essentials for homework; a close-up of the fabric of our floor-to-ceiling curtains that I sewed: (click to enlarge)

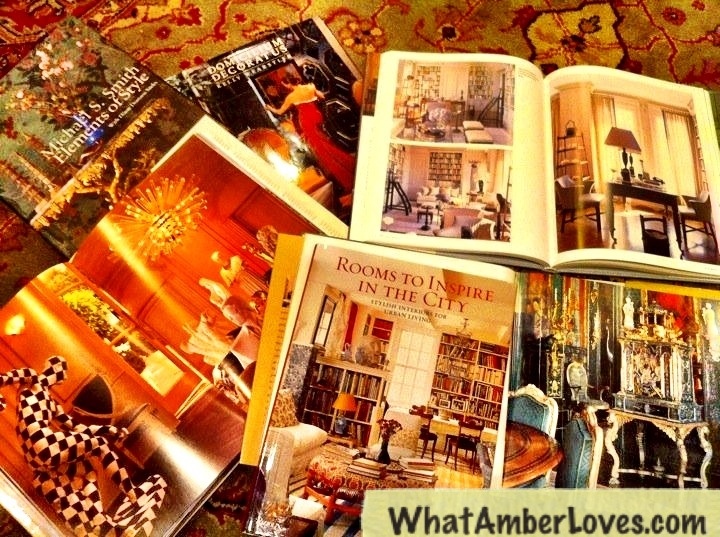
Like I said, I got rid of most of my novels and just read on my iPad via iBooks or NOOKapp, now. However, when it comes to “look books,” I doubt technology will ever be able to replace how I feel about being able to sit down, open up, and spread out several books at once the way I do. It’s kind of my quiet time to regenerate creative energies. Surprisingly, blogging and visiting so many blogs lately seems to be having this same effect, sparking my creativity…
(click to enlarge)
That concludes our tour of this room! You’ll notice i didnt show you my desktop. Well, its piled high with papers, magazines, the girls’ stuff from school, and MORE at the moment. If I clear it off anytime soon, I’m sure I’ll probably be proud enough to write a post about it! Lol. Second, I may re-edit this post at a later day just to add a few “behind the scenes” photos to the end of this post that show the “before” shots of the chairs and the “during” bookshelf building.
Enjoy my projects or links? Please, pin it, tweet it, like it, whatever… just be social and feel free to share as long it links back to here! Also, if you do feature this room in some way on your blog/site/’zine, please let me know, and I’ll add your link into this post!
Later! (more photos at the bottom of this post!)
See you in blogland!
Your Friend,
~Amber Hamilton Henson
PS This room of ours is looking forward to the party circuit!! The daily links:
Catch as Catch Can #90 @ My Repurposed Life
Link Party and Mes Preferes #73 @ ReDoux Interiors
PotPourri Party #42 @ 2805
Inspiration Friday #83 @ AtThePicketFence
What’s Cluckin’ #21 @ ChickenScratchNY
Wow Us Wednesday #86 @ SavvySouthernStyle
The individual / detail photos in no particular order:


Master Bedroom Tour
Welcome to our Our Master Bedroom Suite!
(At any point, you can click on a photo, and an enlarged copy will open in a new window/tab!)

Pinning Welcome!
On this site, bits and pieces of different rooms are visible in my project posts and recipe posts, but this is my VERY FIRST “finished” whole room reveal in Blogland! YAY!
We’ve had a hand in creating A LOT of what is in the room you are about to see.
Specifically:
*We put in new hardwood Sapele floors.
*We painted the walls using Home Depot’s flat Behr “Smokey Topaz.”
*We built and upholstered the headboard.
*We built and upholstered the valance.
*We painted the antique dress form and covered her in leather.
*We painted and applied vinyl graphics to a vanity.
*We painted and upholstered the stool for the vanity.
*We reupholstered the antique Italian settee.
*We decoupaged an antique door and hung it above the bed.
*We created the “floral” arrangements and potted the plants.
*We accessorized using pieces passed down through the family, gifts, and a few unique finds from specialty boutiques.
I’m sure I’m forgetting things in the list, but you get the gist of it, right? This isn’t a catalog room by any stretch of the imagination. It is ours, just ours, and we worked for it. Several of these projects happened just prior to beginning of this blog, since I just started two months ago, but a few have happened recently. For example, you can read more about the door in my “Crazy Old Door” post, or read a tutorial about applying vinyl graphics to furniture in my “Vanity” post by clicking on those links.
Have you signed up to receive my updates or “liked” the Facebook page, yet?

In this first area that I’m showing in the next photos, you’re looking to the far end of the room. You see the door we decoupaged, headboard we built, the bed, a pair of contemporary chests, and the antique settee we re-upholstered:


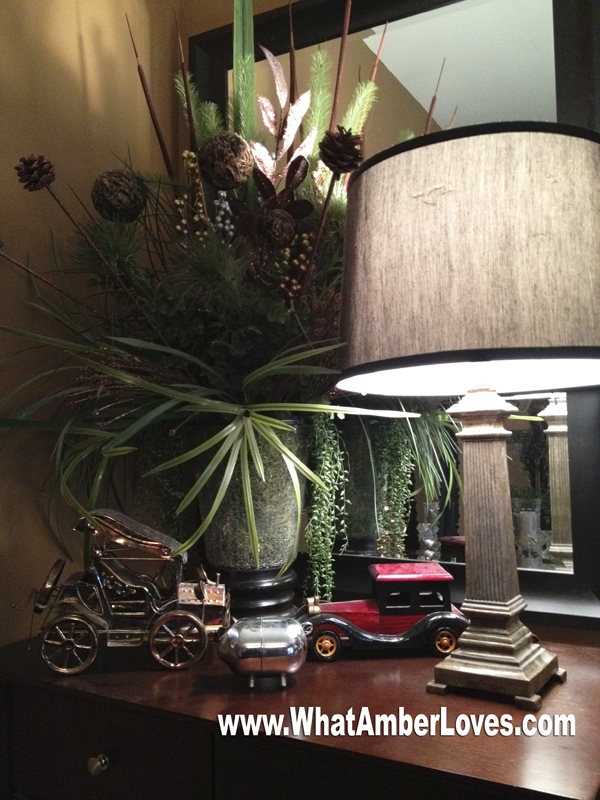
The next photo is the top of the chest on “his” side of the bed, topped by a floral arrangement, lamp, copper car musicbox, wooden car storage box, and a little piggy bank from his childhood:
The next photo shows the top of the chest on “her” (my) side: Similar to his, except that instead of cars, I have pieces of silver handed down to me from my grandmother and a silver plate trinket box given to me by a friend:

Next, also on my side, you see my re-vamped antique dress form that was in terrible condition when I purchased it. We painted it gloss black and covered the crumbling, tattered paper-ish form of the body in real black leather. She is fully functional, now, spinning, widening and compressing as needed. You can also see a red lacquered jewelry box from my mother in-law and one of my many vintage lucite purses from the ’50s:

Next, you’ll see my deco vanity vignette with stacked mirrors, wall shelves, with arrangements, crystal lamps and clocks, houseplants, & crystal candleholders on top of the vanity.


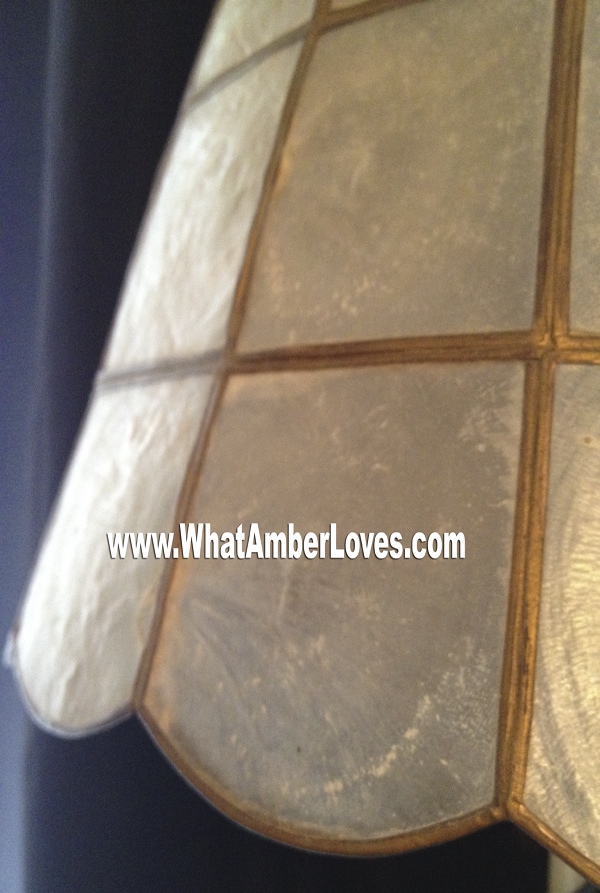
Next, you’re seeing the “window wall” area of our bedroom. Basically, it is a large pair of windows adorned by curtains, embroidered sheers, and custom valance that coordinates with the headboard. The window is flanked by a pair of HUGE 7 foot tall mirrors. Other items visible include a pair of multi-drawer jewelry chests that hold my collection of bracelets and necklaces that I make. A little shelf holding a capiz shell lamp, other little decor, and my tanning bed that I hardly ever use, because I have decided to embrace my paleness. Actually, from this point forward, I’m not going refer to myself as pale, but “porcelain,” instead. There.


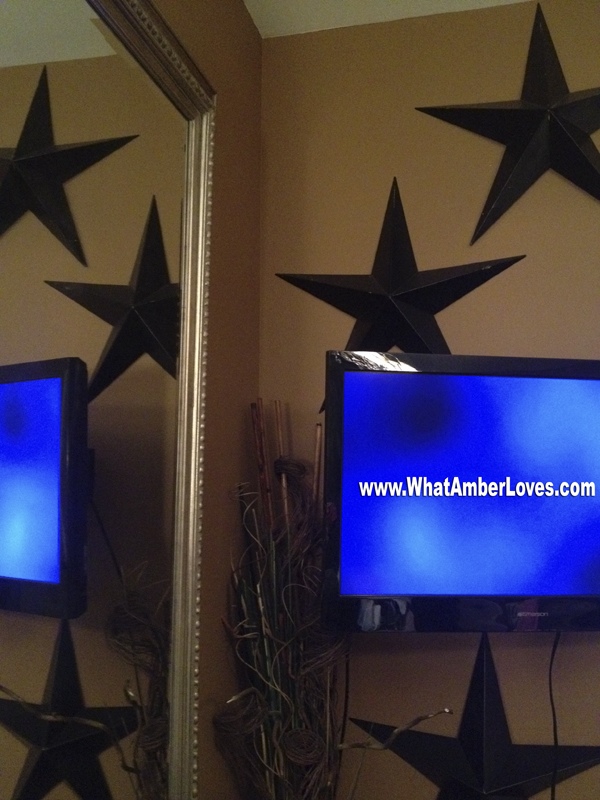
Now, in the next four photos, you’re looking at the “window wall” from the other direction, you see the tanning bed, tv, a few stars painted black, a mirror, and the rug. Do you see the rug? The rug is made entirely of scraps left over from neck-tie manufacturing. Each little piece of necktie is individually stuffed and sewn onto a backing. Neat, right? The international manufacturer’s import/export home office is here in Little Rock, and, once upon a time, they would open their warehouse one day per month to us locals and sell their overstock at wholesale prices! Perhaps, they still open once a month. I don’t know because it has been several months since I’ve been there. The pictures:


Well, that concludes my tour.

Thanks for taking the time to look around our room! I may be proud of the space, but I’m also quite flattered that you took the time to look! I’ll get around to photographing other rooms in our home at some point soon, as we complete several more projects that are midpoints!
Your Friend,
~Amber Hamilton Henson
PS
Enjoy my projects or links? Please, pin it, tweet it, like it, whatever… just be social and feel free to share as long it links back to here! Also, if you do feature this room in some way on your blog/site/’zine, please let me know, and I’ll add your link into this post!
This room will go on tour with other rooms at a few blog parties!
Daily Links:
Weekend WrapUp @ TatorTotsAndJello
Get Schooled Saturday @ TooMuchTime
DIY projects @ The36thAvenue
Saturday Nite @ FunkyJunkInteriors
Sunday’s Best @ My1929Charmer
Make The Scene Mondays @ AlderBerryHill
Masterpiece Monday @ BoogieBoardCottage
Mod Mix Monday @ ModVintageLife
Nifty Thrifty Tuesday @ CoastalCharm
Be Inspired @ ElizabethAndCo
Wow Us Wednesdays @ SavvySouthernStyle
All Star Block Party @ SimplyDoneWright
PotPourri Party #42 @ 2805
Inspiration Friday #83 @ AtThePicketFence
What’s Cluckin’ @ ChickenScratchNY
Wall Collage of Frames, Mirrors, & Quotes
Do you have excess empty frames and perhaps a spare mirror or two that doesn’t really have a proper place to hang because it isn’t of the proper scale? If so, I suggest grouping them all together; then, it reads as one comprehensive vignette rather than as lone pieces creating clutter. Our ceiling height throughout the first floor of our home is 10′. Hanging mirrors and art that are only 24″ or so just doesn’t make enough of an impact for my taste. I like “statement” scale art and installations. Thus, I grouped/collaged the mirrors and frames. There are a few options for creating your own display in this style, you can hang them all really close together, or you can do like I did and actually OVERLAP them. It was easy.


Here is another angle where you can see the frame collage reflected in another mirror in our living room. Btw, in this photo, you can also see the smaller of my two belt chairs!

I laid out the mirrors and empty frames on the floor to arrange them. I snapped a pic of the arrangement on my phone. Then, I just started hanging them on the wall while referring to my pic. For the frames that overlap on top, we just used our finish nail gun (tiny, small nails shot through the pneumatic nail gun via portable air compressor) to nail them together as inconspicuously as possible. Finally, to tie it all together, I’ve added a few quotes that were cut using my sign machine. For a complete tutorial on how to install vinyl sign graphics, check out my tutorial for installing graphics on furniture.
The quotes that I chose to use are kind of a variety… an art quote, one from Dr. Seuss, one from Ayn Rand, one from Wayne Gretzsky, one from Thomas Edison … you know, just general interest quotes that I found interesting for one reason or another… I’ll continue adding quotes as the moods strike! 😉
Here a few photos of the quotes: (Side note, photographing mirrors is tricky! It was actually quite a challenge to get a semi-decent looking photo that doesn’t show me holding the camera, that doesn’t reflect light, that doesn’t have a busy reflection, etc. Yikes!)


Thanks for taking time to read this post and check out our little “I’ve Been Framed” project! I’ll be back tomorrow with a post about a crazy old door that we’ve been working on!
Your Friend,
Amber Hamilton Henson

PS
As, always feel free to repost an image, pin it, fb it, tweet it, etc, so long as the image clearly links back to here! 🙂 I Love blog party Linking!! If this post is “featured” on your blog/site/zine, please let me know and I’ll add your link into this post and my “shares” page!
Fabulous Mirrors Category @ FunkyJunkInteriors
Happy Hour Friday @ HappyHourProjects
Weekend Showoff @ LadyBirdLn
It’s Inspiration Friday @ AtThePicketFence
Potpourri Friday @ 2805
Catch as Catch Can @ MyRePurposedLife
ReDoux Link Party @ ReDouxInteriors
Furniture Feature Friday @ MissMustardSeed
Weekend WrapUp @ TatorTotsAndJello
DIY Home Projects @ The36thAvenue
Get Schooled Saturdays @ TooMuchTime
Saturday Nite Special @ FunkyJunkInteriors
Sunday’s Best @ My1929Charmer
Make The Scene Monday @ AlderBerryHill
Masterpiece Monday @ BoogieBoardCottage
Mod Mix Monday @ ModVintageLife
Craft o Maniac Monday @ Craft-o-Maniac
Mop It Up Mondays @ IShouldBeMoppingTheFloor
Nifty Thrify Tuesday @ CoastalCharm
Be Inspired @ ElizabethAndCo
Wow Us Wednesdays @ SavvySouthernStyle
Time Travel Thursday @ TheBrambleberryCottage
Thursdays are Your Days” @ 52Mantels
Transformation Thursday @ TheShabbycreekCottage
Home and Garden Thursday @ BlissfulRythym
Tutorials, Tips, and Tidbits @ StoneGableBlog
Hookin’ Up With HOH @ HouseOfHepworths
Chewy Peanut Butter Cookies

2 cups all purpose flour
1/2 tsp baking soda
1/4 tsp salt
1 1/4 cups dark brown sugar, firmly pack
1 1/4 cups white sugar
1 cup salted butter, softened
3 large eggs
1 cup creamy peanut butter
2 tsp pure vanilla extract
Preheat oven to 300°F. In a medium bowl combind flour, soda and salt. Mix well with a wire whisk. Set aside. In a large bowl blend sugars using electric mixer at medium speed. Add butter and mix to form grainy paste, scraping the sides of the bowl. Add eggs, peanut butter and vanilla, and mix at medium speed until light and fluffy. Add the flour mixture and mix at low speed until just mixed. Do not overmix. Drop by rounded table spoons onto an ungreased cookie sheet, 1 1/2 inches apart. With a wet fork gently press a crisscross pattern on top of cookies. Bake for 18-22 minutes until cookies are slightly brown along edges. Transfer cookies immediatly to cool surface with spatula.
The cookie jars are restocked. My day is done! lol. Not really, dinner is yet to be made, the baby to be bathed, laundry to be done. Mitch is midway through re-flooring our bedroom, so furniture is everywhere. Hopefully, when the kids are in bed, there will be a few minutes left to work on the pair of chairs we’re re-upholstering.
Later Gators! ~Amber
PS
Like this post? Be sure to check “my Kitchen” for links to more of my recipes!
Wonder to which parties I’m linking? I have a page dedicated to “shares”, too!
Linked:
Coconut Macaroons and Milk in Martini Glasses

1 and 1/2 cups sweetened coconut flakes
2/3 cup granulated sugar
2 egg whites
1/4 tsp vanilla
dash salt
*Beat egg whites, salt, and vanilla until soft peaks form. Gradually add sugar, beating until very stiff and glossy. Fold in coconut; drop by rounded teaspoons about 2″ apart onto greased cookie sheets.Bake at 325°F about 20 minutes or until set and lightly brown.
Our daughters LOVED them. Per usual, they wanted to drink their milk from some of my favorite stemware… blown glass martini glasses featuring little birds and blossoms. lol. At least the set of martini glasses are getting used, even if it’s not for my Martinis. 😉 Love.
Your Friend,
~Amber Hamilton Henson
PS
Like this post? Be sure to check “my Kitchen” for links to more of my recipes!
Wonder to which parties I’m linking? I have a page dedicated to “shares”, too!
Linked with love at these parties:
TatorTots and Jello Weekend Wrap Up
Too Much Time Get Schooled Saturdays
I Heart Naptime Sunday Scoop Link Party
TwiggStudios Sunday Showoff
Momnivore’s Dilemma
Chicken Scratch NY “What’s Cluckin?”
All Star Block Party @ Full Circle Creations
Time to Shine @ A Diamond in the Stuff
Sunday Linky Party @ PetiteHermine