Blog Archives
Wall Collage of Frames, Mirrors, & Quotes
Do you have excess empty frames and perhaps a spare mirror or two that doesn’t really have a proper place to hang because it isn’t of the proper scale? If so, I suggest grouping them all together; then, it reads as one comprehensive vignette rather than as lone pieces creating clutter. Our ceiling height throughout the first floor of our home is 10′. Hanging mirrors and art that are only 24″ or so just doesn’t make enough of an impact for my taste. I like “statement” scale art and installations. Thus, I grouped/collaged the mirrors and frames. There are a few options for creating your own display in this style, you can hang them all really close together, or you can do like I did and actually OVERLAP them. It was easy.


Here is another angle where you can see the frame collage reflected in another mirror in our living room. Btw, in this photo, you can also see the smaller of my two belt chairs!

I laid out the mirrors and empty frames on the floor to arrange them. I snapped a pic of the arrangement on my phone. Then, I just started hanging them on the wall while referring to my pic. For the frames that overlap on top, we just used our finish nail gun (tiny, small nails shot through the pneumatic nail gun via portable air compressor) to nail them together as inconspicuously as possible. Finally, to tie it all together, I’ve added a few quotes that were cut using my sign machine. For a complete tutorial on how to install vinyl sign graphics, check out my tutorial for installing graphics on furniture.
The quotes that I chose to use are kind of a variety… an art quote, one from Dr. Seuss, one from Ayn Rand, one from Wayne Gretzsky, one from Thomas Edison … you know, just general interest quotes that I found interesting for one reason or another… I’ll continue adding quotes as the moods strike! 😉
Here a few photos of the quotes: (Side note, photographing mirrors is tricky! It was actually quite a challenge to get a semi-decent looking photo that doesn’t show me holding the camera, that doesn’t reflect light, that doesn’t have a busy reflection, etc. Yikes!)


Thanks for taking time to read this post and check out our little “I’ve Been Framed” project! I’ll be back tomorrow with a post about a crazy old door that we’ve been working on!
Your Friend,
Amber Hamilton Henson

PS
As, always feel free to repost an image, pin it, fb it, tweet it, etc, so long as the image clearly links back to here! 🙂 I Love blog party Linking!! If this post is “featured” on your blog/site/zine, please let me know and I’ll add your link into this post and my “shares” page!
Fabulous Mirrors Category @ FunkyJunkInteriors
Happy Hour Friday @ HappyHourProjects
Weekend Showoff @ LadyBirdLn
It’s Inspiration Friday @ AtThePicketFence
Potpourri Friday @ 2805
Catch as Catch Can @ MyRePurposedLife
ReDoux Link Party @ ReDouxInteriors
Furniture Feature Friday @ MissMustardSeed
Weekend WrapUp @ TatorTotsAndJello
DIY Home Projects @ The36thAvenue
Get Schooled Saturdays @ TooMuchTime
Saturday Nite Special @ FunkyJunkInteriors
Sunday’s Best @ My1929Charmer
Make The Scene Monday @ AlderBerryHill
Masterpiece Monday @ BoogieBoardCottage
Mod Mix Monday @ ModVintageLife
Craft o Maniac Monday @ Craft-o-Maniac
Mop It Up Mondays @ IShouldBeMoppingTheFloor
Nifty Thrify Tuesday @ CoastalCharm
Be Inspired @ ElizabethAndCo
Wow Us Wednesdays @ SavvySouthernStyle
Time Travel Thursday @ TheBrambleberryCottage
Thursdays are Your Days” @ 52Mantels
Transformation Thursday @ TheShabbycreekCottage
Home and Garden Thursday @ BlissfulRythym
Tutorials, Tips, and Tidbits @ StoneGableBlog
Hookin’ Up With HOH @ HouseOfHepworths
Coconut Macaroons and Milk in Martini Glasses

1 and 1/2 cups sweetened coconut flakes
2/3 cup granulated sugar
2 egg whites
1/4 tsp vanilla
dash salt
*Beat egg whites, salt, and vanilla until soft peaks form. Gradually add sugar, beating until very stiff and glossy. Fold in coconut; drop by rounded teaspoons about 2″ apart onto greased cookie sheets.Bake at 325°F about 20 minutes or until set and lightly brown.
Our daughters LOVED them. Per usual, they wanted to drink their milk from some of my favorite stemware… blown glass martini glasses featuring little birds and blossoms. lol. At least the set of martini glasses are getting used, even if it’s not for my Martinis. 😉 Love.
Your Friend,
~Amber Hamilton Henson
PS
Like this post? Be sure to check “my Kitchen” for links to more of my recipes!
Wonder to which parties I’m linking? I have a page dedicated to “shares”, too!
Linked with love at these parties:
TatorTots and Jello Weekend Wrap Up
Too Much Time Get Schooled Saturdays
I Heart Naptime Sunday Scoop Link Party
TwiggStudios Sunday Showoff
Momnivore’s Dilemma
Chicken Scratch NY “What’s Cluckin?”
All Star Block Party @ Full Circle Creations
Time to Shine @ A Diamond in the Stuff
Sunday Linky Party @ PetiteHermine

Old House became a “Historic” House
Let’s accomplish a few tasks all at once with this post. I’m going to tell you a little story about how a couple (my husband, Mitch, and I), through meticulous budgeting and money management, bought a house for $37,500 and sold it for $255,500. My friends and family that have kept up with us for years through Facebook have seen and heard this story, but knowing roughly what our annual income is, Mitch’s new co-workers recently wondered aloud as to how we can afford to live in the house in the neighborhood that we do, now. I’ll answer that with this post. Second, I’m seeing A LOT of blog posts linking to other blogs linking to other blogs that show home improvement, restoration, DIY projects, real estate transactions, and more. I thought that having already gone all the way through the process once, our story and what we did may be of some value to others currently going through the process.
Basically, we bought an old house (built in 1902) that was a few blocks beyond the borders of the “Governor’s Mansion Historic District” in downtown Little Rock, Arkansas. Mitch and I were newly weds. I was 18. He was 22. We saw the huge space and had a dream. Overall, the neighborhood was pretty rough (high crime, condemned houses, etc.), but there were these little dots of inspiration, too. Within a block or two, one or two houses were newly remodeled/rehabilitated houses, a couple were under construction, and few dilapidated ones had “for sale” signs. So, even though the condemned houses and old-homes-that-became-boarding-houses still outnumbered us by far, there were indicators that a change COULD be possible. Our friends and family openly said that they thought we were crazy to choose to buy such a rough house in such a rough area. We knew we weren’t. While simultaneously attending college full-time and working as a receptionist full-time, I started planning and tackling projects. Mitch, with the help of his dad, brother, and my brother, worked tirelessly. My grandmother was a saving grace, gifting funds multiple times. Among the very first projects we tackled were to take down all of the metal bars on the doors and windows in order to give the house a “friendlier/homier” feeling, having a professional security system installed, and putting a pretty new roof on the place. The house was structurally sound, but every surface of the interior needed to be replaced. Interior plaster, floors, ceilings, and fixtures had to be replaced, the second story had been stripped all the way back to just the framing beams, for the most part, and the big front porch was about to completely fall off, it seemed. The yard was barren and empty, except for one lovely, mature pecan tree in the backyard.
For many years, we really didn’t have any sort of hobbies or spare money to spend on anything other than updating our old house. See, while lots of people took out big construction loans, refinanced after every project and kept their projects fully mortgaged, we didn’t. We saved and paid for each project one at a time, acting as our own general contractor and hiring professionals as needed for central heat/air conditioning, new electrical breaker boxes, and rough plumbing. Mitch and I insulated, hung new drywall, painted, installed floors, built closets, built bookshelves, installed all of the outlets/switches/lighting, installed all of the tubs/sinks/toilets, re-built the front porch, built fences, installed landscaping, and more.
When we bought the house, we thought we would tackle it all in a year or two. However, since we took a pay-as-we-go and DIY approach, it was actually a decade before it was all done. Interestingly enough, the more changes that we and the few others kept making were encouraging to the rest of the neighborhood and potential buyers. One by one, almost all of the houses in the area began to change. Real Estate prices went up. Crime went down. The boundaries of the “Governor’s Mansion Historic District” that were/are controlled by the Capitol Zoning District Commission were extended to include our house!
Did I mention that during those years spent renovating, Mitch worked full-time and took on automotive restoration projects for profit, I graduated with two degrees, we had two daughters, and were expecting a third daughter when we decided to sell it? The addition of a third child soon to arrive and the needs of our growing daughters who wanted neighborhood pools, bike paths, room to roam, access to a newly constructed public school, and so forth are what ultimately necessitated the sale of our beloved house downtown.
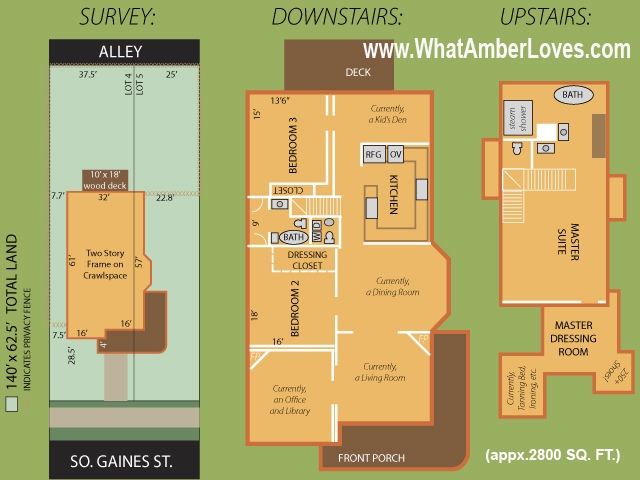
Important message here. See the photo that shows the floorplan of the house and so forth? I believe that in a “buyers’ market” you have to do whatever it takes to help sell your house, if you’re truly motivated to sell quickly. In Arkansas, most online real estate listings do not include a floorplan, but in the event that a buyer might see our house on the internet first, we wanted it to be memorable and for them to be able to envision the spaces. Seeing how the rooms actually connect and flow from one another is very different than using just photographs and trying to imagine how it may be laid out. It paid off. Our buyer was from out of state, saw it online, wanted to see ours specifically, even though it was a cluttered market with several other homes similar to ours, he chose to visit ours and wrote an offer. I never had the opportunity to ask, but I’d guess that being able to see the floorplan was a tremendous help and a deciding factor as to which houses were worth taking the time to visit.
(Dear Readers, Include a floor plan of your home with your photographs when you are selling your home online. Taking the guesswork out of it all for your buyers and real estate agents instantly creates a degree of familiarity and comfort with a piece of property compared to those that forget to include the floor plan. I used Adobe Illustrator to create ours, but a simple sketch to scale by hand would get the job done, too, or you can probably hire a local graphic artist or college student inexpensively to visit the property, measure, and create an illustration for you. Having an illustration of the space plan/layout of the house is also a useful reference for other agents that show your home! When we were buying our new home, we were astounded at how few listings included floor plans on their marketing materials. Online, it was impossible to guess how much square footage was wasted by hallways or what sort of distance existed between bedrooms and bathrooms. Furthermore, without a copy of a floor plan in hand, going to an “open house” where potential buyers outnumbered agents can be like walking around in a maze sometimes. Rooms get overlooked or viewed twice, etc. Include a floorplan. If you’re in central Arkansas and looking to buy or sell, I recommend the services of Scott Heffington. Having him represent our house as a selling agent was fantastic. We will be using his services again in the future.)
Okay; Mitch, my husband, just read my draft of this post and isn’t convinced that my descriptions of the work we did adequately portray how dramatic the transformation of the old house really was. So, on that note, I’m adding a few before/after photos. It would be nice to have more “before” pictures, but we don’t. We were so focused on improvement, we just didn’t think to take many “before” photos. (Dear Readers, TAKE BEFORE PHOTOS! You’ll be glad you did!) The next picture shows the old house in the beginning, then when it got a new roof, then years later after it was painted, storm windows added, landscaped, fenced, new slate pathway, etc., etc. The right side shows the upstairs interior views as it was when we started versus how it was when we finished the master suite level of the house.
I miss my house. I absolutely love my new house and new neighborhood, but even if I say that I PROFOUNDLY miss my old house, old neighbors, and the friends we made along the way downtown, it is an understatement. It was a great house, with great memories inside, and a style that was completely of my own design. We’ve been in our new house for almost two years now. It is a fantastic house. It is primarily a brick and stone exterior, which means a lot less maintenance than our old painted wooden house. It has a great family-friendly floorplan, the craftsmanship of the finishes are great, and for the most part, we really like the fixtures throughout the house. The previous owners were the ones that commissioned its construction, so as a result of being a custom home, it came equipped with lots of bonus features and meticulous attention to detail. I’ll start showing you some of this in future posts. We’ve made a few changes, too. We’ve painted most of the interior, built a wall of bookshelves, swapped a few fixtures, changed bedroom carpet for new wood floors, etc. It’s still a work in progress. I’ll post photos of these new projects soon and tell you about a few major projects that we still have planned! Stay tuned!
Last photo shown is a photo of our new house in our new neighborhood.
Thoughts? Questions? Please, use my comment space on this blog post or email me directly AmberDHenson@att.net
See you in the blogosphere soon!
Your Friend, ~Amber


P.S.
Hi, again! Please, see my new “SHARES” page for info leading to other blogs/sites and ‘zines!
This post is a featured article in Hat Trick Magazine!! Click on the issue cover to read more!:

Guess what?! My post was featured on a great site! Here’s the button link!:

I’m linked:
Verry Merry Vintage Style
Home and Garden Thursday @ Blissful Rythm


