
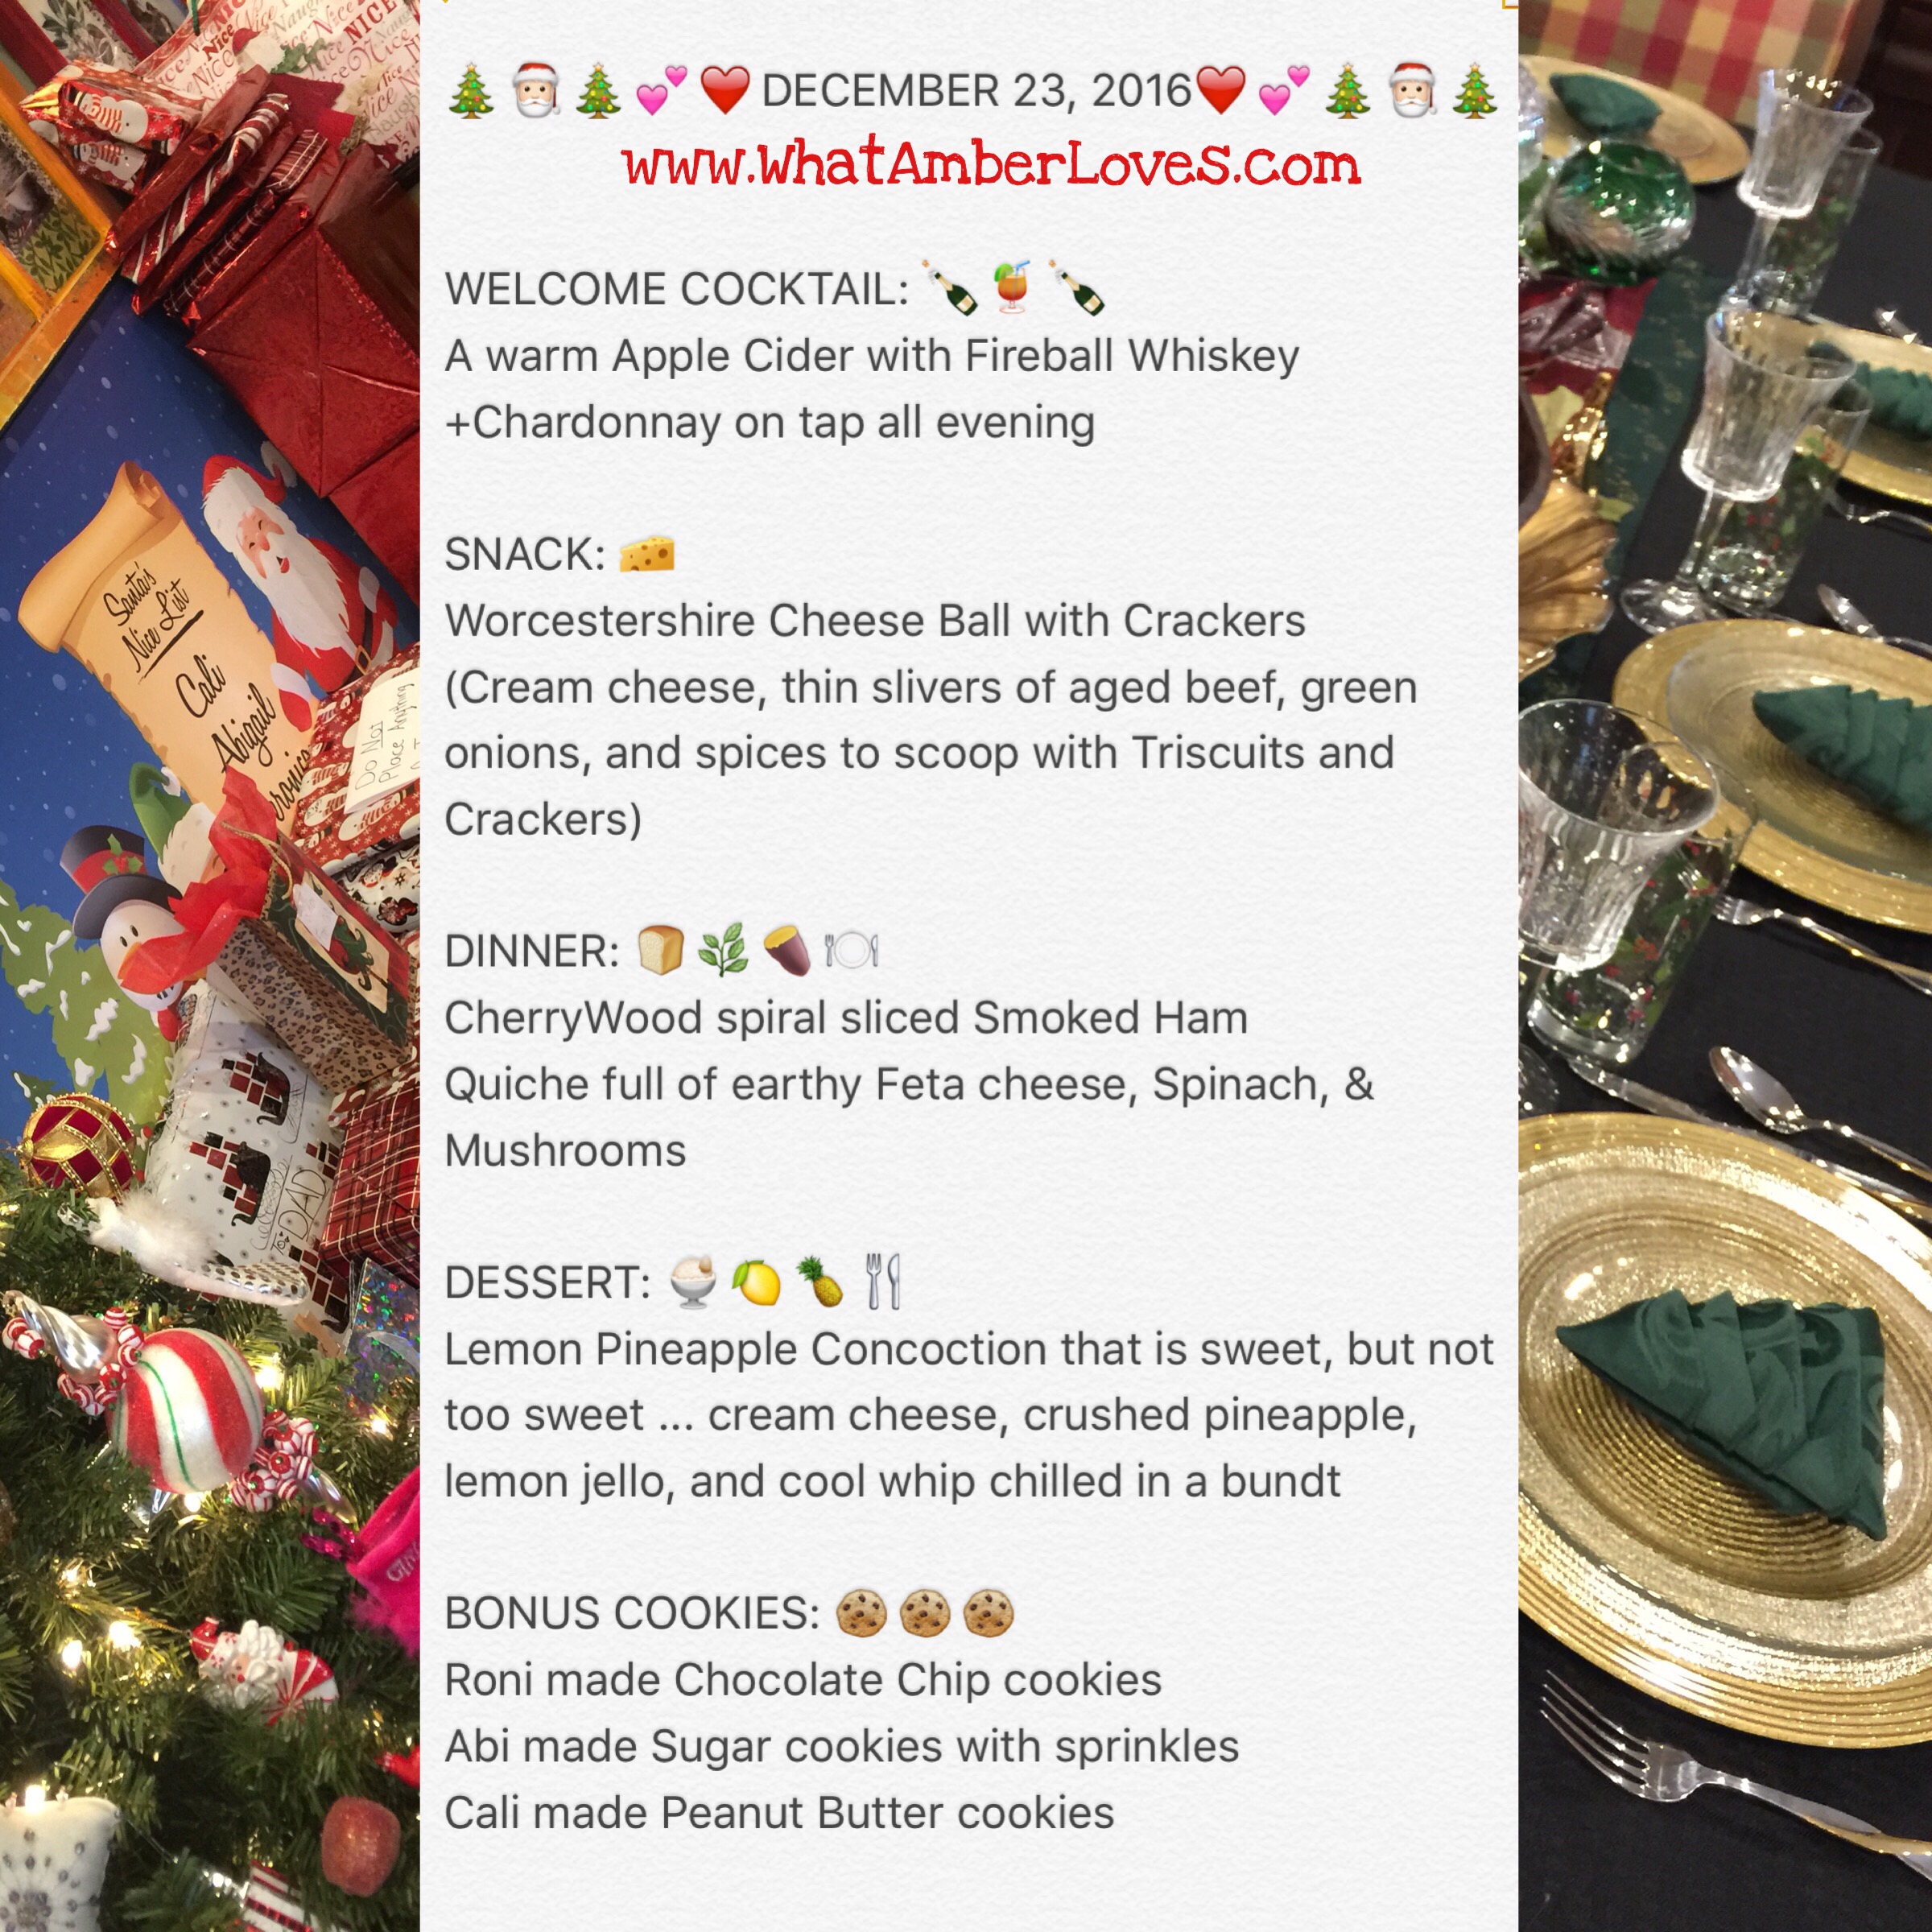
Chicken, Olive, Feta, Pesto, SourCream Bake
🍗🍈🥛
How about a high fat, high protein, low carb dish? Sounds good to me! If, like me, you like olives, feta, & pesto, then this may be the perfect dish for you to make, too! On Sundays, I like to meal prep my lunch for the week. This recipe makes 6 servings, so I’ll enjoy one serving tonight and one serving for lunch each day mon-fri this week. Yay! 🙌🏻

DIRECTIONS:
1. Chop boneless skinless chicken thighs into bite size pieces. Season with salt and pepper. Sauté in olive oil until done.
2. Arrange chicken, olives, and feta cheese in a 9×12 glass baking dish.
3. Stir together the sour cream and pesto. A spoonful at a time, add it to the top of the baking dish, then smooth it over, thus coating the top of the chicken, olives, & feta with the sauce.
4. Bake in preheated 375*F oven for 20-25 minutes. The Sauce will bubble and edges will brown.
5. Portion into 6 servings. Enjoy!
🍗🍈🥛🙌🏻🥛🍈🍗
Ingredient Detail Photos:


Process Detail Photos:


Enjoy:
The macros were calculated by MyFitnessPal app when I created the recipe and scanned the ingredients into the app.
525 calories per serving
40 fat
3.5 carb
32.5 protein


Your Friend,
AmberHH


Casserole Bracelet?

What if I call this the “Casserole Bracelet?”… because it is put together using a variety of leftover, extraneous beads that I just had on hand?
😆 The name kind of amuses me. Thoughts? #casserole #bracelet #CasseroleBracelet
What you need to duplicate it: Memory wire, loop tool, beads, design board, half an hour.


Have you made something silimar with your leftover beads? Show me, please! Drop a link to your site in my comment section or tag/message me on Pinterest!
You can see more jewelry I’ve made on these links:
Here, here, here, here, here, and elsewhere on my site!
Your Friend, ~AmberHH


Aromatic SouthAsian/MidEast Chicken Soup
 Seven-Spice Chicken Soup
4 lb. skinless, boneless chicken thighs
Salt and freshly ground pepper
1 Tbsp. Seven-spice powder*
*(I buy this at a local Mid East grocery store. It includes a finely ground blend of all spice, black pepper, cloves, cardamom, cinnamon, fennel, & ginger)
2 Tbsp. oil*
*(I used olive oil. A peanut oil would be great, too.)
1 yellow onion, finely chopped
4 cups chicken stock
1 Tbsp. Minced fresh Ginger*
*(I use the tube of fresh minced ginger, available in the produce dept of WalMart.)
2 small serrano peppers, thinly sliced
1⁄4 cup soy sauce
1⁄4 cup Asian fish/oyster sauce
2 cups baby carrots
1 Tbs. rice vinegar
2 Tbs. fresh cilantro leaves
2 Tbsp. green onion, thinly sliced
–Pat the chicken dry and season generously on all sides with salt and pepper and the 7-spice powder. Cut into small pieces, about 2″
–In a large, heavy frying pan over medium-high heat, warm the oil. When the oil is hot, working in batches to avoid crowding, add the chicken and sear, turning as needed, until golden brown, about 8 minutes total. Transfer the chicken to a slow cooker.
–Add the chopped yellow onion and Serrano peppers to the frying pan and sauté over medium-high heat until golden, 6 to 7 minutes.
–Pour in 1 cup of the chicken stock and stir to dislodge any browned bits on the pan bottom. Stir in the ginger, soy sauce, fish sauce and vinegar. Transfer the contents of the pan to the slow cooker. Add optional ingredients: I added baby carrots
–Add the remaining chicken stock to the crockpot until contents are covered. Cover and cook on the low setting for 5 hours. The chicken should be very tender and thoroughly cooked.
–Ladle the soup into warm shallow bowls, distributing the chicken evenly. Scatter the cilantro leaves and green onion over the top! Serve immediately.
🍵🌿🍚
**I ate it as described above, as a soup, however for my husband and daughter, I prepared white rice and ladled the soup over the rice for their heartier meal.
🍚🌿🍵


It was exactly the warm flavorful soup that I was craving on this cool, damp January day!
You’ll try it, too?
I love you, but I’ll love you even more if you use the Pinterest or Facebook Button on the bottom of this post to share it! 😍
Your Friend, Amber


What a Busy Christmas Season 2016!
I’m sure I’m forgetting a few things, but highlights of our Henson Family Christmas activities during the last month or so included:
🎄 Black Friday Shopping!
🎄 Loads of Lights on the exterior of our house and lawn!
🎄 Older two daughters’ Band concert!
🎄 Younger daughter’s elementary party!
🎄 Handmade & custom gifts for husband & kids!
🎄 New Christmas tree and wreaths!
🎄 12th Annual Egg Nog Competition at the Historic Arkansas Museum!
🎄 Driving around looking at lights!
🎄 Visited AR Capitol building to see decor and take family photos!
🎄 Hosted Dinner for 8 in our home, including Pop, Grammy, & Gram!
🎄 Attended a Dinner for 8 with husband, daughters, & nephew that my sister cooked for us all!
🎄 3 daughters baked Cookies for Santa!
🎄 Stockings & unwrapping gifts!
🎄Christmas morning homemade Sticky Bun Cinnamon Rolls from scratch by Mitch!
🎄 Dec 26th Clearance Shopping!
Here are a few of my Favorite Photos from these activities:


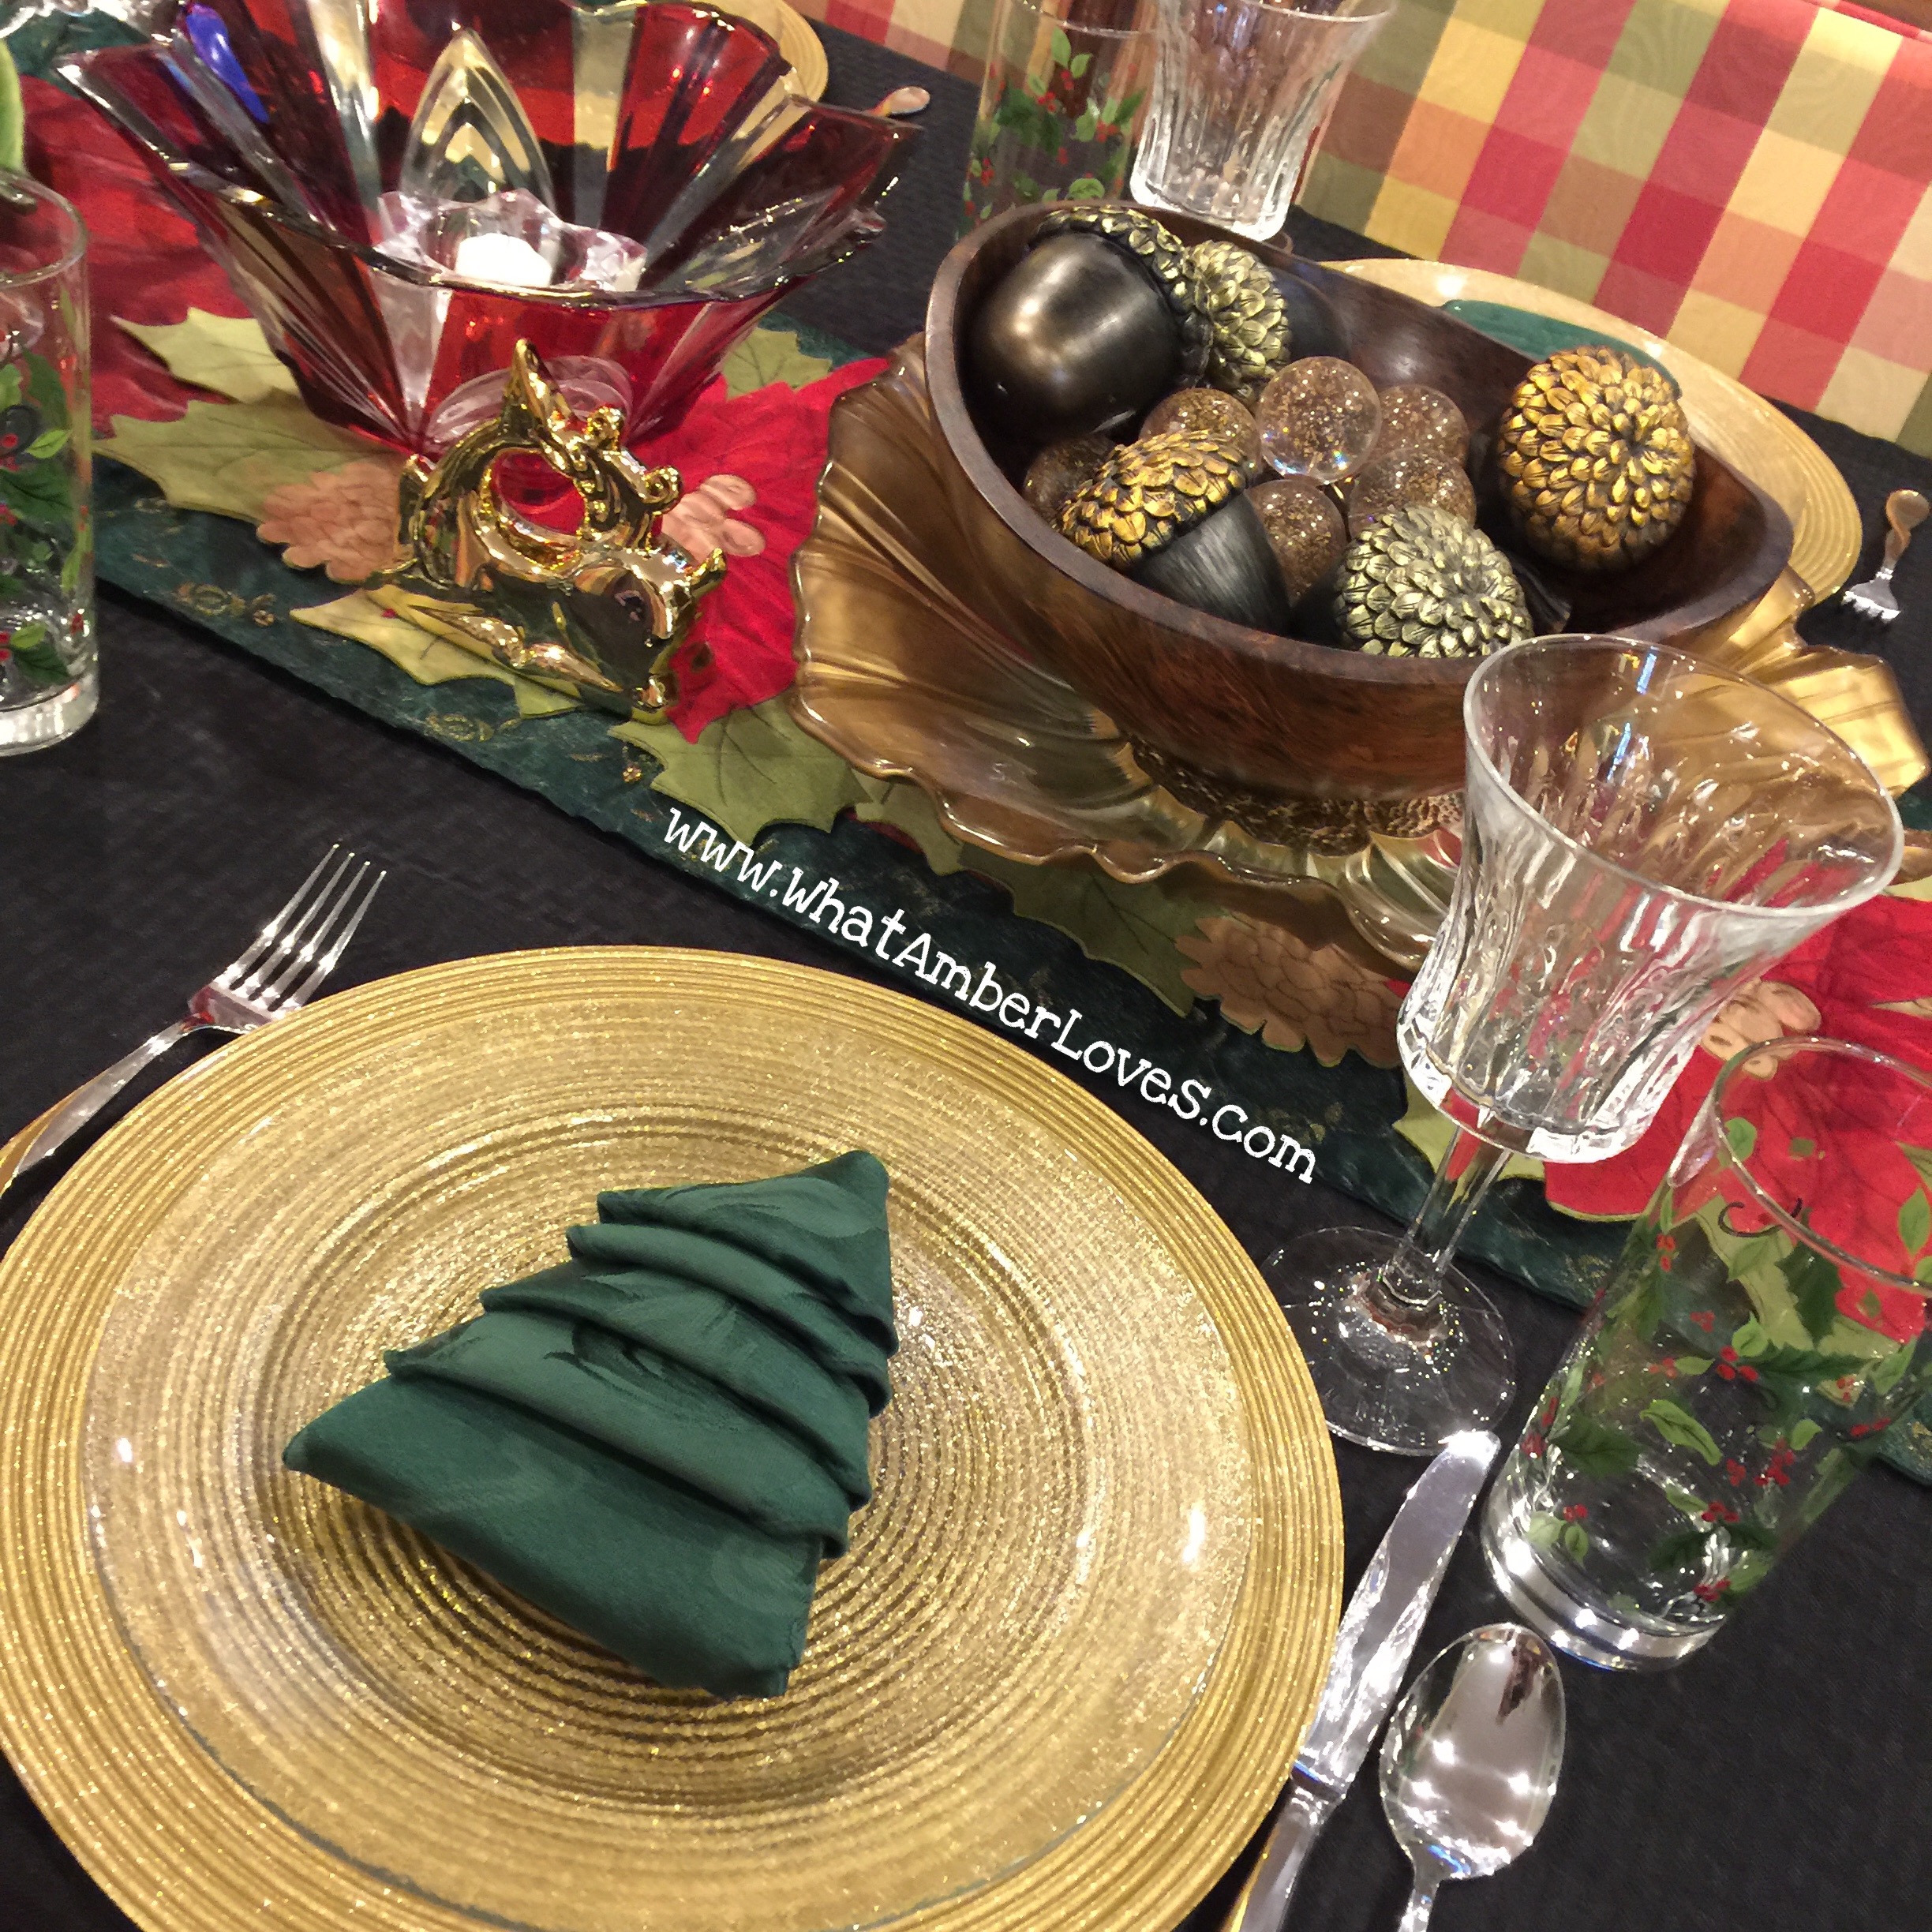


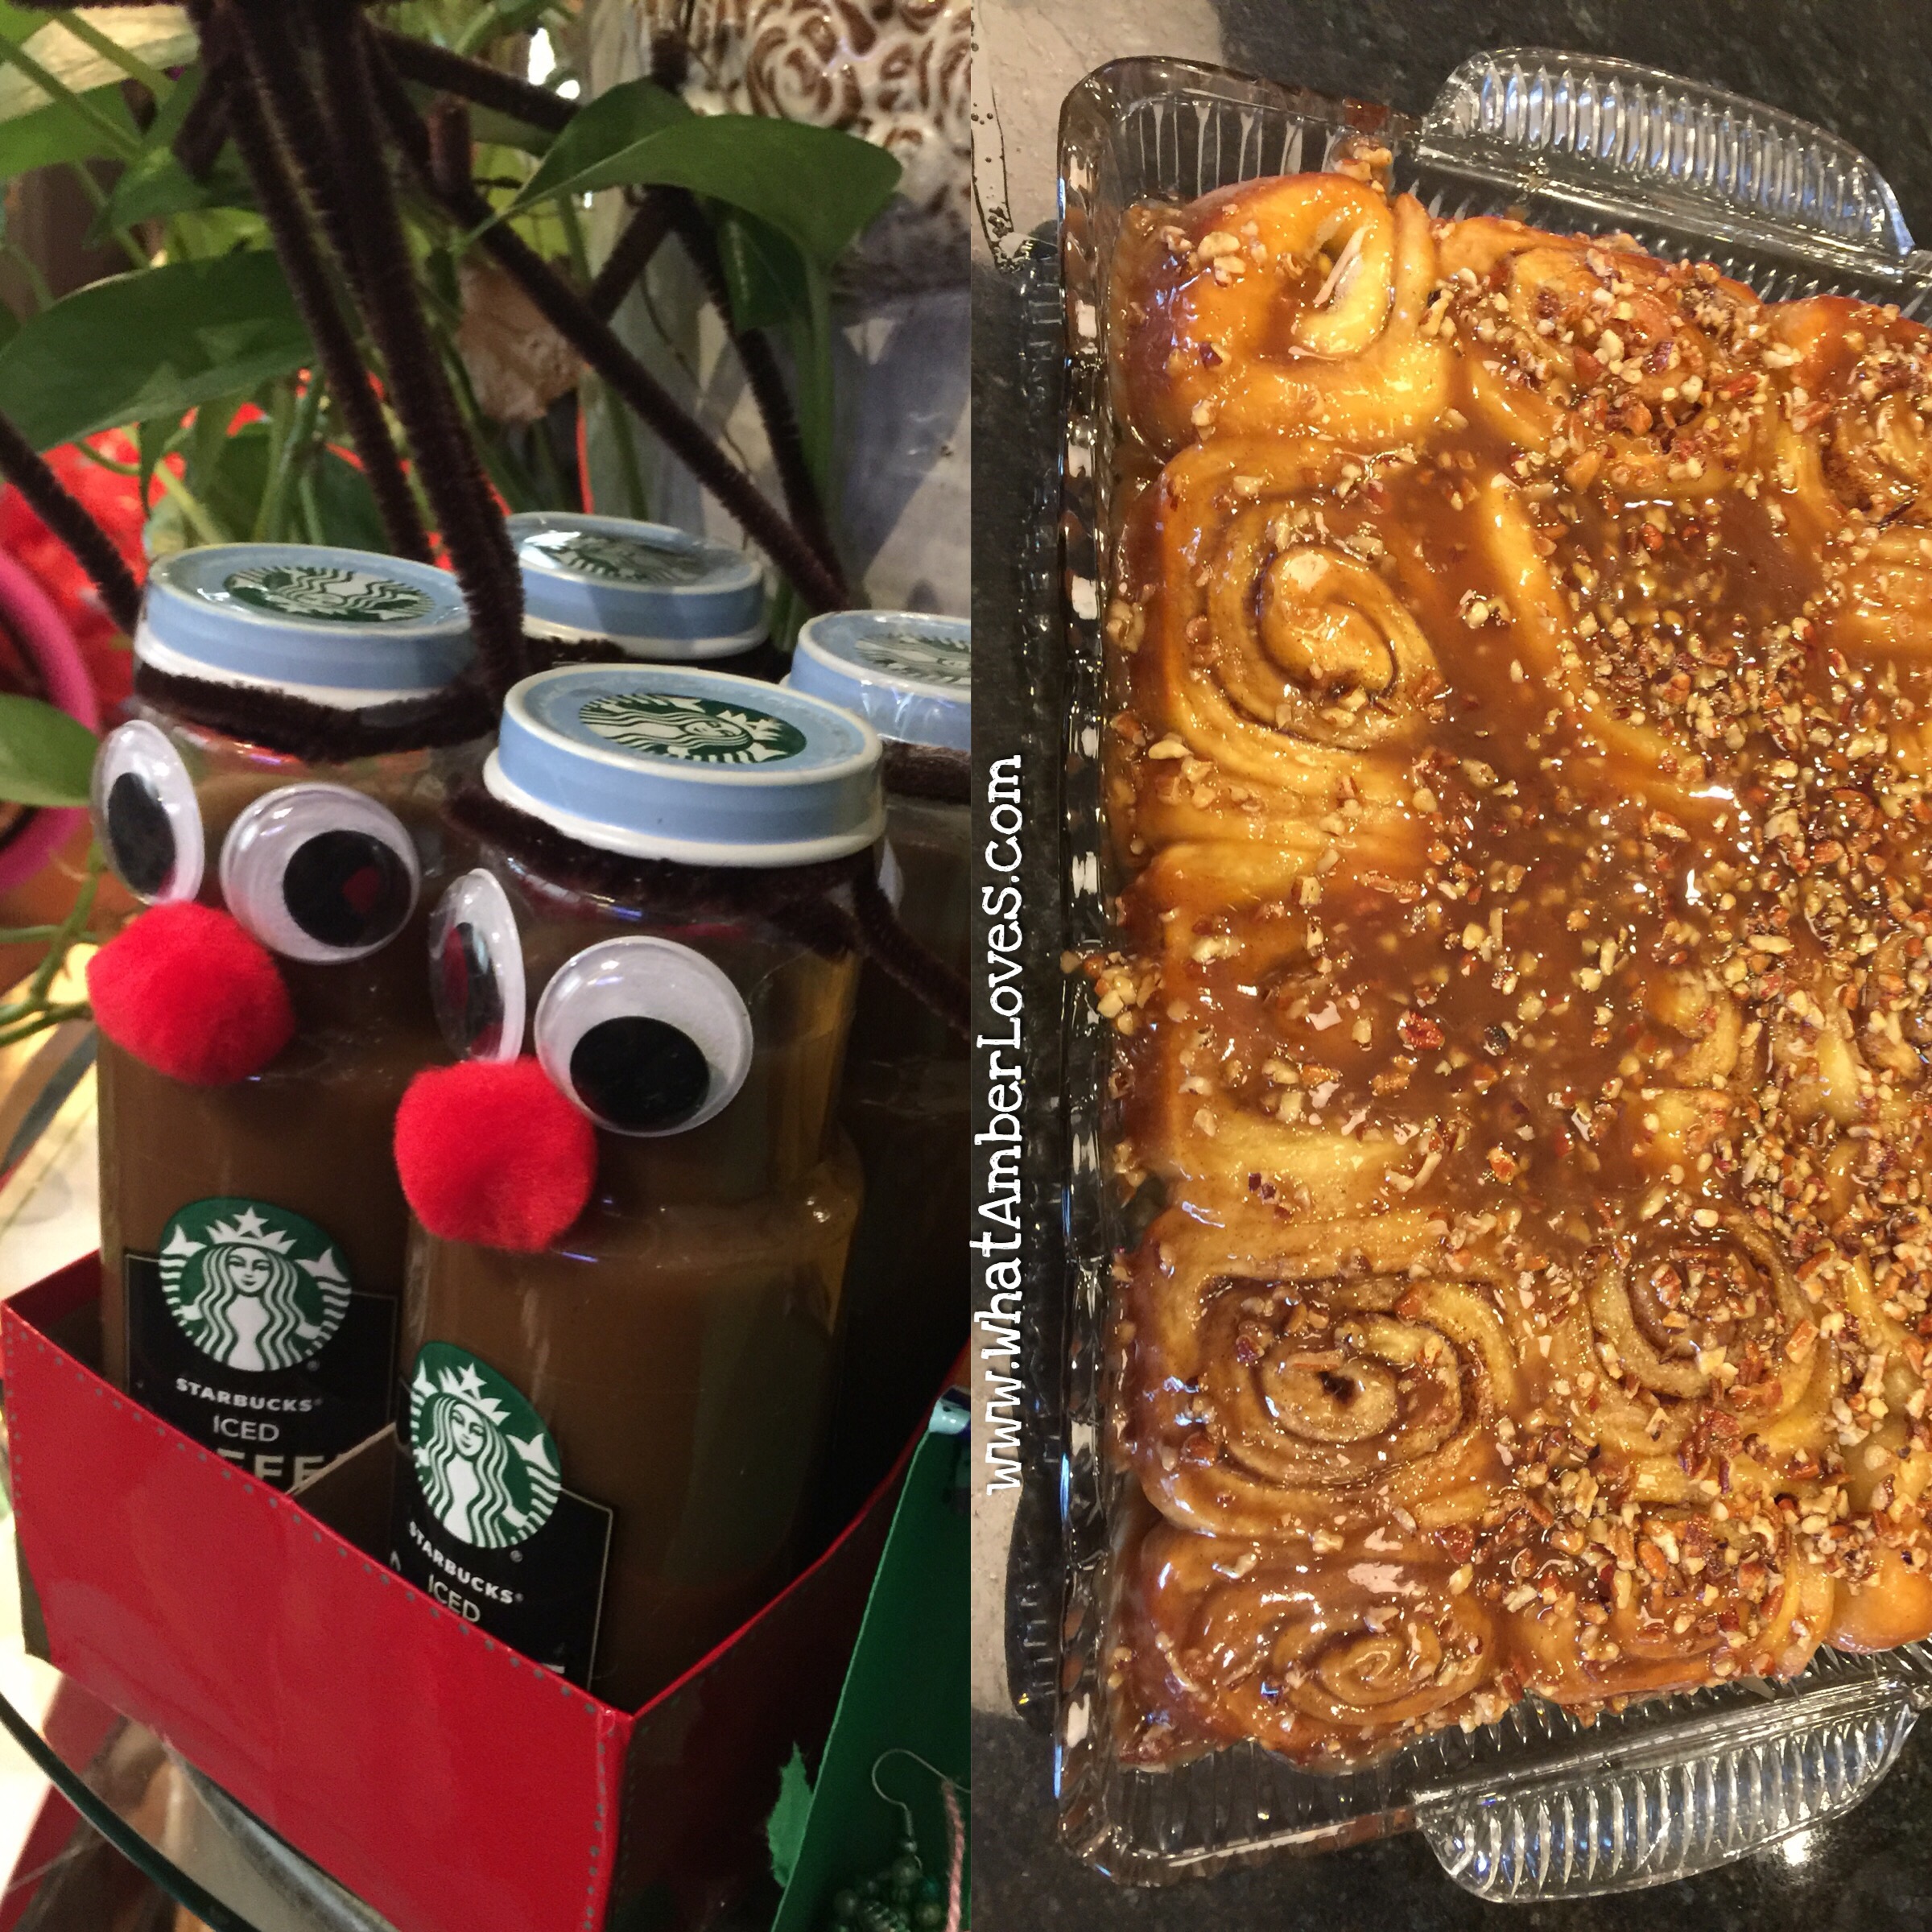
We hope you had a festive Winter Holiday Season, too! I’ll be back with more posts, soon! ❤️
Your Friend,
–Amber Hamilton Henson


Druzy Memory Wire Jewelry
Do it! Wear it! Make a DIY druzy memory wire bracelet in a few easy steps! Why pay astronomical boutique prices when you can make your own pieces in minutes?
In? In!
Let’s create!! ❤️
Memory wire. Druzy quartz. Glass Beads. Done!


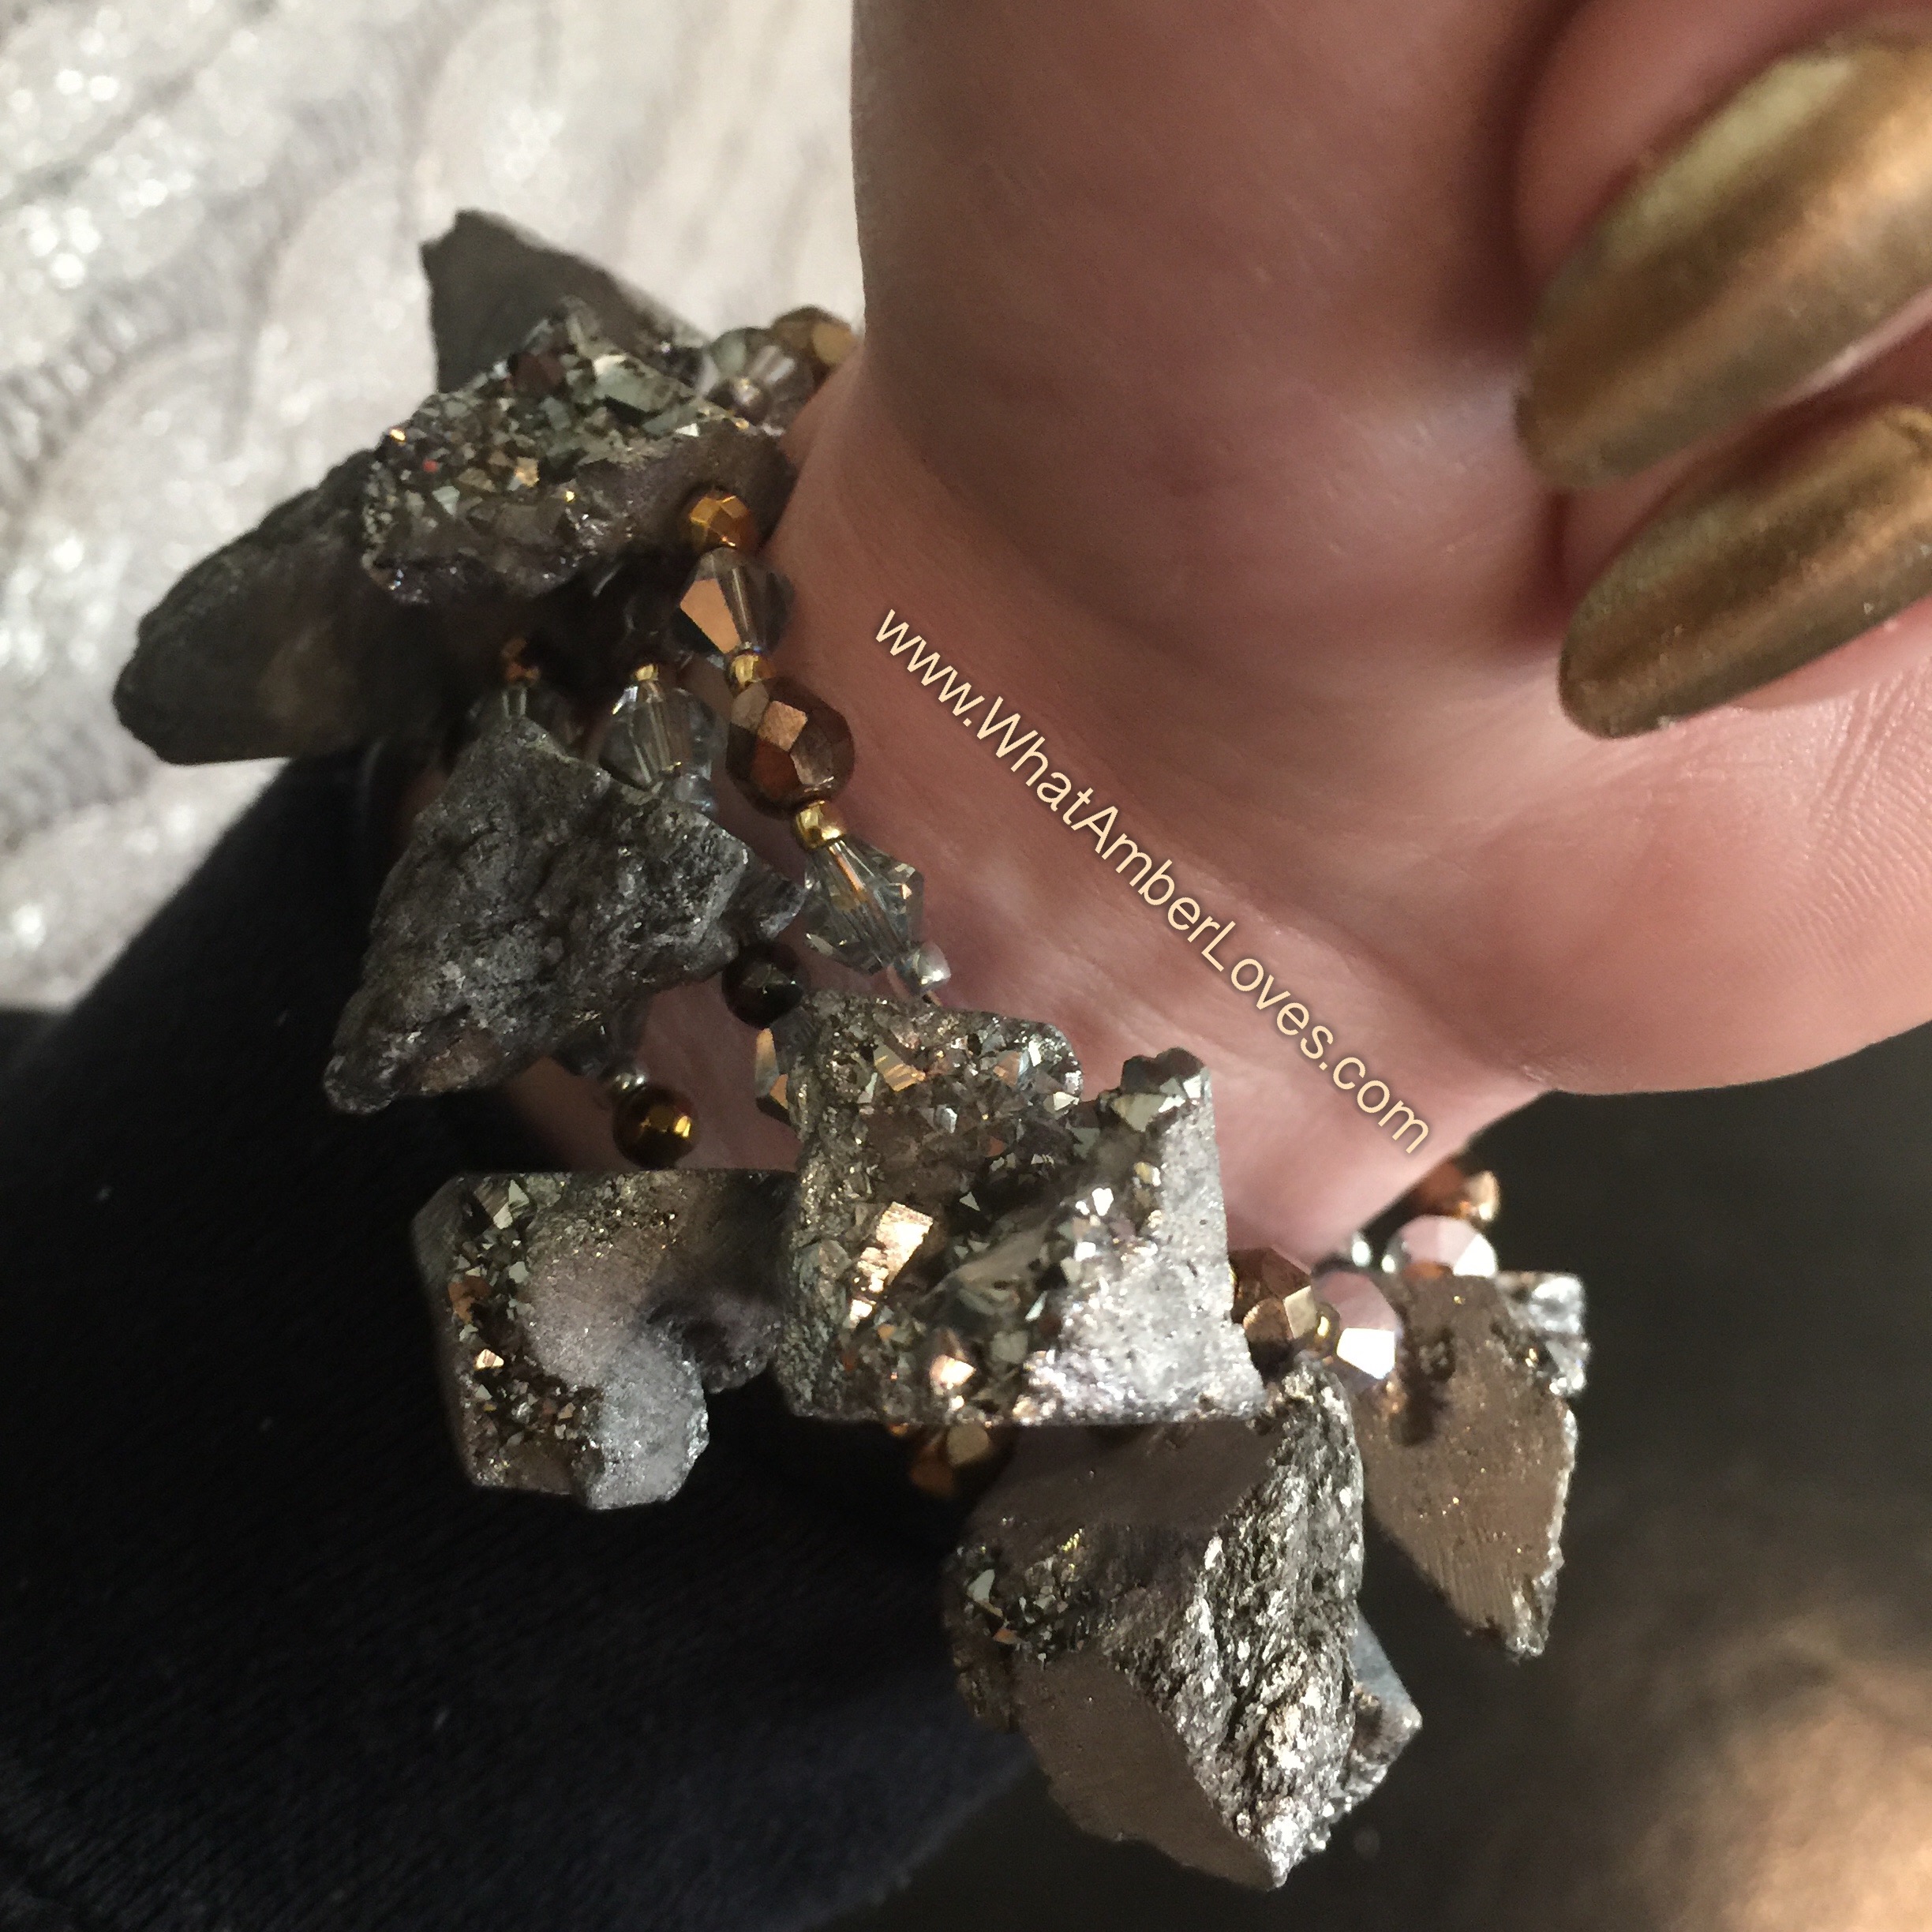

You can do this, too!
1) Buy beads and memory wire.
2) Make a small loop at one end of memory wire.
3) Add your pattern of beads.
4) Close with small loop at other end of memory wire.
5) Wear.
❤️–Amber Hamilton Henson

Winter Solstice!
Longest Night and Shortest Day of the Year!
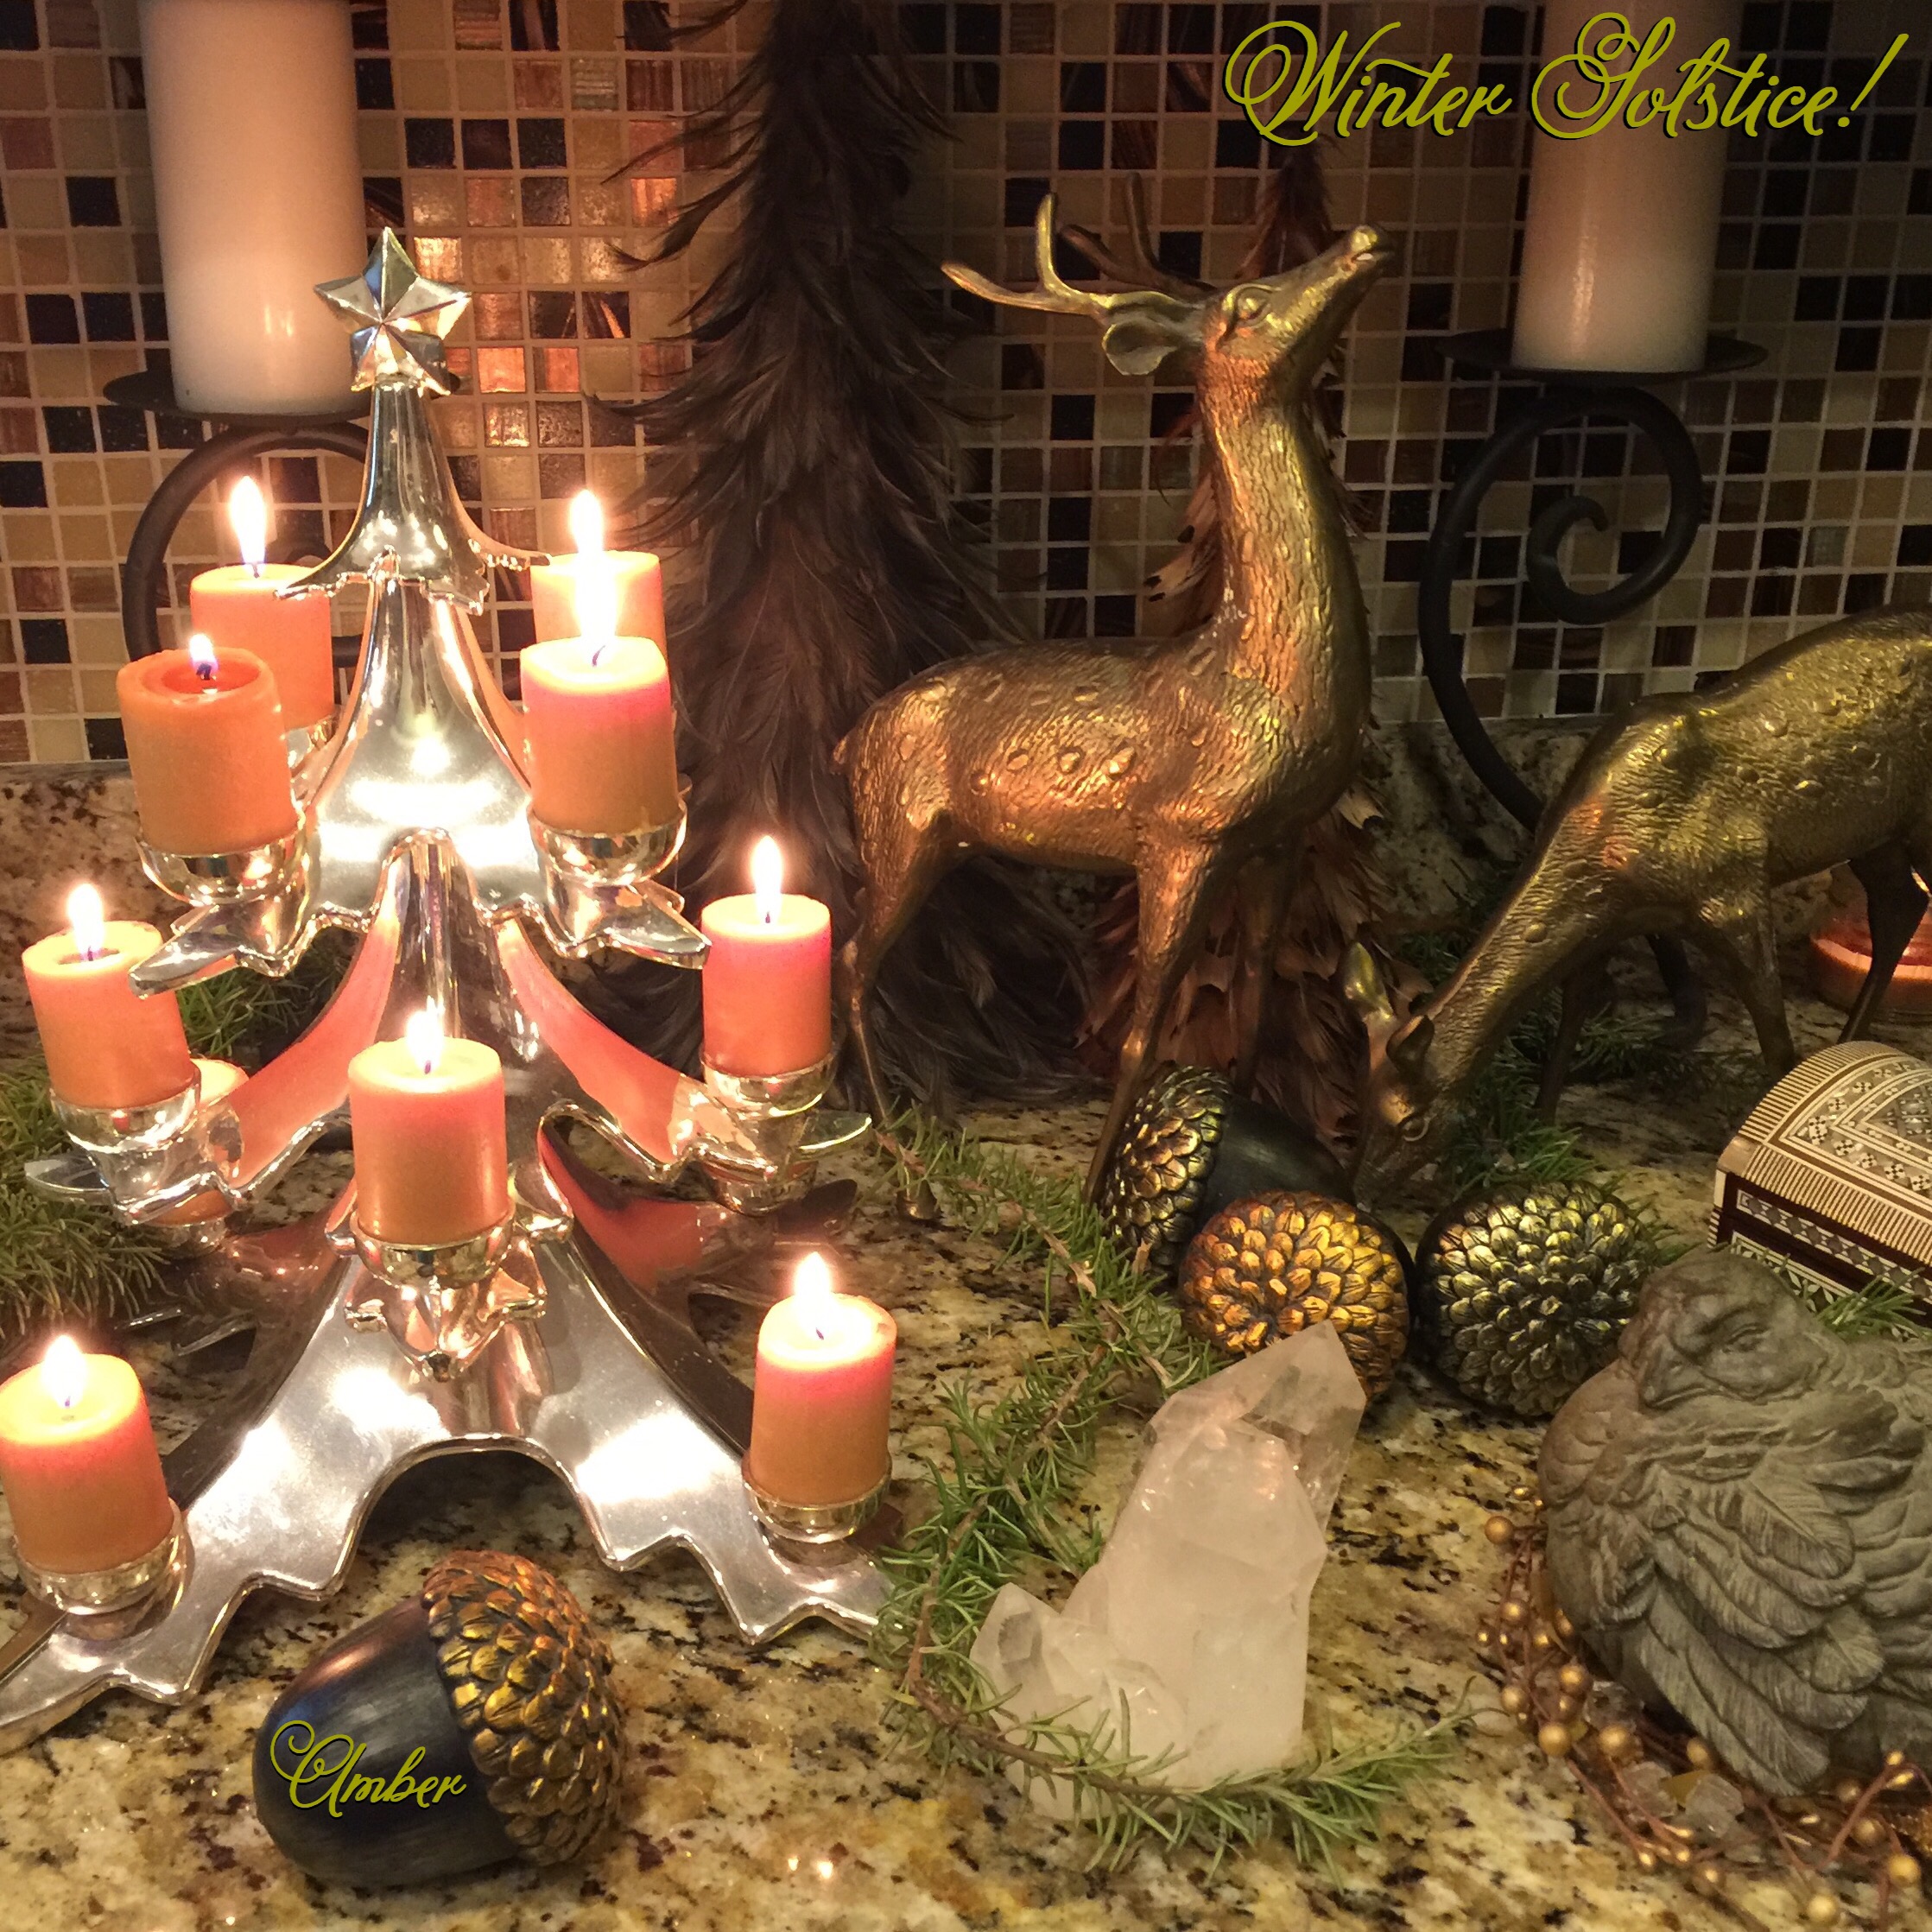
We hope you Enjoy this moment!
🌲 Winter Solstice! 🌲
❤️ –Amber Hamilton Henson

Mad Tea Party 2016: Blog Hop!!
First
the Tea Cup was HUGE…
Then, it was tiny.
There are so many!
Enough to fashion into a bracelet
to wear to Tea!
…back through the looking glass! 💞


You can see my 2015 tea party, here:
https://whatamberloves.com/2015/07/10/mad-tea-party-2015/
You can see my 2014 tea party, here:
https://whatamberloves.com/2014/07/12/mad-tea-party-2014/
For the Bestest Bestest Mad Tea Party and to visit dozens of other tea party links happening in blog land this week, please hop over to Vanessa’s site, “A Fanciful Twist,” here:
http://afancifultwist.typepad.com/a_fanciful_twist/2016/07/mad-tea-party-2016-.html
Thanks for Partying with meeee! –Amber

")
Mad Tea Party (blog hop!)

Vanessa of “A Fanciful Twist” is hosting her 9th annual MAD TEA PARTY! This will be my 3rd year to participate! Please, join us! Get all of the details and enjoy her stunning photos at http://afancifultwist.typepad.com/a_fanciful_twist/2016/06/join-us-for-our-9th-annual-mad-tea-party-.html
See my 2015 mad tea party: https://whatamberloves.com/2015/07/10/mad-tea-party-2015/
See my 2014 mad tea party: https://whatamberloves.com/2014/07/12/mad-tea-party-2014/
So excited!!!
–Amber

DIY: ribbons & rhinestones braided bracelet or choker
Easy Project! Just follow the photos!
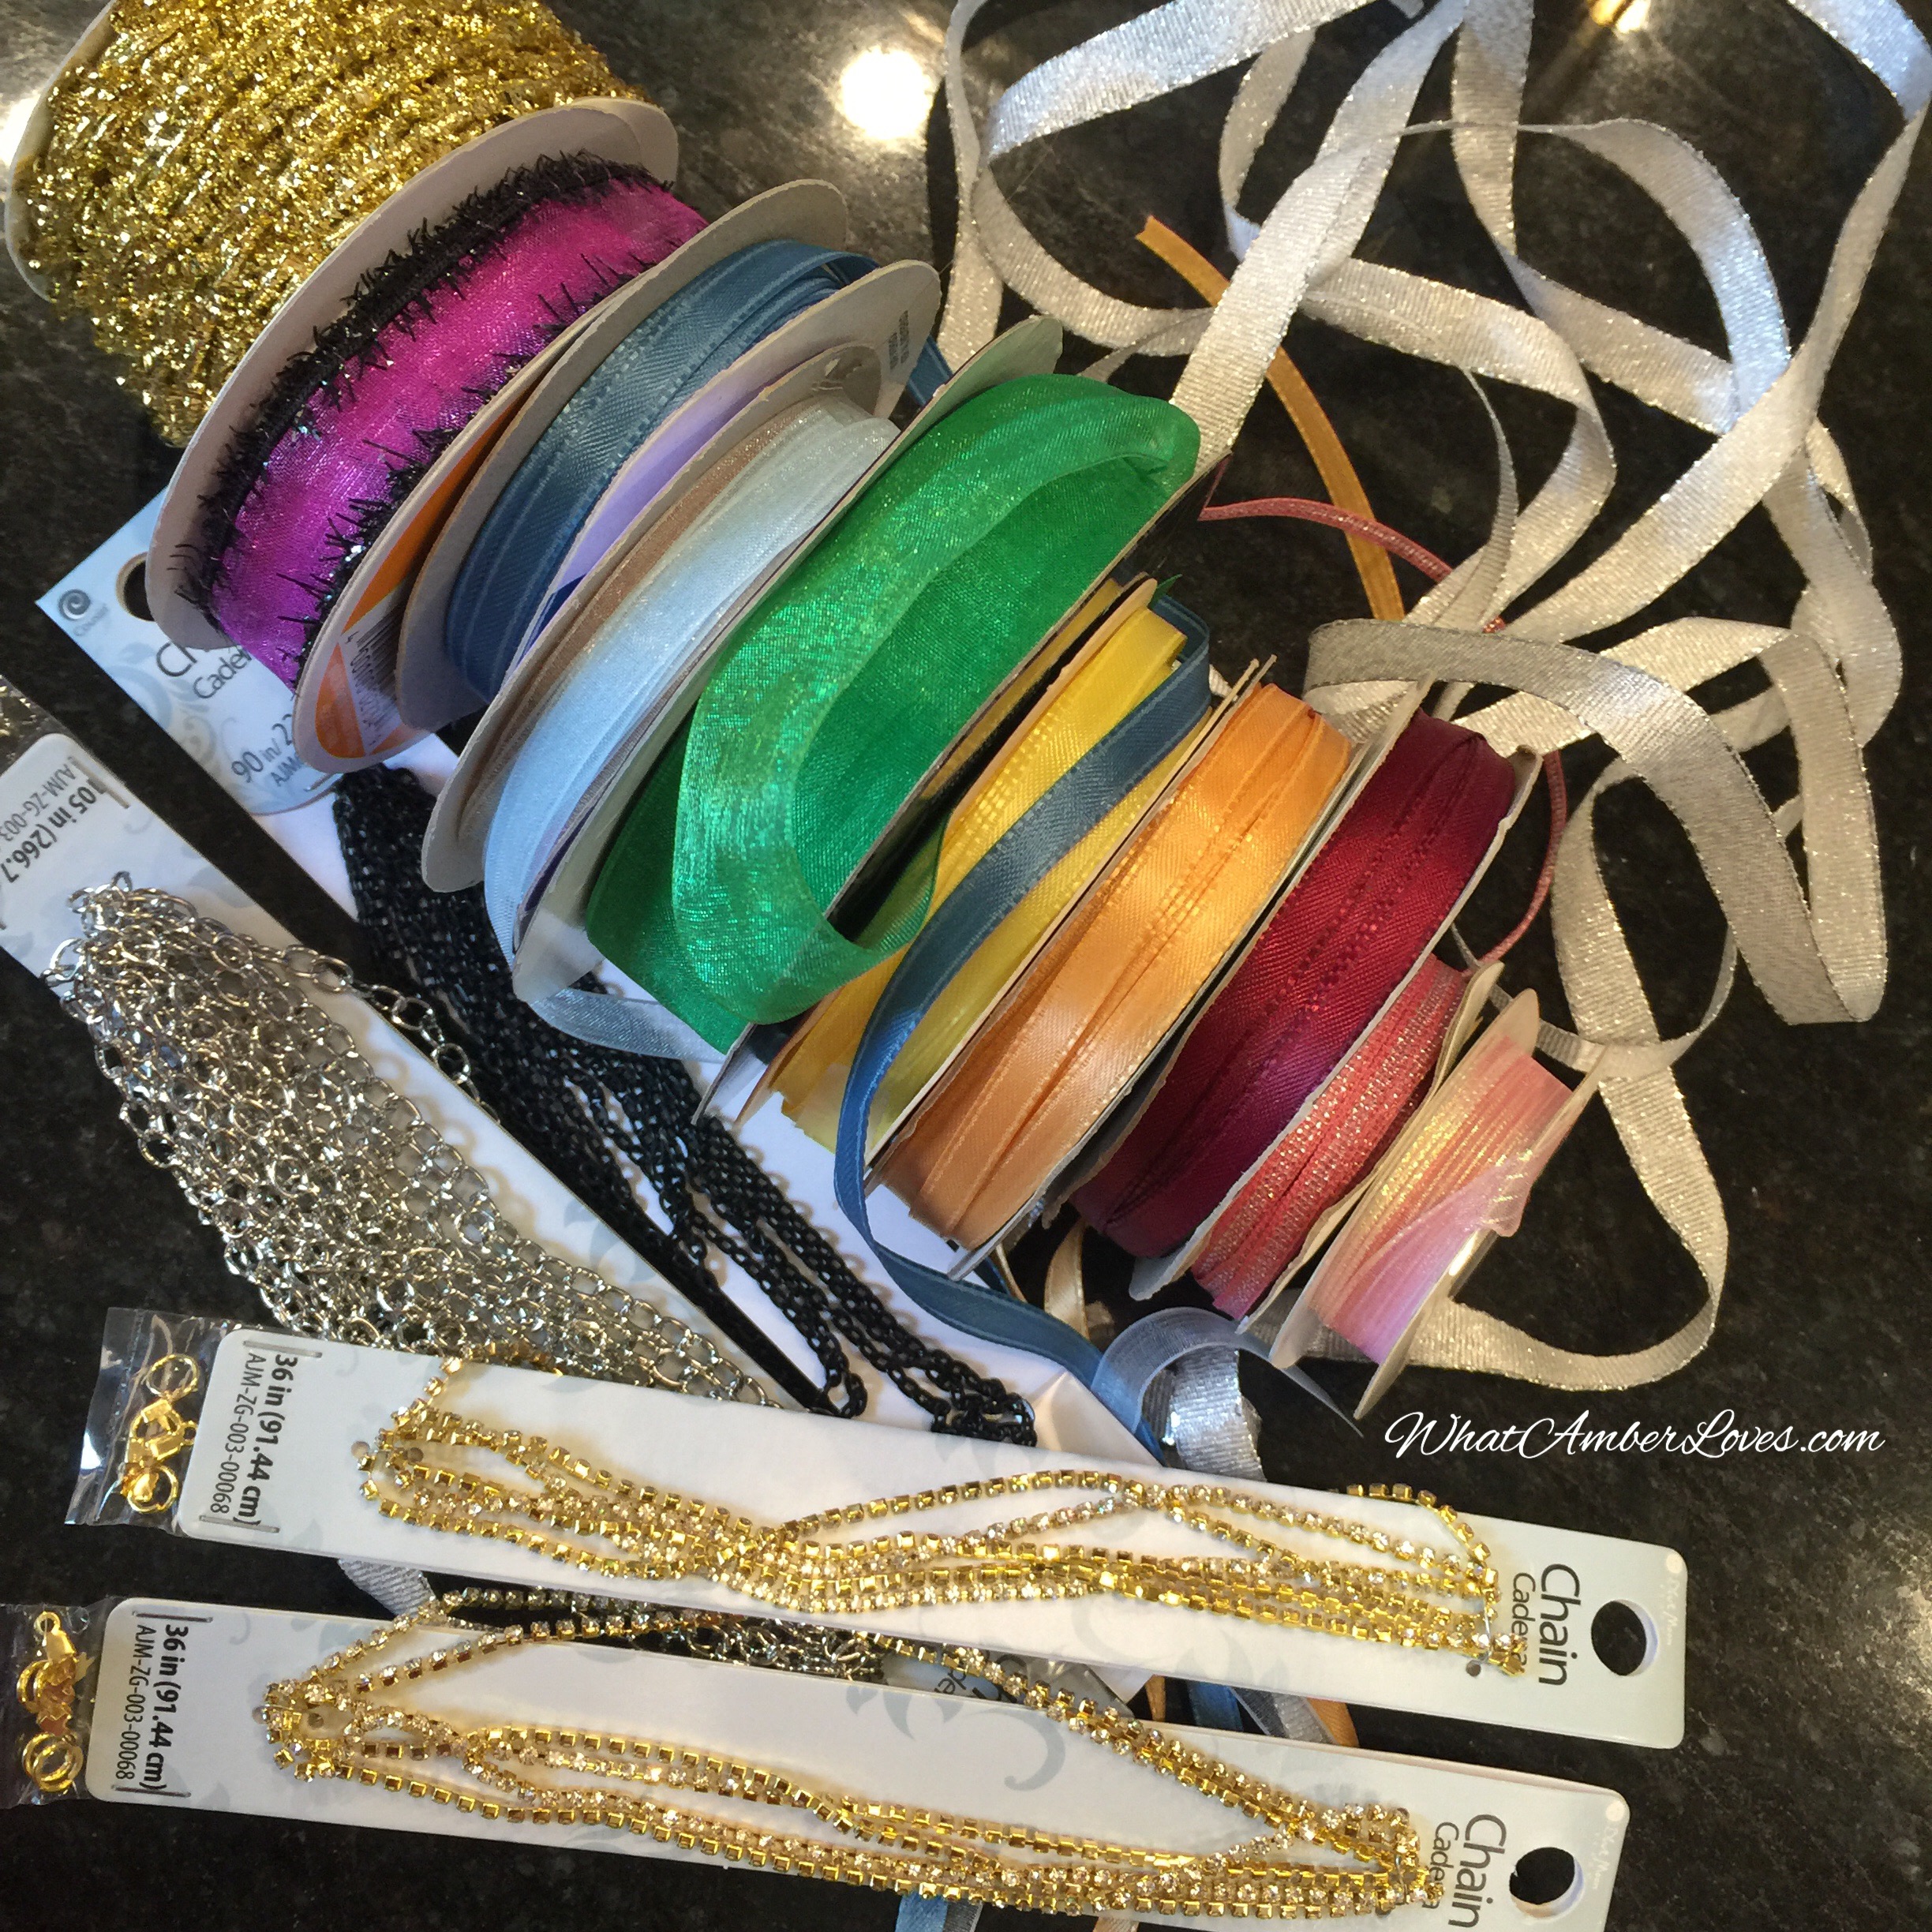
Supplies
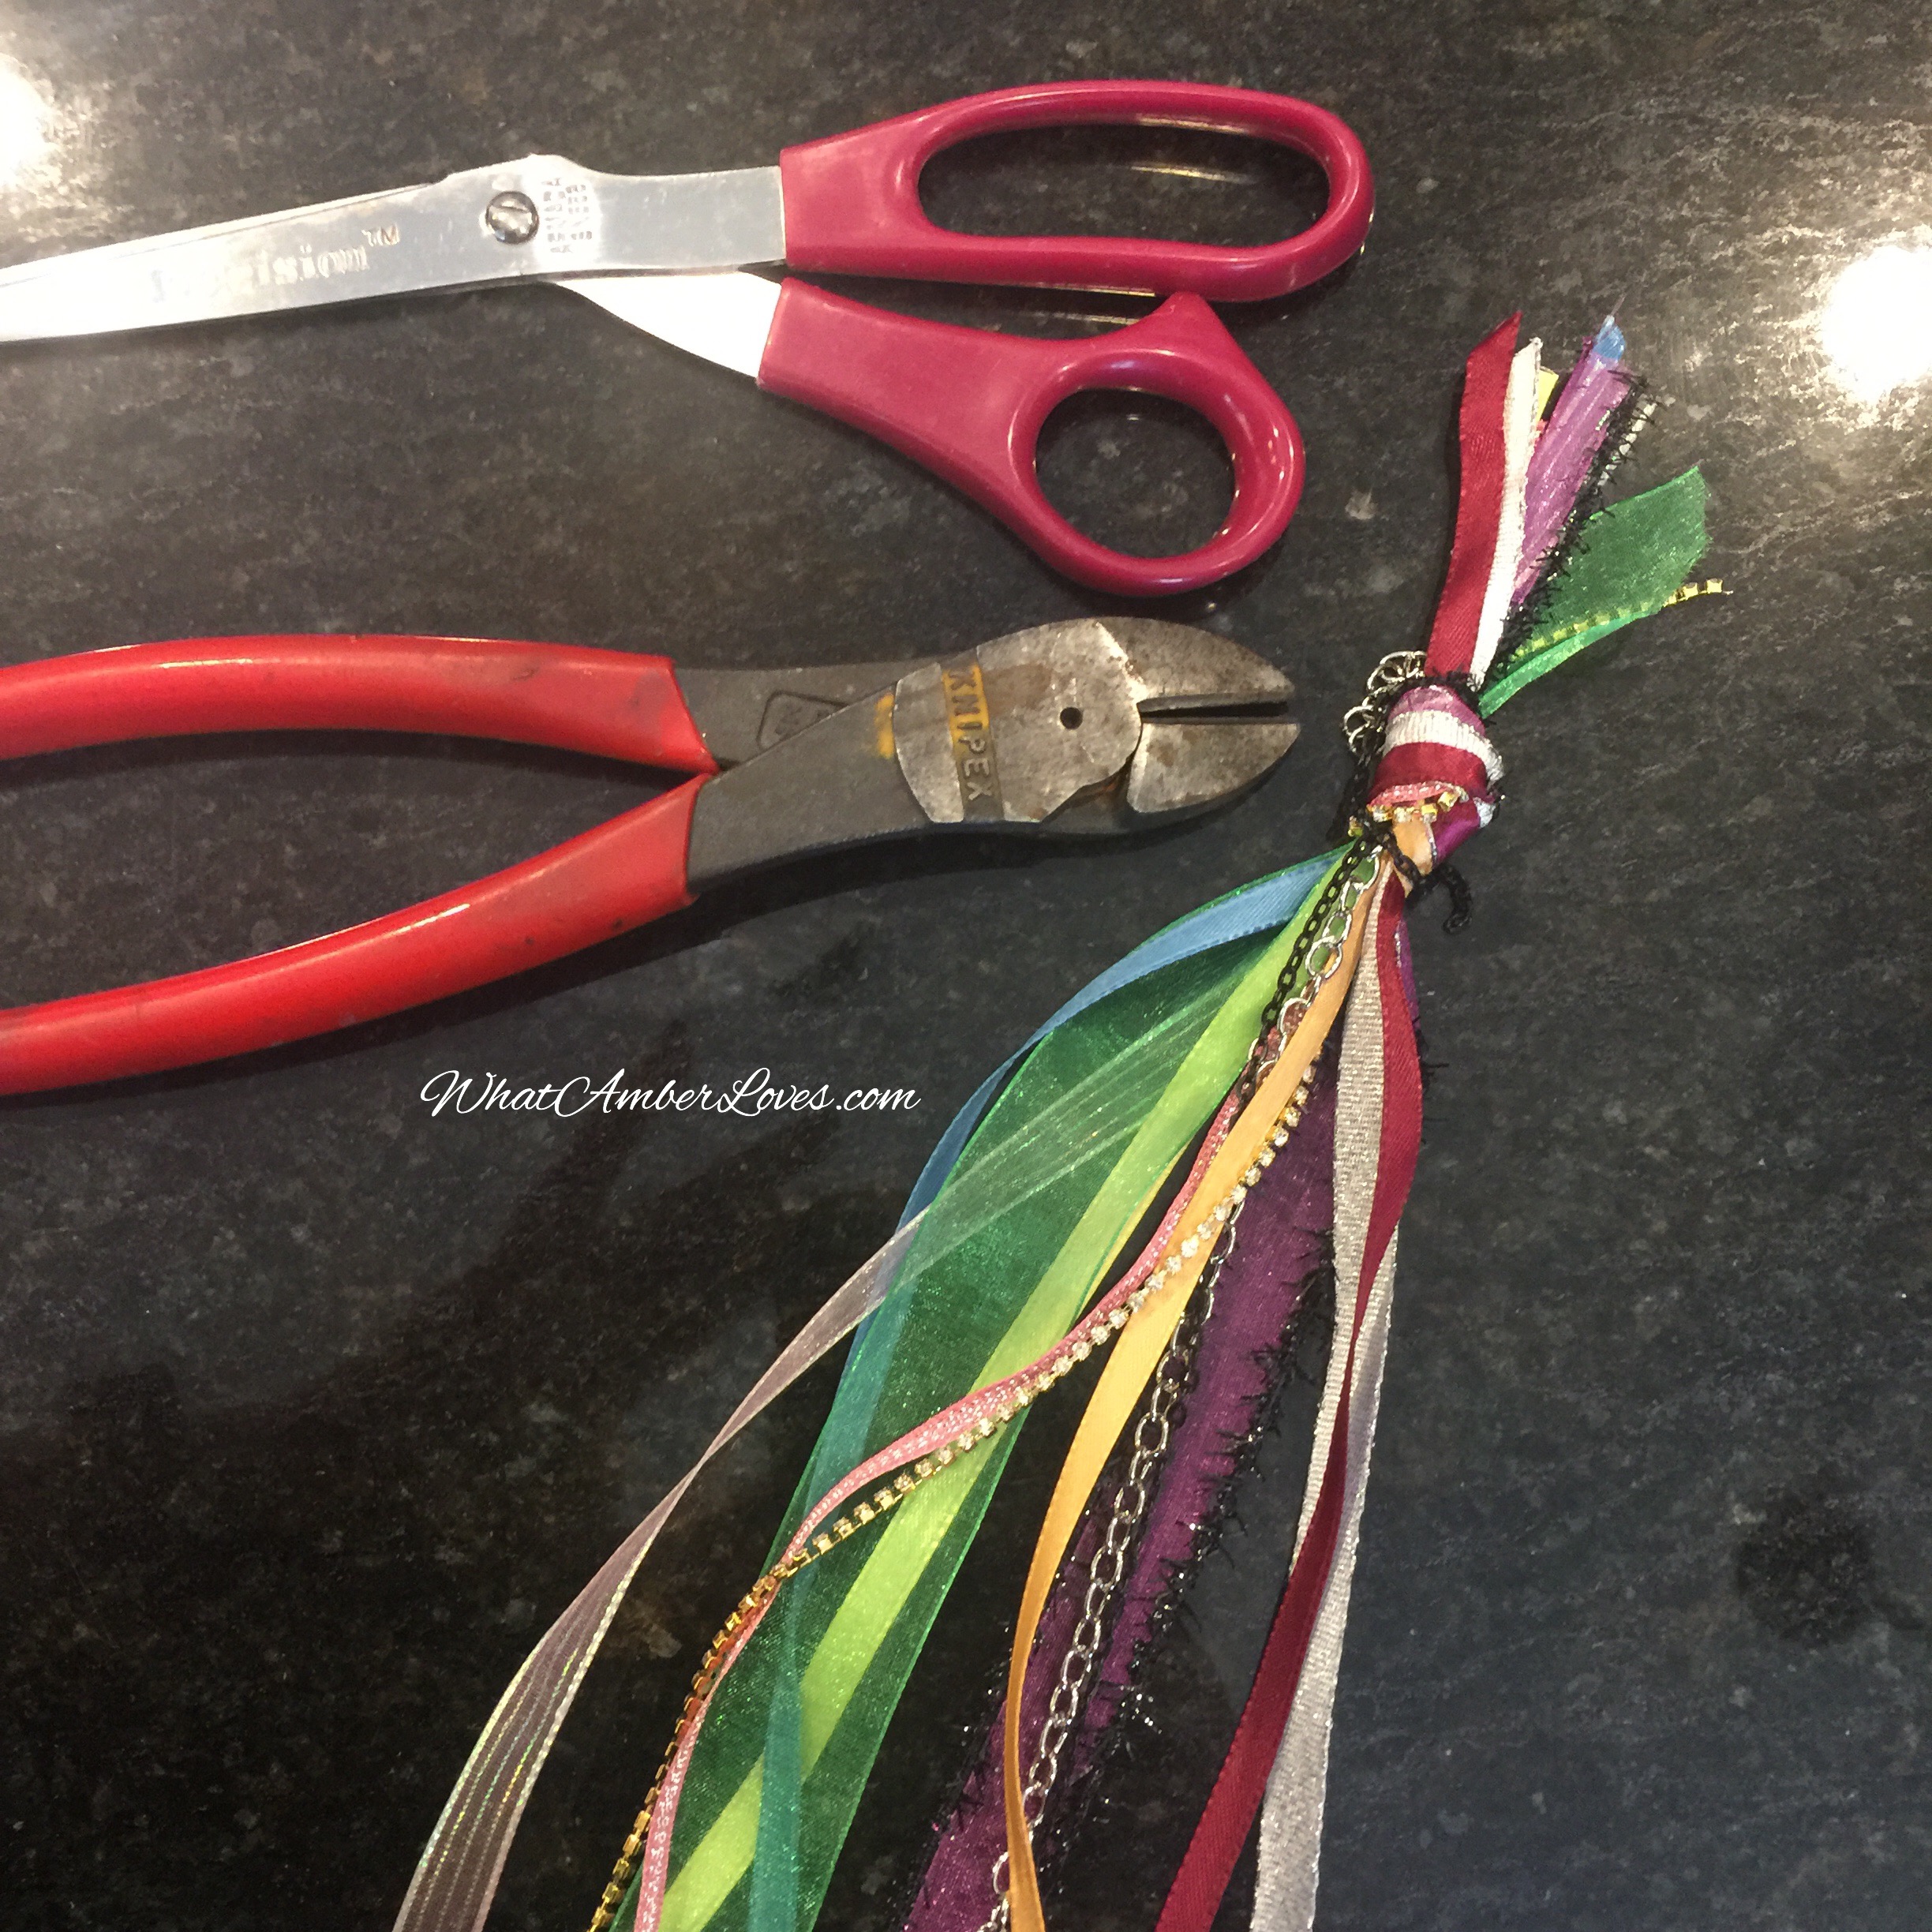
Knot one end and cut to desired length. I used multiple ribbons, a silver chain, a black chain, and a strand of gold prong set rhinestones.

Braid it. Tie a knot at the other end.
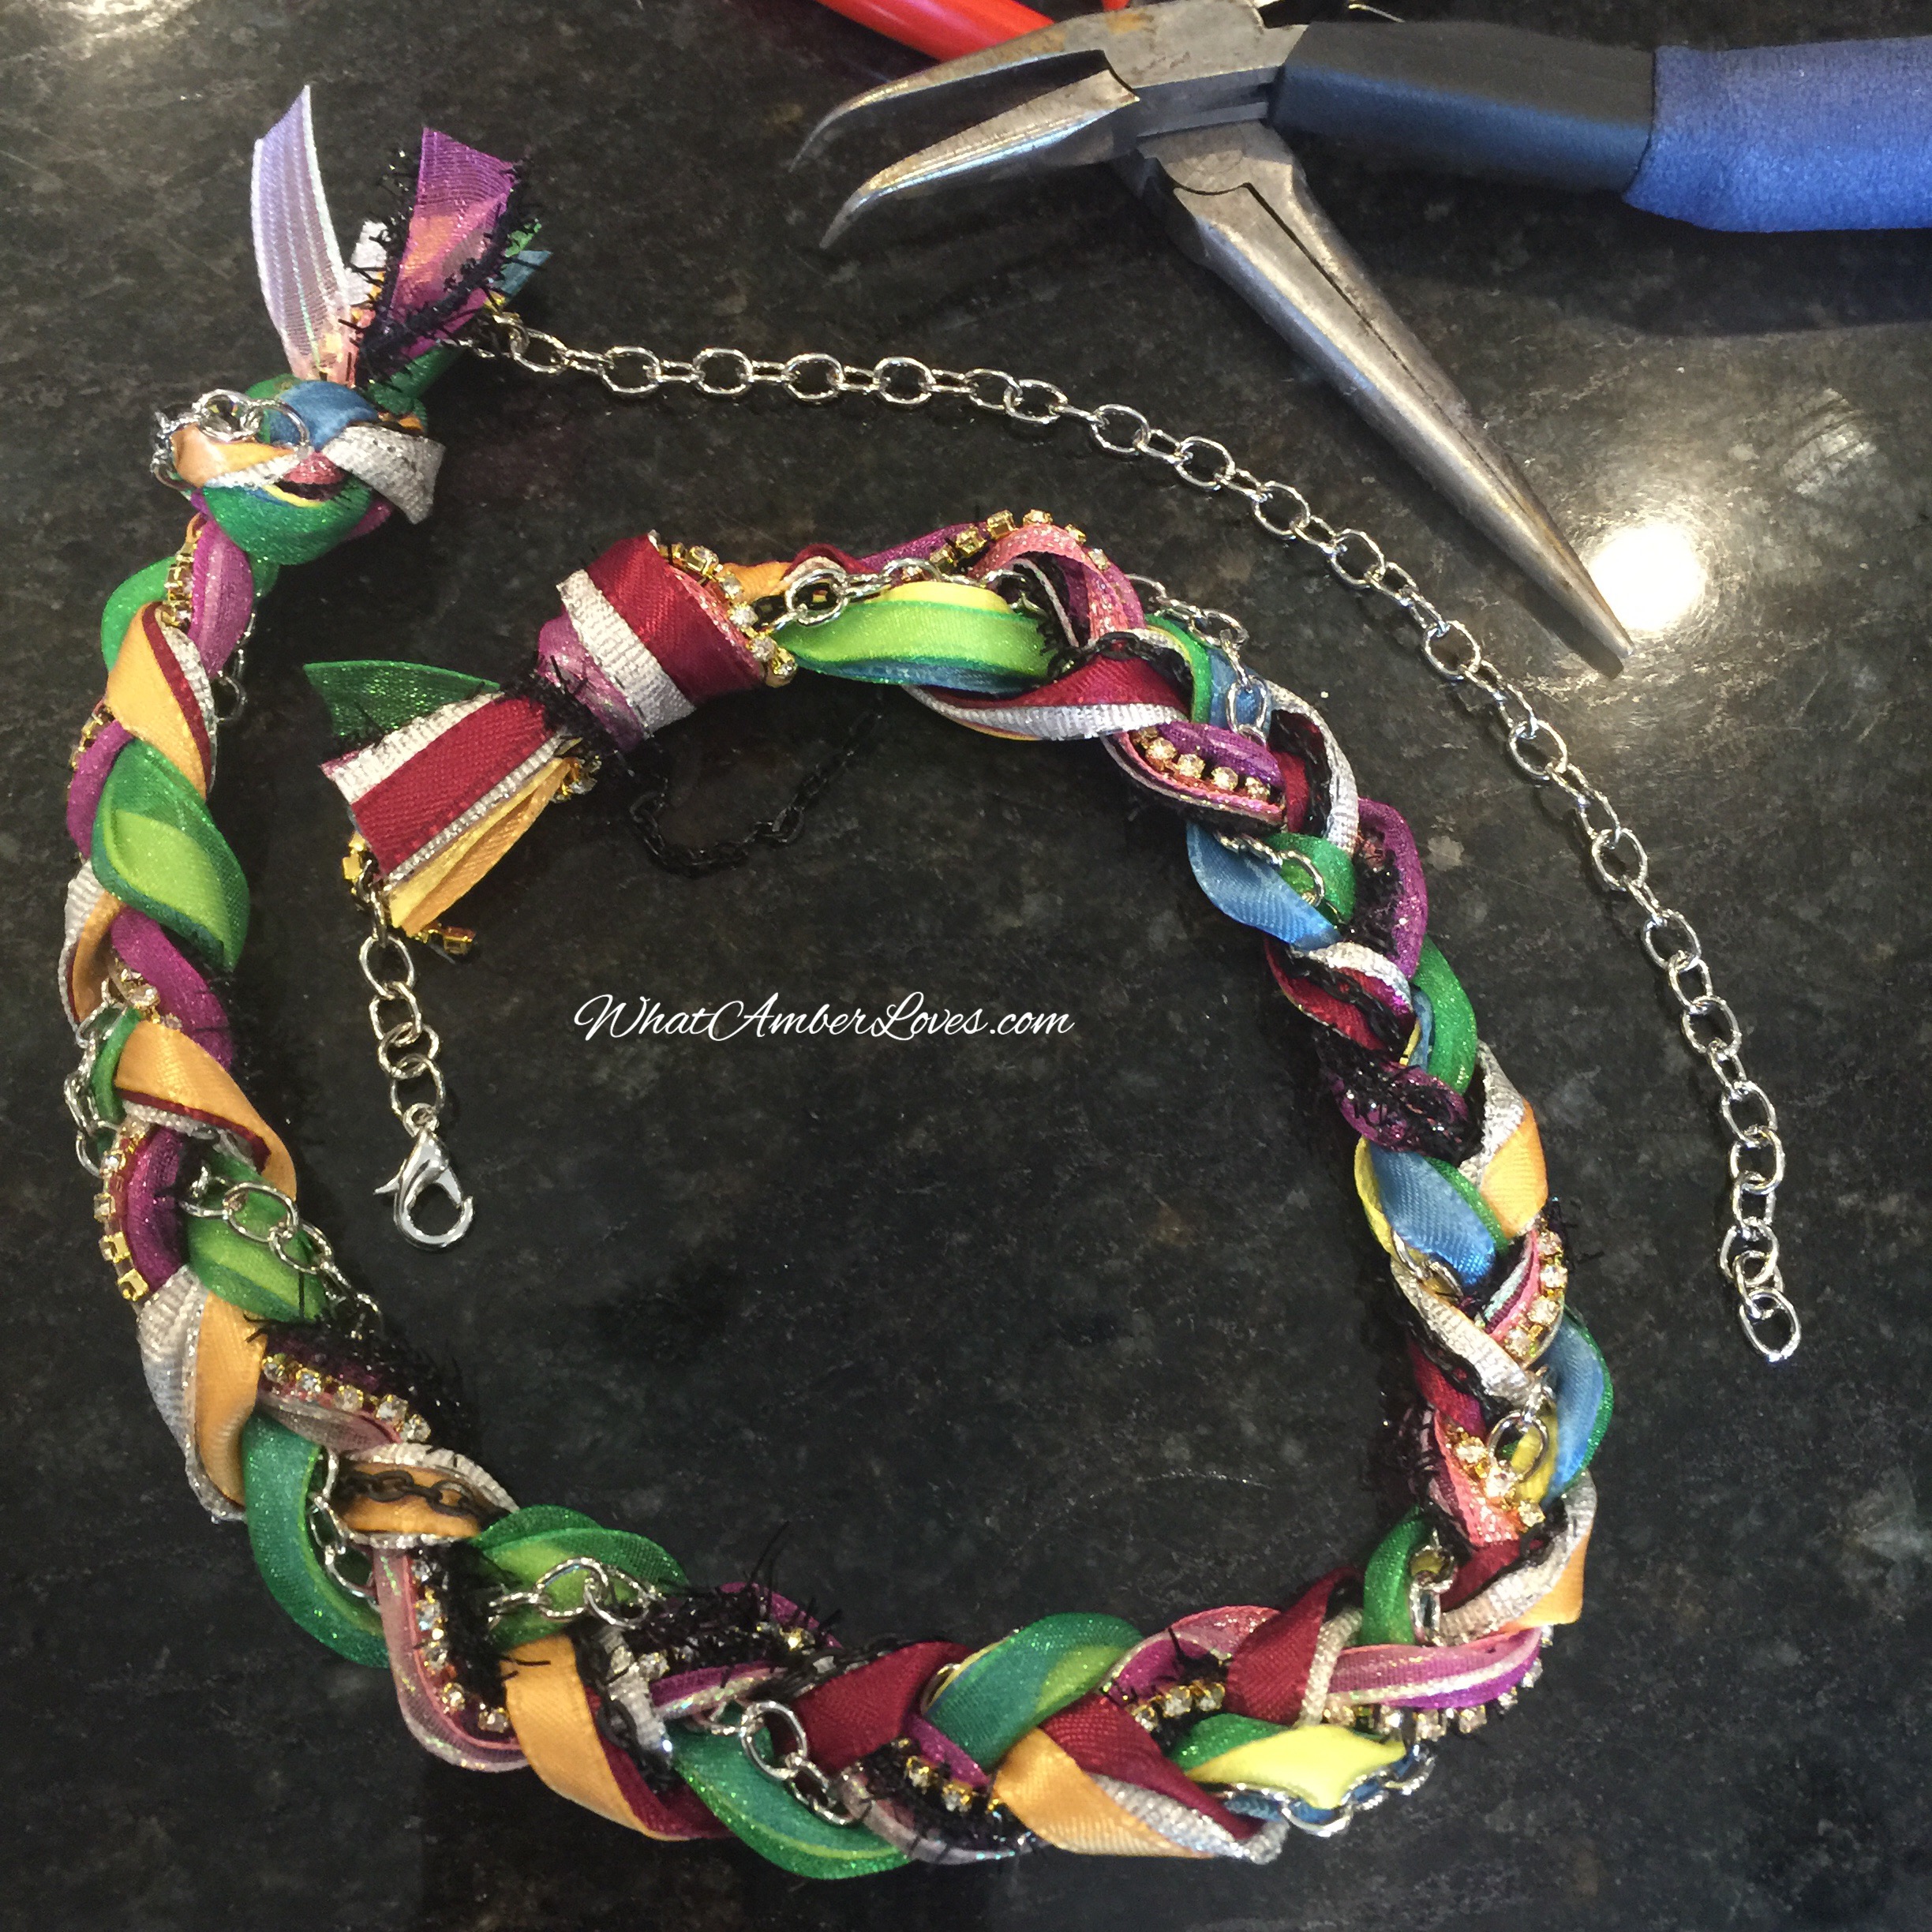
Trim the excess, leaving one chain long on the end. Attach the clasp with pliers and a jump ring onto the short end of chain. The long end of chain will give you options for length when wearing it as a necklace.

Summary:

Wear it as a choker OR double wrap it as a bracelet!


Like it? Share it, please!
I’ll love you even more, if you do!! 💞🙌
Your friend, AmberHH


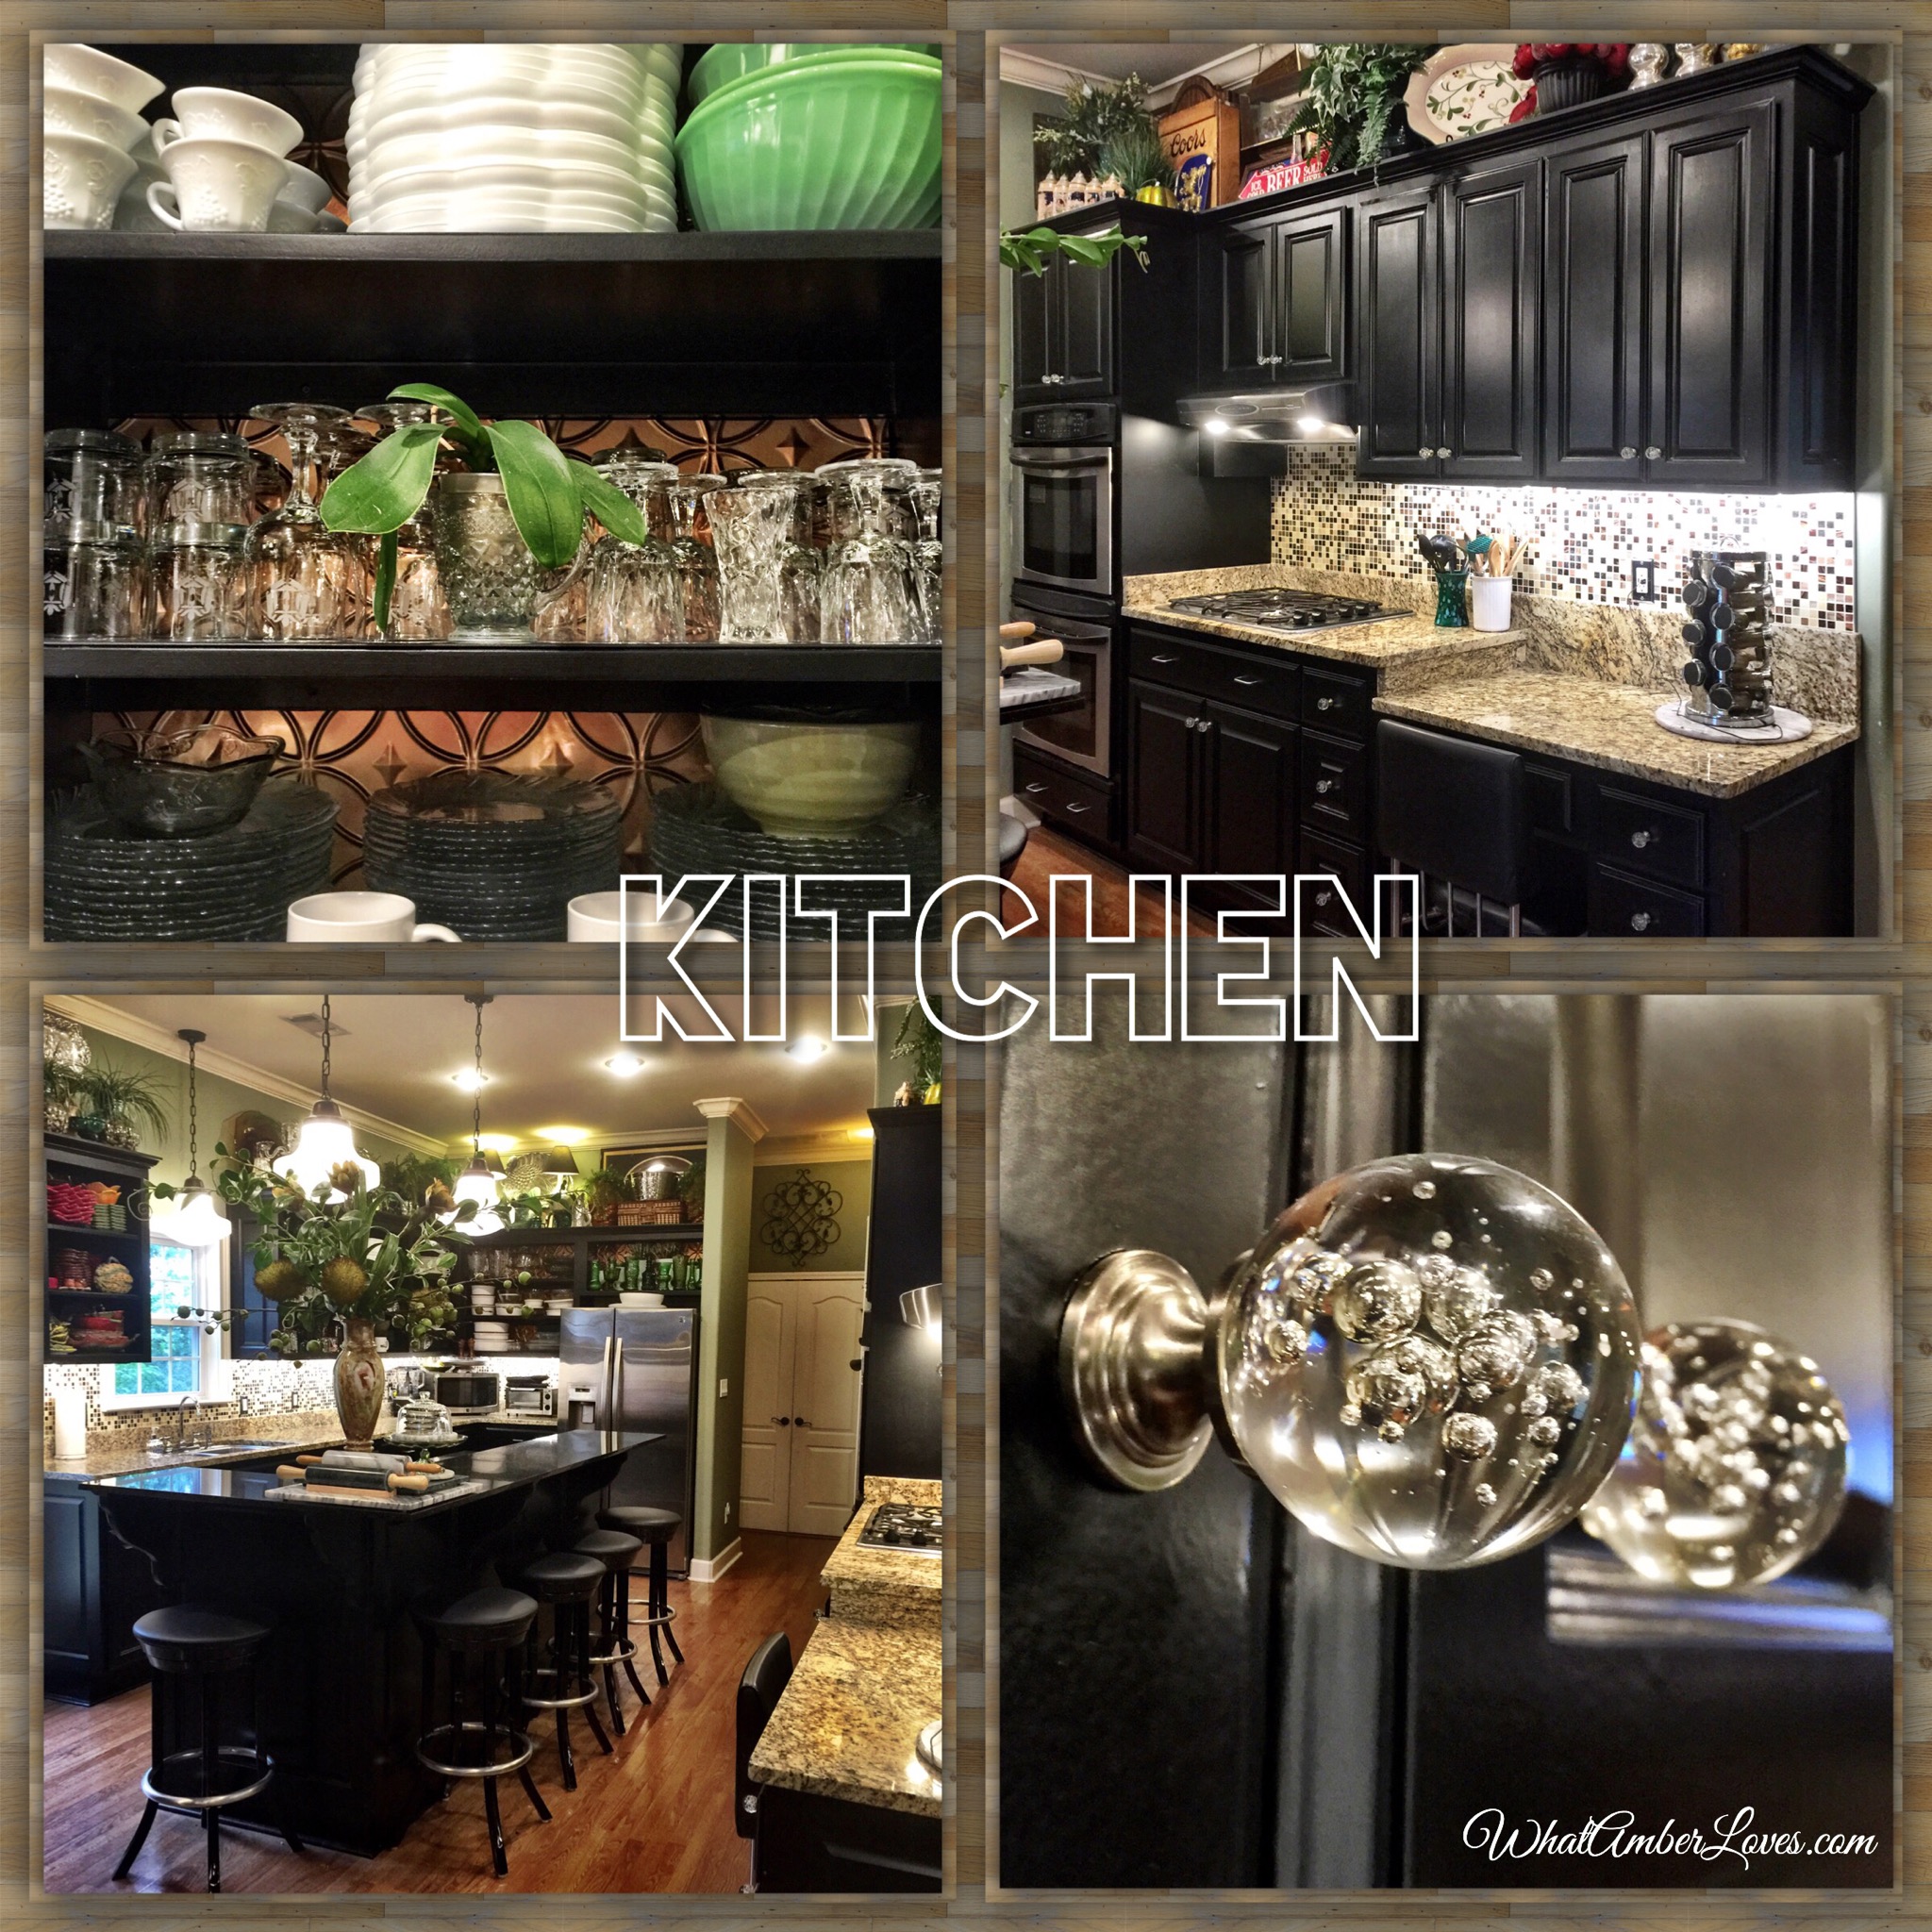
My Kitchen Update!
So, our old kitchen wasn’t terrible.
However, it was tired.
It was outdated.
It had been working hard for ten years, and it showed.
The family that owned the house before us raised teenage sons in it for five years. We have been raising three young daughters here for five years. Countless meals, lots of large gatherings, and endless craft projects have taken place in this kitchen for over a decade.
The construction of the ivory painted wood cabinets was sturdy, but the finish was worn.
The granite and hardware just weren’t my style/preference.
It had never really been a “finished” kitchen, to my eye, because there wasn’t a proper backsplash, just painted sheetrock between the countertop and upper cabinets.
We updated it according to MY style, MY preferences!
Bonus: We did it without breaking the bank, and because this is an open-concept floor plan, the WHOLE house feels updated! Love it!!
Want to see LOTS of photos of my newly updated kitchen?
Do you like “before/after” photos as much as I do?
If so, here you go:
(Click on photo to have it enlarge into a new window.)


The detailed before/after photos:
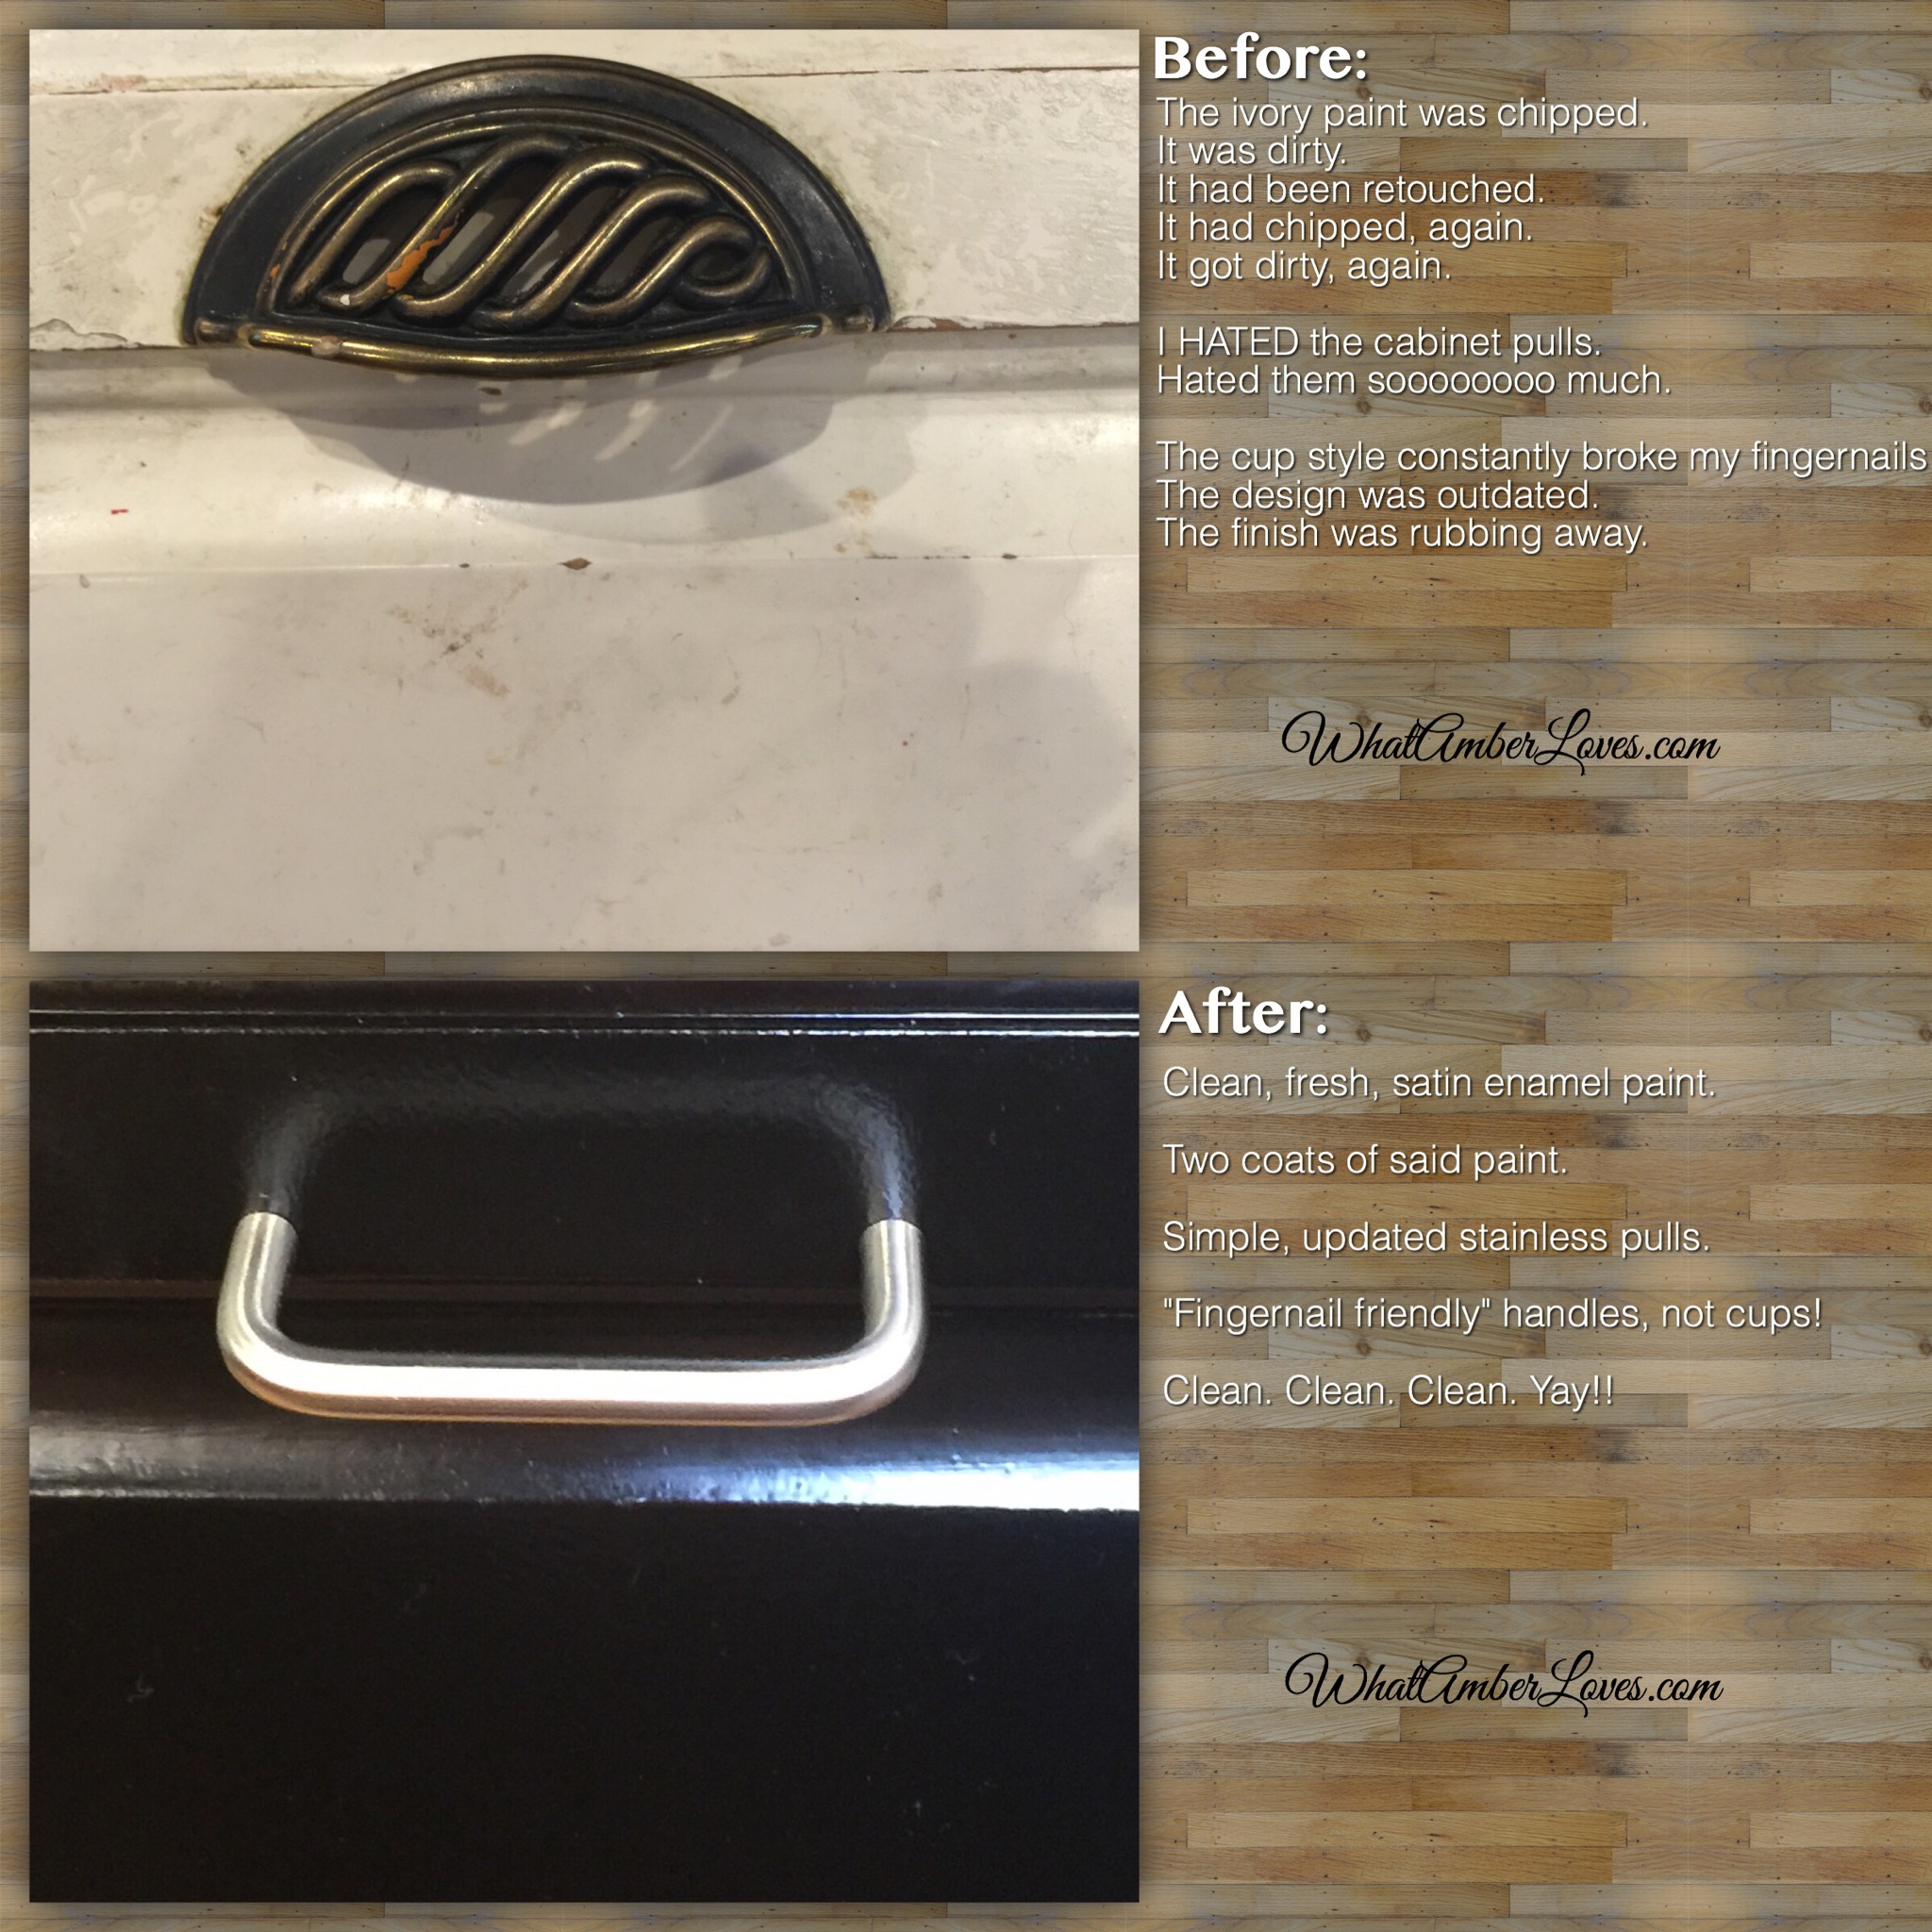
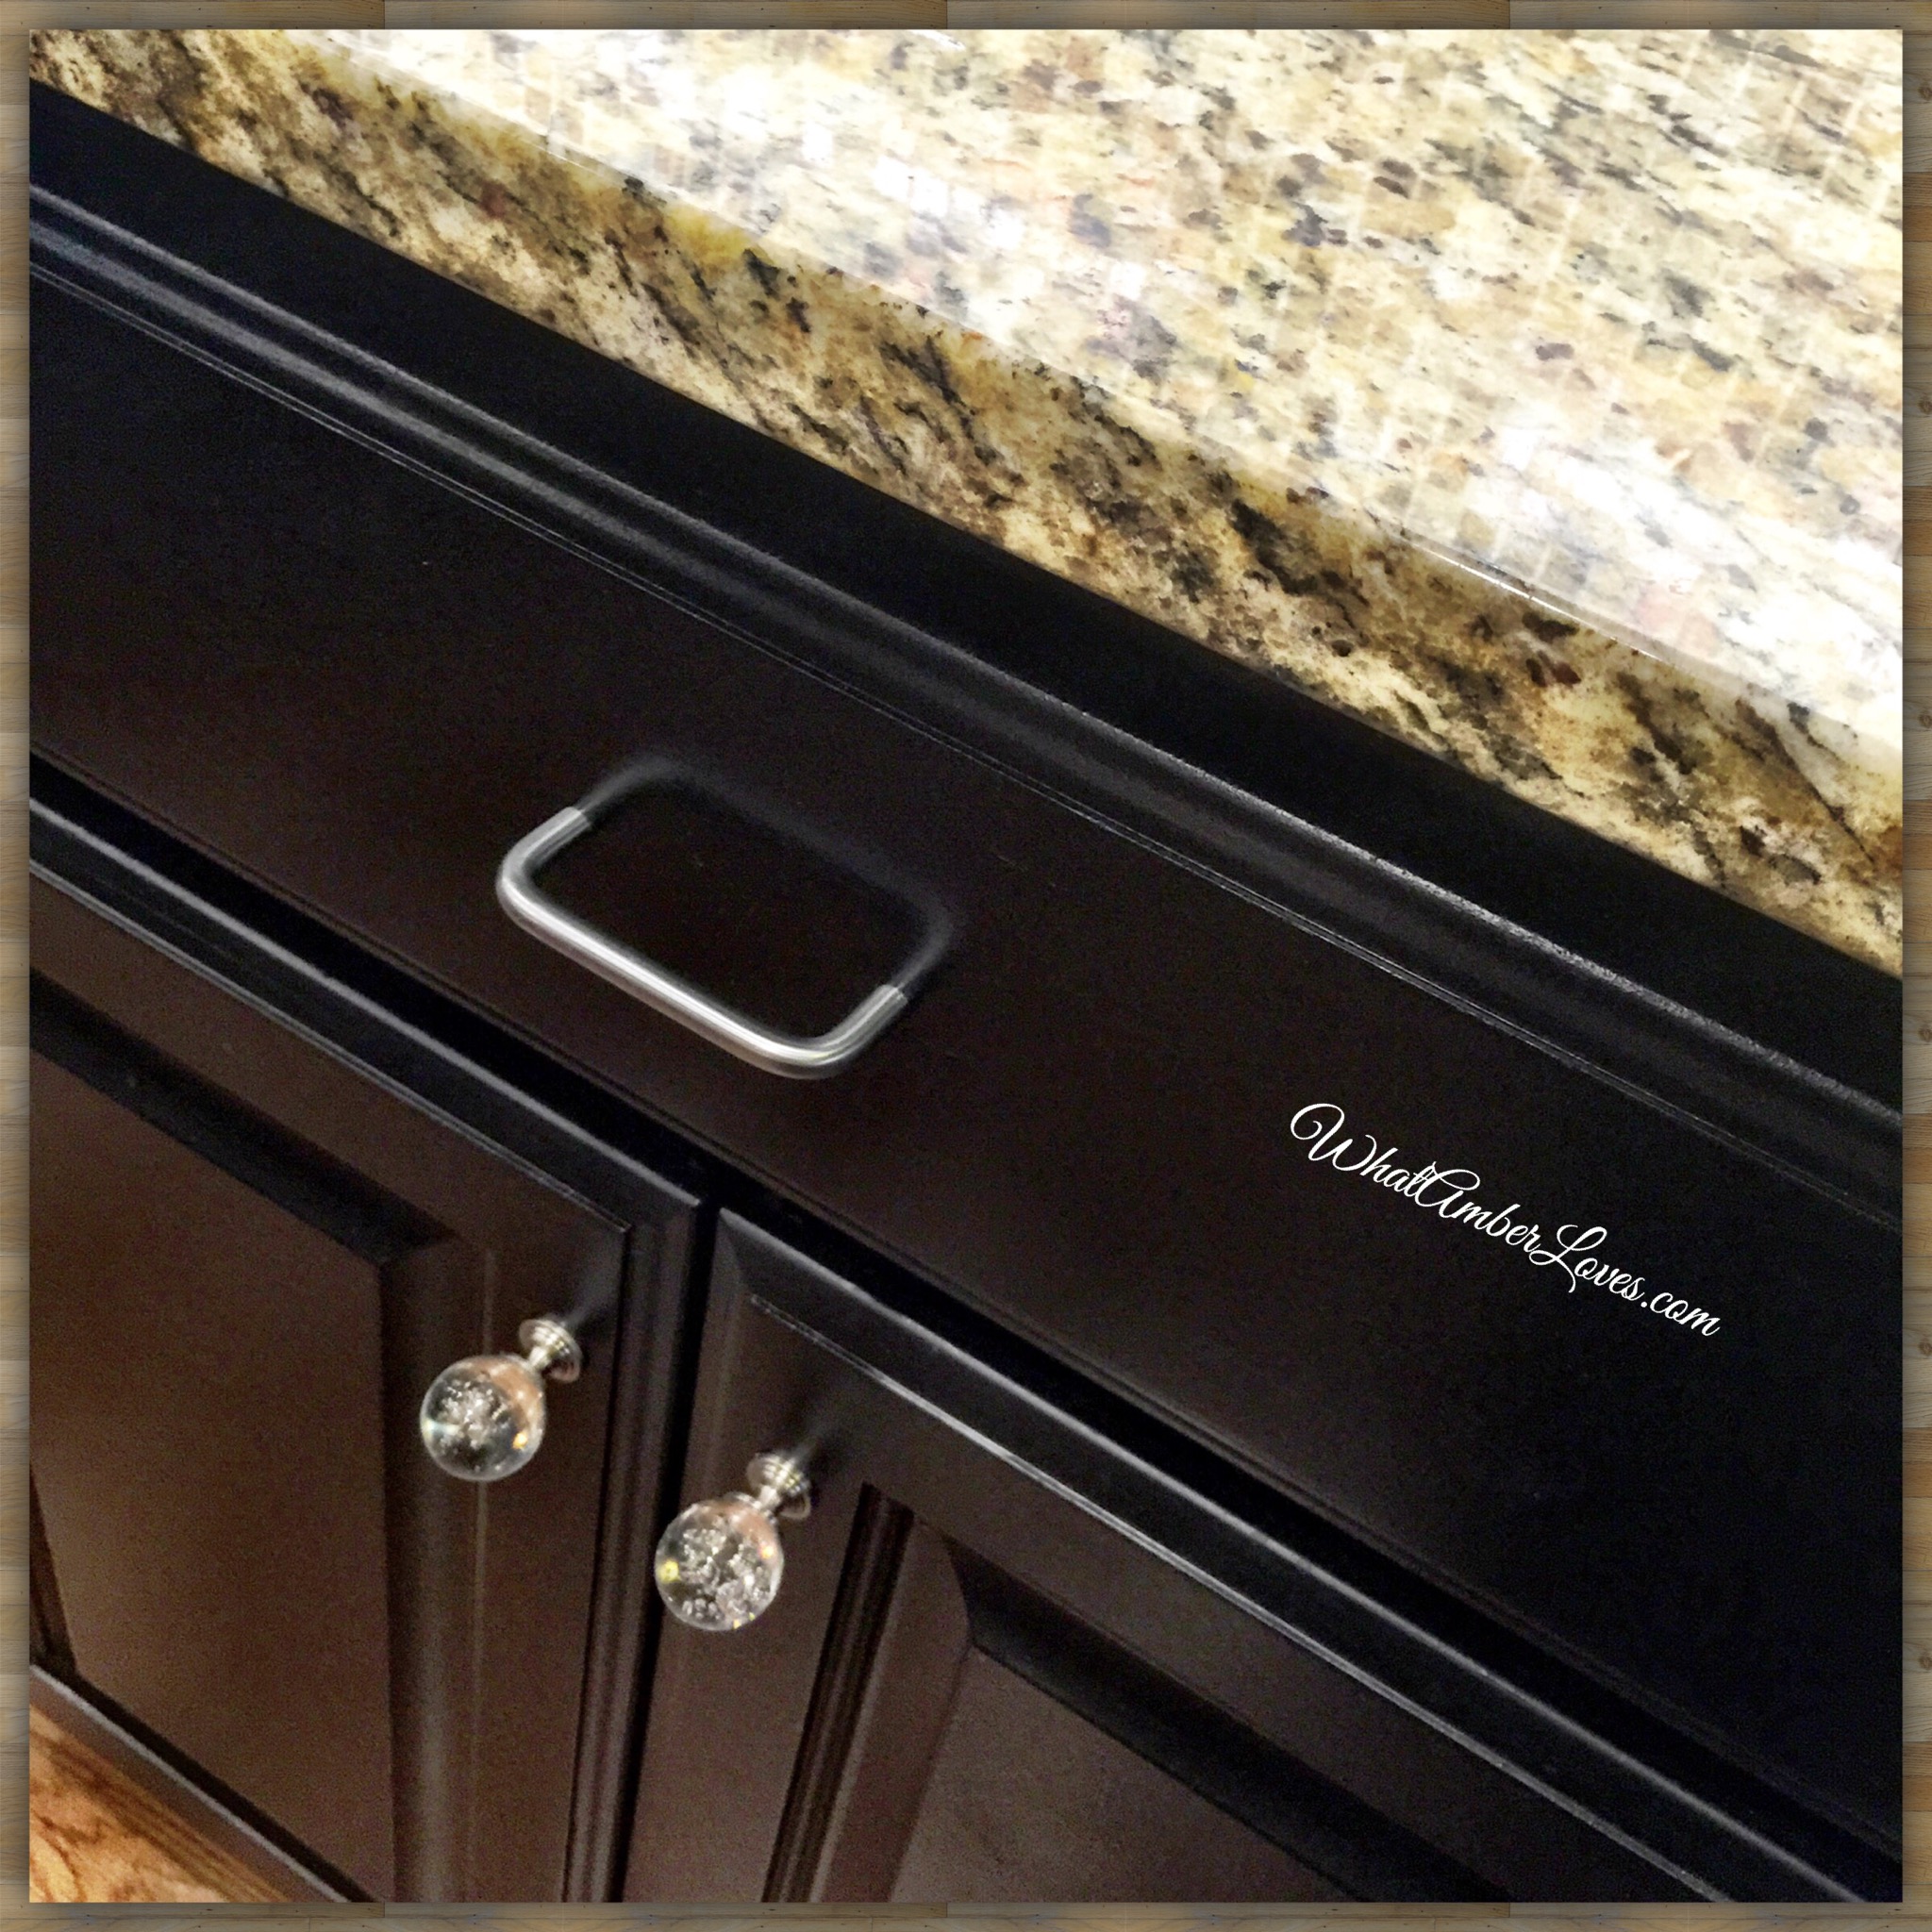
CABINET HARDWARE:
Before:
The ivory paint was chipped.
It was dirty.
It had been retouched.
It had chipped, again.
It got dirty, again.
I HATED the cabinet pulls.
Hated them soooooooo much.
The cup style constantly broke my fingernails.
The design was outdated.
The finish was rubbing away.
After:
Clean, fresh, satin enamel paint.
Two coats of said paint.
Simple, updated stainless pulls.
“Fingernail friendly” drawer handles, not cups!
Clean. Clean. Clean. Yay!!
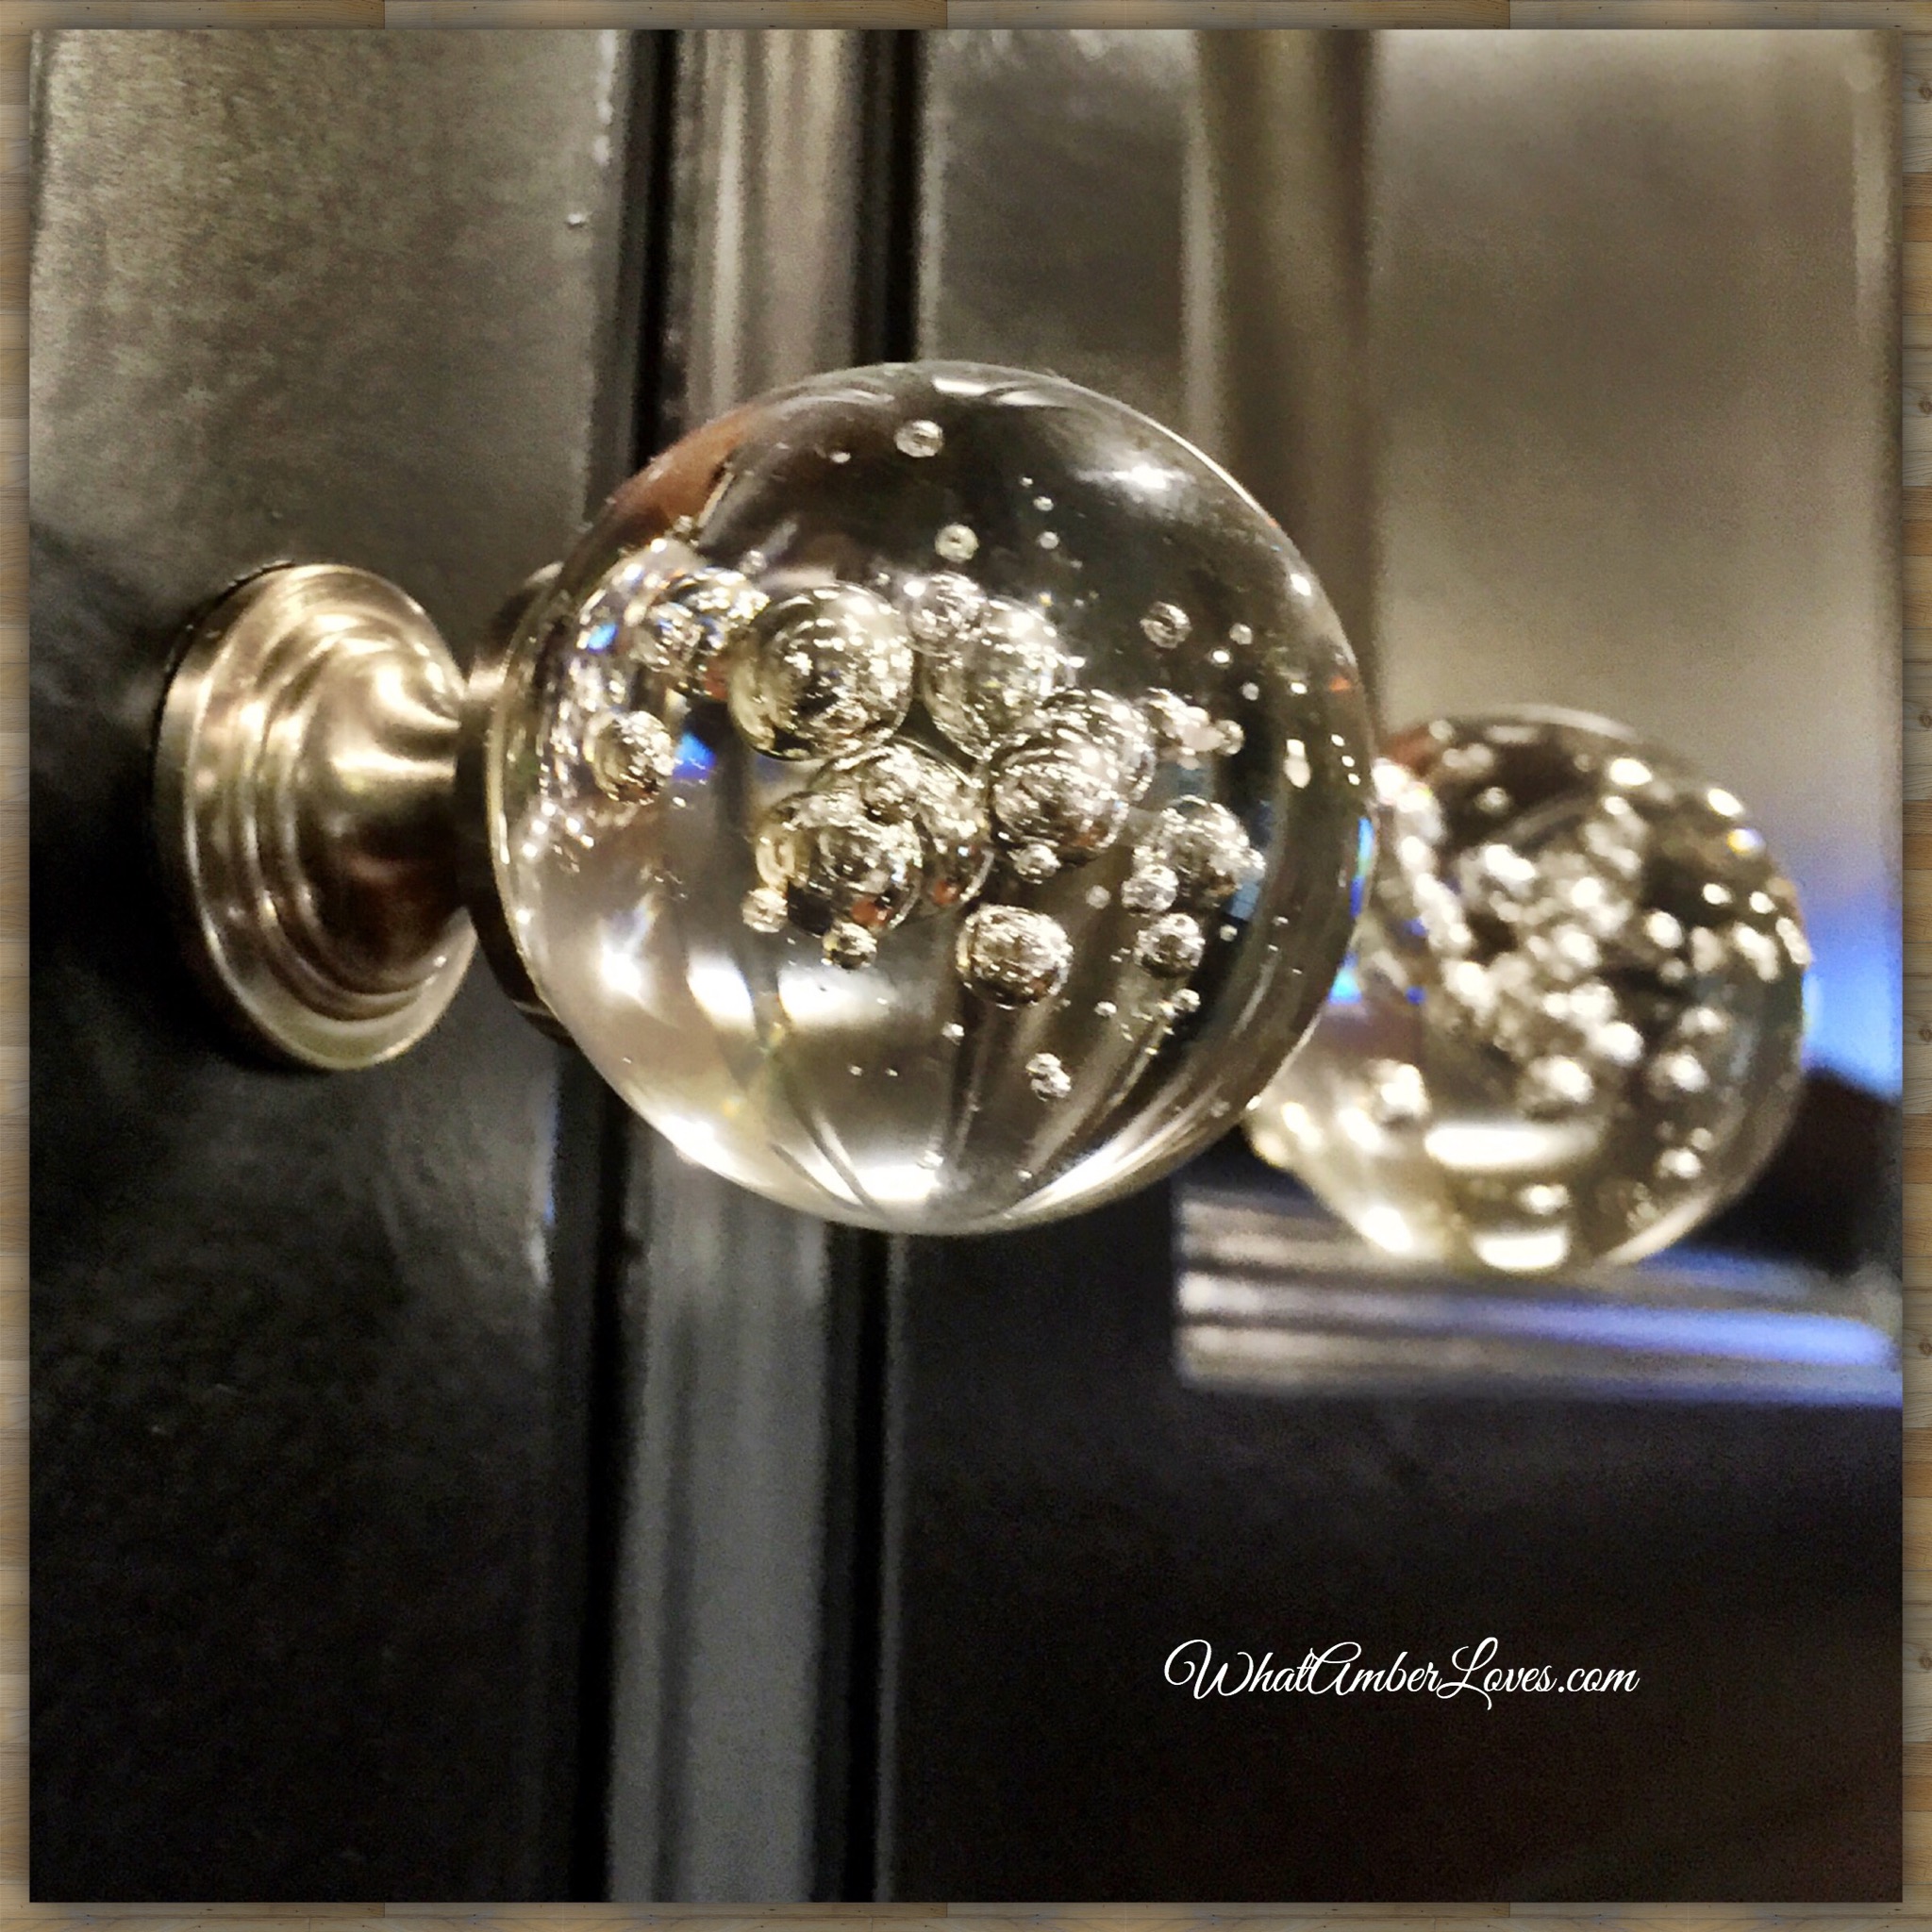
What do you think of my bubble glass knobs?
I adore them!
To me, they’re like the jewelry of a kitchen!
Next, the sink area:

KITCHEN SINK:
Before:
Tired.
My patience had run out.
I was tired of dealing with the inefficiency of
removing crumbs and spills from counters.
The big lip on the top mount sink was
terribly impractical.
Every. Single. Scratch. Showed.
This black sink was showing its 10 year age.
The thin black granite had several stress
breaks and cracks around the sink.
It was a really dark work surface.
I’ll keep this stone on the island, where I
serve dinner buffet-style, but it was way
to dark for my work areas.
After:
New! Efficient!
It is so much simpler, now, to be able to
easily wipe crumbs directly into the sink!
Yay!!
The mottled color is stunningly gorgeous!
The granite is literally almost twice as thick!
The fabricator/installer did a perfect job
smoothing and polishing the edges!
I am so pleased with the transformation
to the quality of the functionality of our
kitchen since making this change!

Next, let’s talk GRANITE:
Specifics about our NEW Granite Countertops:
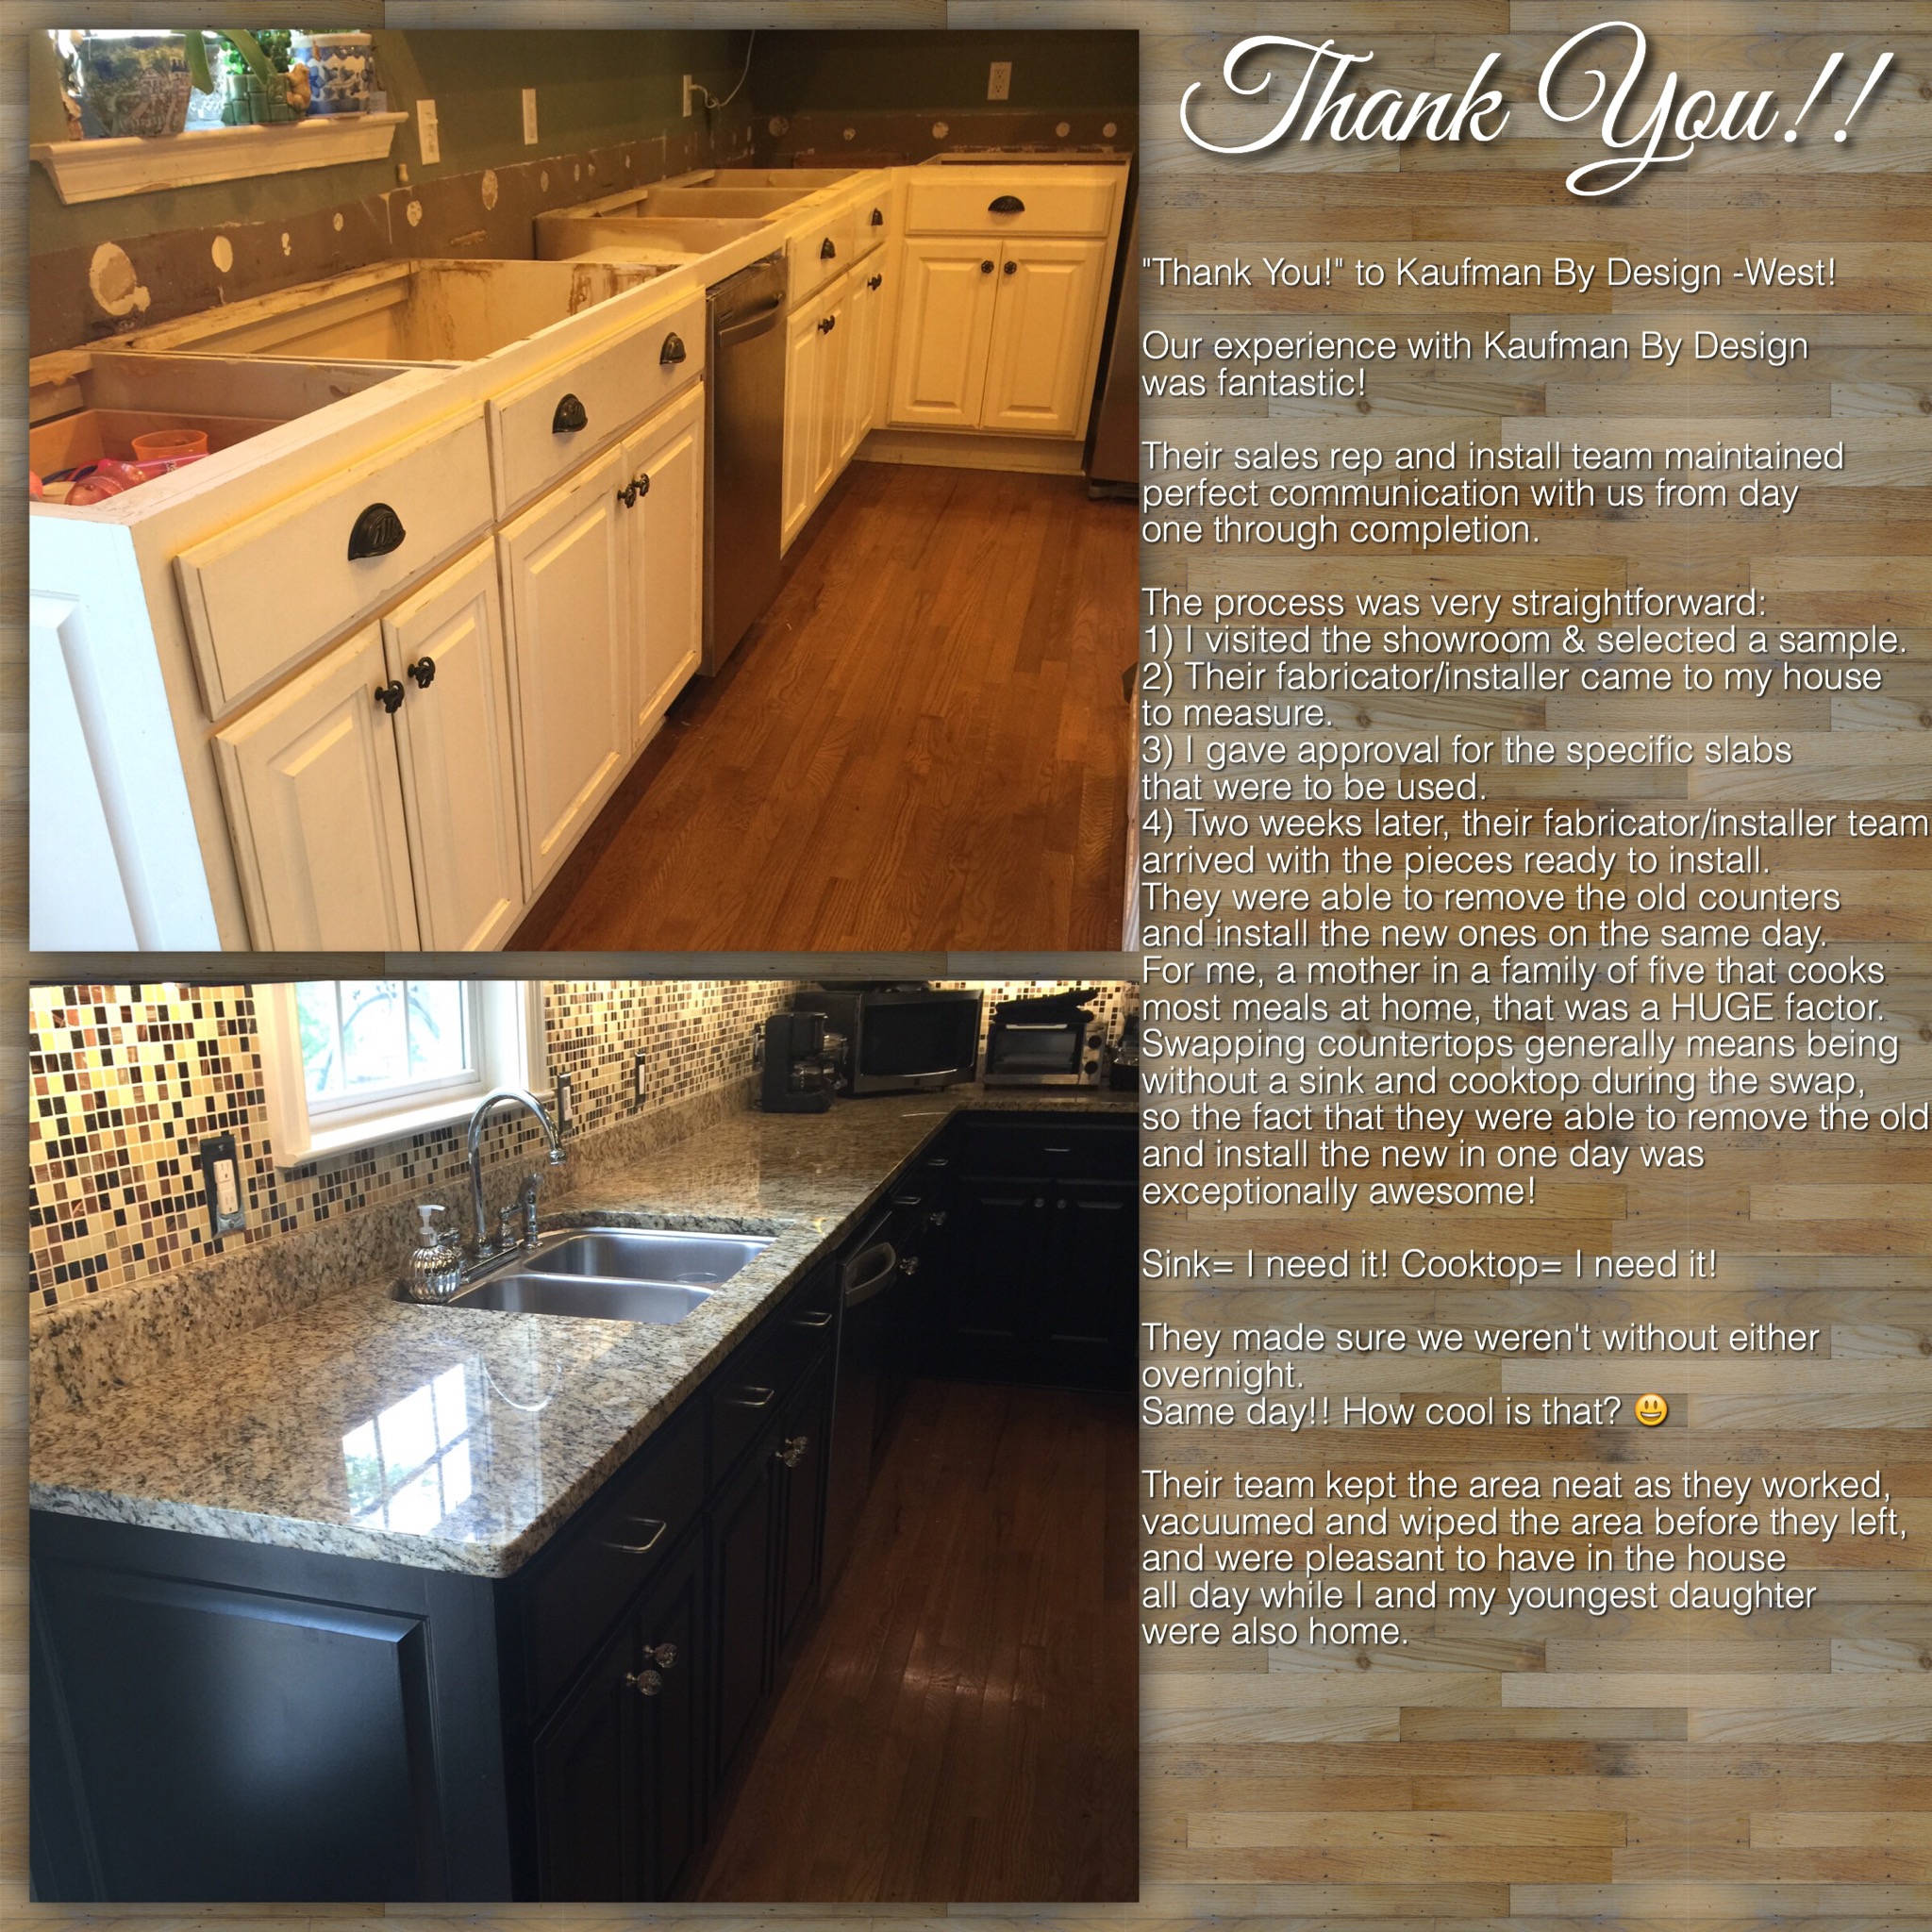
“Thank You!” to Kaufman By Design -West!
Our experience with Kaufman By Design was fantastic!
Their showroom is amazing! When designing for new construction, a remodel, or an update, like my project, it is amazing to be able to visit a well stocked showroom and be able to handle a spectrum of tile sample options ranging from earthy, tumbled natural stones to shiny, metallic dichroic glass and every option in between. Their sales rep and install team maintained perfect communication with us from day one through completion. The process was very straightforward:
1) I visited the showroom & selected a sample.
2) Their fabricator/installer came to my house to measure.
3) I gave approval for the specific slab to be used.
4) Two weeks later, their fabricator/installer team arrived with the pieces ready to install. They were able to remove the old counters and install the new ones on the same day. For me, a mother in a family of five that cooks most meals at home, that was a HUGE factor. Swapping countertops generally means being without a sink and cooktop during the swap, so the fact that they were able to remove the old and install the new in one day was exceptionally awesome! Sink= I need it! Cooktop= I need it! They made sure we weren’t without either overnight. Same day!! How cool is that? 😃 Their team kept the area neat as they worked, vacuumed and wiped the area before they left, and were pleasant to have in the house all day while I and my youngest daughter were also home.
If you see this post, and you’re in Central Arkansas, I highly recommend that you visit Kaufman By Design for any home maintenance project, repair, remodel, update, or new construction.
Find the Kaufman By Design website: click here
Find the Kaufman By Design Facebook page: click here

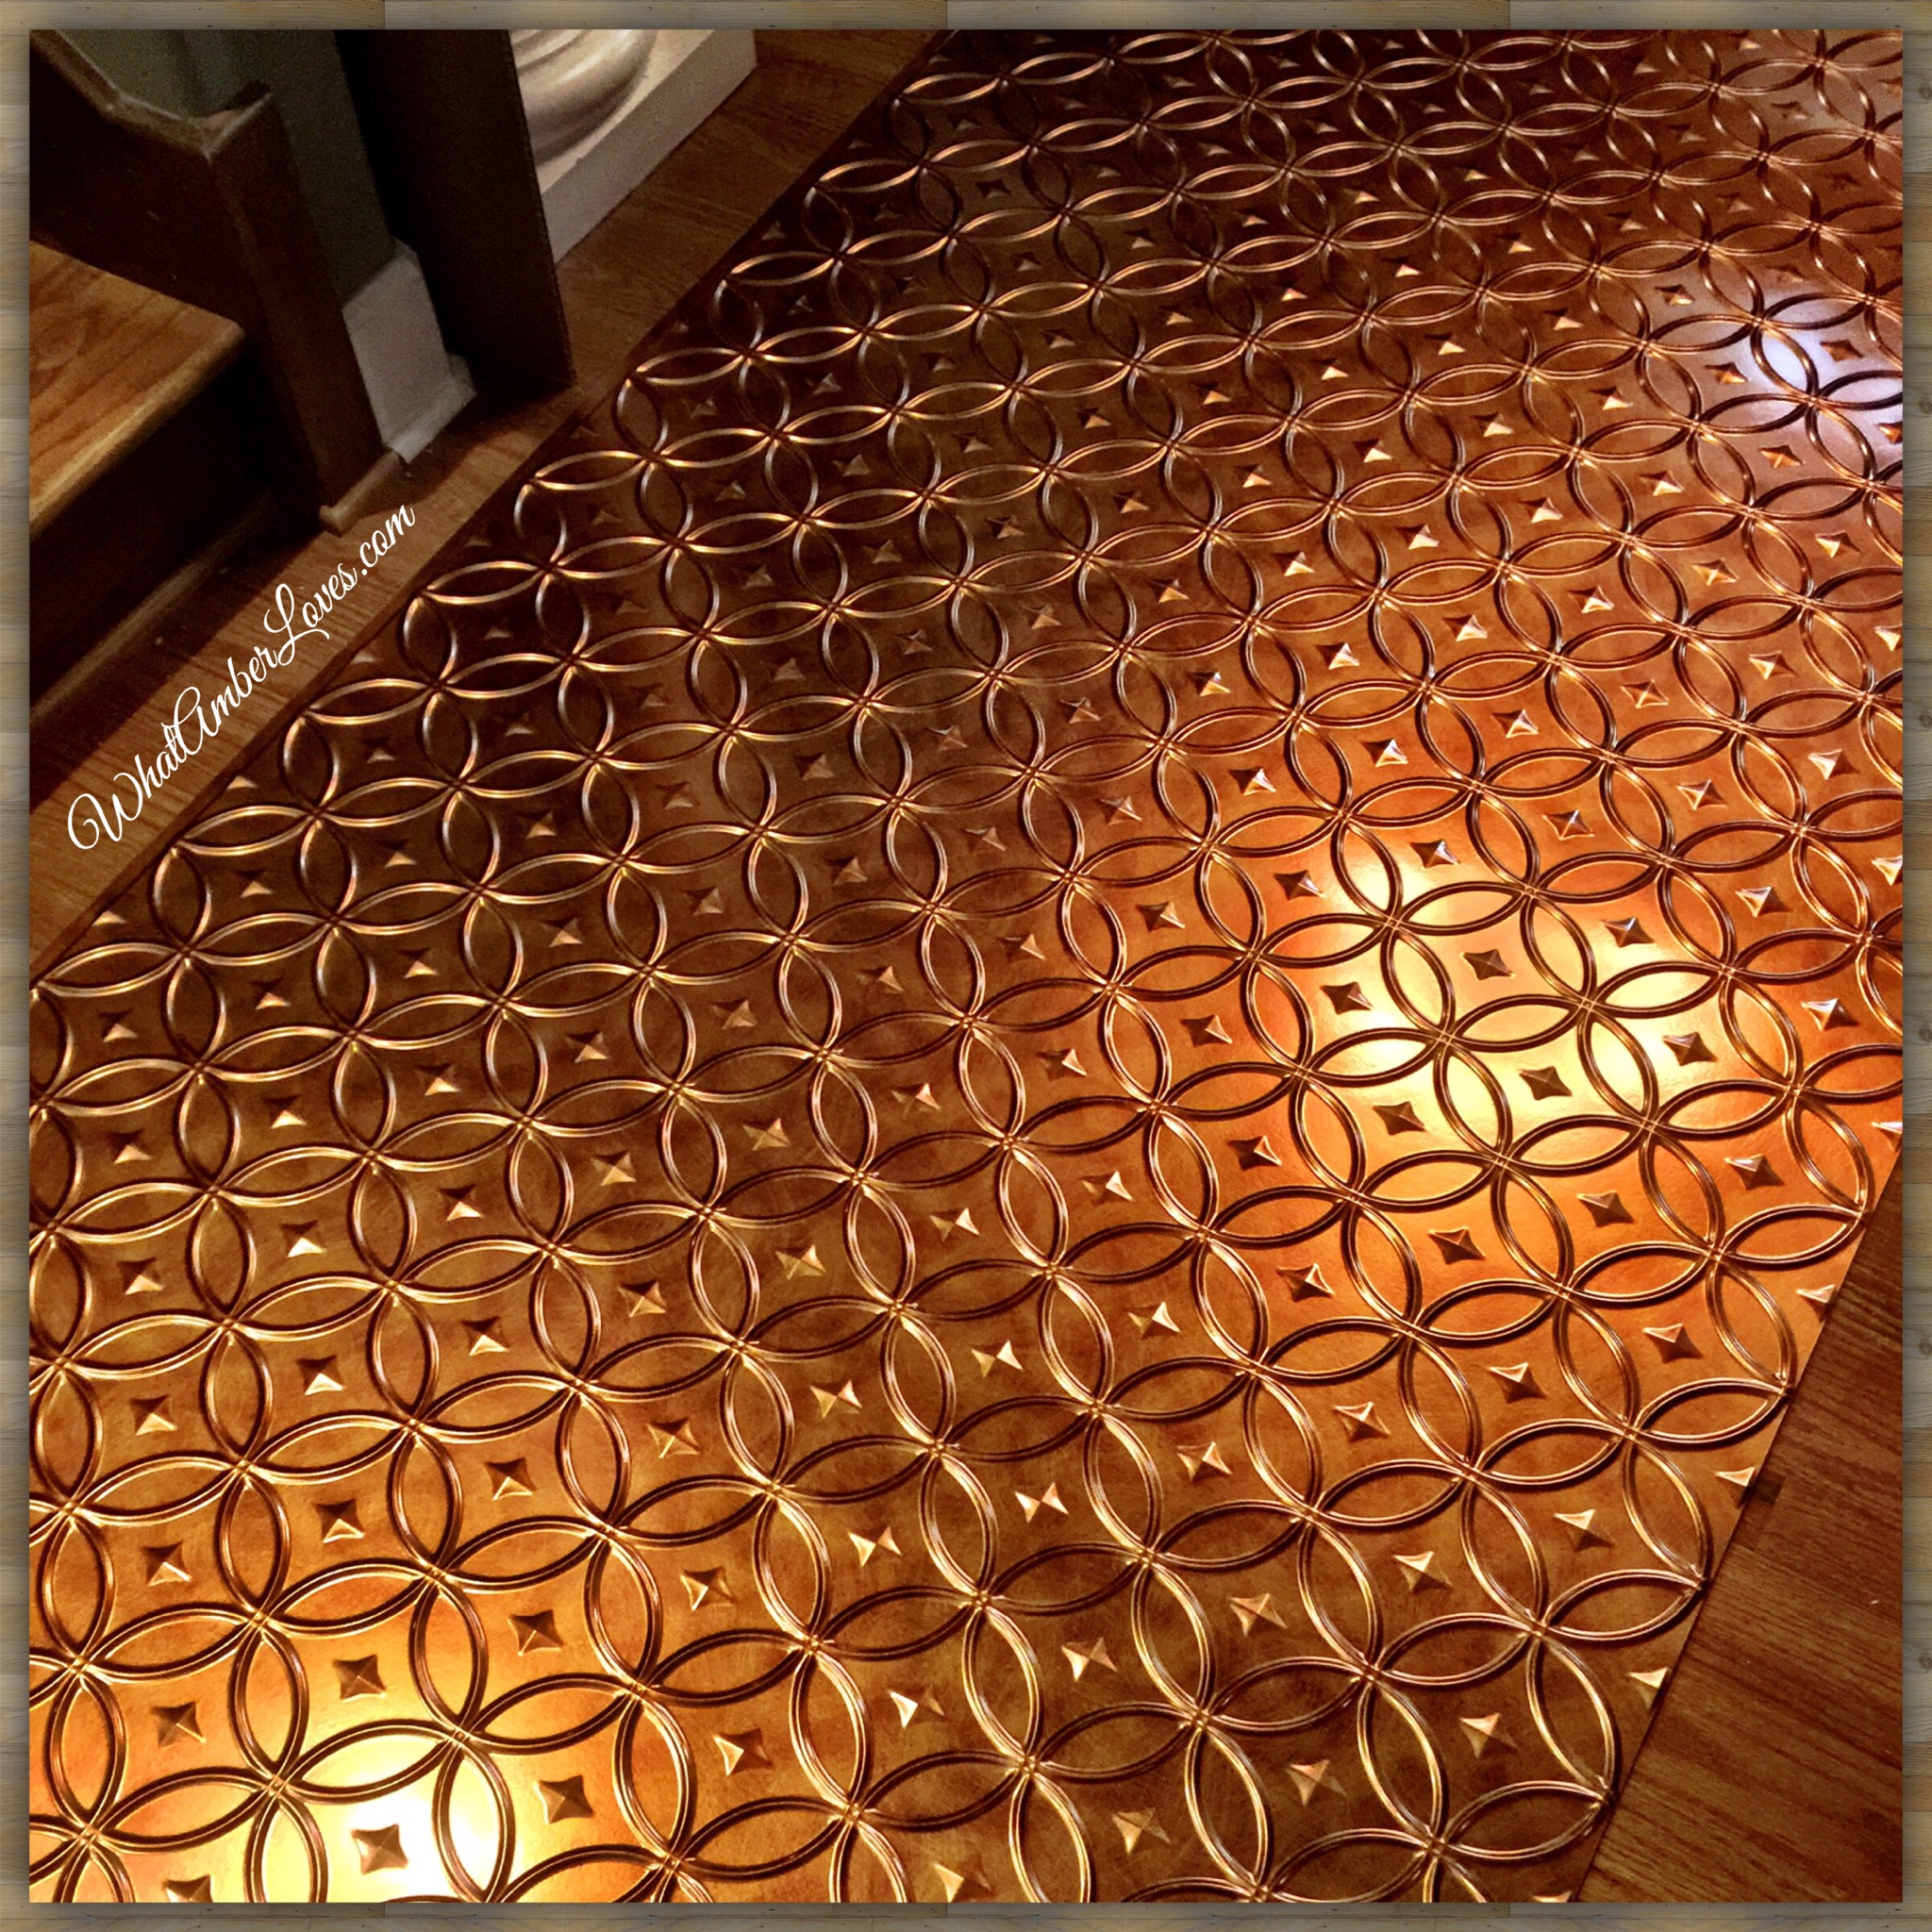
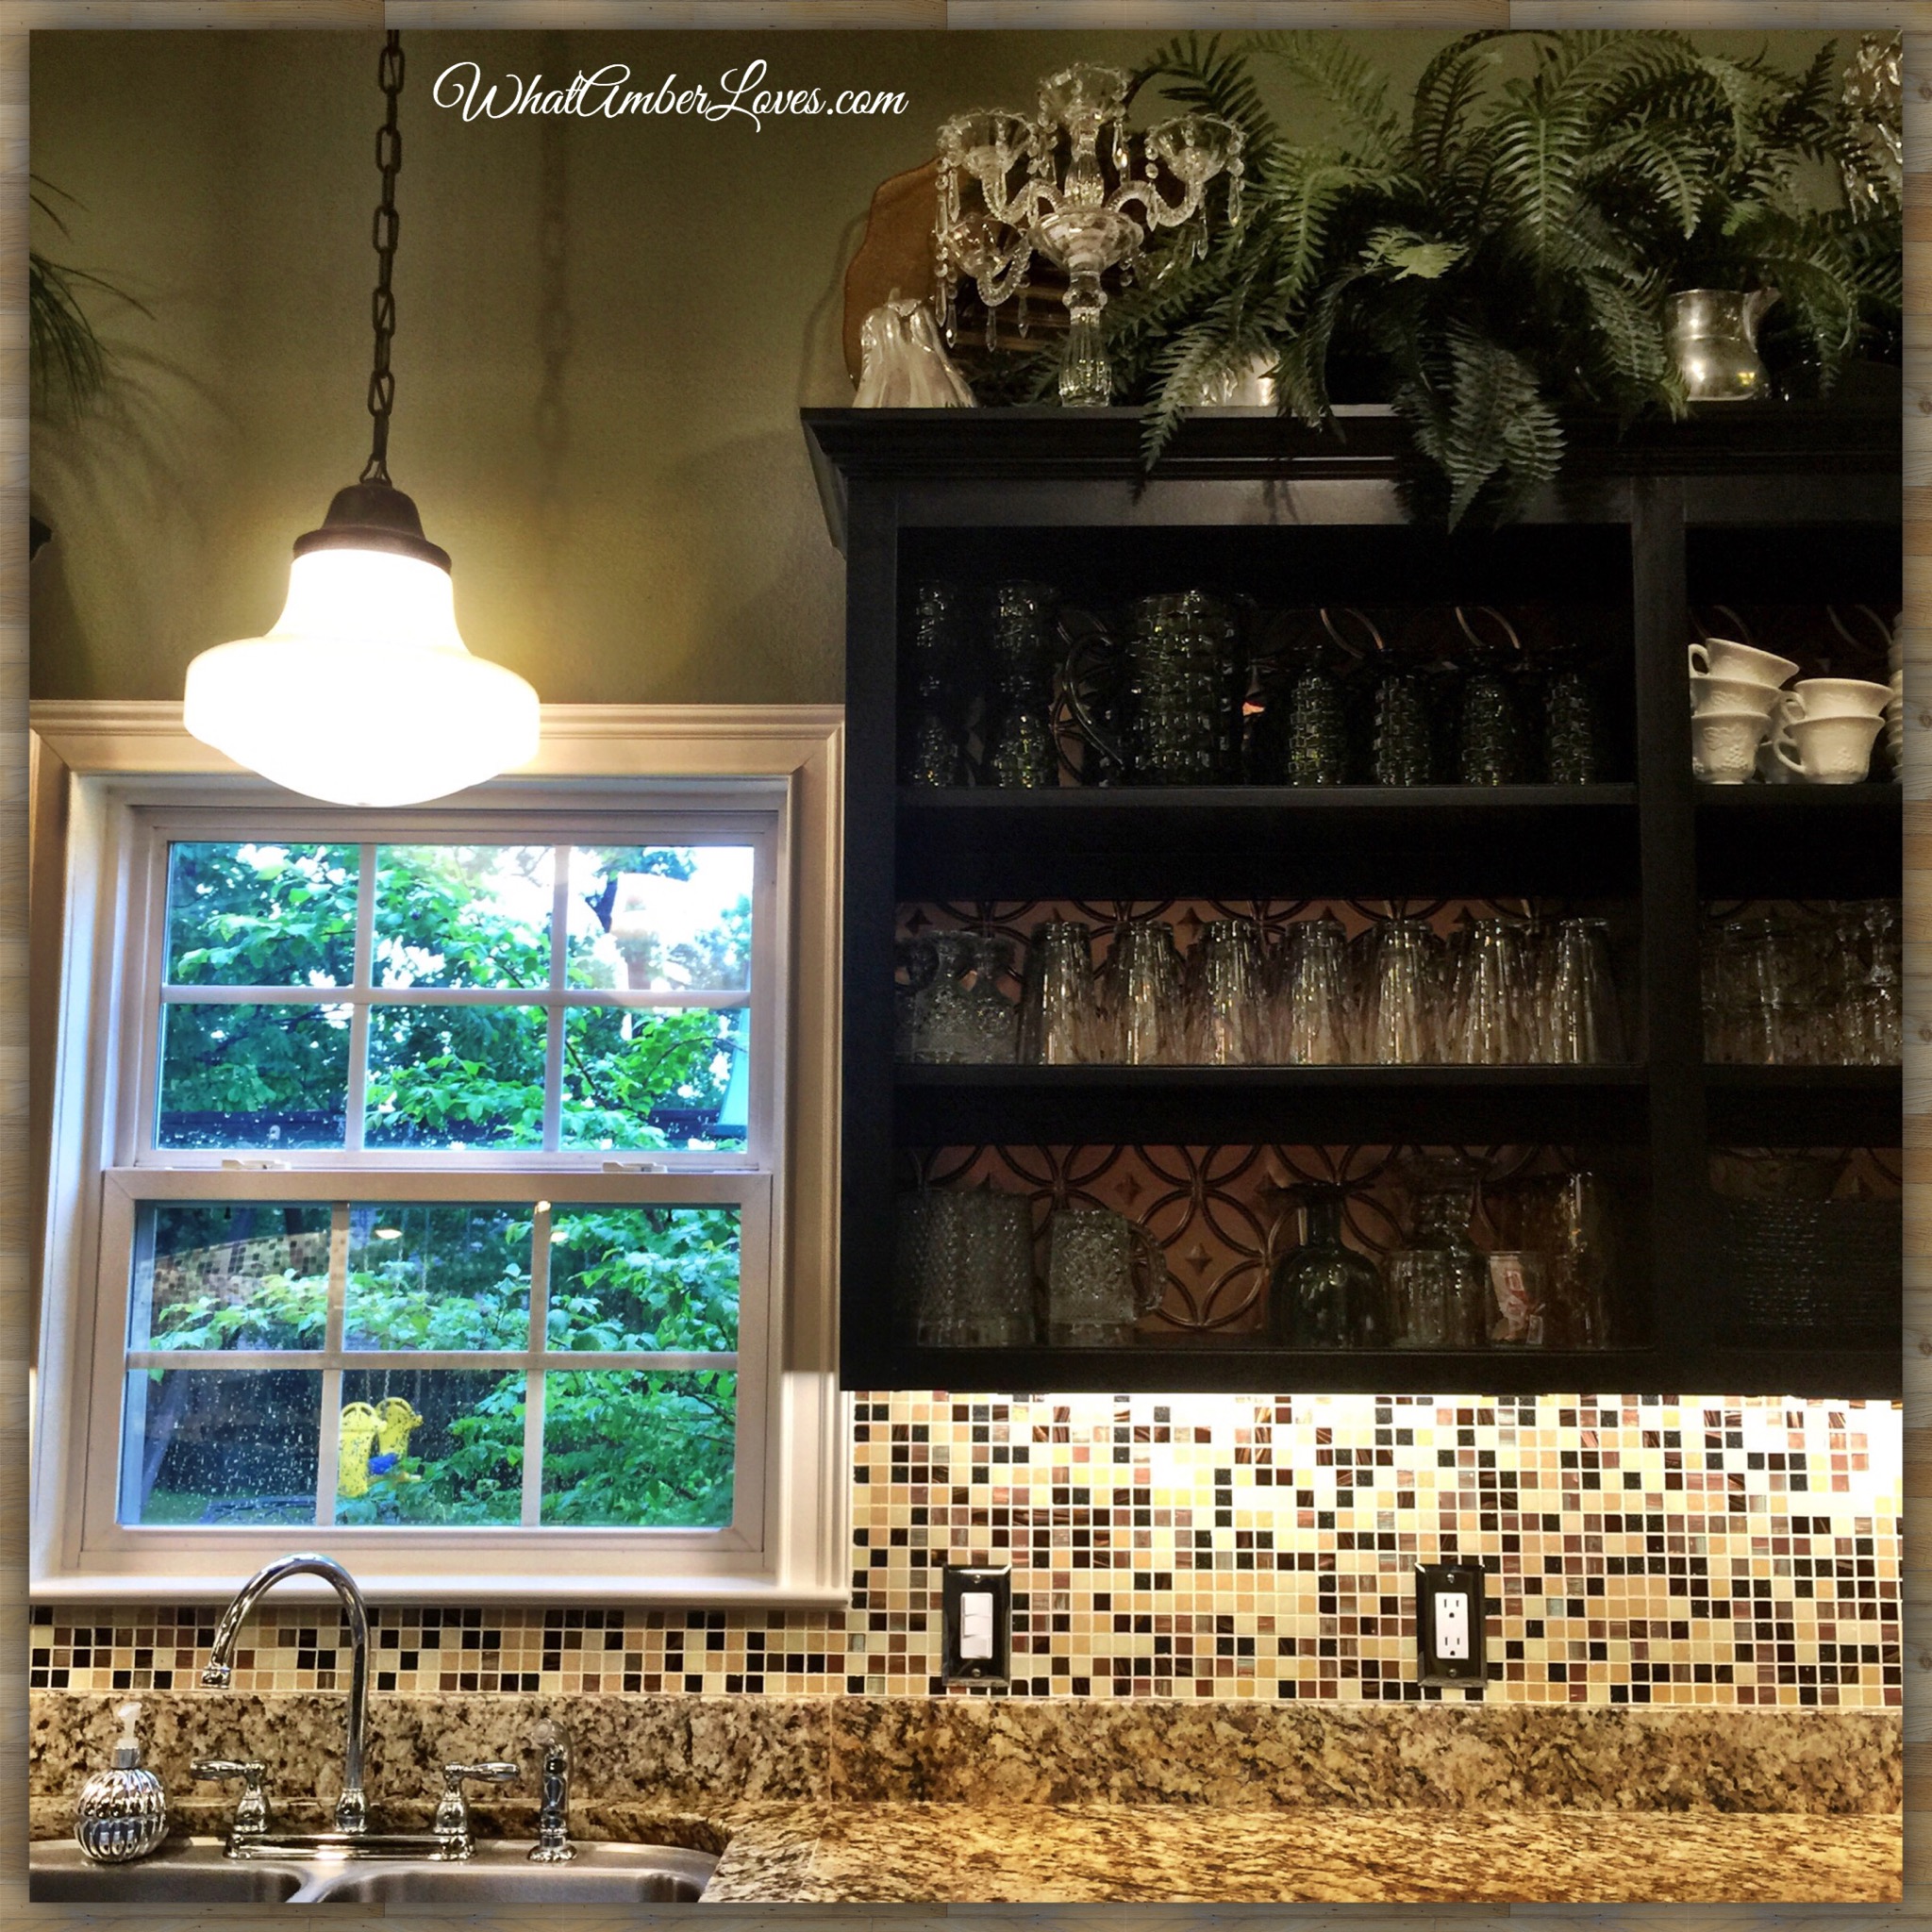
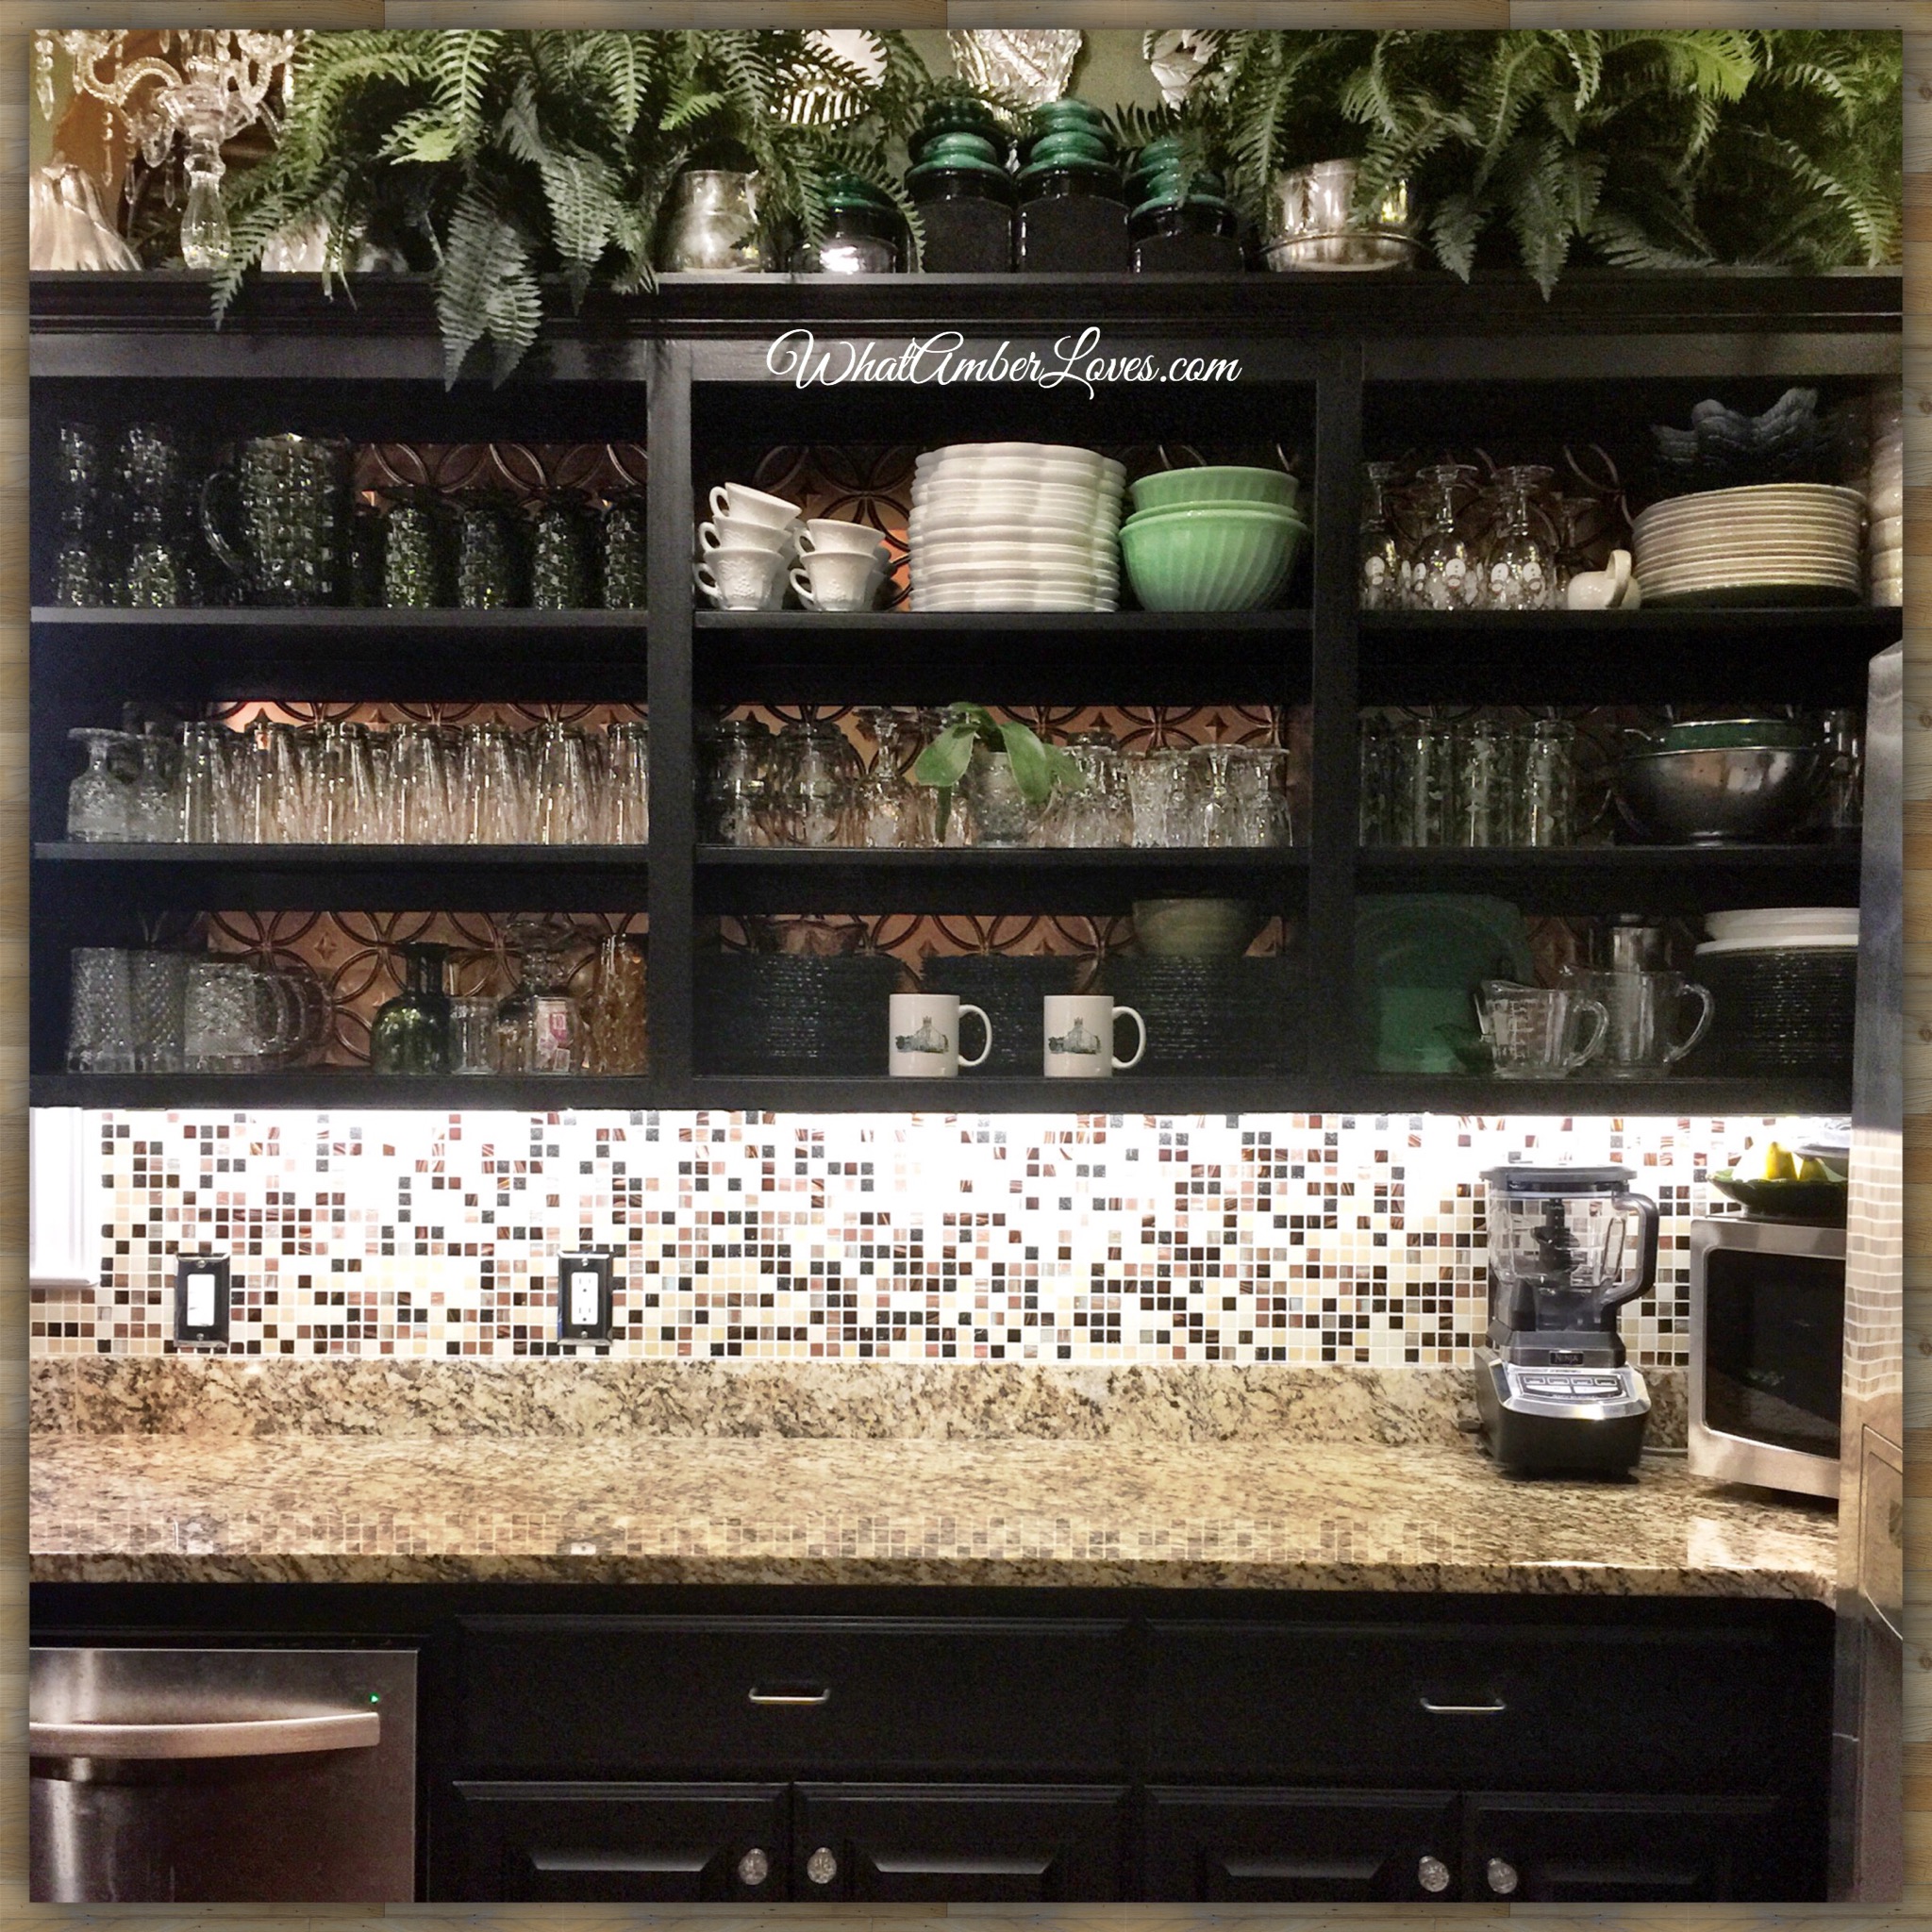
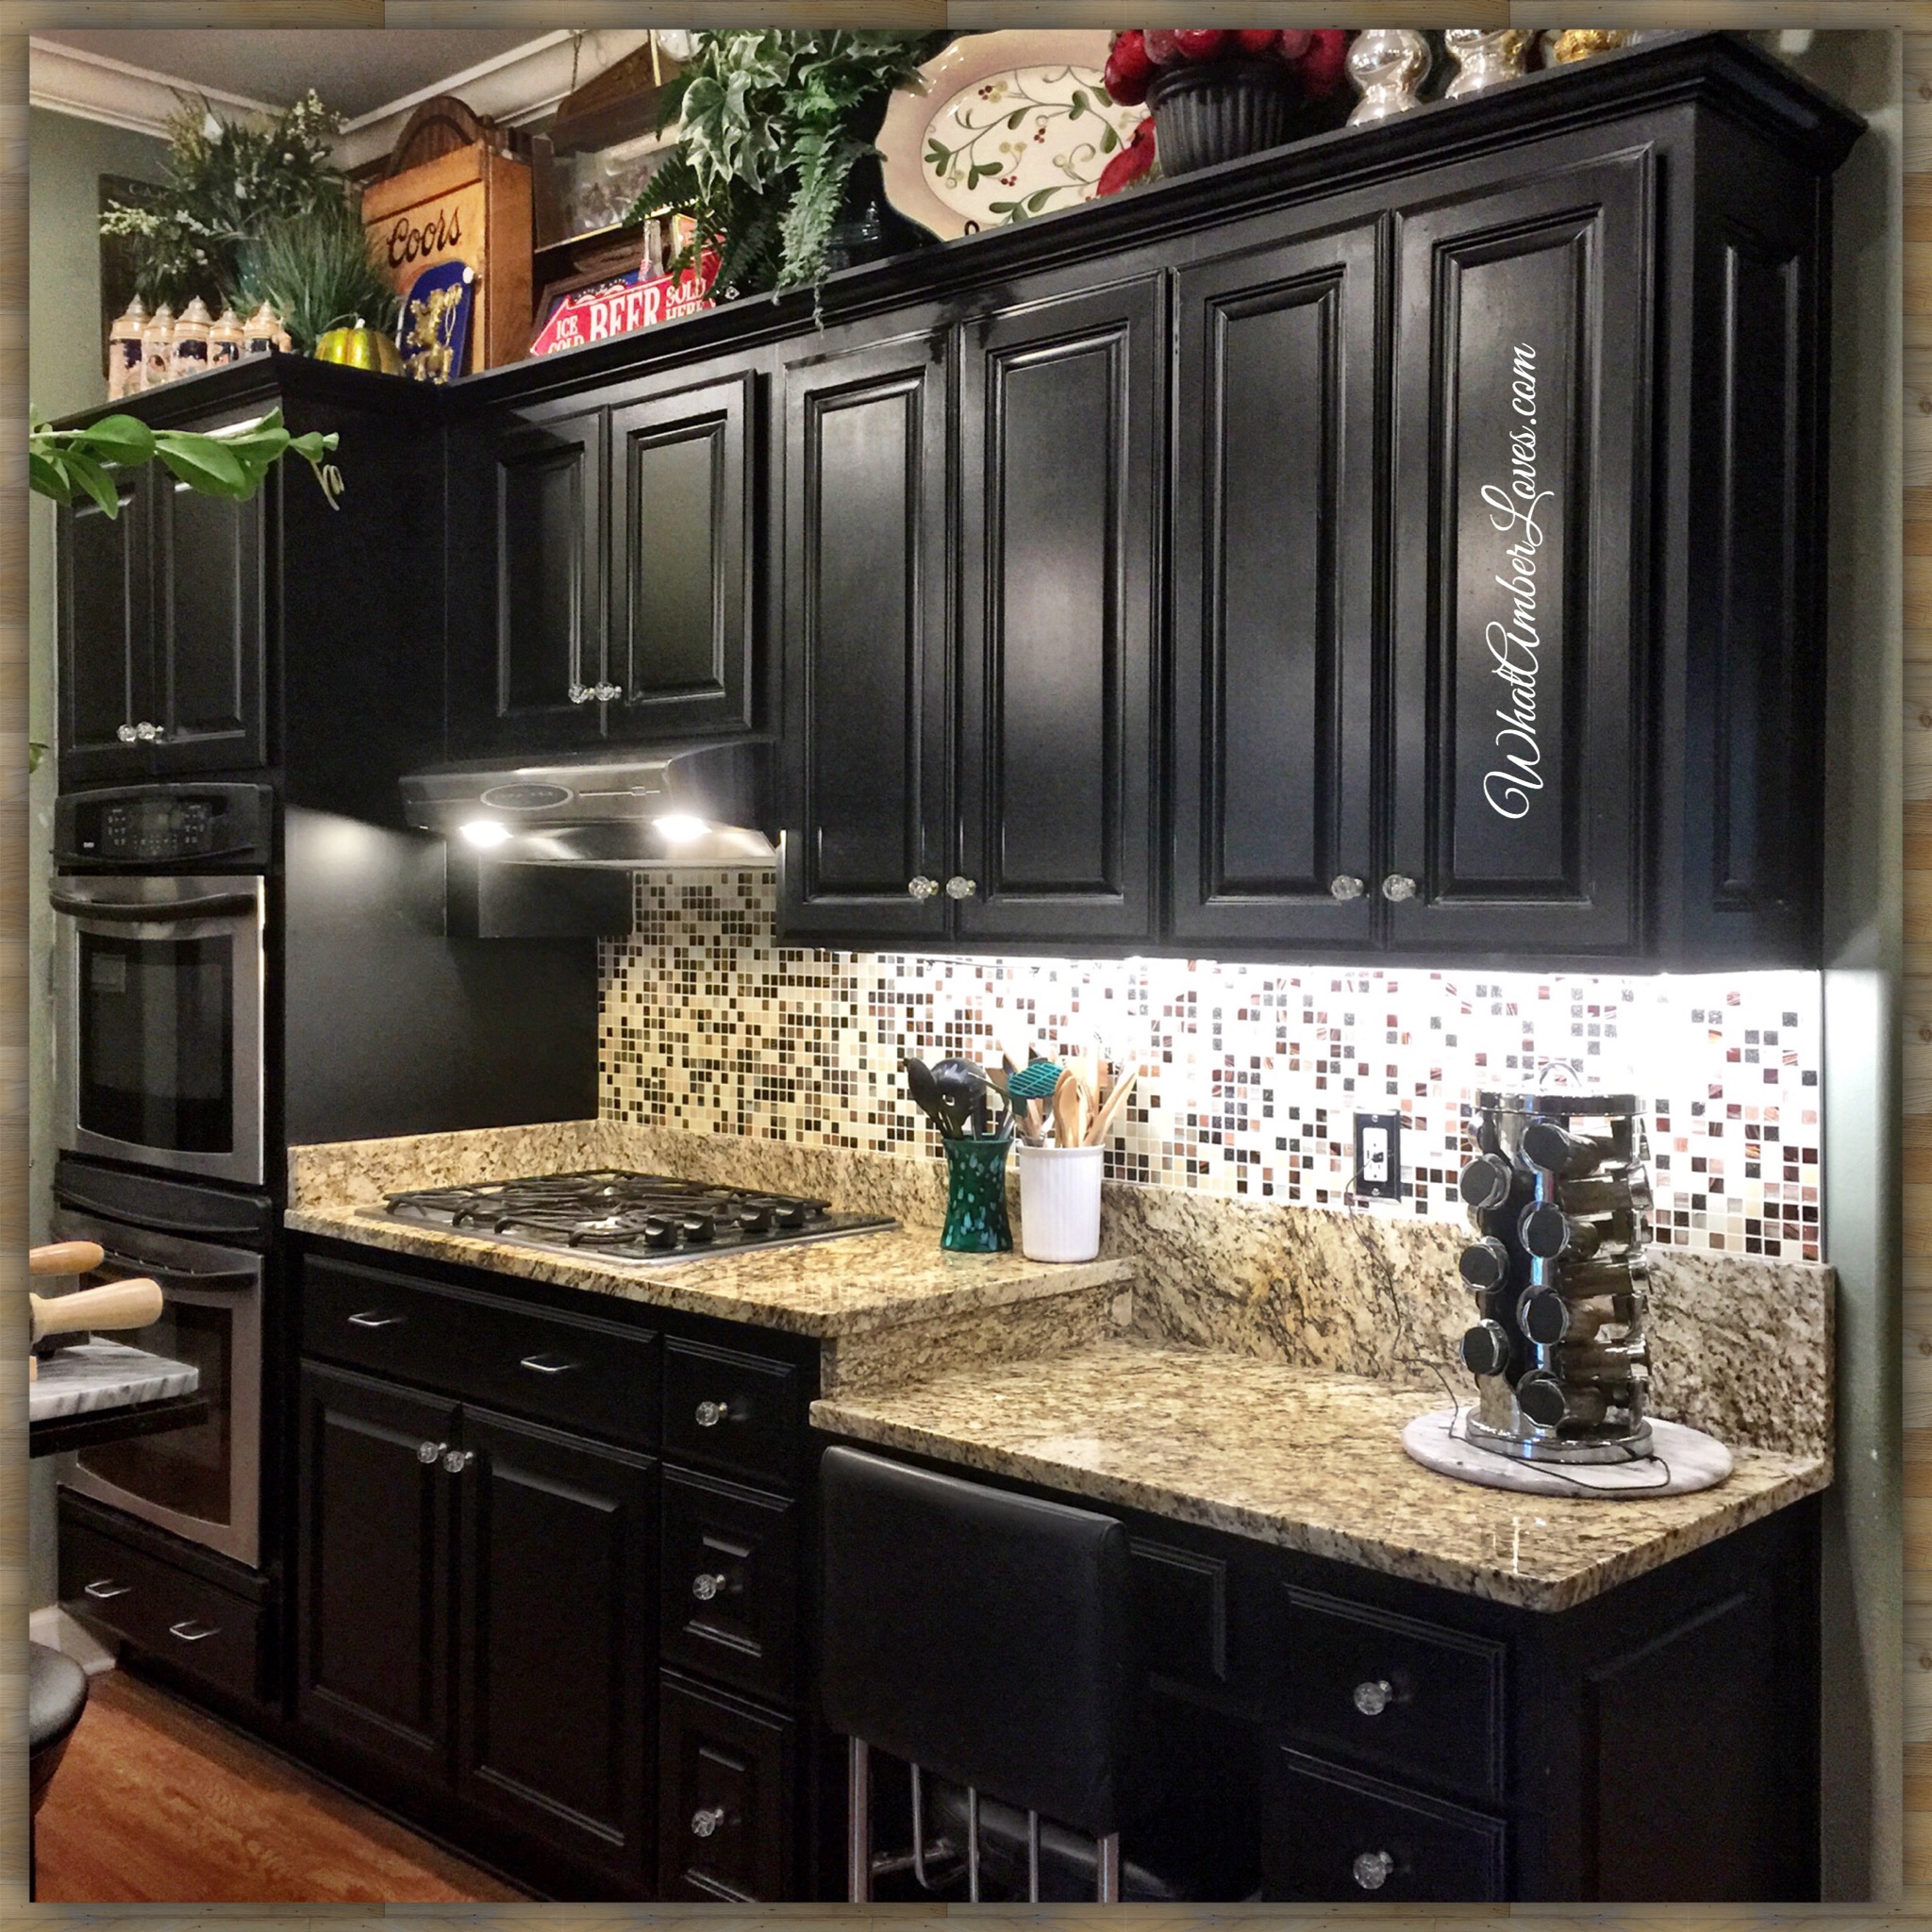
Also, in our Kitchen, we lined the open upper cabinets:
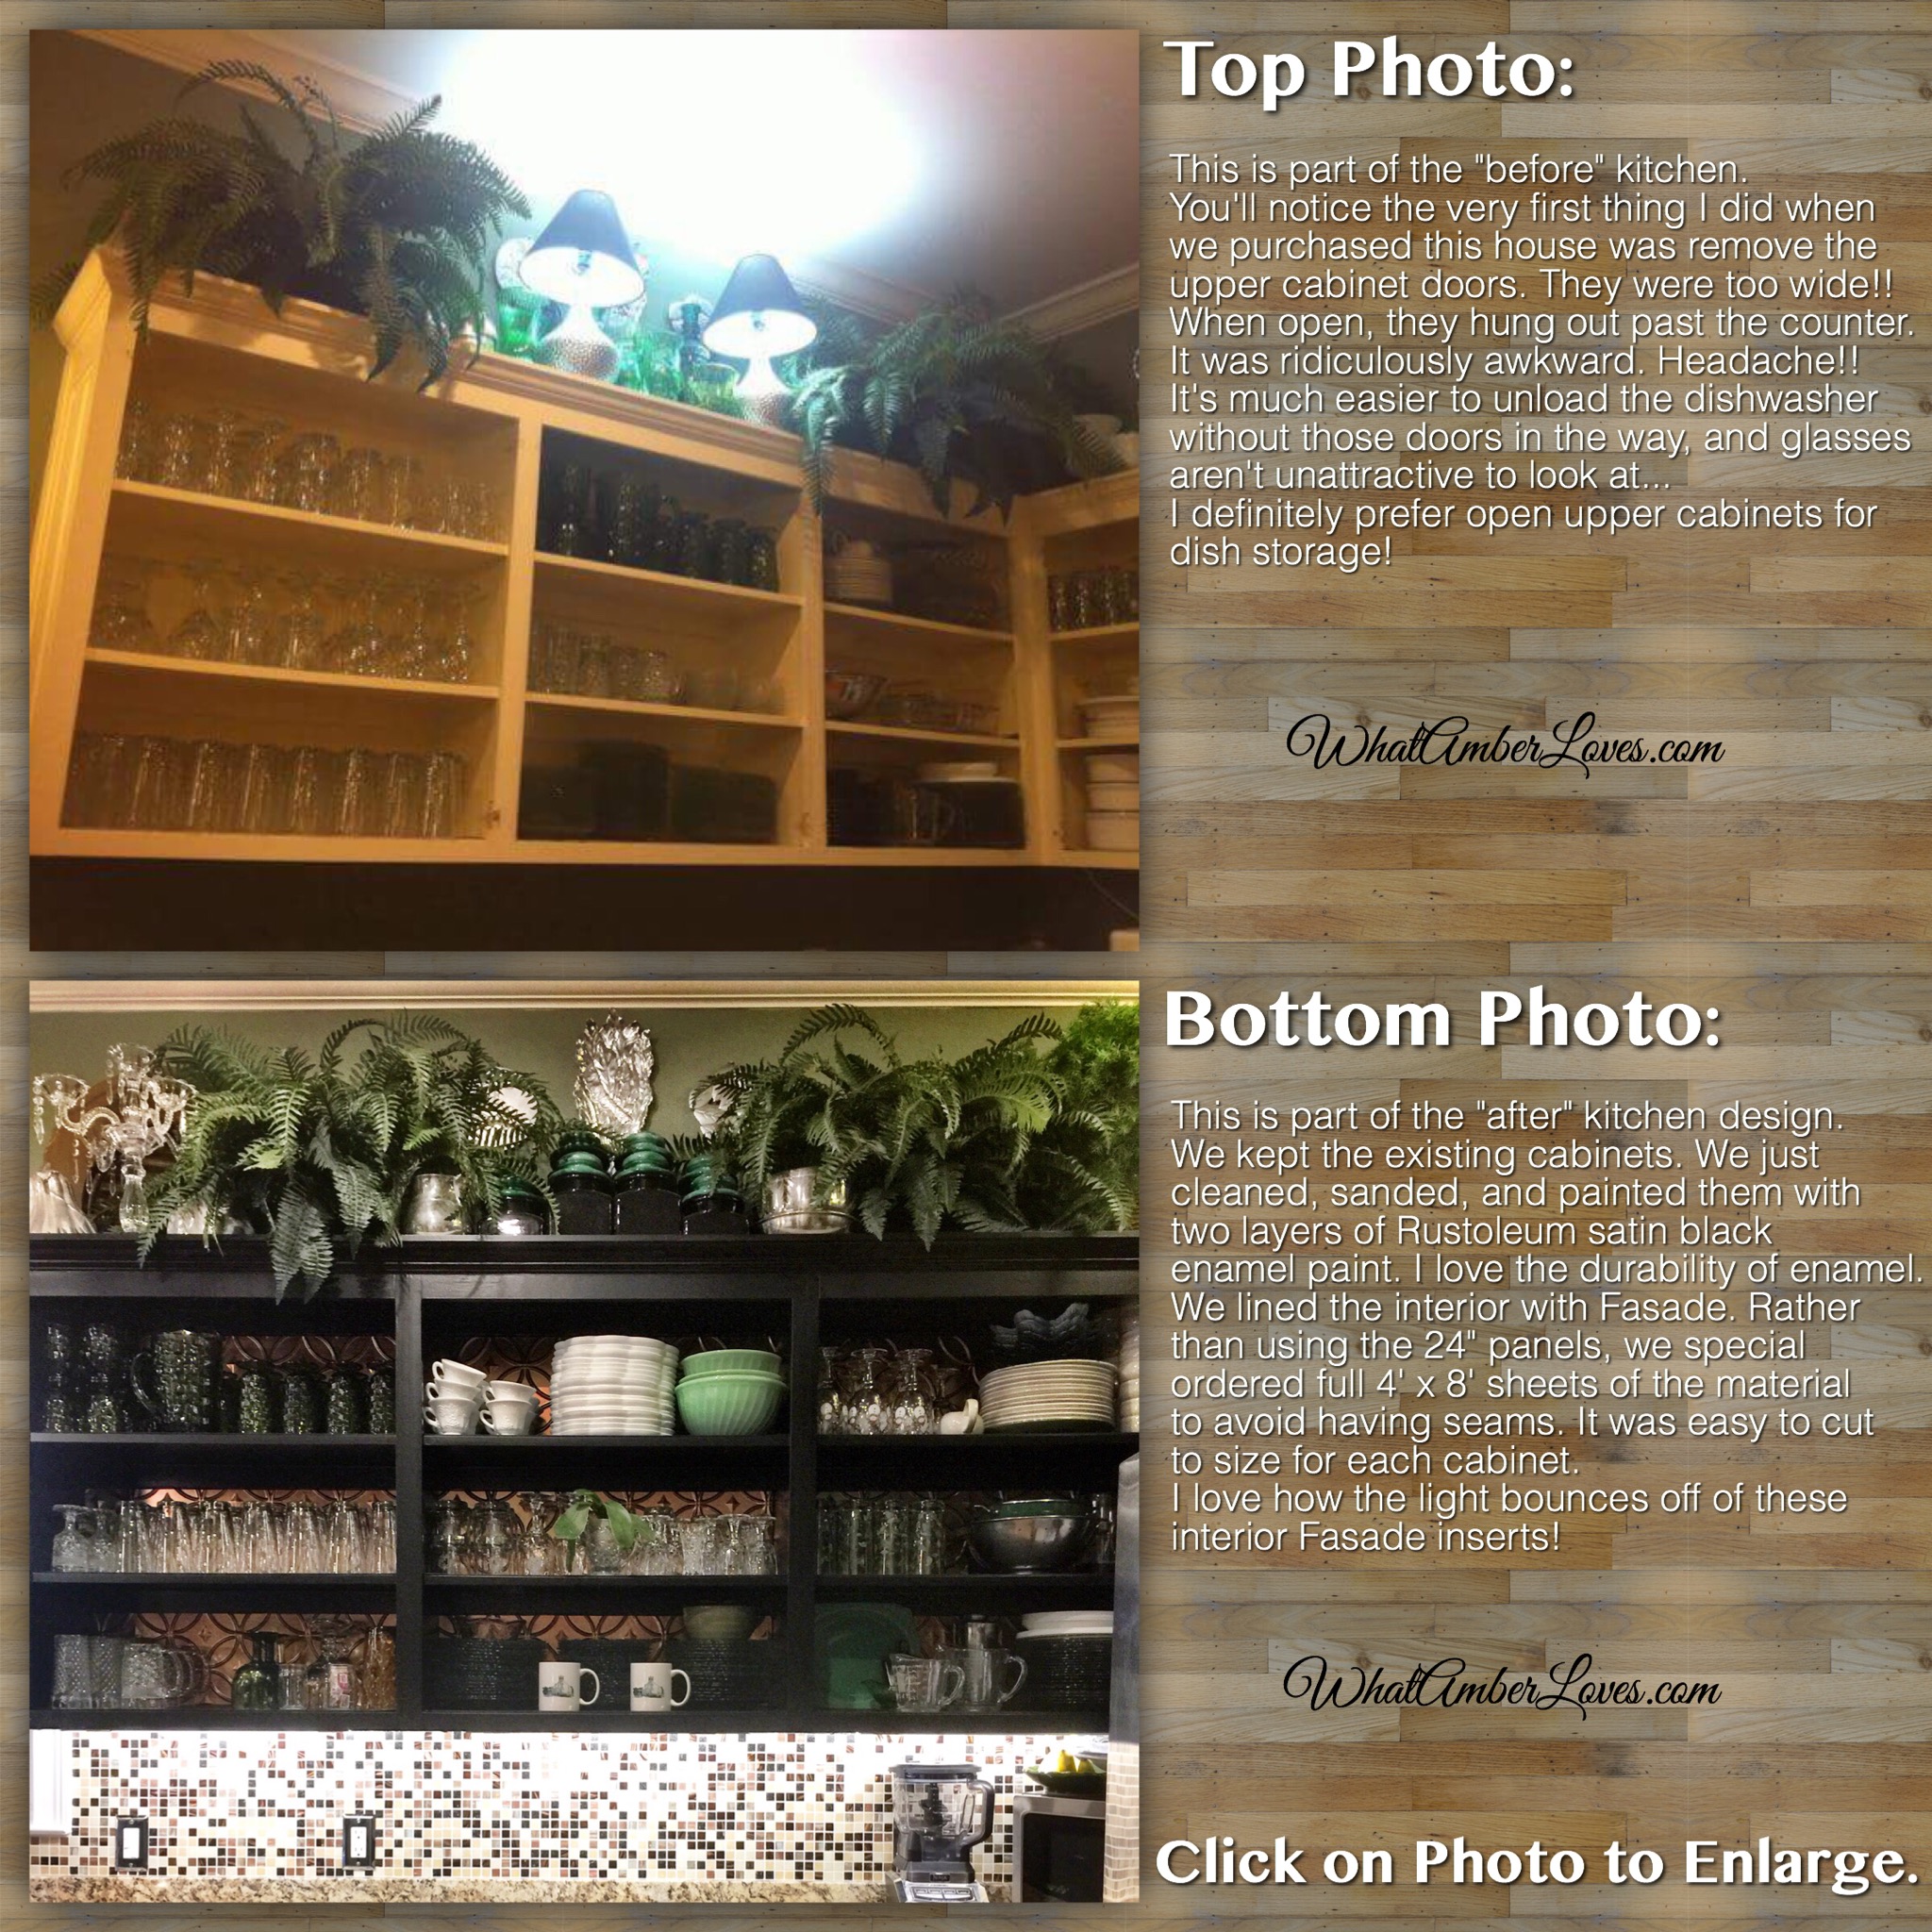
We purchased 4′ x 8′ sheets of a thermoplastic material in an antique bronze finish (looks Copper to me,) and then we cut the pieces to fit each cabinet! Easy!


Last, but not least, we installed under cabinet l.e.d. lighting and completed the DIY tile glass backsplash! I love how they glitter in the light!

There is another Fun detail I almost forgot to tell you about!! Lining the open shelves! I didn’t want to use the rolls of antiskid material sold at big box stores, because I really dislike the raw edges and how it slides around when casserole dishes are moved, but I did want a cushion to keep dishes from chipping and paint from getting scratched. Solution? We covered thin pieces of plastic with vinyl! Yes, it was a bit time intensive, but once it was done, it’s DONE. It’ll be durable forever!

Yay! Here are some overall view of our finished space!


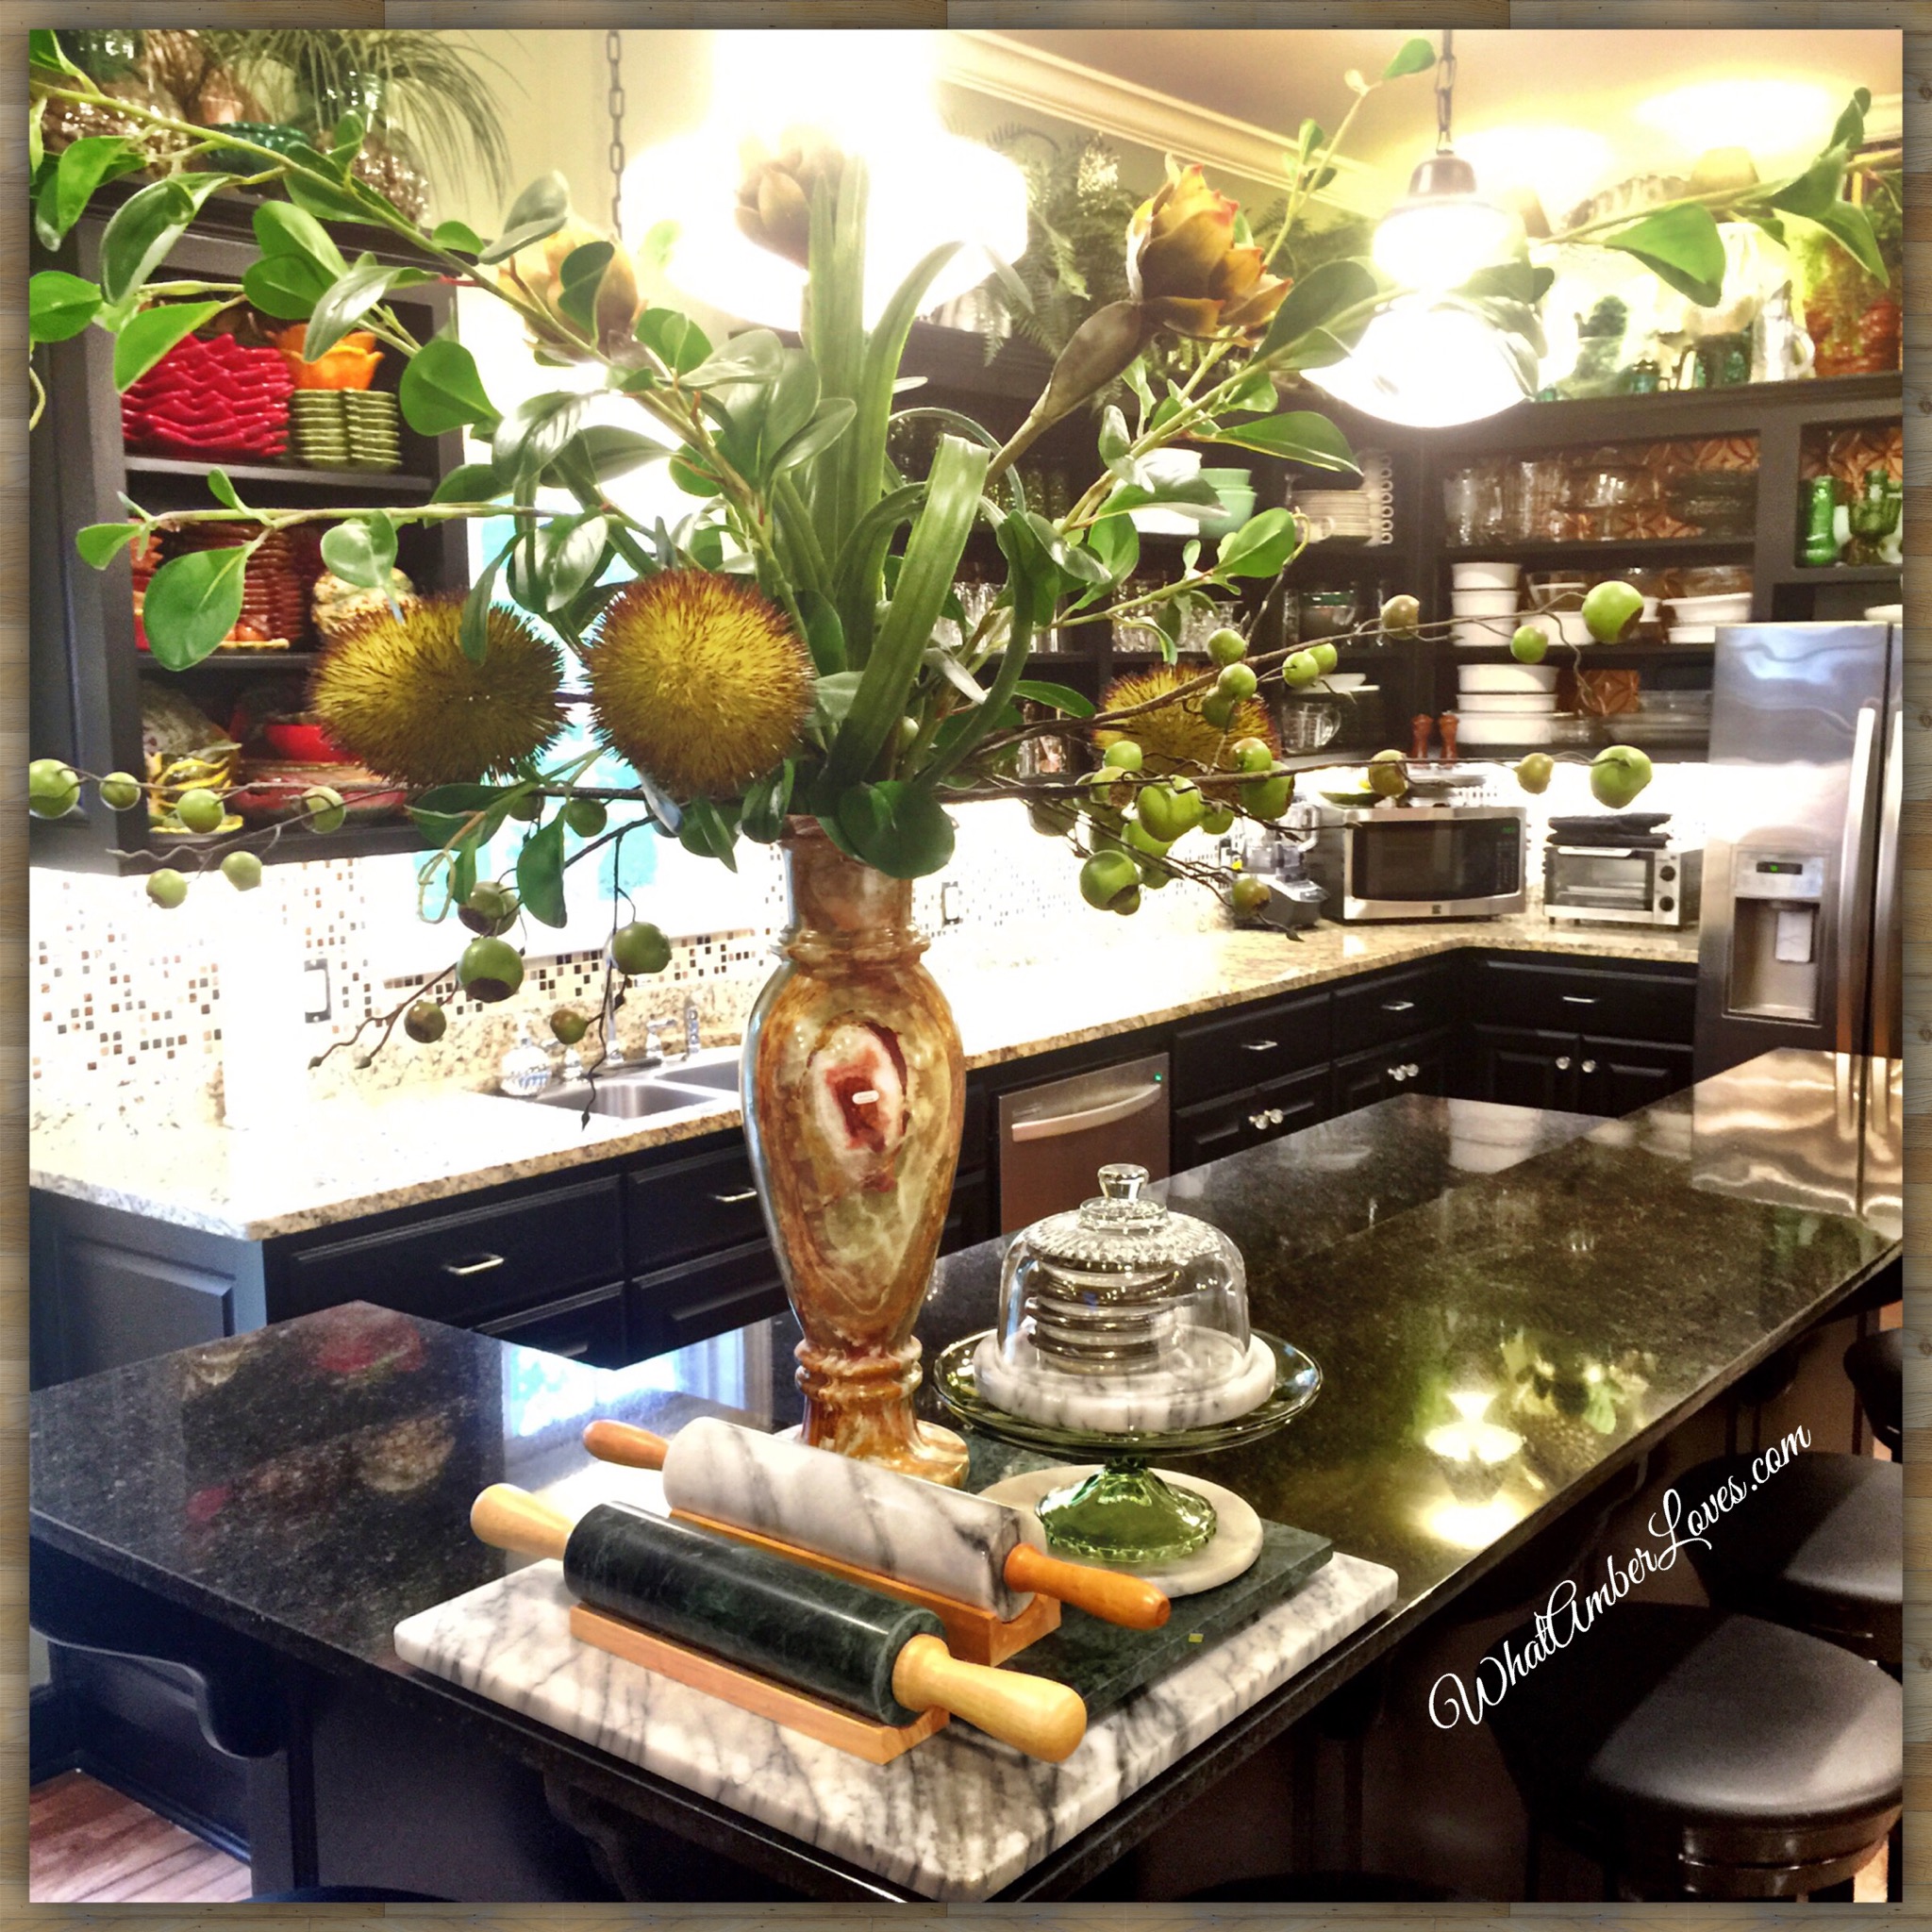

Yay! That’s my kitchen update!
Whatcha think? 😃
~~AmberHH
PS Love Ya, but love you even more if you share this link! 💞😎


