Category Archives: Uncategorized

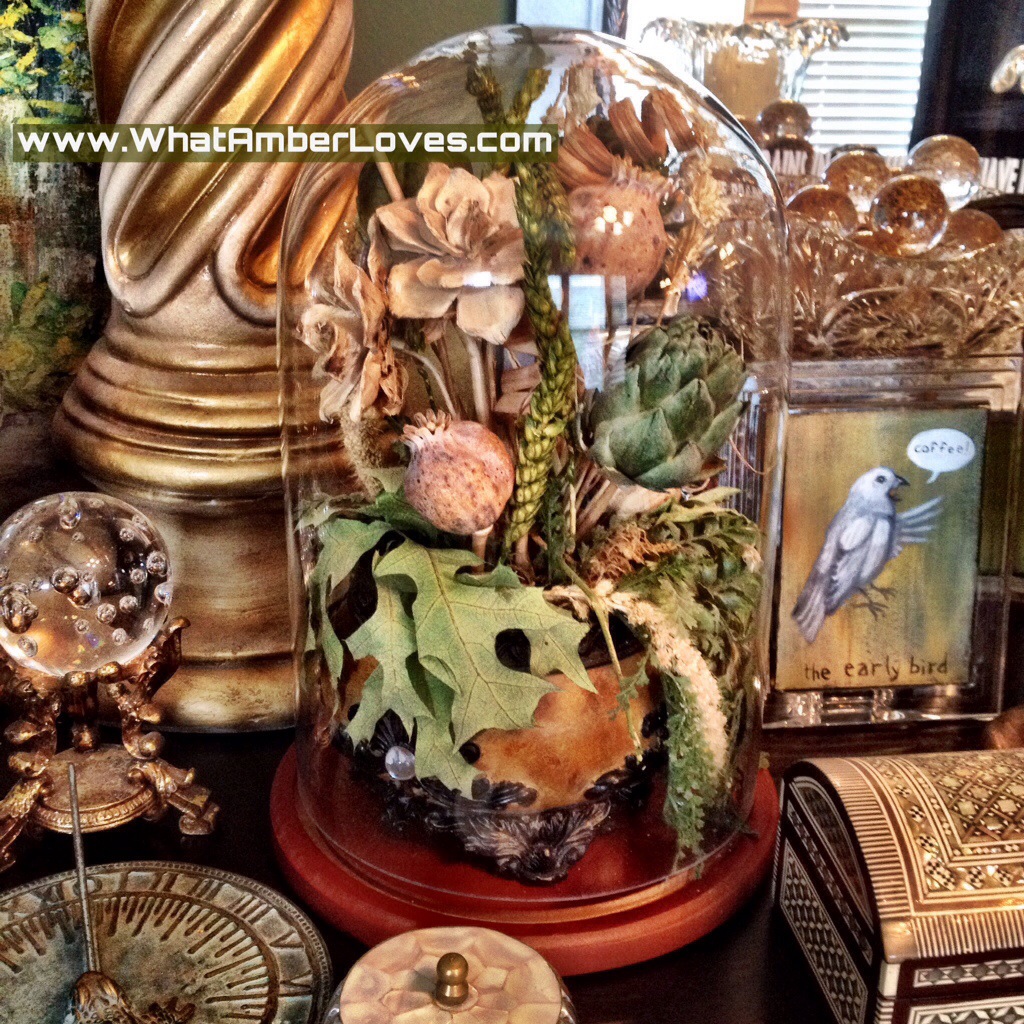
Under the Dome

Click on photo to enlarge it.
Oh, y’all… Oh, y’all! Guess what I did? For the first time ever, I’ve put an arrangement under a glass dome. I can already tell you that I’m so pleased; I envision buying many more to encapsulate my treasures and little dried floral arrangements. Why had I waited so long to embrace the glass dome, when it is obviously capable of instantly elevating any object or arrangement to rare specimen status? Glass dome, y’all. Glass dome. I’m late to the party when it comes to speckling glass domes throughout my decor, but I’m here, now!

Click on photo to enlarge it.

Click on photo to enlarge it.
Hanging on the wall near my new dome is one of my favorite paintings of a barn. It’s a favorite because it reminds me of my Gram, my paternal grandmother. No, she’s never had a barn or lived on a farm, but she loves barn art. For that reason, this painting reminds me of her and I love seeing it in my living room everyday.

Click on photo to enlarge it.
Click on photo to enlarge it.
I adore that my floral arrangement is still fully visible, yet there is this protective shield that has the added bonus of being able to reflect the light in a pillar along a curving side and a bright glint as the dome nears it’s peak while keeping cute (but often sticky) toddler fingers away from delicate foliage!
(Speaking of toddlers, I’ve never shown my youngest daughters’ rooms on this blog. This week, I’m working on a fun project of draping strings of l.e.d. lights, strands of pennant banner bunting, and garlands of yarn Pom-Pom balls all across my youngest daughter’s yellow bedroom. Details and photos in a week or so, assuming I finish the sewing and the rest of the l.e.d. strands arrive in the mail!)
Click on photo to enlarge it.
Do you use glass domes to enshrine items? Have ideas for what else belongs under a dome? If so, what? I’d love to hear!
Your Friend,
~Amber Hamilton Henson
PS
Check out these two free images I found via TheGraphicsFairy, free for my/your personal use: click to enlarge or visit her site for full size versions and lots of other cool graphics! 😉


What should I do with these images that I’ve fallen in love with? I may just print one and put it in a small frame near my dome or perhaps use one as an image transfer for a pillow?…We’ll see…
PPS
I love linking with blog parties! Its a great way to connect with other bloggers with similar interests! I’ll update this post each day as I link with parties! Check them out:
MyRepuposedLife ~ Catch as Catch Can #168
ReDouxInteriors ~ Best DIY linky #158
ShabbyNest ~ Frugal Friday
Arkansas Women Bloggers ~ Sunday Link Up

Upcycled Tobasco NeckTie Upholstery!

Click on photo to enlarge it.
More often than not, I buy something with plans to change it, but often I have to think about it for awhile before actually initiating change. Usually, it’s just a matter days to finalize my concept for what I want to do, and then I begin procuring supplies to do the task.
Today is different! Today, I bought a piece, knew immediately, and transformed it immediately!
We went to an estate sale this morning and I spotted this ornate, brass vanity stool, and I just had to have it! The manufacturer’s label says it’s made in Italy. I have no idea how old/new it is, but I’d guess 1970s or ’80s. Rather than using it for a vanity stool, I wanted to use it for a foot rest/small ottoman in the living room. It was obvious it needed reupholstery, because I don’t “do” white in my house except for sheets, towels, and candles. Furthermore, it was stained. However, the frame is all heavy metal construction! Heavy, and 18″ tall.
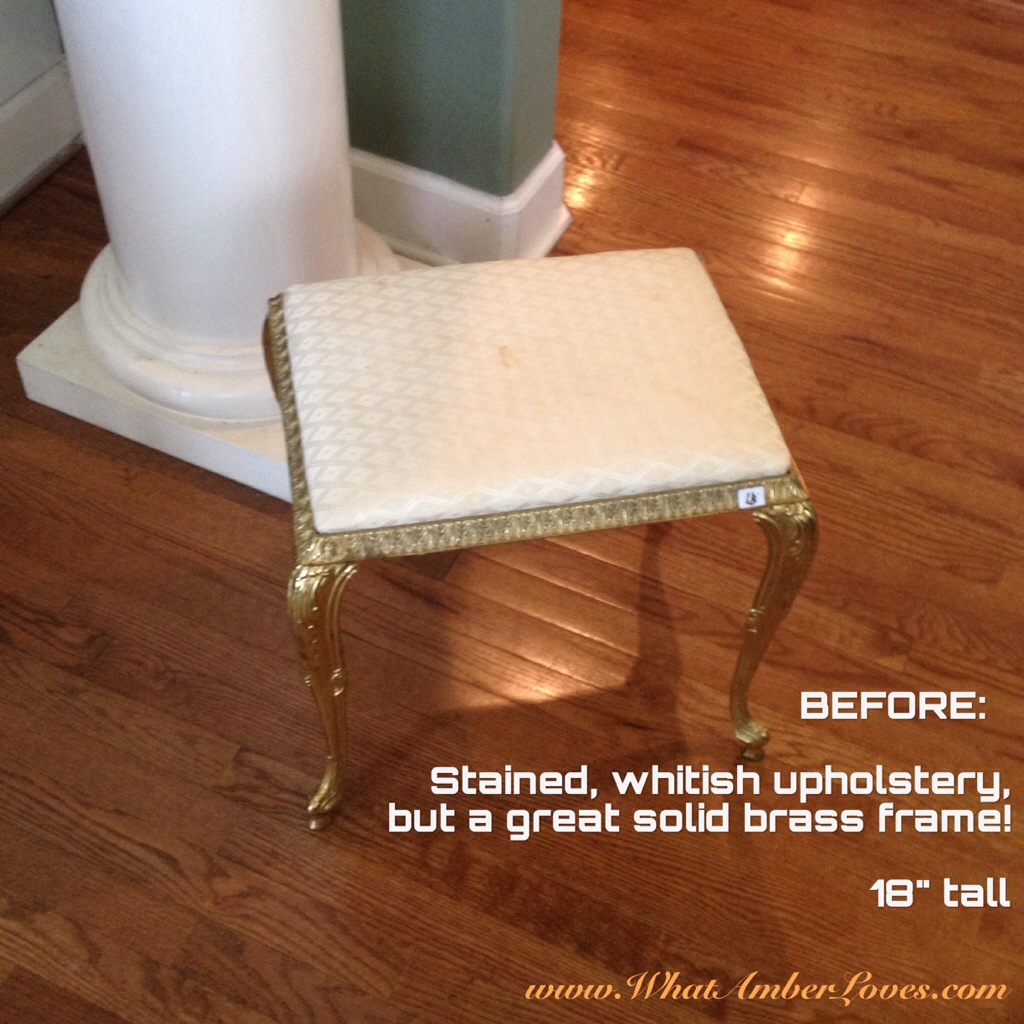
Click on photo to enlarge it.
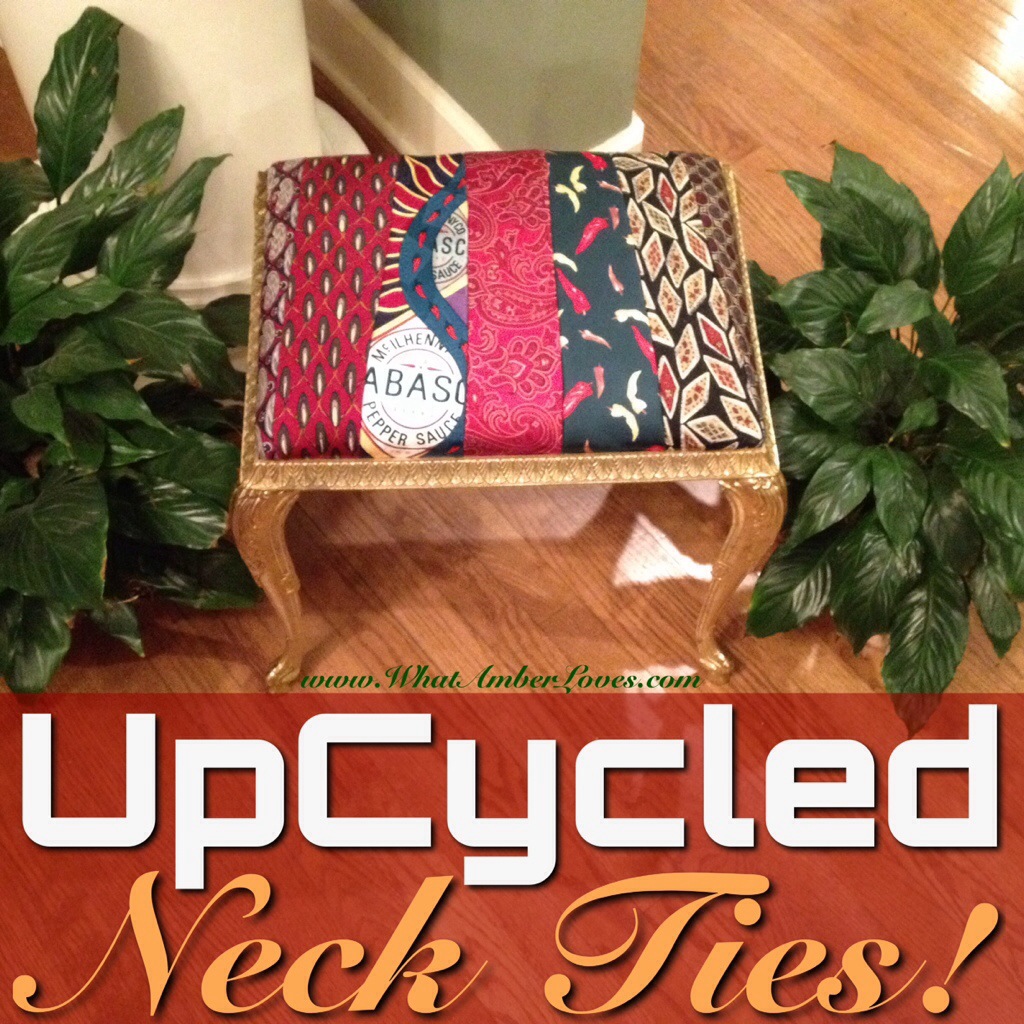
My husband Mitch suggested we sew together neckties to recover it, since he knows I’ve been diligently waiting to use neckties in a project! (Necktie window valance? Necktie lampshade? Necktie etc?)
So, that’s what happened!

Image Sources used for collage:
1, 2, 3,
The neckties are all sewn together. Then, it wraps around the cushion and is stapled on the underside. Last, it’s just screwed into the frame from the underside!

Click on photo to enlarge it.
I used a fun mix of traditional and whimsical neckties! Some are paisley, one has playing cards, one has hot peppers, and one is a Tobasco brand advertising necktie! Really! How fun is that?! I love it! I may even share this post on their Facebook page. I bet they usually only see recipe posts using their product on their page! Well, today they get to see their Tobasco necktie upcycled! Fun!

Click on photo to enlarge it.

Click on photo to enlarge it.

Click on photo to enlarge it.
I’ve got my sandals off and my feet propped up on it right now as I’m writing!
So, even though this was a fast turn around time for me, I’m really pleased!
Maybe even EXTRA pleased!
What do you think of my results from today’s project? I love comments!
Your Friend,
~Amber Hamilton Henson
PS
This post was Featured! Click on the square image (USSCrafty) to be redirected to the post and to link up your project this week:

I’m linking with some great blog parties! Check them out! (I’m updating this post as I link each day this week!)
ArkansasWomenBloggers ~ Sunday LinkUp
TwiggStudios ~ Sunday Best
USSCrafty – Submarine Sunday #87
BoogieBoardCottage ~ Masterpiece Monday #179
ElizabethAndCo ~ Be inspired #122
ConfessionsOfAPlateAddict ~ the Scoop #122
KammysKorner ~ Trash 2 Treasure
SavvySouthernStyle ~ Wow Us Wednesdays #173
FromMyFrontPorchToYours ~ Treasure Hunt Thursday #159
MyRepuposedLife ~ Catch as Catch Can #168
MissMustardSeed ~ Furniture Feature Friday
ReDouxInteriors ~ Best DIY linky #158
ShabbyNest ~ Frugal Friday
Funky Junk Interiors ~ Upcycled Side Tables
In my garden, today!
The pretty pink Lily planted among the Rosemary along the path to the front door stretch out towards the sun out of the shadow of the house:

Our Heirloom Arkansas Traveler tomatoes are loaded with green tomatoes patiently waiting to burst into a show of gorgeous red fruit soon:

Our peppers that we planted early and babied with protective covering through late frosts are thriving in the Arkansas heat, now. Can you see the heat these peppers radiate, yet?

(Click on photo to enlarge it.)
At the end of the day, taking photos of our garden is one of my favorite things to do. Then, when the light gets low, I come inside and continue to enjoy them as I kick off my heels, put my feet up, and play with photo editing apps on my iPad. These photos were edited with a combination of 3 apps: LensLight, Bokeh Booth, and Phonto. I don’t share these evening garden photos of mine much on this site. Maybe I’ll start.
Your Friend,
~Amber Hamilton Henson
PS
I’m Linking with some great blog parties! You’re invited to visit the parties:
HowSweetTheSound ~ Pink Saturday
CreativeCountryMom ~ Home Sweet Garden Party
AnOregonCottage ~ Tuesday Garden Party
FromMyFrontPorchToYours ~ Treasure Hunt Thursday #159

Peacock Chair!

Click on photo to enlarge it.

We picked up this old, tattered antique chair for $20. The upholstery was stained and ripped, the seat and cushion were completely failing, but the frame was sturdy. The carving detail and the overall shape of the chair made it too cute to pass by.
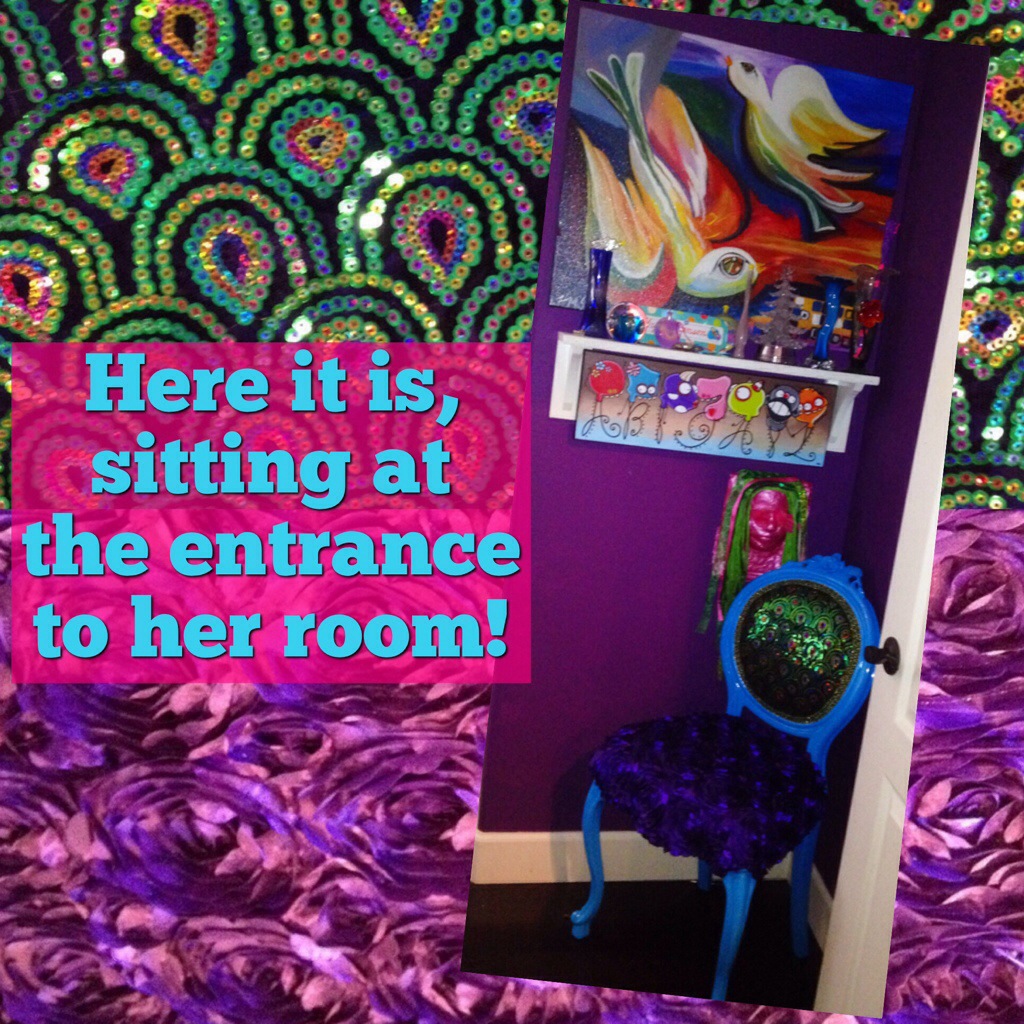
My middle daughter, age 9, asked if we could re-do the chair for her room. She said, “I like it, and if you fix it, I can sit in it while I do my homework.” I needed no further convincing that the chair should be hers!
Her room is painted a bright purple, and she has lots of hot pink accessories and colorful artwork. A restoration of the chair to its former design just wouldn’t make sense for her room. We needed it to be bright, fun, and youthful in fit into her space! On that note, she and I dove into Pinterest looking for inspiration. What idea did we come up with as inspiration to her chair renovation? Peacocks! We decided to make it a vivid, shimmering PEACOCK themed chair!
Here are the peacock themed photos that Daughter and I found on Pinterest that inspired us the most for this chair:
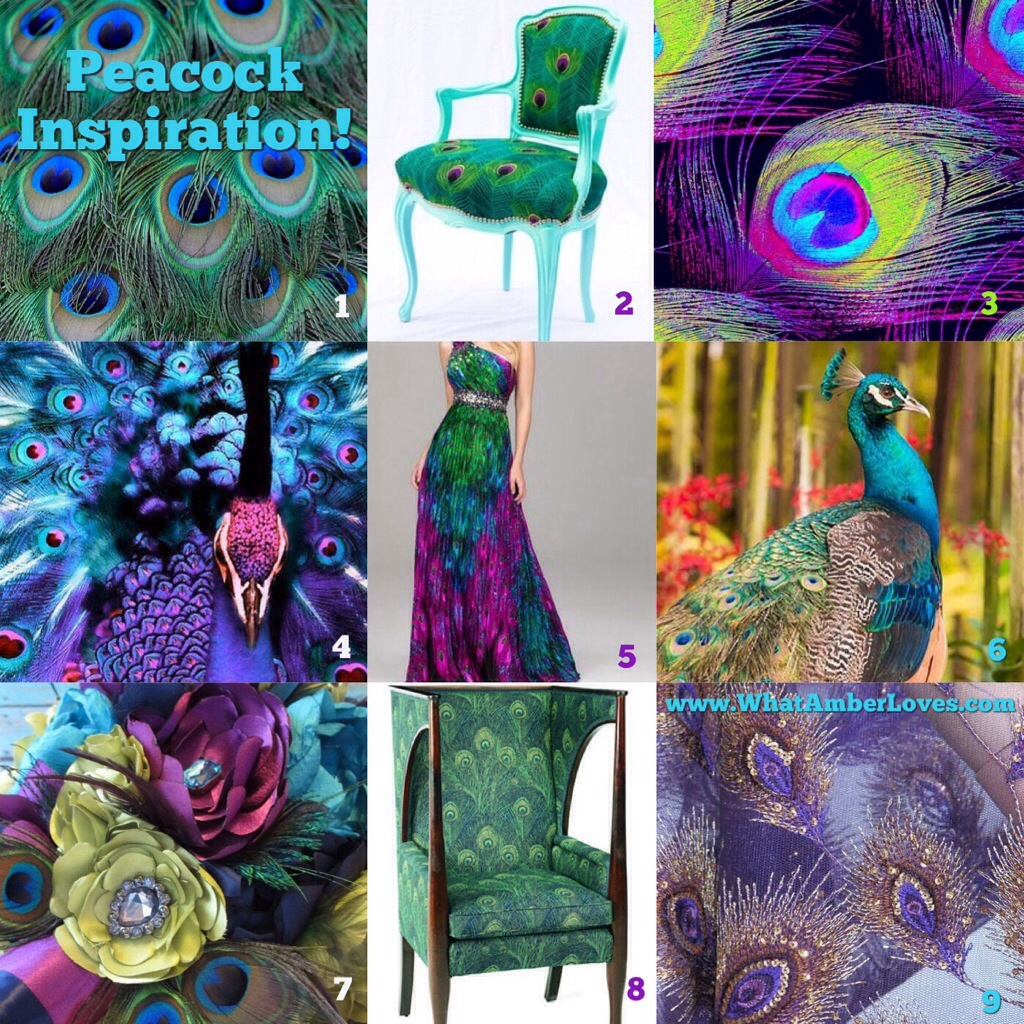
Click on photo to enlarge it.
SOURCES of inspiration: 1, 2, 3, 4, 5, 6, 7, 8, 9
The next step was to create a plan and find our materials for our new peacock chair! We decided we would paint the wood frame of the chair some sort of bright blue, “peacock blue,” if you will. We used Rustoleum spray enamel! I just LOVE the opaque glossy finish that their spray enamels provide! It’s such a durable AND pretty finish!
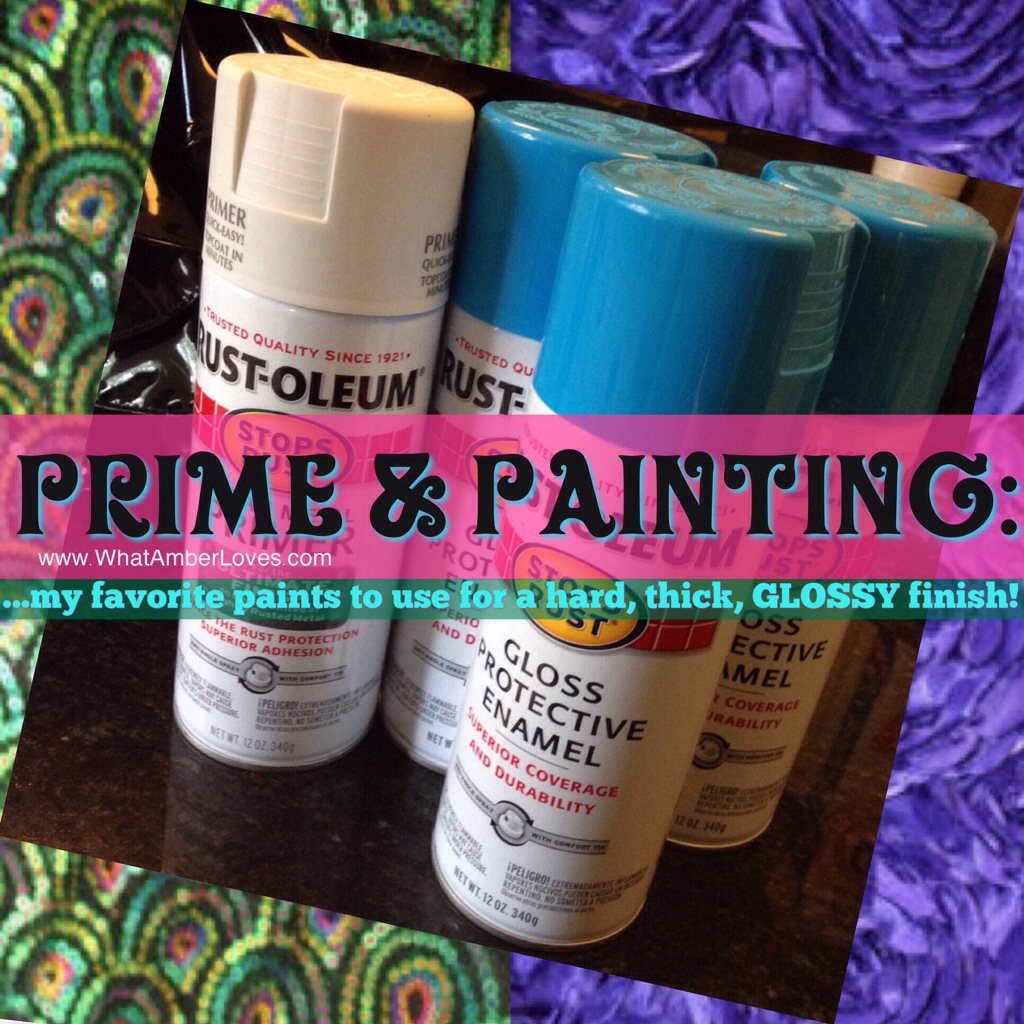
Click on photo to enlarge it.
Click on photo to enlarge it.
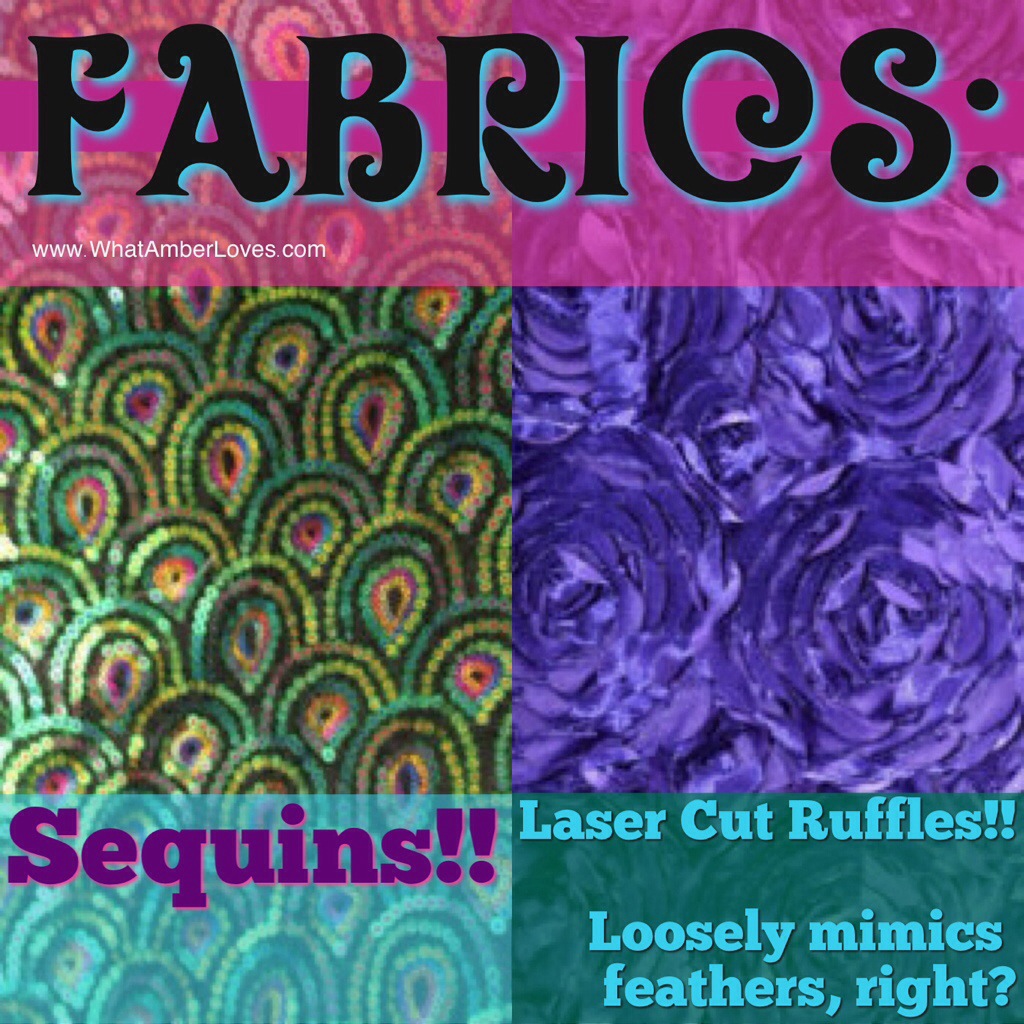
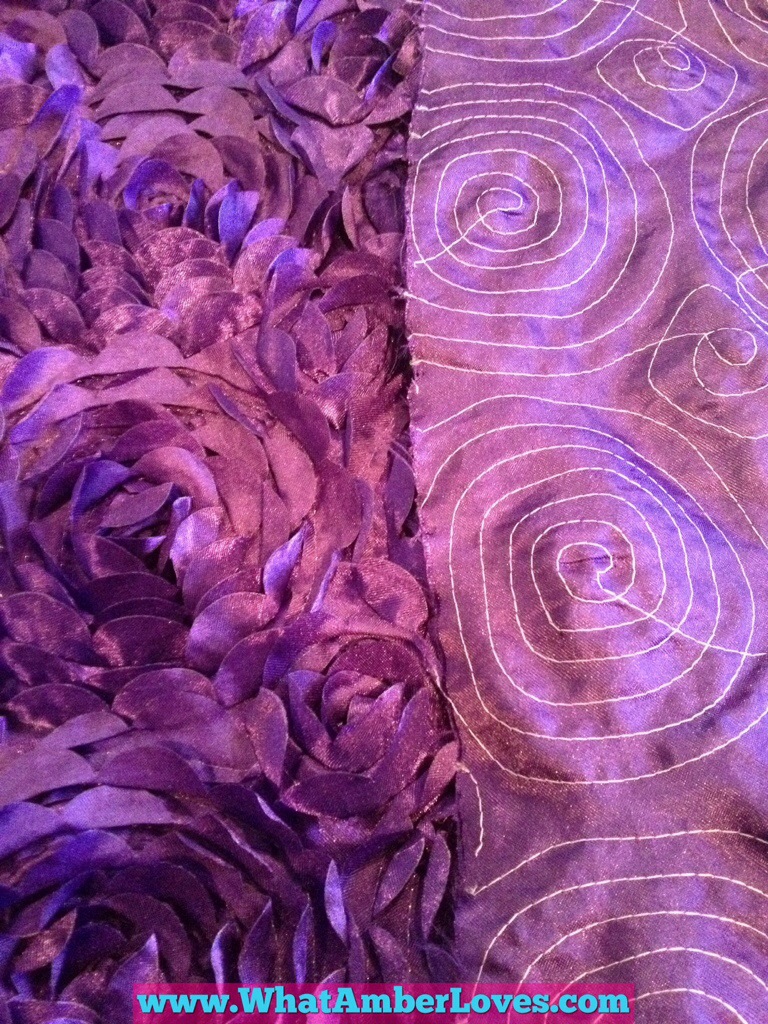
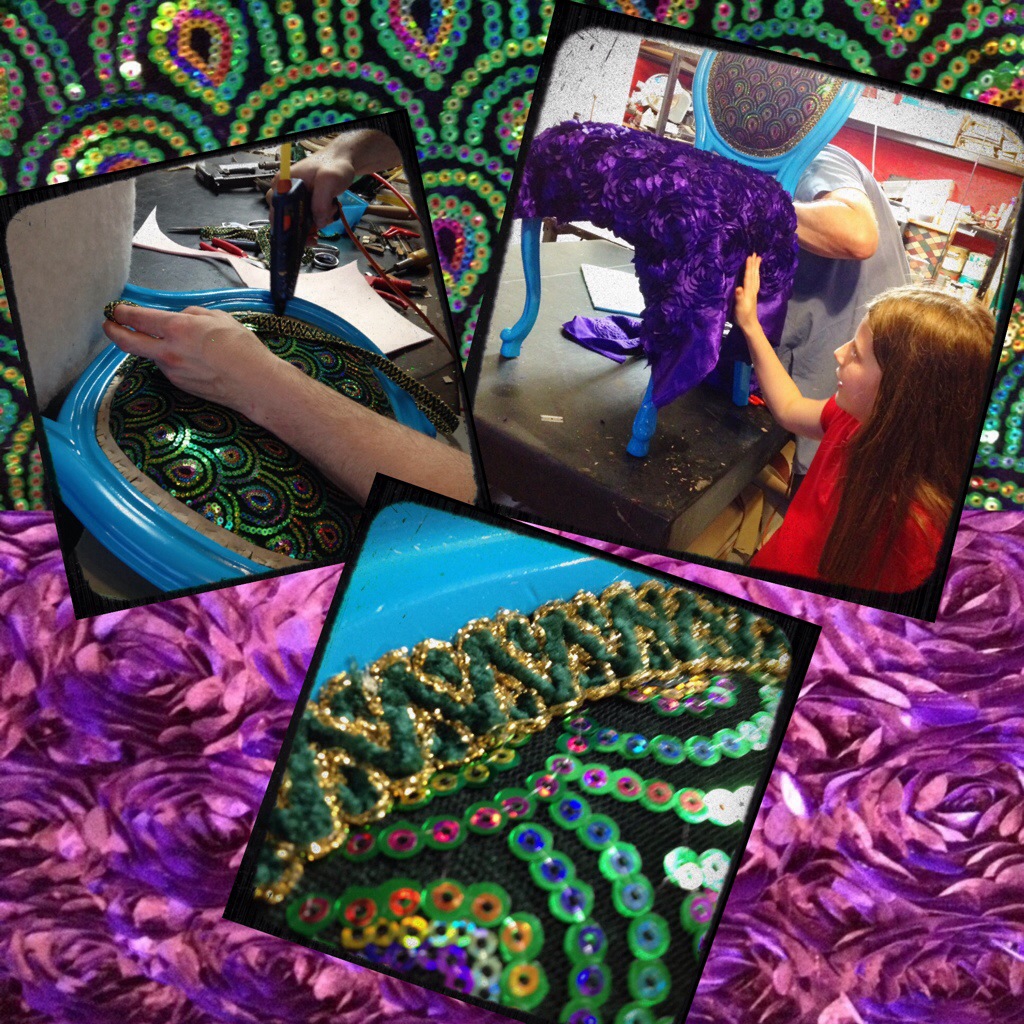
Together, Abigail and I decided we wanted to use greens and purples in addition to the blue enamel of the chair frame, and we wanted some sort of shine, shimmer and texture from the fabrics. So, I promised that while she was at school I would search online for fun peacock fabrics to order. We found what we believe to be the PERFECT newly manufactured fabrics from an eBay seller; he also has an online store www.RonnieHomeTextile.com.

The fabric for the upper portions of the chair is going to be a beautiful emerald green with metallic sequins in shades of hot pink, purple, gold, greens, and teals! For the seat cushion, we found a purple, laser cut, rosette fabric that reminded us of feathers, yet should be far more durable and comfortable to sit upon than real feathers would’ve been! Aren’t the two fabrics fabulous together with the paint color?! Love it! …and more importantly, my daughter LOVES if! YaY!!
Click on photo to enlarge it.

Then, the work process:
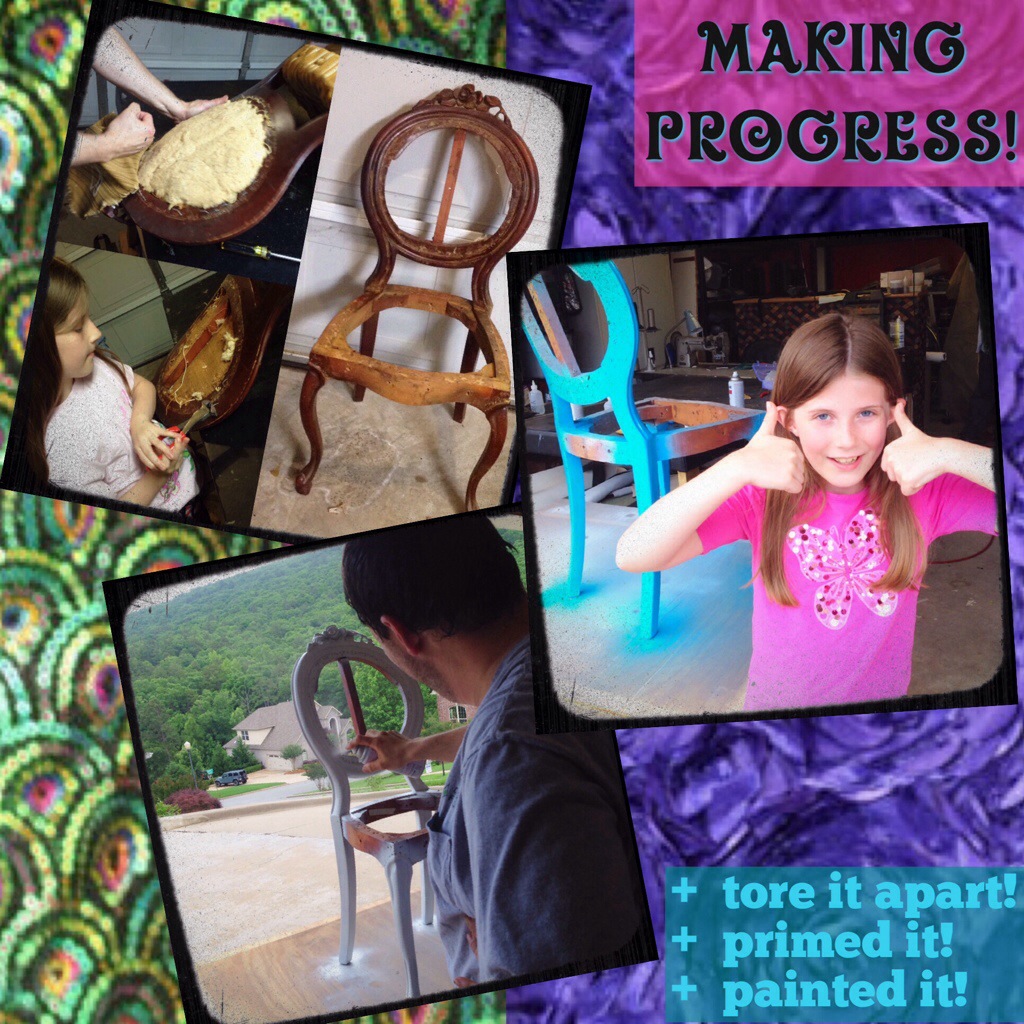
First, we stripped the chair. Mitch pried it apart and Abigail helped pull staples!
Second, we primed, then painted the frame, taking special care not to paint over original makers’ marks! The original Victorian era maker’s stamp is on the frame, a pencil signature from its re-upholstery in the ’40s, and our pencil signature from current reupholstery. That way, if it’s ever re-upholstered 20 or 50 years from now, the history is preserved!:
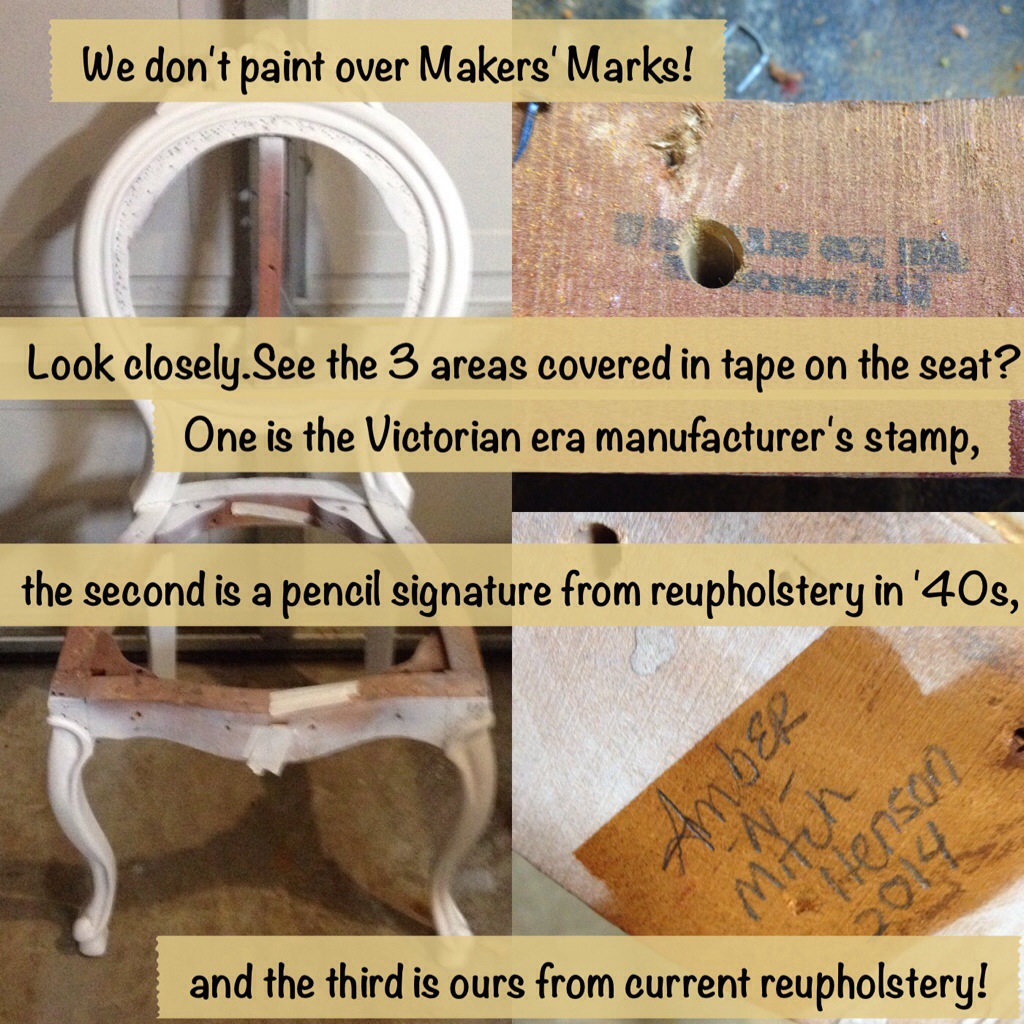
Click on photo to enlarge it.
Third, we added new webbing for the seat (stapling and trimming excess,) a thick layer of foam for the seat, and a thin layer of foam for the back. Finally, the whole thing was wrapped in polyester fiber (stapling and trimming excess.)
Lastly, we upholstered the back and seat, and stapling all pieces into position, then stapling cardboard tack strip around all of the edges in order to create a smooth surface to adhere finishing trim!

Click on photo of husband working on the chair to enlarge it.
Click on photo to enlarge it.

Click on photo to enlarge it.
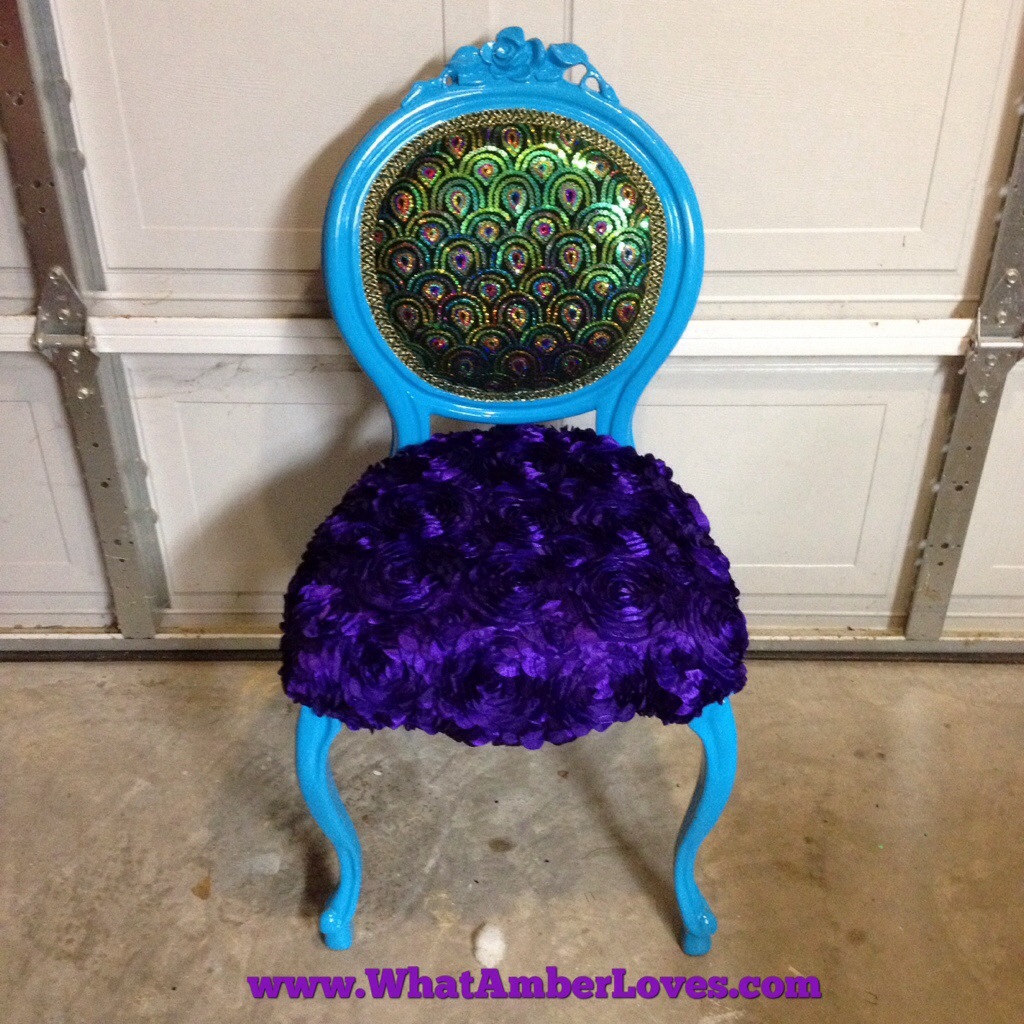
Now, she’s proud as a peacock of her new chair, and I’m expecting continued straight ‘A’s from all the homework and studying she’ll do while sitting in her Peacock Chair!
Click on photo to enlarge it.
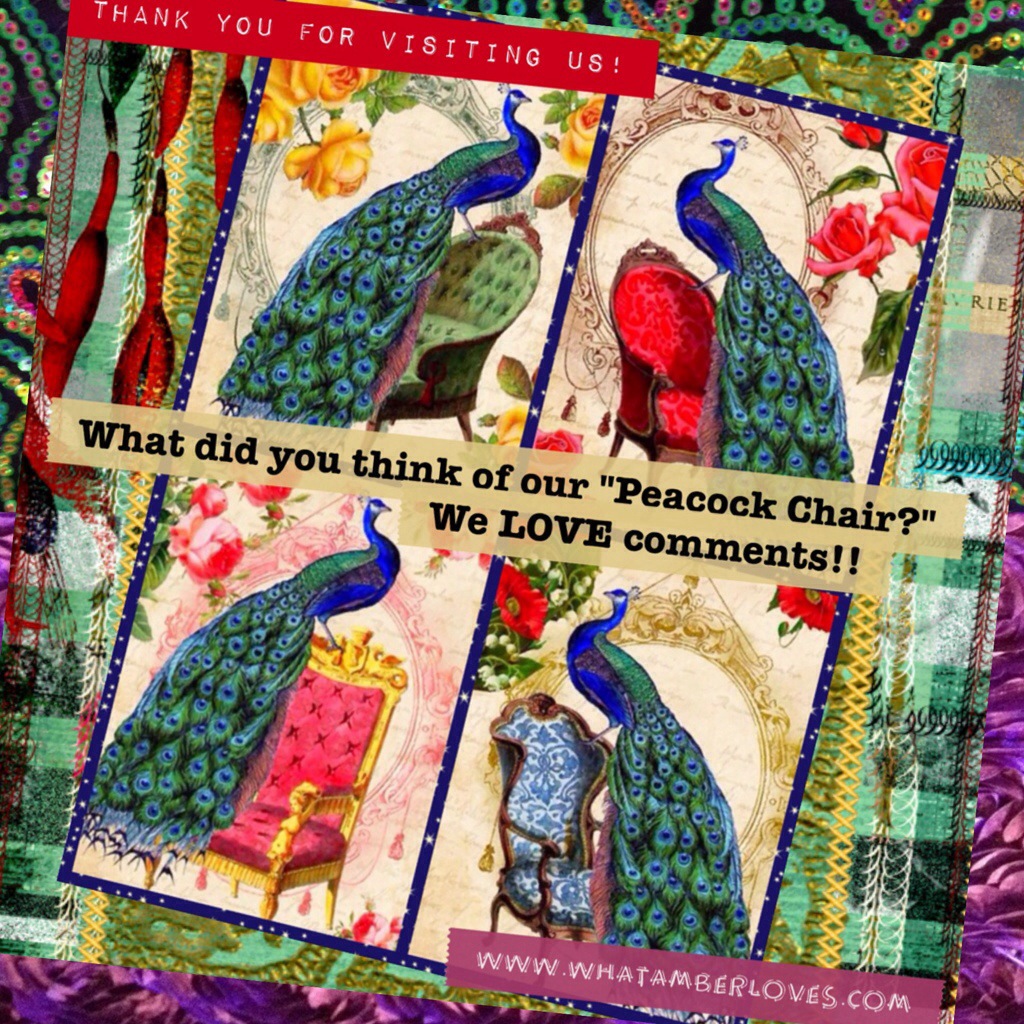
What do you think of our chair renovation? We’d LOVE it if you left us a comment or two!
Your Friend,
~Amber Hamilton Henson
PS
Guess what? 😃 This chair is being featured on KammysKorner and HandyManCraftyWoman! Click the square images below this text to be redirected to their sites:
 |
 |
I’m linking with some great blog parties! Check them out! (I’m updating this post as I link each day this week!)
TwiggStudios ~ Sunday Best
ArkansasWomenBloggers ~ Sunday LinkUp
HandyManCraftyWoman ~ Wicked Awesome Wednesday #163
FromMyFrontPorchToYours ~ Treasure Hunt Thursday #158
MarigoldsLoft ~ Tutorial Thursdays
ReDouxInteriors ~ Best DIY Linky
My Repurposed Life ~ Catch as Catch Can
MissMustardSeed ~ Furniture Feature Friday
ShabbyNest ~ Frugal Friday
The36thAvenue ~ Best DIY projects and recipes
ChicOnAShoestringDecorating ~ Flaunt it Friday
TrulyLovelyBlog ~ Fancy This #179
HomeStoriesAtoZ~ Tutorials Tips #161
HouseByHoff ~ Enchanting Inspiration
ConfessionsOfAPlateAddict ~ the Scoop #121
FunkyJunkInteriors ~ #242
BoogieBoardCottage ~ Masterpiece Monday #179
SmilingSally ~ Blue Monday
KammysKorner ~ Trash 2 Treasure
SavvySouthernStyle ~ Wow Us Wednesdays #173
Mad Tea Party!
We’ve been invited to a blogland “Mad Tea Party!” It’s actually the 7th annual event! Where have I been during the last 6 years?!
If you love whimsy even half as much as I do, you should click on the invitation FLYER to be re-directed to the informational (and rules) invitation by A Fanciful Twist. Her whole blog is such a treat! You’ll be glad you visited!

She is definitely the hostess with the mostest! Beyond showcasing her work, and offering tours of her spaces, she has invited us all to participate in this “Mad Tea Party!” She has links to our blogs on her sidebar, and on July 12th, we ALL post a Mad Tea Party of our own and then hop from blog to blog to visit all of the tea parties!
What will we offer at our tea party on July 12th? (Our = me + 3 daughters?) Well, we’ll pull out our finest, of course! Come see our treasures escape the china cabinet and get put into use! What fun! What FUN!! We’ll serve many treats we make ourselves, like our Coconut Macaroons … with Milk in Martini Glasses, and we’ll have a curious adventure of big and small spaces that we show and tell along the way!

(Click on Photo to enlarge It.)

We’re tweeting the news! The birds have heard and may join us, too!
(Click on Photo to enlarge It.)

Sound interesting? Well, take a look at a few posts from I’ve found from previous years’s Mad Tea Parties:
Hostess Vanessa’s Mad Tea Parties for the last 6 years:
http://afancifultwist.typepad.com/a_fanciful_twist/2008/06/the-time-has-co.html
http://afancifultwist.typepad.com/a_fanciful_twist/2009/06/-the-mad-tea-party-2009.html
http://afancifultwist.typepad.com/a_fanciful_twist/2010/06/mad-tea-party-2010.html
http://afancifultwist.typepad.com/a_fanciful_twist/2011/06/mad-tea-party-2011.html
http://afancifultwist.typepad.com/a_fanciful_twist/2012/07/mad-tea-party-2012.html
http://afancifultwist.typepad.com/a_fanciful_twist/2013/07/mad-tea-party-2013.html
Participant Mad Tea Parties:
http://triciafountaine.blogspot.com/2011/06/mad-catter-tea-party.html
http://apinkdreamer.blogspot.gr/2013/07/a-magic-invitation-magic-summer-art.html
http://cobblestone-prims.blogspot.de/2013/07/happy-un-birthday.html
and soooo many more!!
Save the Date, and we’ll see you for a blogland Mad Tea Party in July! Songbirds and sweet treats will be here for our adventure!
Your Friends,
Amber, Caroline, Abigail, & Veronica!
PS
I’m Linking with some great blog parties to extend the invitation! You’re invited to visit the parties:
HowSweetTheSound ~ Pink Saturday

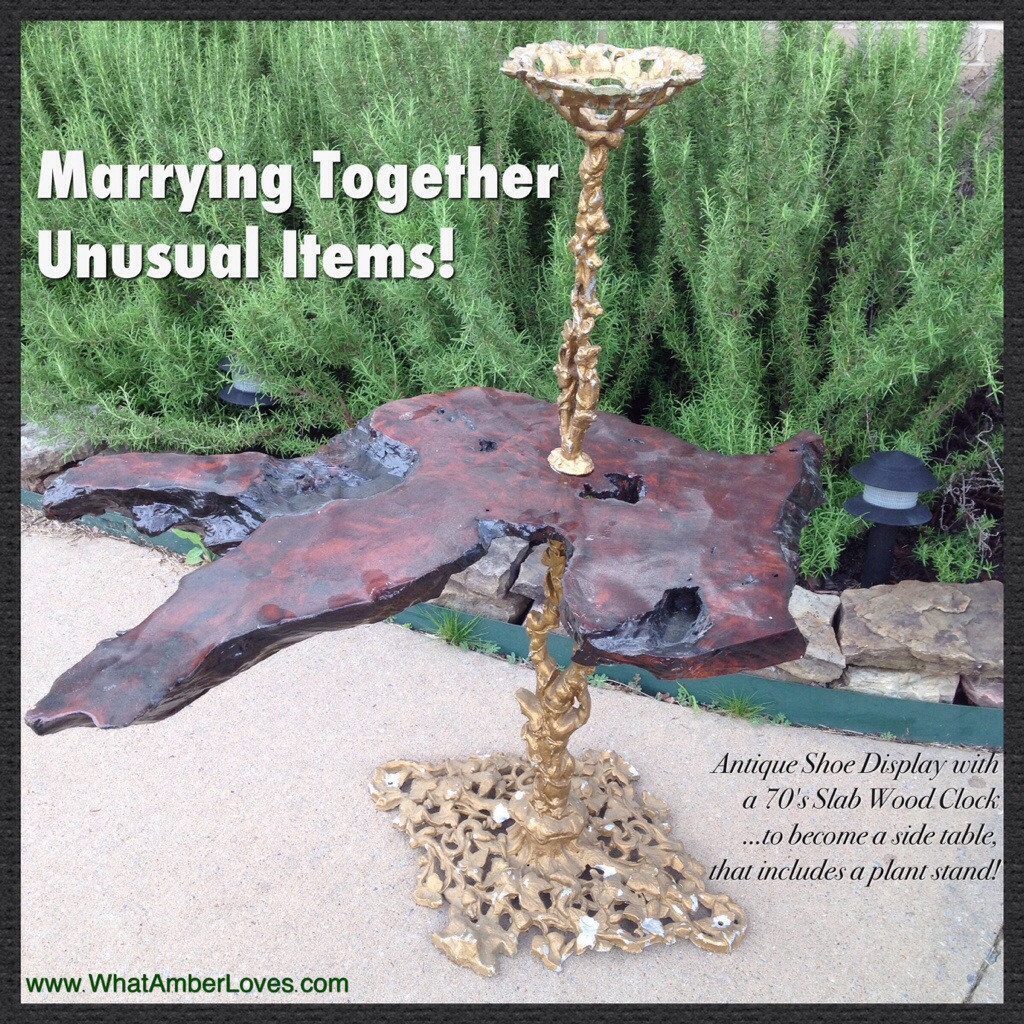
Marrying Together Unusual Items!
How about putting an Antique Shoe Display Table together with a 70’s Slab Wood Clock, so that it is a new piece of furniture? Well, we did just that. Now, we have a side table that includes a plant stand!
I picked up the gilded, cast aluminum(?) table-ish piece at an estate sale. The resident of the house told me it was salvaged from on old shoe store that closed and was eventually torn down in town decades ago. The same weekend, I bought a piece of slab wood that has a high gloss finish. It had a hole drilled in the center and an area routed in the back indicating it had once been used as a large clock. 1970’s style?
The pieces had both been sitting in the garage for a few weeks, awaiting inspiration, when while looking at one of my favorite interior design books, it suddenly came to me that I should put the two pieces together, forming a side table with plant stand! It took a little work to get the pieces together…husband had to wrestle some old bolts and chisel a bit more wood out of the way in order to get them to fit together, but “TaDa!” Here it is:
Click on photo to enlarge it.

Click on photo to enlarge it..
Click on photo to enlarge it.
Click on photo to enlarge it.

Click on photo to enlarge it.

Click on photo to enlarge it.
 </a
</a
Click on photo to enlarge it.

Click on photo to enlarge it.
So, what do you think of our funky little creation?
If you like this project, you may also like my belt chair, collage of frames, room tours, and more, if you click around my blog/website!
I LOVE comments; please do, while you’re here!
Thanks for visiting!
~Amber Hamilton Henson
PS
I’m linking with some great blog parties! Check them out! (I’m updating this post as I link each day this week!)
FromMyFrontPorchToYours ~ Treasure Hunt Thursday #158
TwiggStudios ~ Our Sunday Best Showcase
Nifty Thrifty Things ~ Sunday #158
My1929Charmer ~ Sunday’s Best Par-Tay
ArkansasWomenBloggers ~ Sunday Link
IShouldBeMoppingTheFloor ~ Inspiration Monday
ModVintageLife ~ Mod Mix Monday #155
ElizabethAndCo ~ Be Inspired #121
SavvySouthernStyle ~ Wow Us Wednesday #172
HandyManCraftyWoman ~ Wicked Awesome Wednesday #163
ReDouxInteriors ~ Best DIY Linky
My Repurposed Life ~ Catch as Catch Can
MissMustardSeed ~ Furniture Feature Friday
ShabbyNest ~ Frugal Friday
The36thAvenue ~ Best DIY projects and recipes
ChicOnAShoestringDecorating ~ Flaunt it Friday
TrulyLovelyBlog ~ Fancy This #179
HomeStoriesAtoZ~ Tutorials Tips #161
HouseByHoff ~ Enchanting Inspiration
FunkyJunkInteriors ~ #242
Funky Junk Interiors ~ Upcycled Side Tables

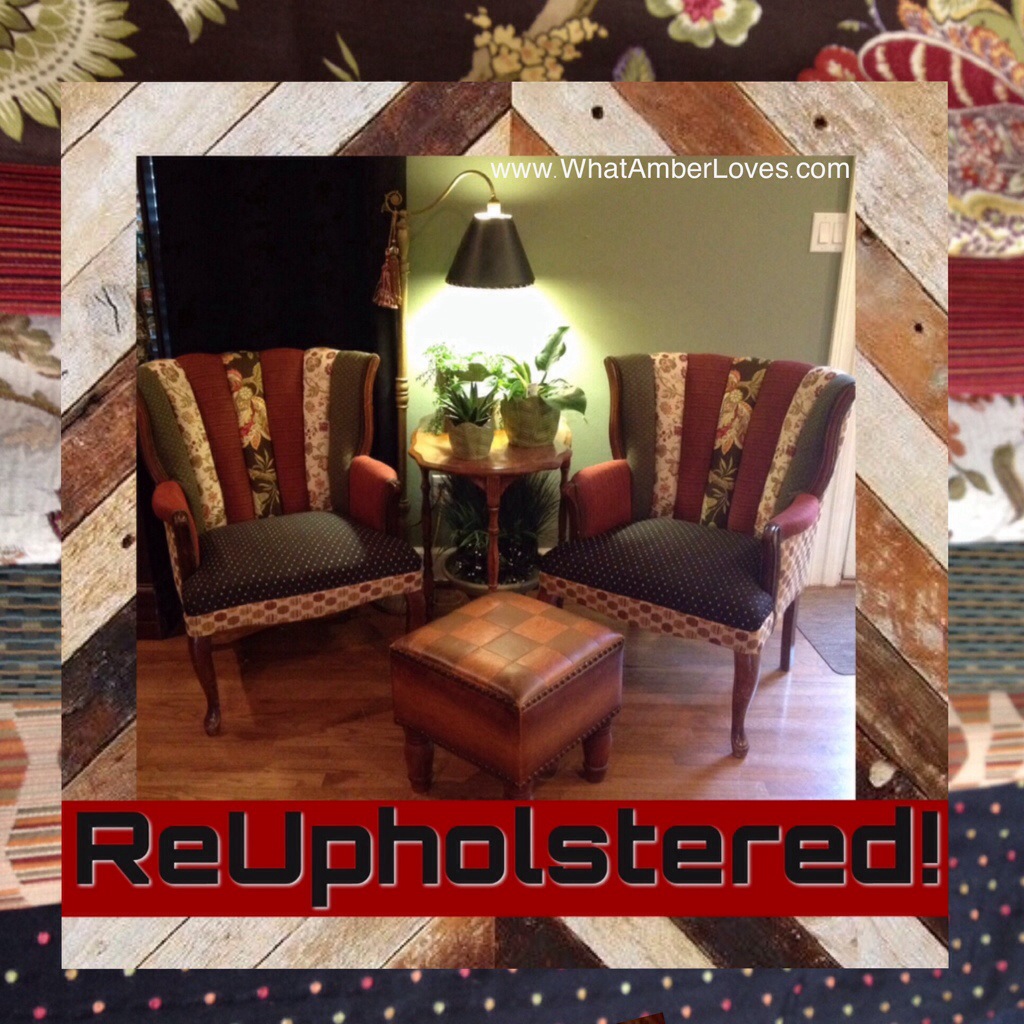
ReUpholstering Chairs!
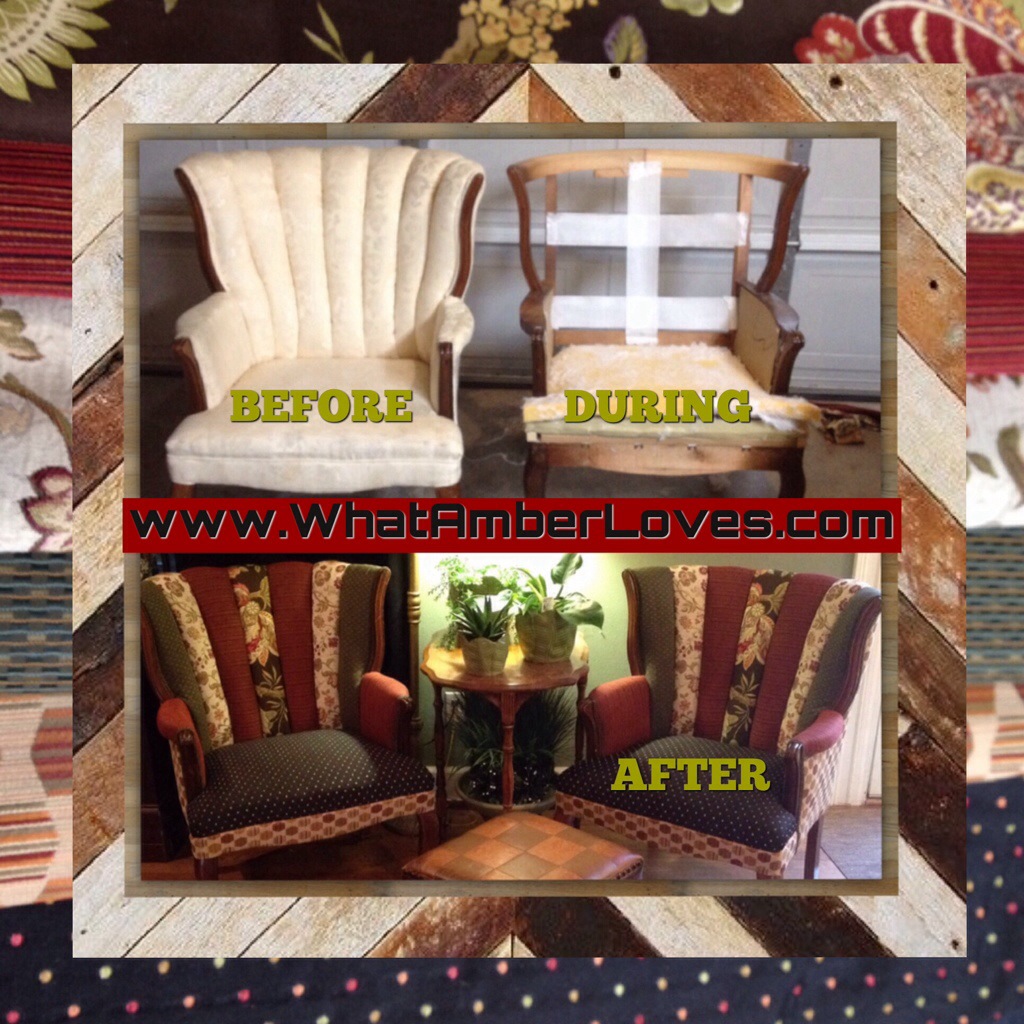
So here’s the deal. I’m re-upholstering a pair of chairs in this post. See, I bought the pair of chairs at an estate sale for $40 bucks, measured and bought clearance fabric, then took a bunch of photos while my husband re-upholstered them for me! Voila! I re-upholstered chairs, right? All kidding aside, my husband is an aircraft upholsterer by day and at night he’ll upholster things for me from time to time. So, I’m giving you in-depth, up-close look at how he re-upholstered a pair of chairs for me in the garage. You may pick up a few tips, so you can try it yourself!
I’m a very VISUAL person, so first I’m showing you several collaged photos, then text will follow with more detail. Refer back to photos as you read the text at the end. Click on any photo to enlarge it into a new window to read captions! Ready? Let’s upholster:
Click on photo to enlarge it
Click on photo to enlarge it

Click on photo to enlarge it
Click on photo to enlarge it
Click on photo to enlarge it
Click on photo to enlarge it’ll

Click on photo to enlarge it

Click on photo to enlarge it

Click on photo to enlarge it
Click on photo to enlarge it
****************************
Click on any photo to enlarge it!
****************************
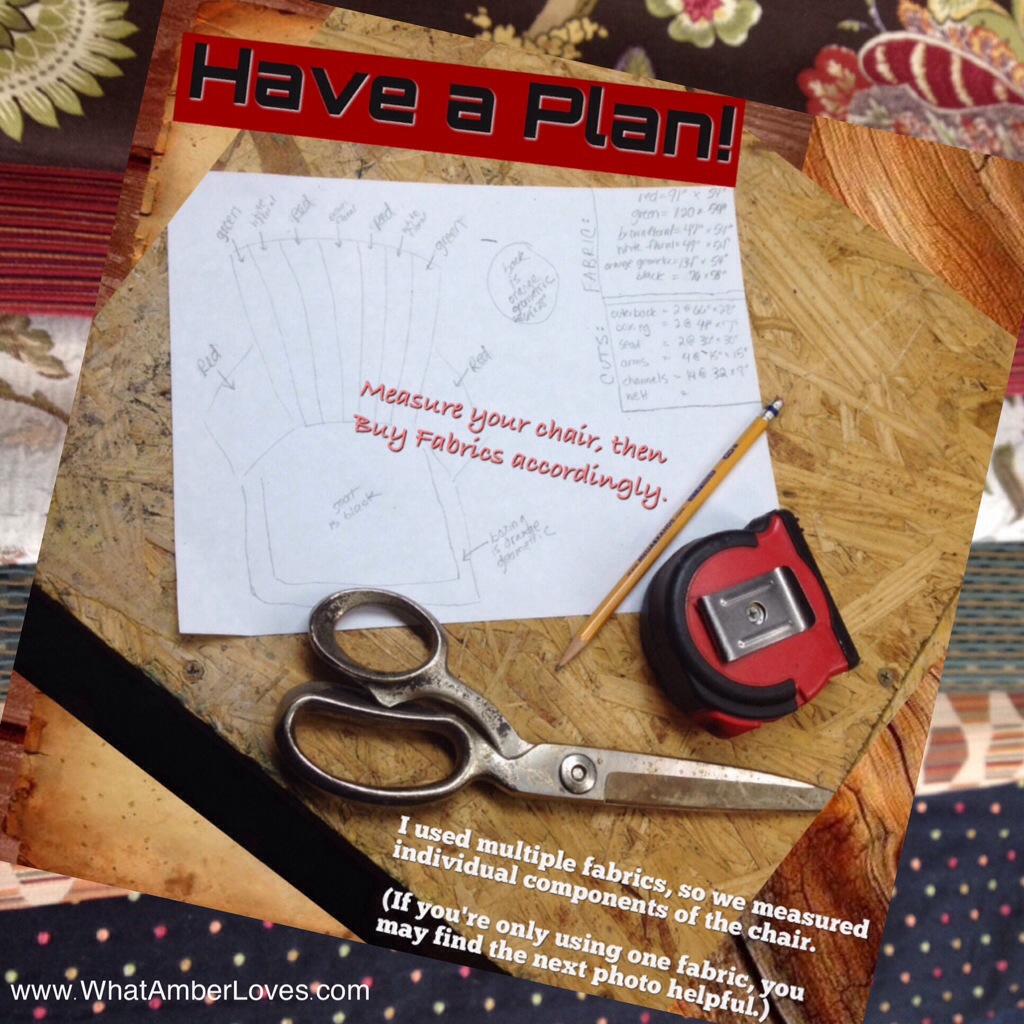
Have a Plan: I used multiple fabrics, so we measured individual components of the chair.
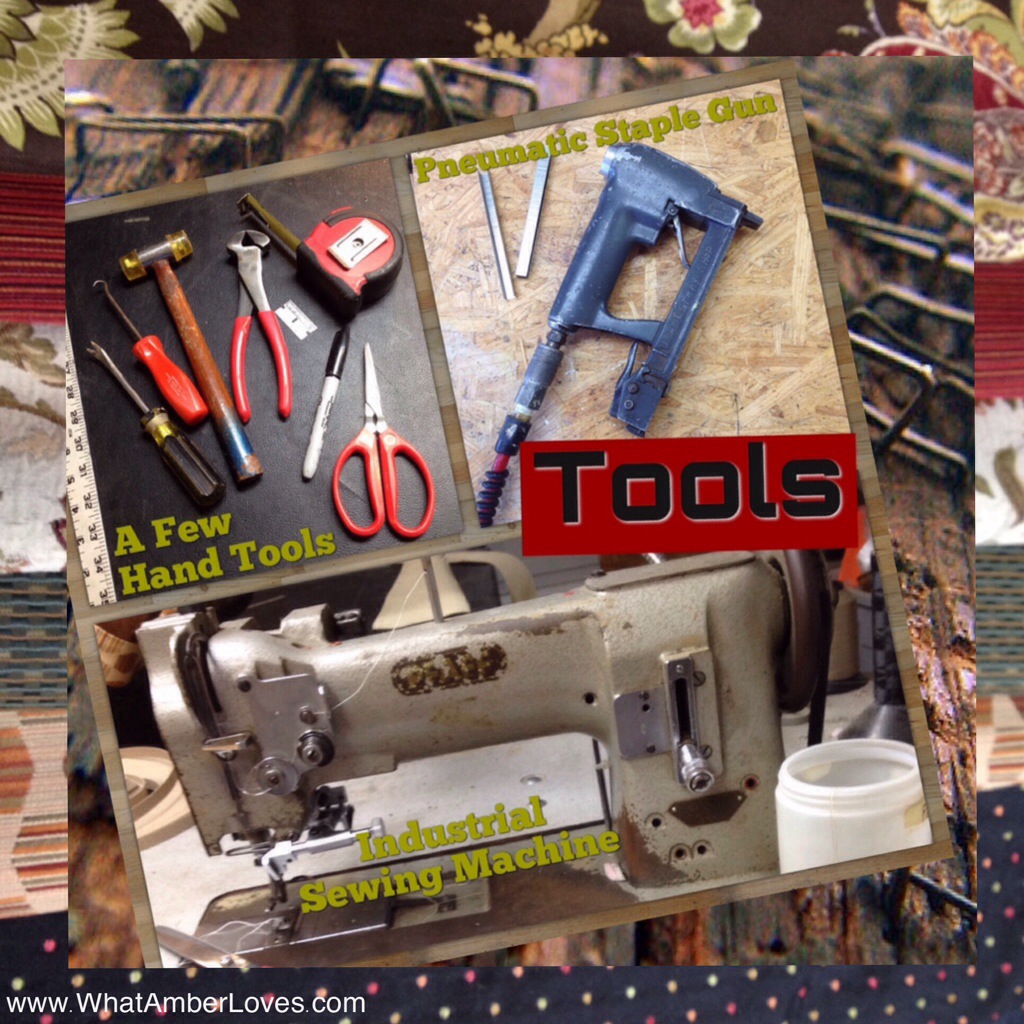
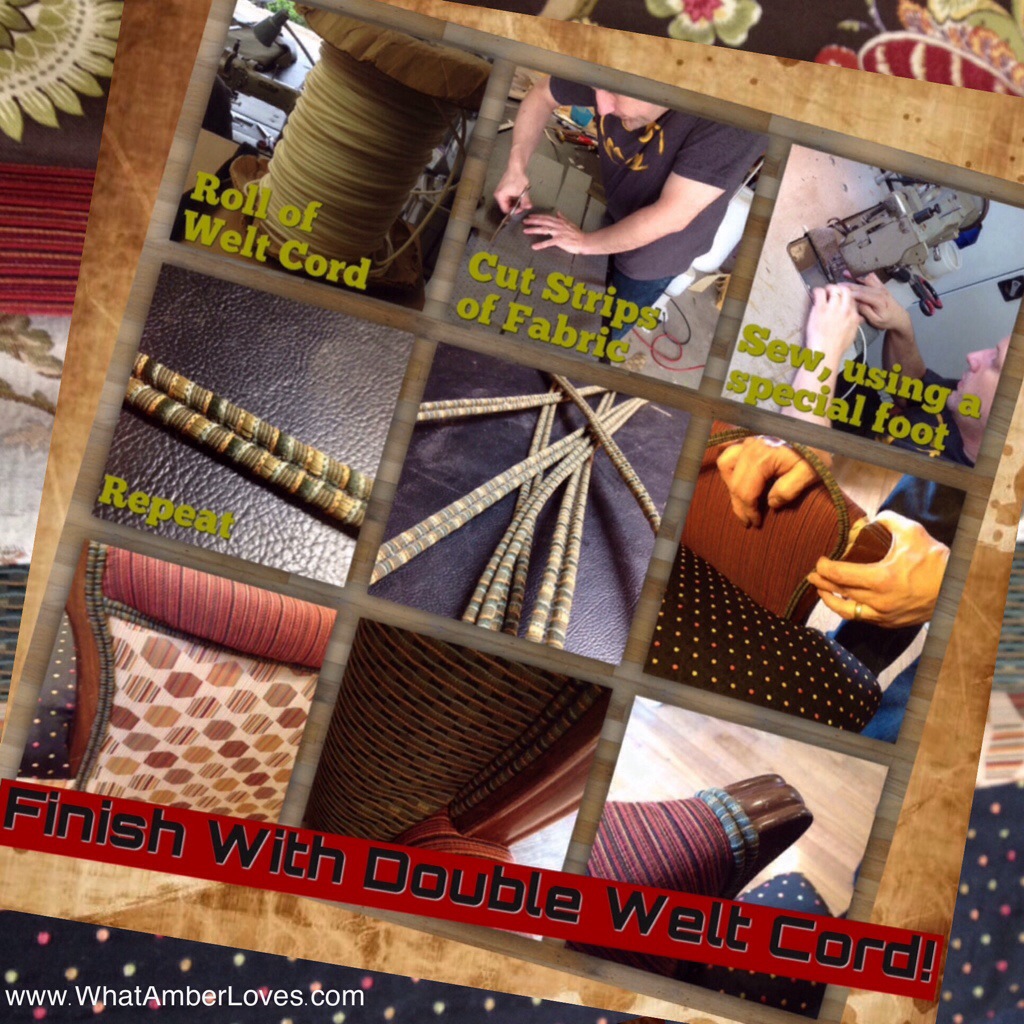
Tools: Gather your tools! A few hand tools, a pneumatic staple gun, and an industrial sewing machine with an optional double welt cord foot.
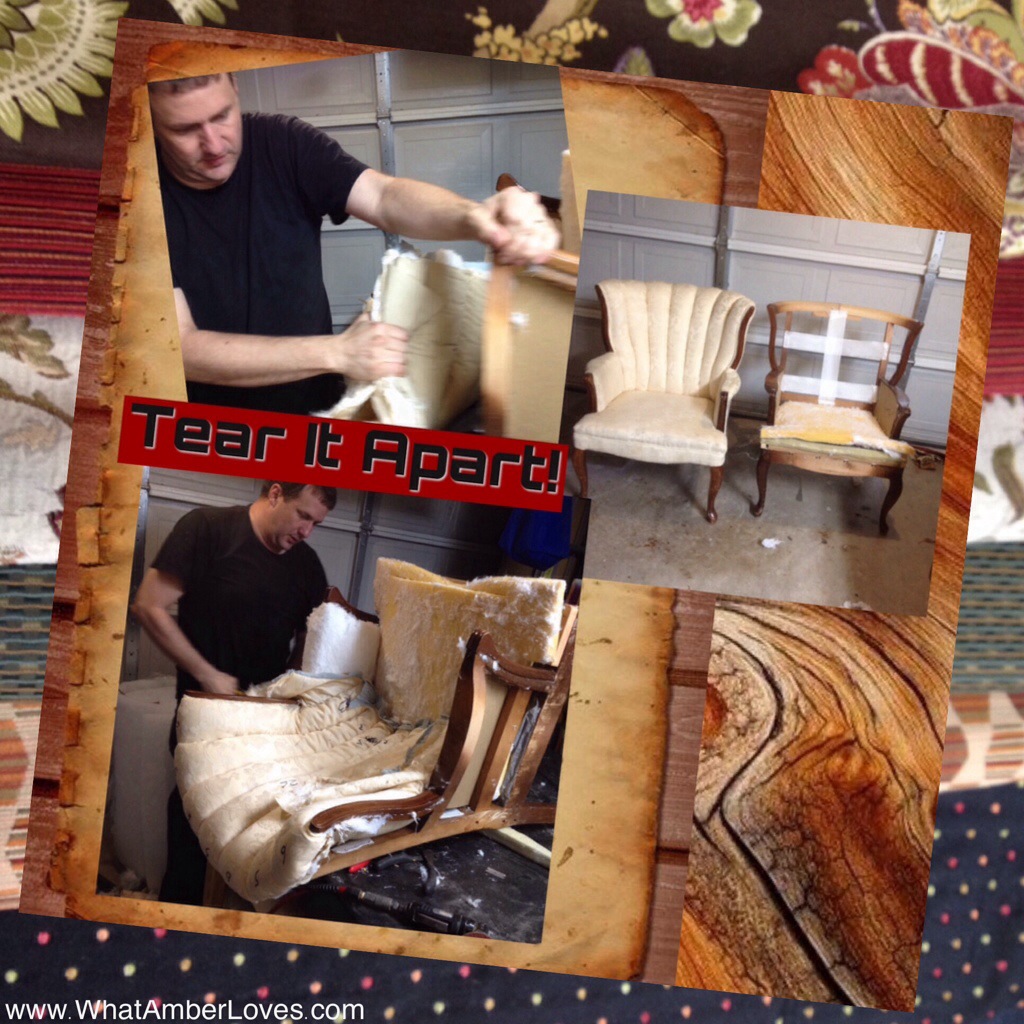
Tear it apart: Only after you’ve taken all of your measurements, made any necessary patterns*, and taken plenty of “before” photos, should you begin tearing apart the upholstery. Now, have fun tearing it apart! Be sure to remove all old staples, too!
(If you’re only using one fabric, you may find the fabric estimating photo helpful.)
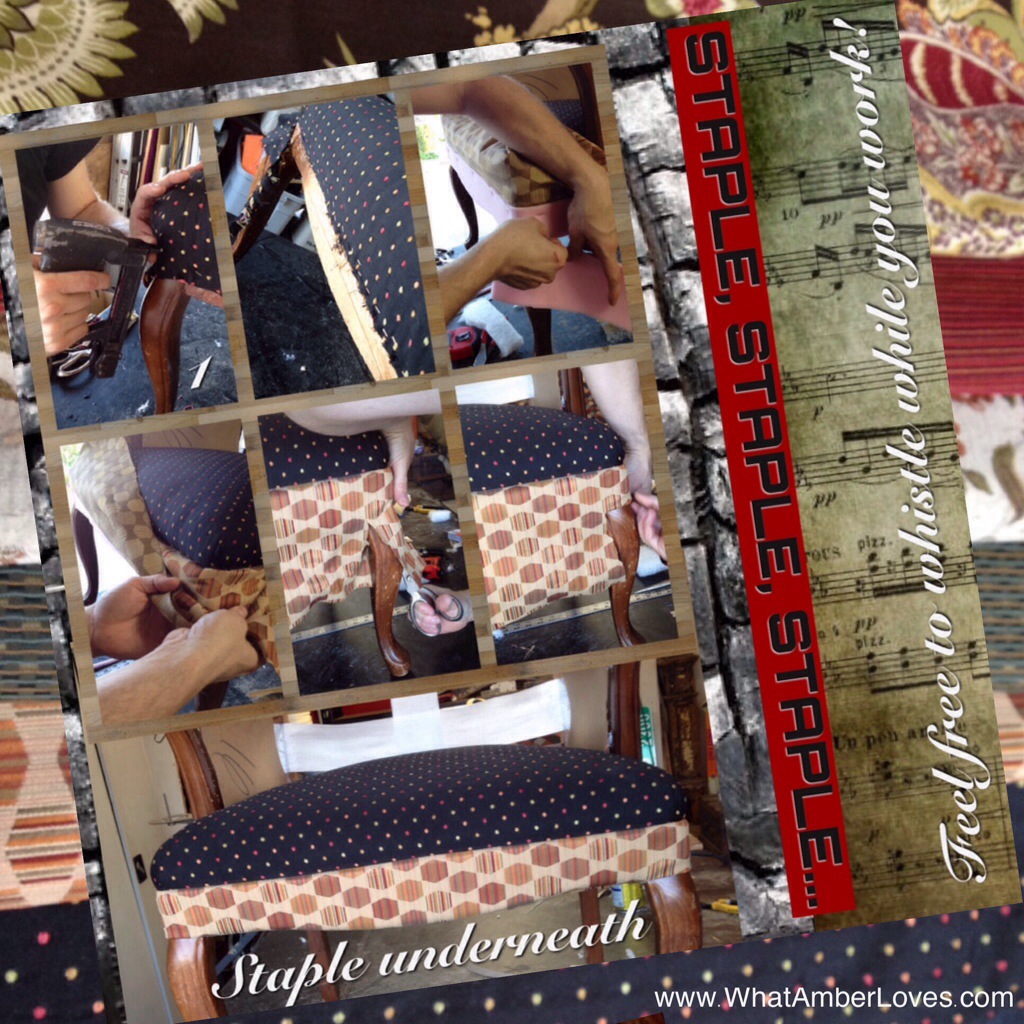
Staple, Staple, Staple: assuming you paid attention to the order you removed the previous upholstery, staple your new upholstery in reverse order, adding polyester as needed. For these chairs, the seat was first, then the bottom boxing, then the arms, then…
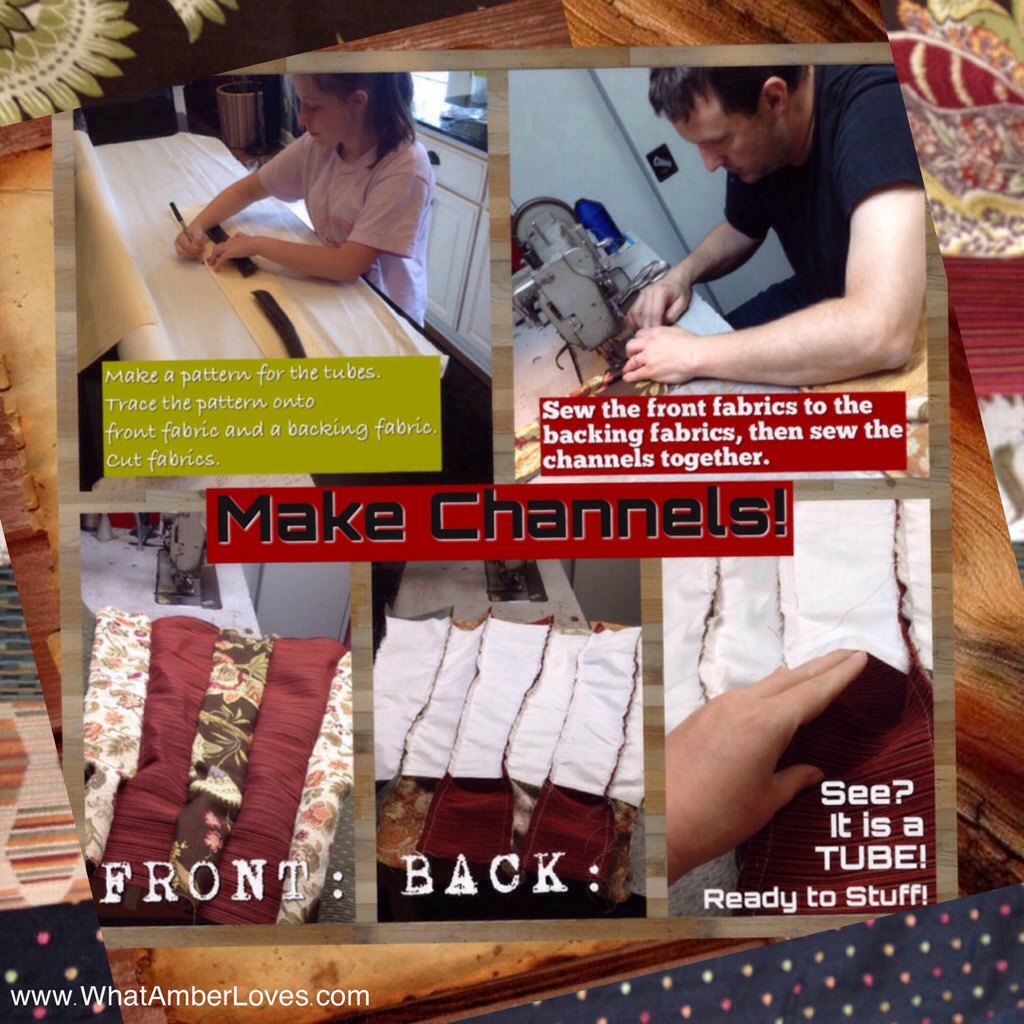
Channels: Make a pattern for the channels (tubes.) Trace the pattern onto front fabric and a backing fabric. Cut fabrics for the channels (tubes.) Sew front fabrics to backing fabrics, creating channels (tubes.) Sew the channels together. Staple to chair.
Wrap the Back: more stapling, using cardboard tack strip for folds and edges as needed. Don’t trim to short, because you need to be able to fold the fabric under to go around the legs neatly.
Repeat: second chair. Everyone likes a matched pair of chairs, right? When working with patterned fabric(s), be sure to pay particular attention to alignment!
Finish with Welt Chord: cut strips of fabric, sew double welt cord, trim excess fabric, and attach to chairs via glue or staples (between cords) to finish all edges!
Photograph your finished chairs! 🙂
***********************
Please, leave a comment so that I know you’ve visited, (I LOVE comments), feel free to share it on social media, or if you have specific Questions for your project, just email me! My email address is on my ABOUT page. Feel free to click around all of the blog while you’re here visiting WhatAmberLoves! You might like my Decor and Crafts page with the room tours and other tutorials, too! 🙂
Your Friend,
~Amber Hamilton Henson

Guess what? This post is featured and linked another blog! I linked to a blog party and was chosen as a feature! Click on the square button below this text to be re-directed to her blog!

I’m linking with some great blog parties! Check them out! (I’m updating this post as I link each day this week!)
MyRepurposedLife ~ Catch As Catch Can
ACreativePrincess ~ Party #160
BeyondThePicketFence ~ Under $100 link party
RedouxInteriors ~ Best DIY linky party #156
TheHappyScraps ~ Creative Exchange
TheBrambleBerryCottage ~ Time Travel Thursday
FrenchCountryCottage ~ Feathered Nest Friday
MissMustardSeed ~ Furniture Feature Friday
RootedInThyme ~ Simple & Sweet
TaterTotsAndJello ~ Link Party Palooza
TwiggStudios ~ Our Sunday Best Showcase
Nifty Thrifty Things ~ Sunday #158
My1929Charmer ~ Sunday’s Best Par-Tay
ArkansasWomenBloggers ~ Sunday Link
IShouldBeMoppingTheFloor ~ Inspiration Monday
ModVintageLife ~ Mod Mix Monday #155
ElizabethAndCo ~ Be Inspired #121
SavvySouthernStyle ~ Wow Us Wednesday #172
MarigoldsLoft ~ Tutorial Thursdays
FunkyJunkInteriors ~ #242

Turnip “Fries”
Take 4 turnips, peel and slice into French fry size strips. Toss with 2 tsp. olive oil and add seasonings you like (I use sea salt, garlic powder, and Mrs. Dash extra spicy). Lay out on a baking sheet and bake at 400 until lightly browned. They will not become crispy as they dehydrate, but they will have a consistency like McDonald’s fries. 🙂 Enjoy!

🙂
~Amber
>
")
DOLMA! (Lamb in GrapeLeaves!)
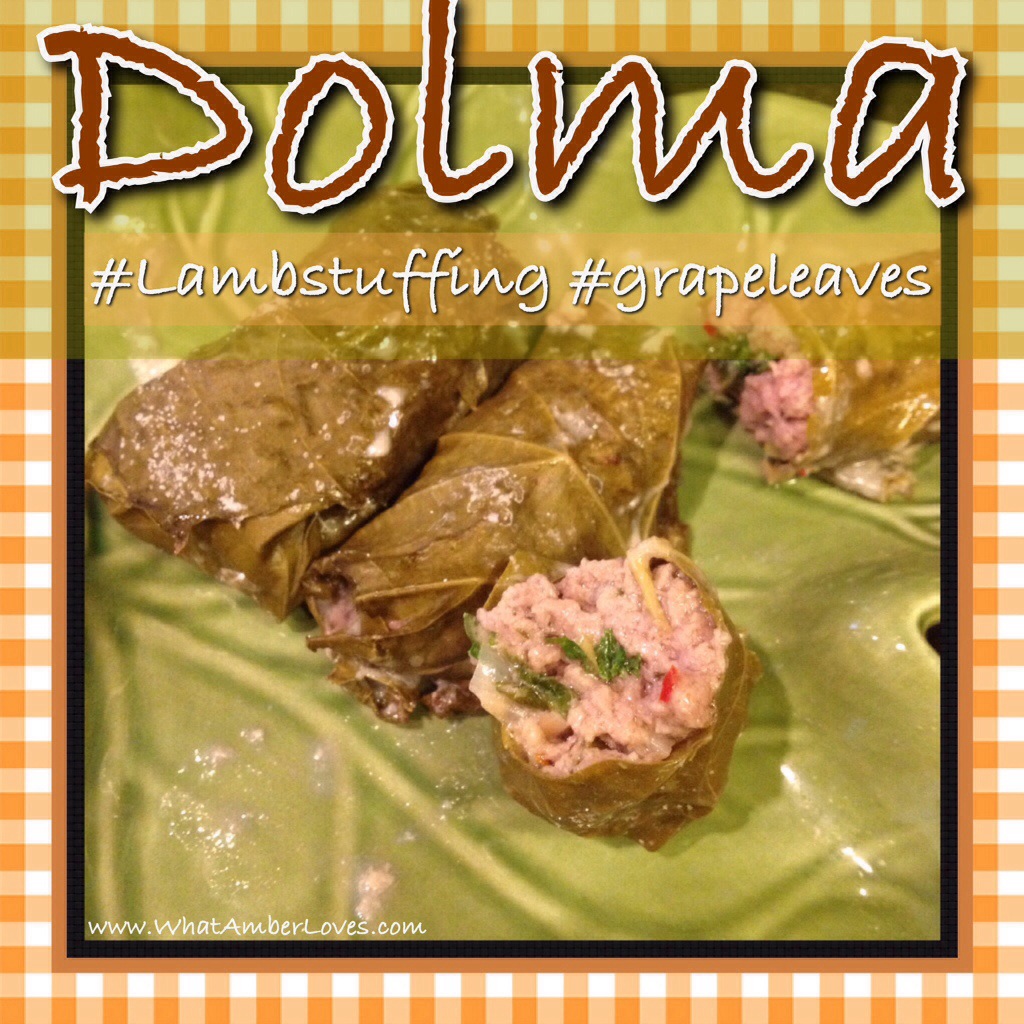
LAMB DOLMAS
1 1⁄2 Lb lean ground lamb
1⁄2 medium sized leek (finely chopped)
5 cloves garlic (minced)
2 lemons (zested and juiced)
1⁄2 tsp ground cumin
1 tsp red pepper flakes
2 tbsp olive oil
2 eggs
small handful of mint leaves (chopped)
small handful parsley (chopped)
small handful fresh dill (chopped)
2 tsp mustard
1 1/2 tsp sea salt
black pepper to your liking
1 jar grape leaves (drained of brine and soaked in fresh cold water)
*Place a medium to large size sauté pan over medium heat. Add about a tablespoon of grape seed or olive oil and lightly cook leeks and garlic till softened but not browned (about 5 minutes), to cool. set aside
*After allowing leeks to cool, add all ingredients except grape leaves in a sufficient mixing bowl. Begin to mix filling until just thoroughly combined making sure not to over mix . *Refrigerate for at least 1 hour or up to 4 hours.
*Lay out a clean towel or some paper towel. One at a time, take a grape leave, place shiny side down on towel stem facing yourself. Add a couple small spoonfuls of lamb mixture to center of grape leaf. Firmly tuck in left and right side of leaf, then with both of your thumbs tightly roll forward. (You can do this one by one or lay ten leaves out at a time)
*Place each dolma on a lightly sprayed (with olive oil) sheet pan seam side down. Place sheet pan on middle rack in a preheated 400 oven and bake for about 8 minutes or until internal tem- perature is 140 degrees.
Makes 25-30 dolmas. ENJOY!


🙂
~Amber Hamilton Henson
>

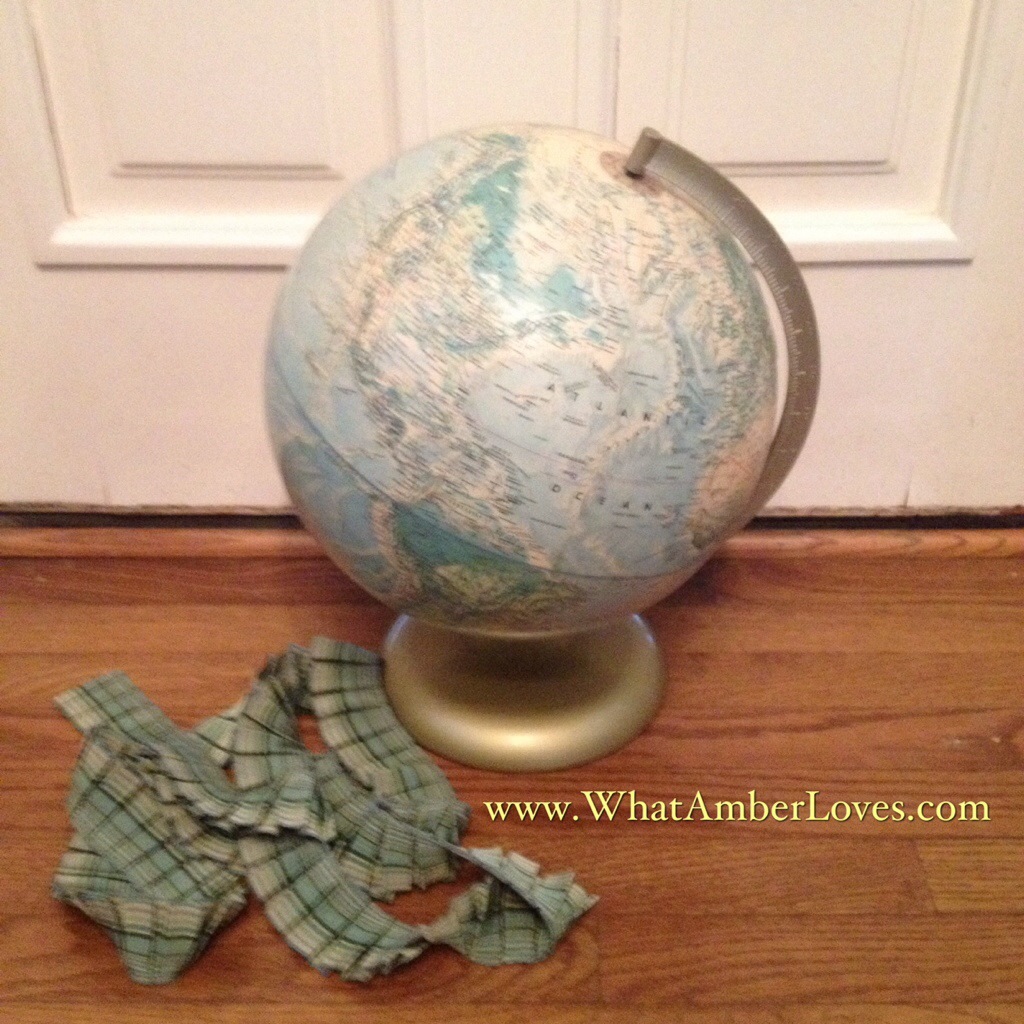
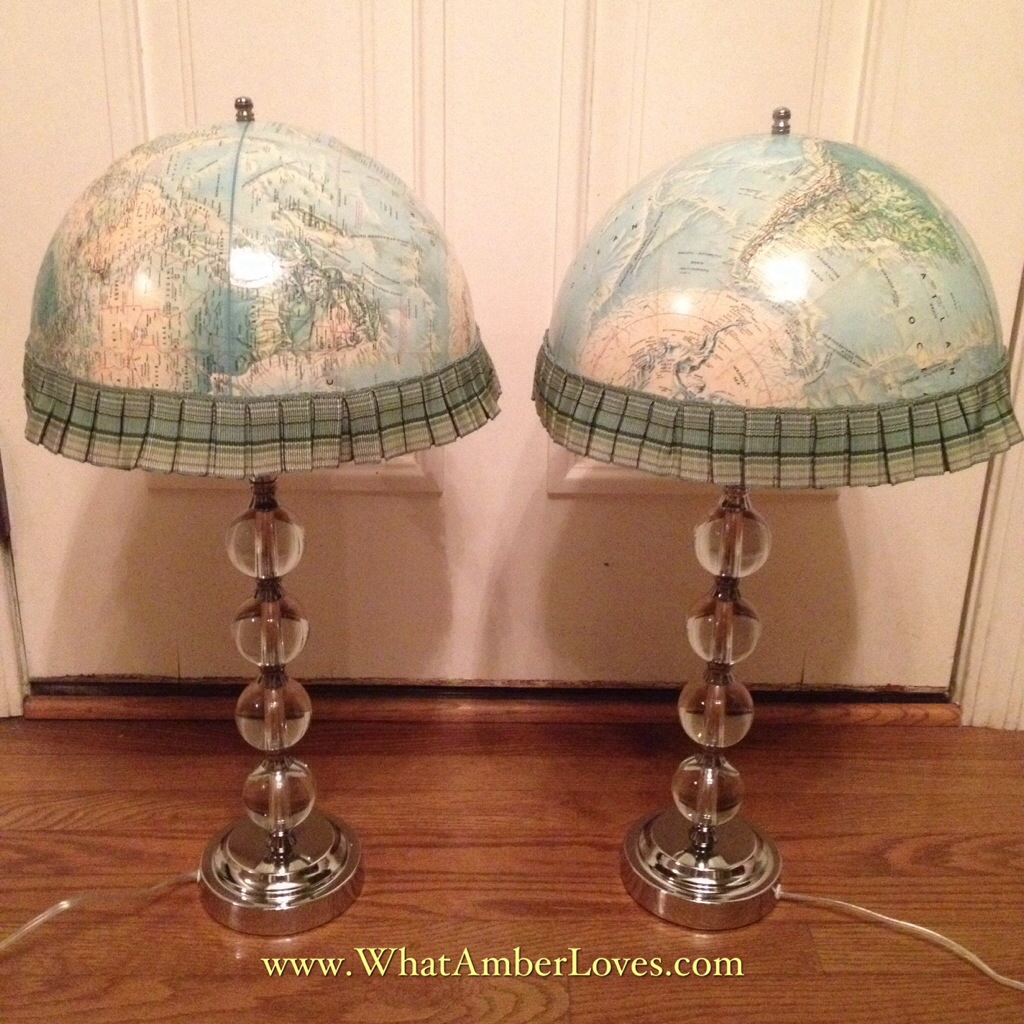
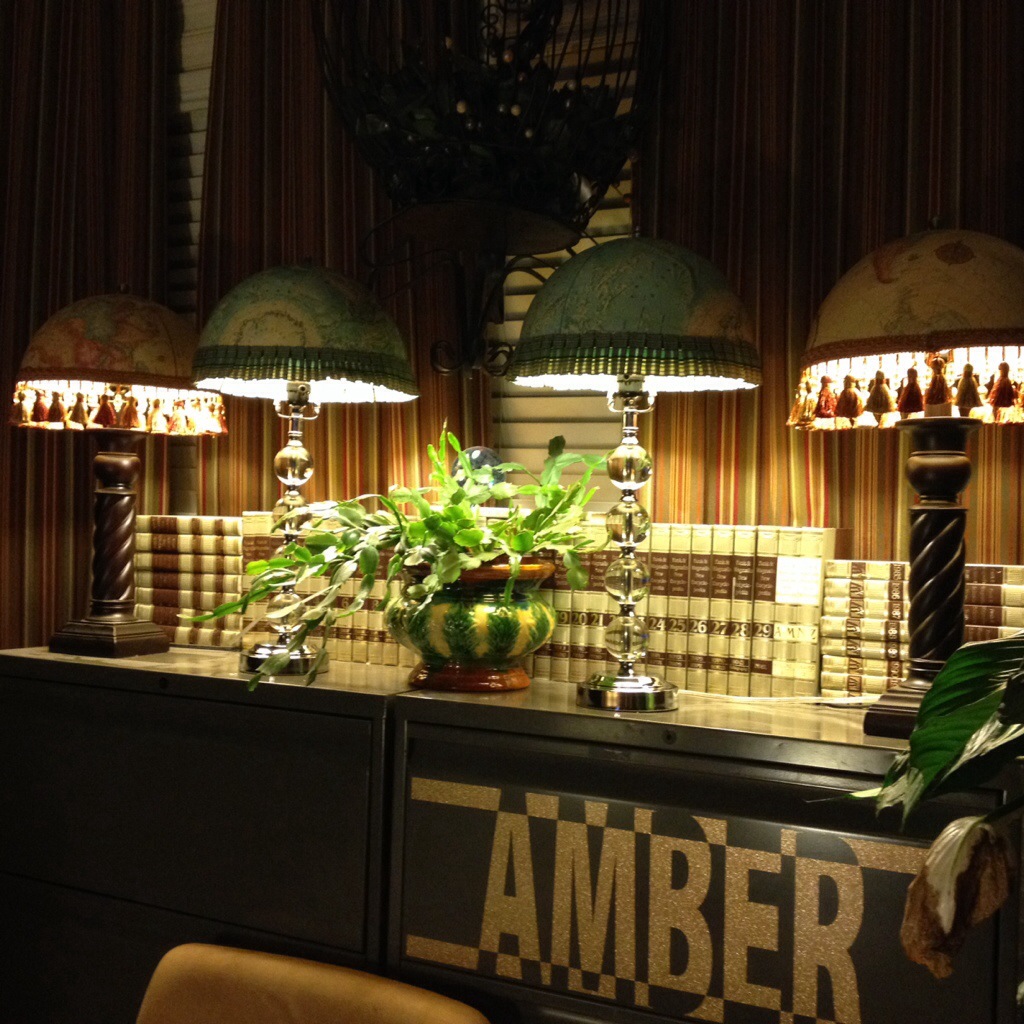
Vintage Globe into New Lampshades!

Easily turn a vintage globe into a new pair of lampshades!
Just saw the globe in half. Use a hot glue gun to adhere trim/fringe. Drill a hole in the top, so that it secures between your lamp harp and finial.
Viola!
You’ve made vintage fun and funky!
#upcycle #reuse


r />
Have you upcycled anything recently? For more Upcycling and craft ideas, please visit my decor & crafts page!
Laters!
~Your Friend, Amber Hamilton Henson


