Blog Archives
Hershey’s Special Dark Tiger Cookies

Hershey’s Special Dark Tiger Cookies
Ingredients:
1.5 cups granulated sugar
0.5 cup vegetable oil
0.5 cup Hershey’s brand Special Dark cocoa or Hershey’s cocoa
3 eggs
1.5 teaspoons vanilla extract
1.75 cups all purpose flour
1.5 teaspoons baking powder
0.5 teaspoon salt
Powdered sugar
48 Hershey’s Kisses
1. Stir together granulated sugar and oil in large bowl; add cocoa, beating until well blended. Beat in eggs and vanilla. Stir together flour, baking powder, and salt; gradually add to cocoa mixture, beating well.
2. Cover; refrigerated until dough is firm enough to handle, at least 6 hours.
3. Heat oven to 350F. Grease cookie sheet. Shape dough into 1″ balls (dough will be sticky); roll in powdered sugar to coat. Place balls about 2″ apart on prepared (greased) cookie sheet.
4. Bake 11 to 13 minutes or until almost no indentation remains when touched lightly and tops are cracked. Immediately press chocolate Hershey’s kiss into the center of each cookie, if desired. Allow to cool completely before removing from baking sheet.
Enjoy! (yields about 4 dozen)

The backstory: I was recently asked where I get my recipes. Well, I am an avid cookbook collector and Pinterest user, as well as the granddaughter of two women that are both fabulous cooks, and in addition to this blog with a recipes page, I maintain my own handwritten “cookbook” notebook of recipes that I’ve modified and like. I usually try to include the source(s) of my recipes on this blog, unless it is something from my own notebook or shared from a relative. For the most part, I include a link or cite a specific cookbook if I follow a recipe precisely; all photos included with recipes are 100% mine and taken in my own kitchen, though. For example, this is a recipe that is a household favorite around here. It is from a HERSHEY’S 3-in-1 cookbook, and my 11 year old daughter made this batch of cookies! I have a few cookbooks specifically about cookies and baking. Do you have one that you recommend that I try? I’m always looking for the next tried, tested, and truly great cookbook! Here is a photo of a few cookie and baking cookbooks in my collection that I recommend!

When you view this post, specifically by clicking on the title of the post, at the bottom of the post, please find the Pinterest, Twitter, Facebook and other options to share these photos and link! Please, feel free to share! Thanks for the blog love!
Your Friend,
~Amber Hamilton Henson
Cookies for Santa!


🙂
We’ll update with recipes for these cookies tomorrow, if Santa likes them!
Love!
Seasons Greetings, Merry Christmas, and Happy Holidays!
Your Friends,
~The Hensons
PINEAPPLE CAKE

PINEAPPLE CAKE
. . . with cream cheese icing!
Ingredients
CAKE:
2 c all purpose flour
2 c sugar
2 eggs
1 tsp baking soda
1 tsp vanilla
pinch salt
1 – 20 oz can of crushed pineapple in heavy syrup ( undrained )
CREAM CHEESE ICING:
1 stick butter
1 – 8 oz cream cheese, softened
1 tsp vanilla
1 1/2 c confectioners’ sugar
1 .
Preheat oven to 350 degree F.
Mix cake ingredients in a bowl with a fork. Pour into a greased 9X13 inch glass pan and bake at 350 for 35 minutes (until top is golden brown).
2.
Icing: Beat butter, cream cheese and vanilla together until creamy. Gradually mix in powdered sugar.
3.
Frost cake with cream cheese icing while still warm. Sprinkle with chopped nuts if desired. (Shown with pecan pieces! Yum!)
4.
Enjoy!

Your Friend,
~Amber Hamilton Henson
PS
This post will link with other blogs:

RUSSIAN TEA CAKES

RUSSIAN TEA CAKES
(jelly filled shortbread cookies)
INGREDIENTS:
cookies: 1 cup salted butter
1/2 cup confectioners’ (powdered) sugar
2 tsp. pure vanilla extract
2 cups all-purpose flour
1/4 tsp. salt
toppings:
1/2 cup fruit preserves/jam/jelly*
1/4 cup confectioners’ sugar
Yield: 2 dozen
DIRECTIONS:
1.
preheat oven to 325 degrees F
2.
in large bowl cream butter and sugar using an electric mixer. add vanilla, scraping down bowl as needed. blend in flour and salt, mixing until thoroughly combined.
3.
roll tablespoonfuls of dough into small balls about 1 in. in diameter. place dough balls on lightly greased cookie sheets about 1 in. apart. press down the center of each ball with a spoon, forming a depression. fill each with a tsp. of preserves or nuts.
4.
bake 15-20 min. or until golden brown. transfer cookies immediately to a cool, flat surface. when cookies are completely cool, dust them lightly with confectioners’ sugar.
*in the photo, you’ll see I used strawberry preserves, fig preseves, and black raspberry-jalapeno jam for variety!
~Amber D. Hamilton Henson

PS: Linking
ArkansasWomenBloggers’ sunday-link-up
GAMEDAY EDAMAME

GAMEDAY EDAMAME
a.k.a. Spiced, Roasted Soybeans
In honor of Arkansas’s Soybean Month, how about a soybean recipe? We use soy products in a variety of ways throughout the year, but this time of year perhaps it makes sense to share one of our favorite SEC football gameday snacks: “Spiced, Roasted Soybeans! GAMEDAY EDAMAME!!”
Yep, like all of y’all, I serve wings, little sandwiches, chips & dips, and more as snack foods for the hubby while he watches football throughout the season, and I also serve spiced edamame. There are a variety of ways to season soybeans (a.k.a. Edamame) when roasting. Garlic and parmesan is pretty popular and so is this 6 season blend. My husband, Mitch, and our daughters LOVE the spiced, roasted Edamame! Here’s how I served it, today, during the Arkansas/Ole Miss game:
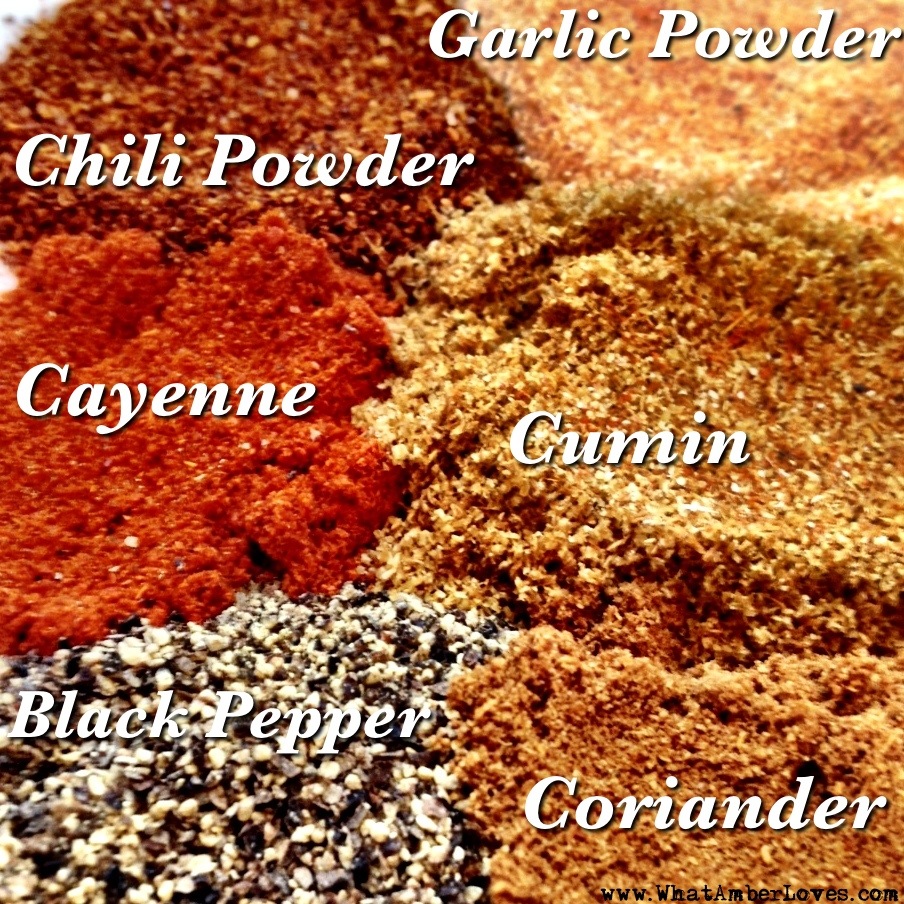
INGREDIENTS:
14 oz bag frozen, shelled soybeans
(a.k.a. EDAMAME)
3 Tablespoons VEGETABLE OIL (soybean oil)
1/2 teaspoon BLACK PEPPER
1/4 teaspoon CAYENNE PEPPER
1/2 teaspoon CHILI POWDER
1/2 teaspoon GROUND CORIANDER
1/2 teaspoon GROUND CUMIN
1/2 teaspoon GARLIC POWDER
1) Preheat oven to 375 degrees F (190 degrees C).
2)Place the thawed edamame into a mixing bowl, drizzle with the oil and salt to taste, then sprinkle with spices. Toss until the edamame are evenly coated with the oil and spices. Spread into a 9×13 inch glass baking dish or on a baking sheet with silicon mat (as I do) in a single layer.
3)Bake uncovered in the preheated oven until the beans begin to brown, 12 to 15 minutes. Stir once halfway through cooking. Enjoy!
(Click on photos to enlarge.)


It’s always fun to serve with a bit of pizzazz! These little pepper shaped dishes sure are fun and indicative of the heat from these spiced soybeans! Cute, right? 🙂
Laters!
Your Friend,
~Amber Hamilton Henson
PS
For more information about Arkansas Soybeans, recipes, and more visit TheMiracleBean.com and Arkansas Soybean Promotion Board on Facebook!
This blog post will link with other blogs party link-ups; links will be updated as this post links:
Arkansas Women Bloggers’ Sunday Link-up
iShouldBeMoppingTheFloor’s “Inspiration Monday Link Party”
This post is also published in the internationally distributed HAT TRICK MAGAZINE. To read the online version of the magazine, please click on the magazine cover below this text.(pg. 100)

Arkansas State Fair 2013
We went to the Arkansas State Fair and had a great time!
Rides, Food, Games, Animals, Crafts!
It was fun!
Our daughters had a GREAT time!
Speaking of our girls, they’re really excited about the bright, fuzzy hat/scarf/mittens with ears that they bought!


Did you visit the Arkansas State Fair this year? What was your favorite part of the fair?

Your Friend,
~Amber Hamilton Henson
This post will link with Arkansas Women Bloggers; visit here:
ArkansasWomenBloggers’ Sunday Link Up
Spiced Pumpkin Bread
Spiced Pumpkin Bread
Easy, easy!
Preheat oven to 350 Fahrenheit.
Use an electric mixer when following this recipe, and you’ll have this Spiced Pumpkin Bread made quickly!
1/2 cup white sugar
1/2 cup brown sugar
1/2 cup vegetable oil or canola
Mix ^
3 eggs beaten
1 can pumpkin purée (15 oz.)
1/2 Tbsp. cinnamon
1/2 Tbsp. nutmeg
1/2 tsp. baking powder
1/2 tsp. baking soda
1/4 tsp. salt
Mix ^
1 & 1/2 cups all purpose flour
Mix ^
Pour evenly into two greased and floured 9″ x 5″ loaf pans.
Bake at 350 Fahrenheit for 30 minutes!
Yields two small, moist, yummy loaves! Enjoy!

Your Friend,
~Amber Hamilton Henson
PS
This recipe will link with other blogs!
You’re welcome to visit the blog party link ups:
NiftyThriftyThings’ Nifty Thrifty Sunday
ArkansasWomenBloggers’ Sunday Link Up
ImAddictedToRecipes’ Scrumptious Sunday Link Party
Green Tomatoes!
Frying Green Tomatoes, Tonight!
This week, temperatures are falling drastically here in Central Arkansas, zone 7. Chances are, if like me, you grew tomatoes this summer, you still have plenty of green, underripe tomatoes growing.
Do you leave the green tomatoes behind or pick them?
We pick them!! Fried green tomatoes are an autumn favorite of ours!
~Amber Hamilton Henson

(Check back later, this blog post is a work in progress, as I update with links to Bonnie Plants’ Mr. Stripey and Troybilt! …and maybe a few photos of the fried ‘maters! Yummmmmm!!”)

EASY RECIPE:
4-5 green tomatoes, med size, sliced 1/4 -1/2 inch thick
Mix 1/2 cup cornstarch, 1/2 cup flour, 1/2 Tbsp salt, 1/2 Tbsp pepper, 1 tsp cayenne.
Coat the tomatoes in the dry mix.
In small bowl whisk 1/2 cup buttermilk and 3 eggs.
Coat the tomatoes.
Fry until golden!
(Fry over Med-high heat. Must have high heat to prevent soggy batter! Light and Crispy is the goal!)
Season with sea salt as they cool on paper towels! 🙂 Enjoy!


*The tomatoes shown are Mr. Stripey heirloom tomatoes. I bought 3 small, starter Bonnie Plants this spring and have had GREAT results! We’ve had loads of orange to red tomatoes to enjoy all summer. It’s October 16th and the plants are still flowering and growing strongly! This is a really sweet variety of tomato. Temperatures are dropping rapidly in Arkansas this week, so I wasn’t sure these last of the season would reach ripeness before the cold sets in. They are PERFECT for frying green! With a well seasoned batter, these Mr. Stripey tomatoes offer just the right of tang when fried while they’re still a dense green! Read more about these tomatoes on Bonnie Plant’s site:
http://bonnieplants.com/products/vegetables/tomato-varieties/all-tomatoes/mr-stripey-heirloom-tomato
*The pruners shown are Troy Bilt professional bypass pruners. With sharp blades and comfortable no-slip grips, harvesting in my garden is FANTASTIC. Troy Bilt gardening tools are really well constructed. I highly recommend them! You can find this pair of pruners and more to buy directly from Troy Bilt on their site:
http://www.troybilt.com/equipment/troybilt/garden-tools
See you around the blogosphere!
Your Friend,
~Amber Hamilton Henson
PS. This blog post will continue to link with other blogs everyday this week! Visit the blog parties, via these links:
SavvySouthernStyle’s Wow Us Wednesday
HandyManCraftyWoman’s Wicked Awesome Wednesday
NiftyThriftyThings’ Nifty Thrifty Sunday
ArkansasWomenBloggers’ Sunday Link Up
ImAddictedToRecipes’ Scrumptious Sunday Link Party
ElizabethAndCo’s Be Inspired Link Party #92
ConfessionOfAPlateAddict’s The Scoop #89
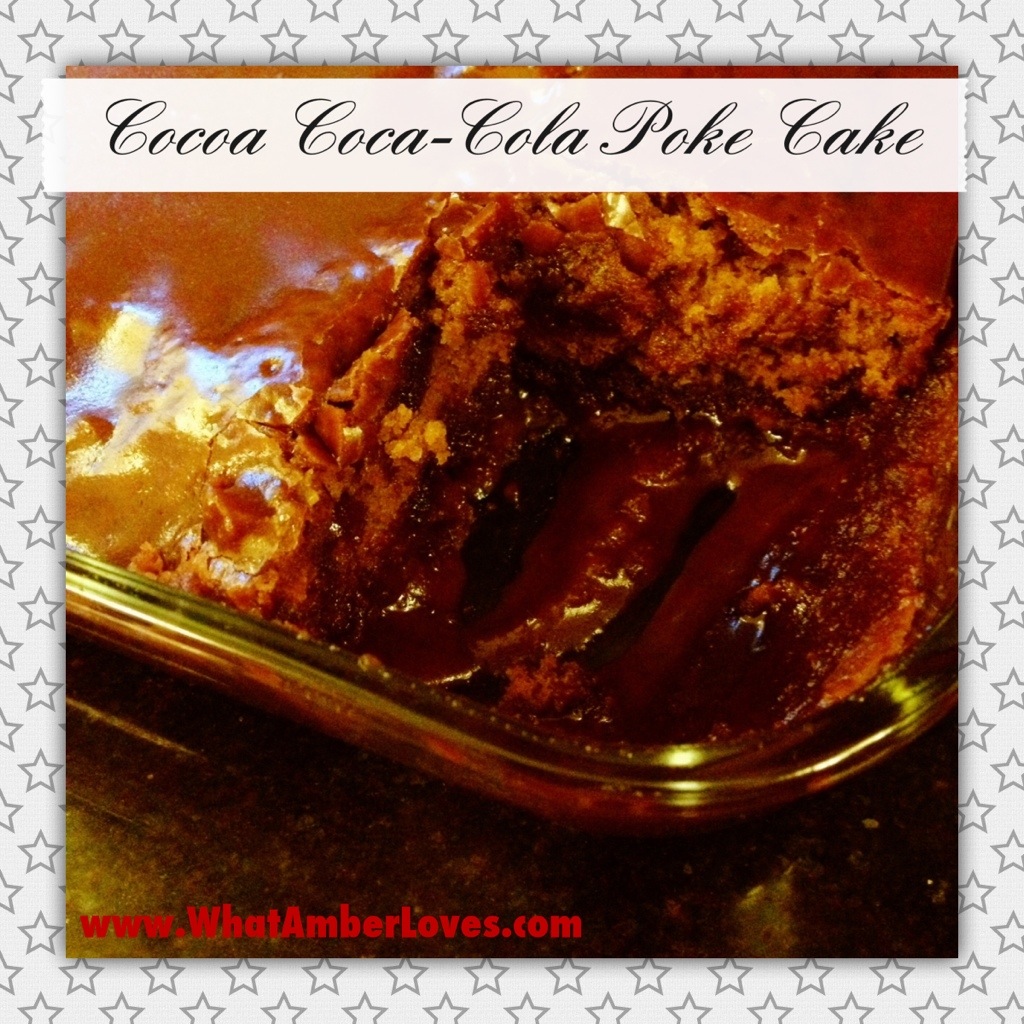
Cocoa CocaCola Poke Cake

If you have a sweet tooth, a craving for something REALLY sweet, this cake will hit the spot! It’s ooey, gooey, super sweet. A spongy cake with soft icing melted into the cake that almost crystallizes on top. Make it in a few easy steps:
– 1 stick (cup) of salted butter
– 1 cup of Coca-Cola
– 2.5 Tbsp Hershey’s cocoa
– 5oz. Marshmallows (for the brand I buy, it’s half a bag)
In saucepan, over medium heat, combine. Stir until marshmallows are melted, then pour into medium mixing bowl.
– 2 cups all purpose flour
– 2 cups sugar
In your mixing bowl, add in two cups of flour and two cups of sugar and mix thoroughly.
– 2 eggs
– 0.5 cup buttermilk
– 1 tsp. vanilla
– 1 tsp. baking soda
In a small bowl, whisk these ^4 ingredients^ together, then slowly add into your mixing bowl, incorporating thoroughly.
This is your cake batter. It’s thin, but bakes up wonderfully!
Use a greased 9″ x 12″ glass baking dish.
Bake at 350 Fahrenheit for 30 minutes.
While its baking, make the icing. It’s easy!
– 1 stick butter
– 3 Tbsp cocoa
– 12 Tbsp CocaCola
– 2 lbs of confectioners powdered sugar
Melt your butter over low heat, add cocoa, whisk. Add CocaCola; Whisk. Slowly add the confectioners sugar, whisking constantly.
When your cake comes out of the oven, immediately poke holes in the cake with a fork, and pour icing. Allow to sit for 1-2 hours before serving.


Your Friend,
~Amber Hamilton Henson
This post is also published in the internationally distributed HAT TRICK MAGAZINE. To read the online version of the magazine, please click on the magazine cover below this text.

Third BELT Chair
I made another BELT CHAIR! This is actually my third. We already have a full size belt chair and an elementary size belt chair that I made last year, and now we have a new toddler size chair for our youngest daughter (age 2).
The process of putting it together was really simple. First, using a knife, I cut away the old, broken, woven rush seat, and I cleaned the chair with an abrasive, soapy sponge. Then, I just wove the belts onto the chair, doing all of the side-to-side belts first and buckling them on the underside of the seat. For the front-to-back direction, I alternated going over or under the side-to-side belts. I used a hole punch tool in order to get the belts to buckle at the proper (smaller) size on the underside of the woven seat. Last, in order to keep the “tails” of the belts from hanging down, just use a zip-tie to hold them in place!
Easy Process:
1) Clean.
2) Weave.
3) Punch holes.
4) Buckle.
5) Zip tie.
6) Sit.

(Click on photos to enlarge.)

(Click on photos to enlarge.)

(Click on photos to enlarge.)
Isn’t our youngest daughter cute? 🙂 Bare feet, cookie crumbs, and wiggling around while I try to take a picture…such is the way with a two year old! I love, love, love her! 🙂
Want to see the other two bigger, more detailed belt chairs I’ve made,? Click here.
I love repurposing items in unusual ways!! You?
Laters!
Your Friend,
~Amber Hamilton Henson
This belt chair post will link to the best blog parties!
The link parties:
TheBrambleberryCottage’s Time Travel Thursday #169
StoneGable’s Tutorials, Tips, & Tidbits Thursday #68
iGottaCreate’s Wildly Original Link Party
ArkansasWomenBloggers’ Sunday Link Up


