Blog Archives

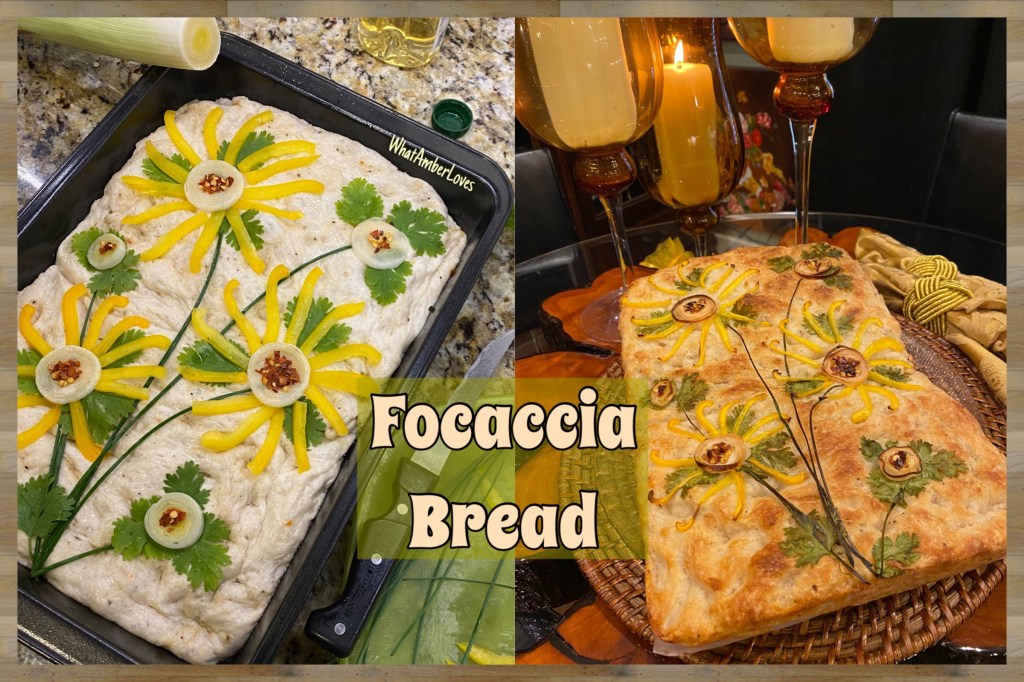
Focaccia Bread! Happy Harvest Day!
🌾🌻🌾 Lammas. 🌻🌾🌻 Give Thanks.
Harvest Day. 🌾🌻🌾 Loaf Mass. 🌻🌾🌻

Focaccia Bread! So fun and easy to make and decorate! First, let’s look at the ingredients and instructions. Then, if you want, you’ll find lots of step by step photos to peruse to keep you on track. This is an easy recipe to follow that is pretty foolproof and flexible. While there are times of rest and time of baking, overall you’re only “hands on” for about 15 minutes in the whole process.
INGREDIENTS:
• 4 cups all-purpose flour
• 1 packet of dry Italian dressing seasoning blend
• 2¼ teaspoons instant yeast (1 packet)
• 2 cups warm tap water
• 4 tablespoons olive oil divided
*Optional toppings/decorations*
INSTRUCTIONS:
Prepare the Dough:
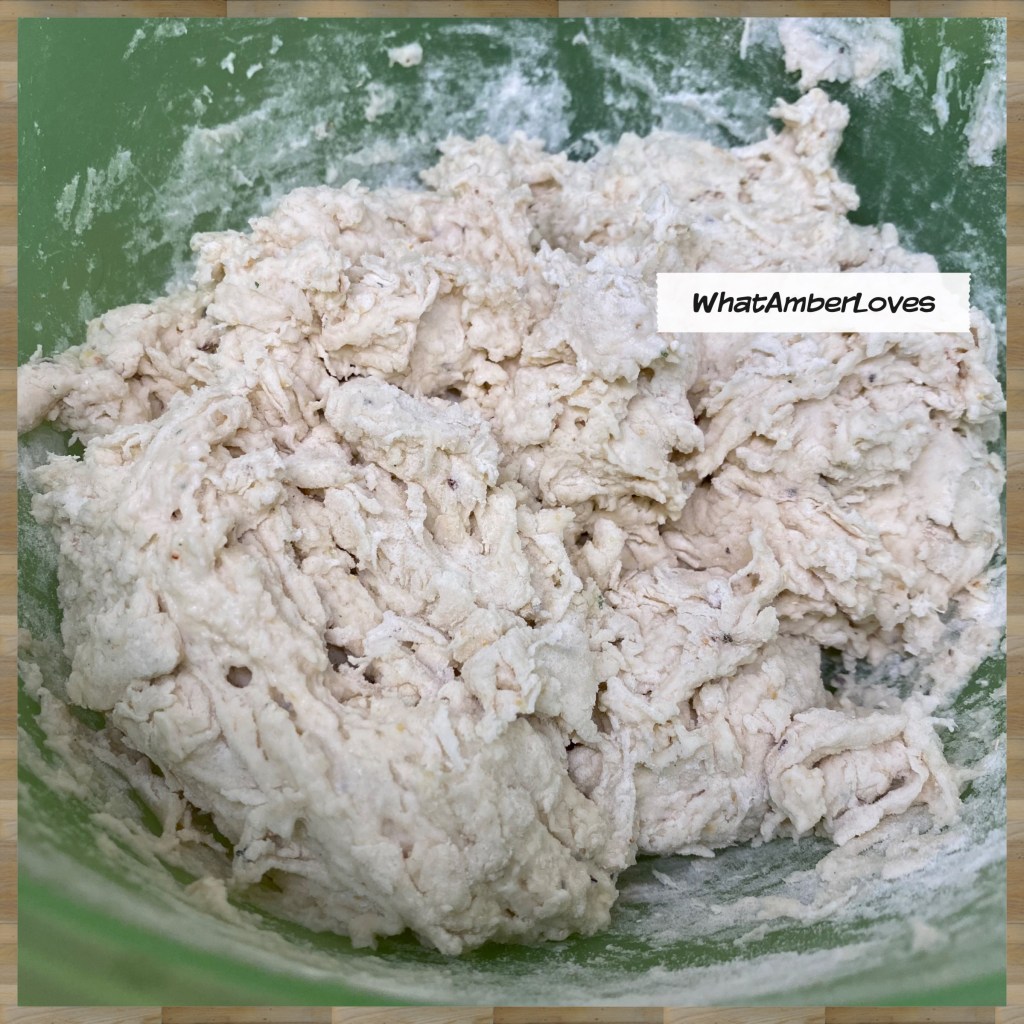
1. In a medium-large bowl, combine flour, packet of dry dressing seasoning, and INSTANT yeast. (This is different yeast than most commonly seen varieties of quick yeast.) Stir well. Add the warm water. Using a sturdy wooden spoon, mix until all of the flour is well incorporated (there should be no small pockets of flour.) Cover the bowl with a lid and refrigerate for at least 8 hours and up to 24 hours.
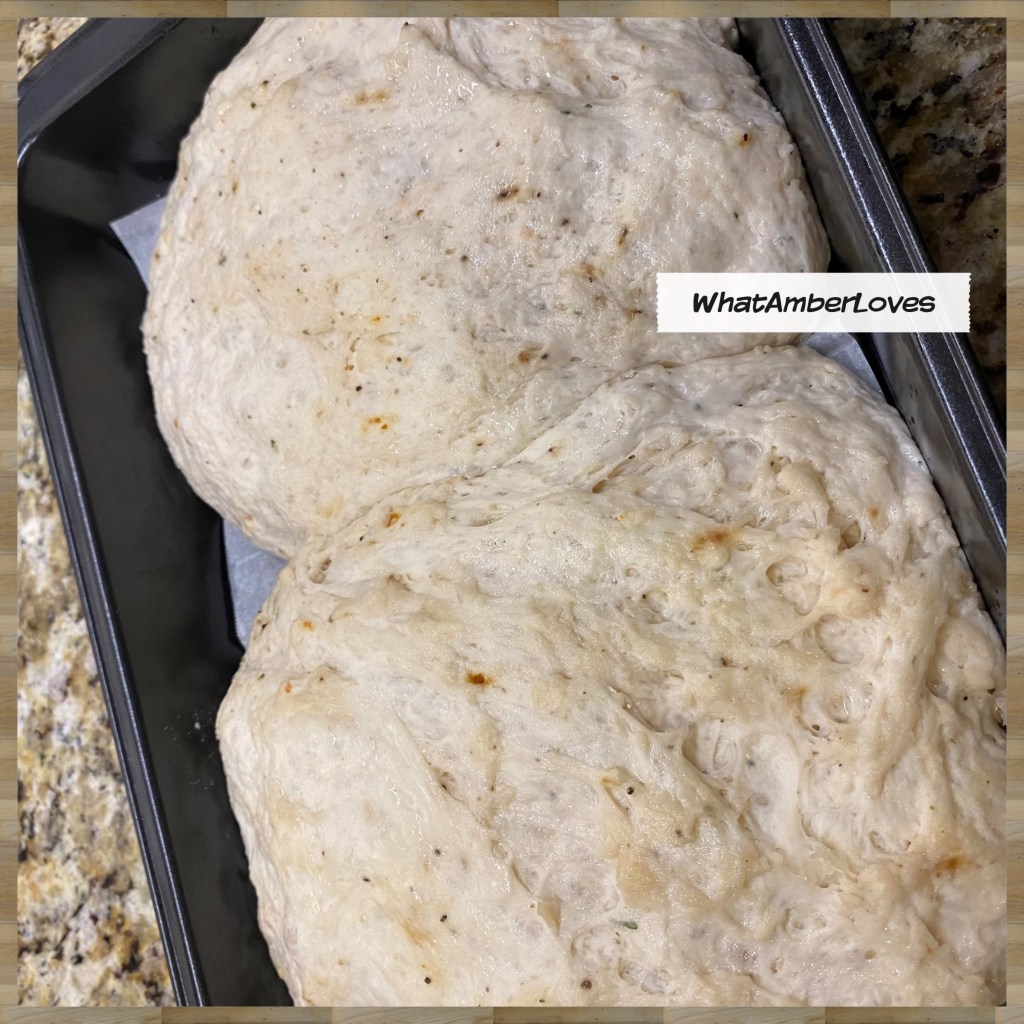
2. Line pan(s) with parchment paper. Pour one tablespoon of olive oil into the center of a metal 9”x12” pan, or smaller pans. Divide dough in half with a large spoon or rubber spatula and place dough in pan, turning to coat with oil. Tuck edges of dough underneath to form a couple of rough balls.
3. Cover each pan and allow the dough balls to rise for 2 hours (it may take as long as 3 hours, depending on the warmth of your kitchen). The dough should cover most of the pan.
Decorate & Bake:
1. Preheat oven to 425˚F with a rack positioned in the center of the oven.
2. Drizzle another tablespoon of oil over each round of dough. With oiled fingers, using only fingertips press gently stretch the dough, if needed, to allow the dough to fill the pan. Also, press a few dimples in thick areas of dough if needed.
3. Sprinkle the top with seasoning and flaky sea salt.
4. Optional: Decorate with thin slices of veg and herbs. (Really thin slices work best to avoid affecting the integrity of the bread during and after baking.) I like using all sorts of things that vary according the design I want to achieve: chives, parsley, cilantro, oregano, bell pepper, tomatoes, green onion, leek, black olives, etc
5. Transfer the pans to the preheated oven. Bake for 20 to 25 minutes, until the tops are golden and the undersides are crisp. Remove pans from the oven.
6. The parchment paper allows you to easily lift the loaves from pan. Serve warm or allow to cool completely then store in a zippered bag.
🌾🌻🌾🌻🌾


Happy Harvest Day!
This is such a fun, easy bread to make any day of the year. You can artfully decorate the focaccia bread to fit any season or holiday. Sunflowers just seemed fun to me today in acknowledgment of First Harvest Holiday commonly known as Lammas or Loaf Mass.
I am grateful for the bounty of the season!
Your Friend, —AmberHH

ProjectSTIR
#PhotoChallenge #October #2015
#ProjectSTIR
Use your social media to share your family’s cooking traditions!
Details about the project, prizes, and so forth can be found by clicking here –> http://www.sarahshotts.com/projectstir/
In addition to posting my photos on my personal fb page, IG account and Pinterest, I’ll update this blog daily to add new photos to THIS post!
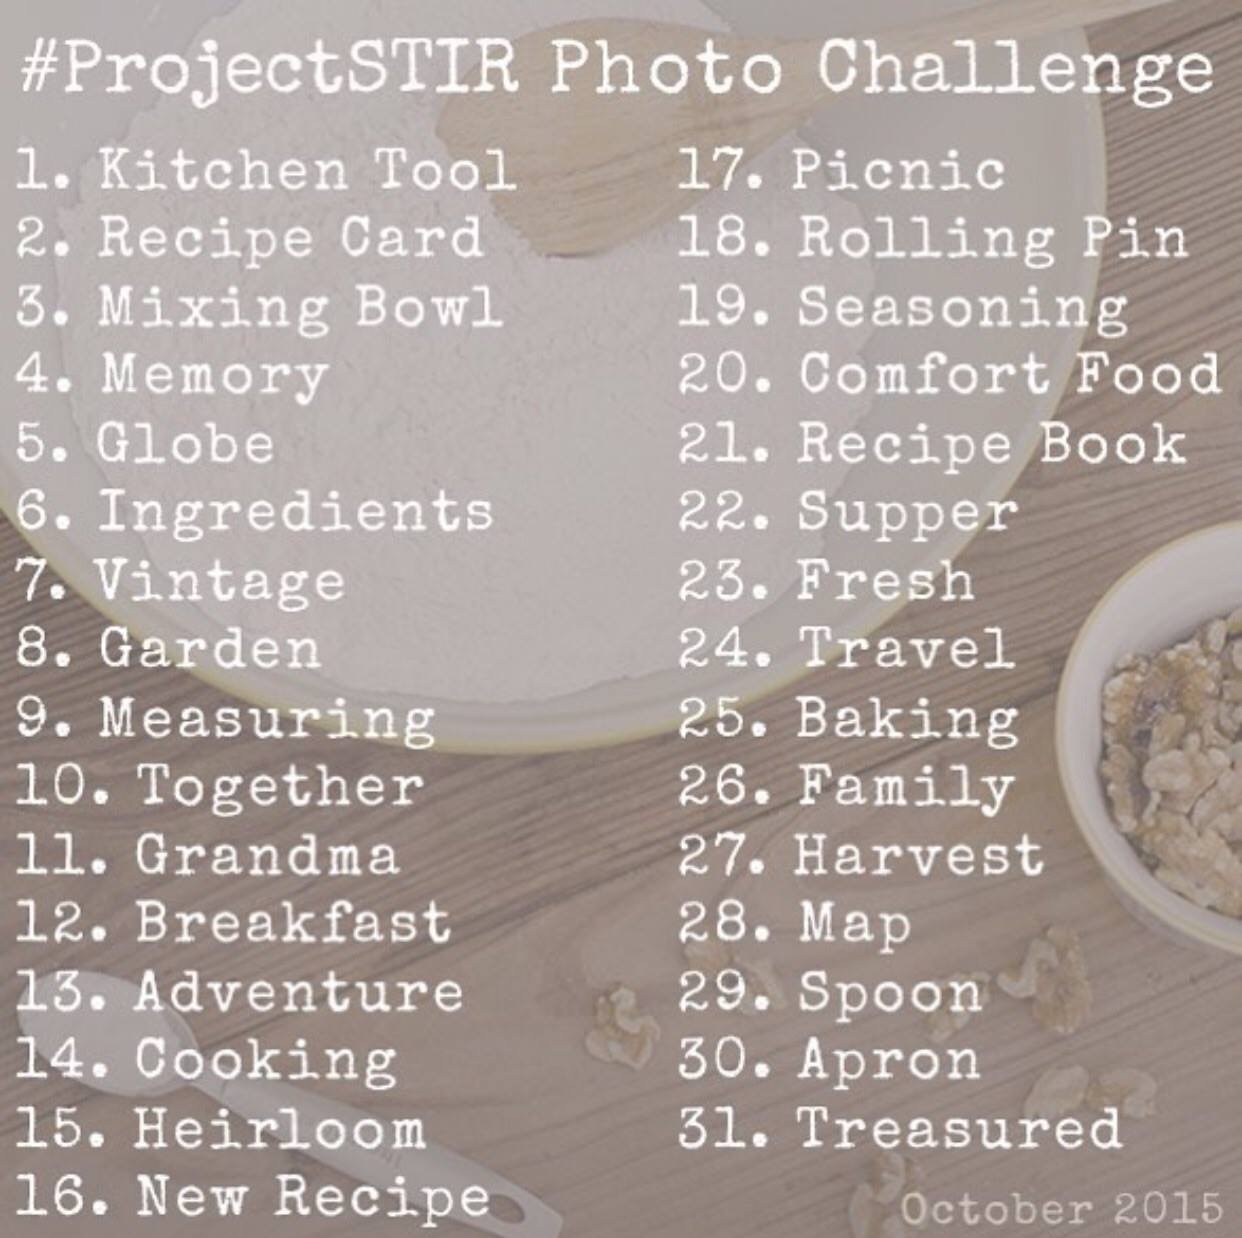
Day 1: kitchen tool
(Yes! I have a kitchen utensil or two! Here is one of many drawers that house my kitchen utensils.)

Day 2: recipe card
(Yes! I have LOTS of cards. My favorites: those that family members have filled out for me and my extensive collection of cards that I used to pick up for free in the @WalMart produce section years ago. I have like 100 of them in this square basket. It’s not hard to tell that I’m born and raised in Arkansas!)

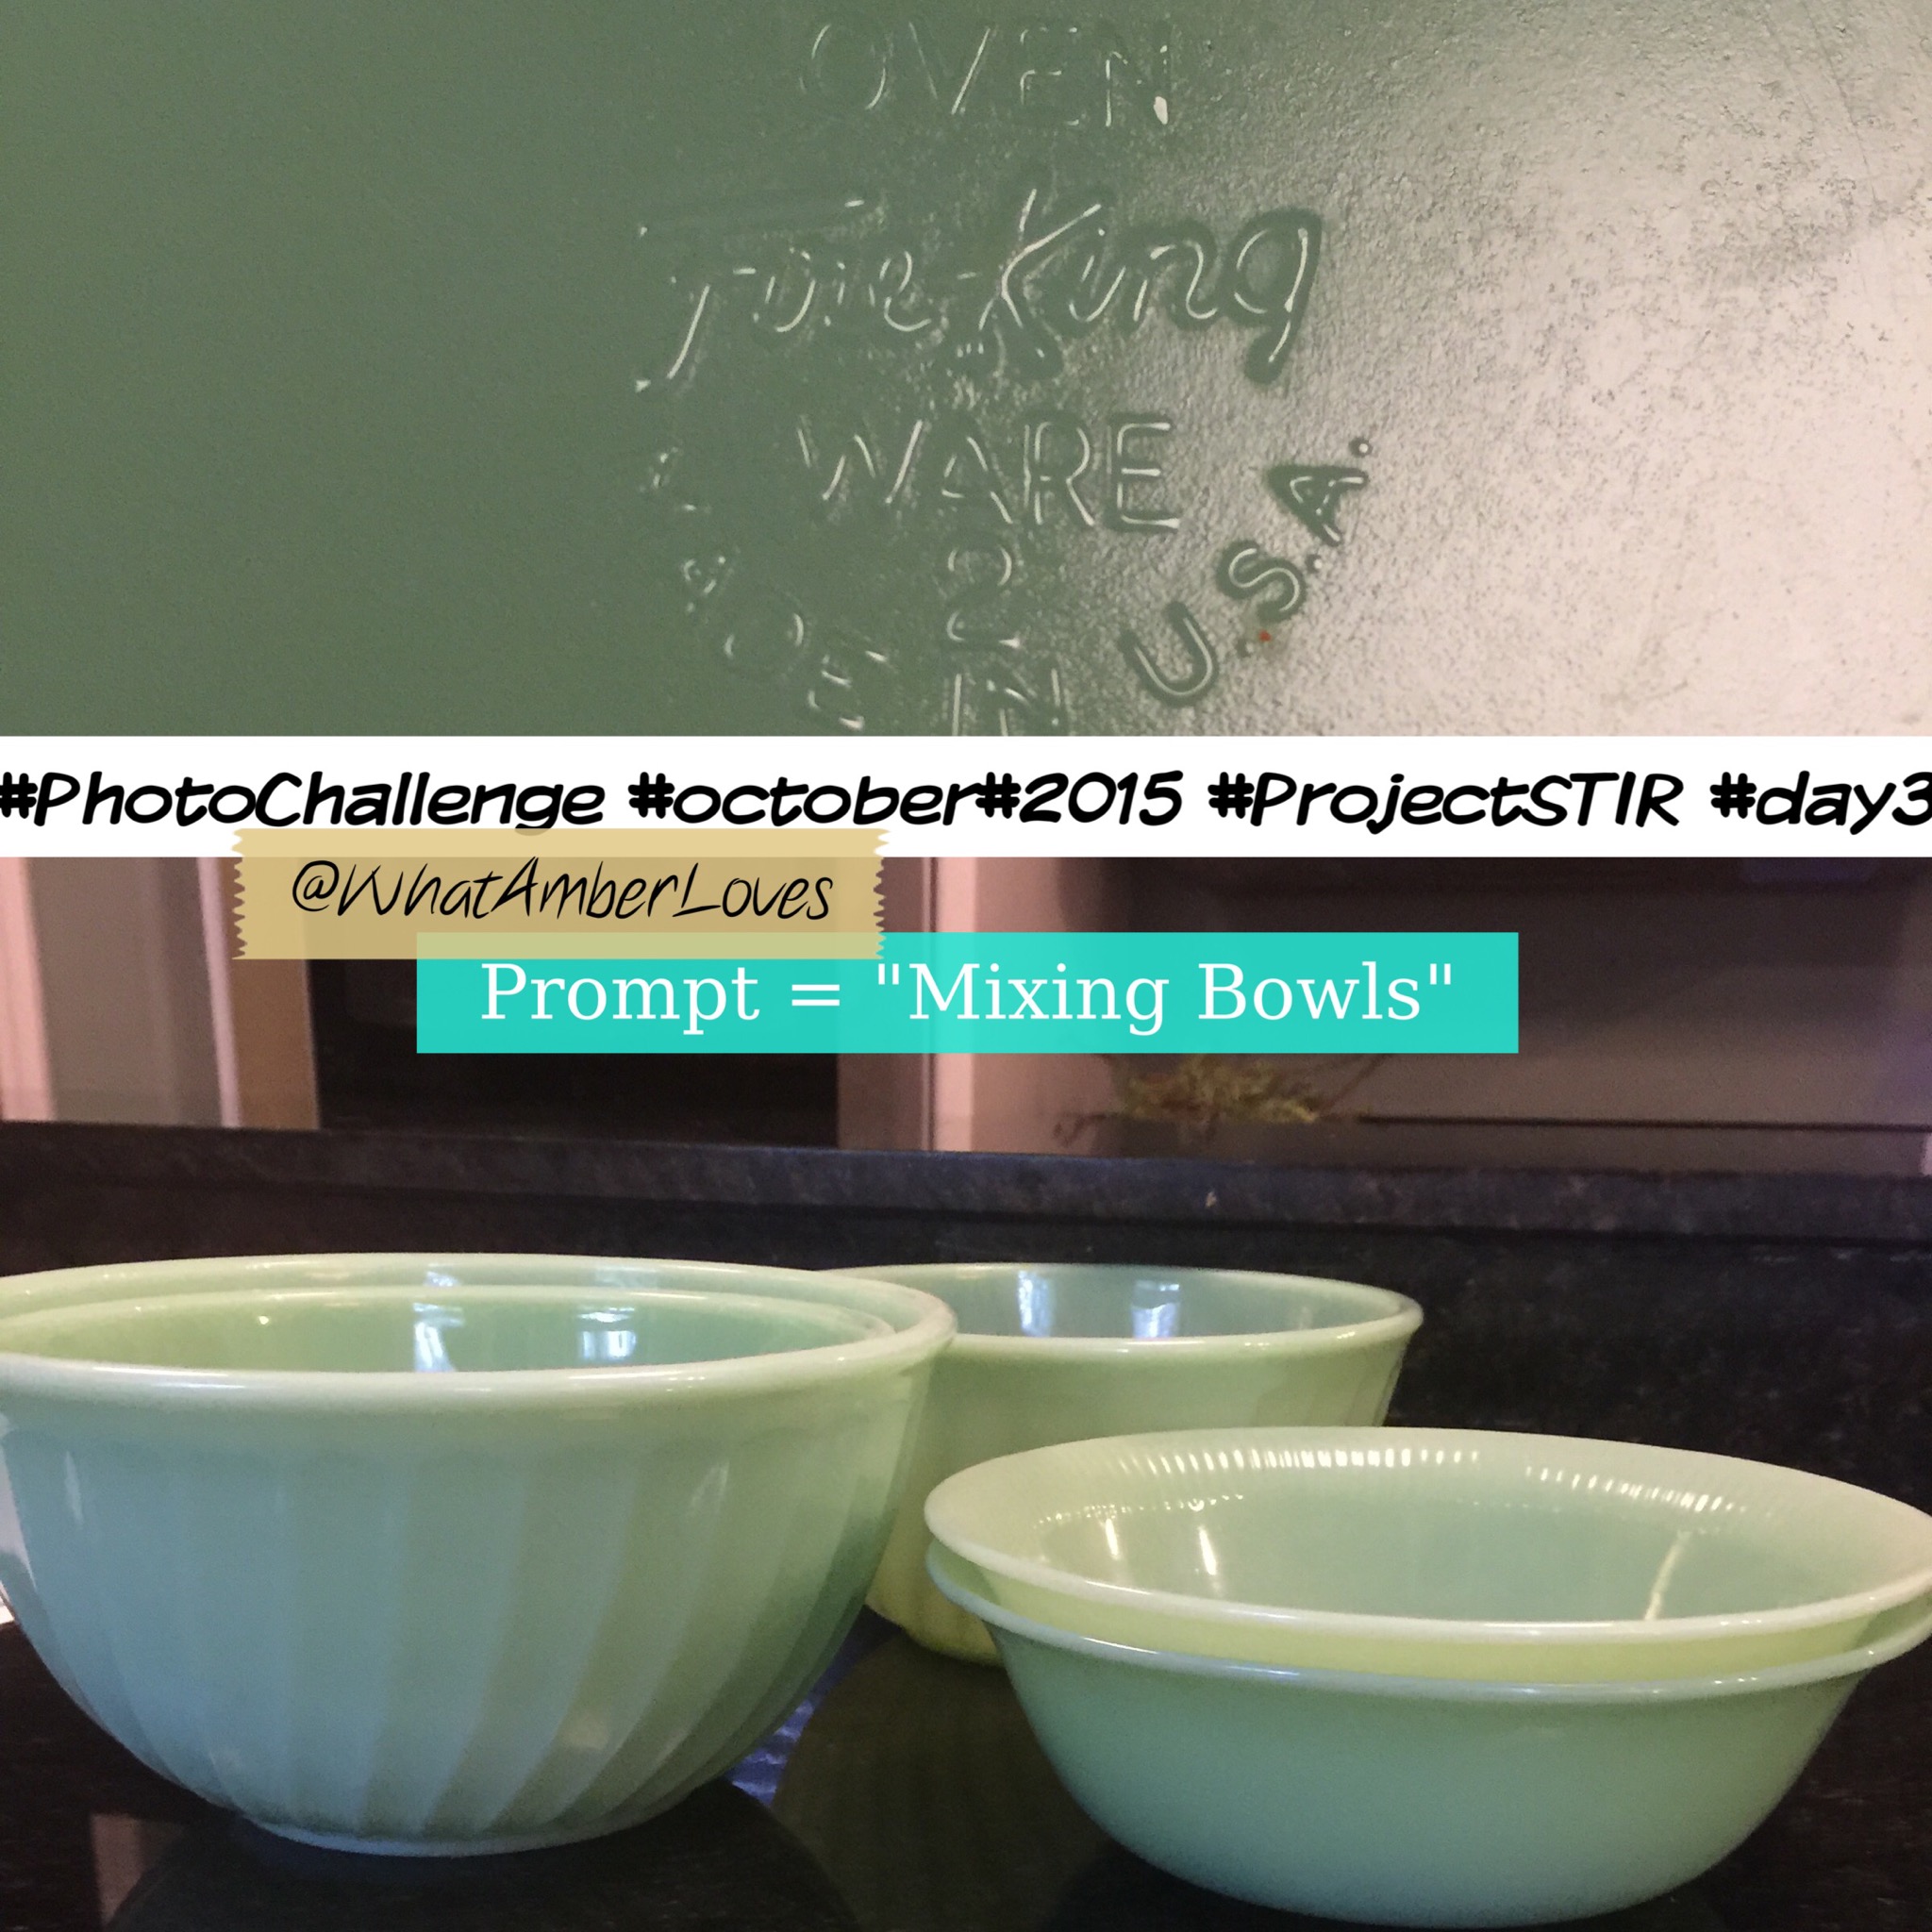
Day 3: Mixing Bowl.
FireKing Jadeite. I don’t have a complete collection. My first one was passed to me from my great grandmother via my Gram. I’ve purchased several at antique stores to accompany it. I use them all the time. They’re the best for cheese dip. They’re fabulous to serve salad. They’re my “go to” mixing bowls.
Day 4: Memory
I remember my great grandparents (my dad’s mother’s parents.) I have vivid memories of sitting at their kitchen table drinking a malt, picking up pecans in their backyard, and so many more. They were amazing. These are photos of them as I remember them, one of her recipe books that my grandmother has trusted me to care for and pass to future generations, and a glass juicer from their kitchen. You can read quite a bit about the amazing life of my great-grandfather, Bill Seiz, at: http://www.encyclopediaofarkansas.net/encyclopedia/entry-detail.aspx?search=1&entryID=2719

Day5: Globe
💞🌍🌏🌎🇦🇺🇧🇪🇺🇸🇹🇷🌎🌏🌍💞
I have 100 or so #cookbooks. Here are a handful of favorites representing various cuisine. Chinese, Spanish, Italian, American (specifically, Southern,) English. 😊

Day 6: Ingredients
🌿🍐
I like using seasonal ingredients and prefer to include at least one ingredient a day from my garden.
Today, I made scones using Rosemary, Pear, Asiago cheese, and Eggnog! They turned out great! The Rosemary is from my 15 foot long, evergreen Rosemary Hedge! Love it!
Get my recipe for these scones, here: https://whatamberloves.com/2015/10/07/scones/
Read more about my love and uses for Rosemary on another post:

Sriracha Brussel Sprouts!

So, I found this amazing recipe. Rather, it’s creator found this blog via WordPress. I, then, found the Nerdsteak.com site and this recipe for Sriracha Brussel Sprouts. Readers, I don’t know if you know or not, but WordPress is its own neat community these days! When I first started blogging a year and a half ago, I always felt like I was talking to myself, but finding other blogs to read and realizing that others find this blog is pretty cool, now!
As soon as I saw his recipe, I knew I had to make it! I couldn’t find the exact spice blend that he uses at my local grocery store (I’ll look into buying it online; it looks like a cool brand of spice products), so I used what we, in this house, refer to as “Rooster Sauce.” It is the Huy Fong Foods SRIRACHA. The results were incredible!! AND, it was super easy to make!!
Directions:
Cut Brussel sprouts into halves or quarters
Coat in olive oil, tossing in a bowl
Drizzle and coat in Sriracha in the same bowl (1/2 cup or so)
Spread onto baking sheet and add s&p, to taste
Bake at 350F for about 20 minutes
Stir in more Sriracha and coconut (1/2 cup or so) and almond slivers (1/2 cup)
Return to oven for an additional 5-8 minutes!
Sooooo good!
Pics: (click on photos to enlarge)


I served lamb meatballs with these Sriracha Brussel Sprouts tonight and LOVED it!
Thanks, Nerdsteak.com!
Your Friend,
~Amber Hamilton Henson

PS
This post will link! Please, visit the links at your leisure:
arkansaswomenbloggers’ sunday-link-up
Cinnamon Monkey Bread

Cinnamon Monkey Bread
Yum! For as long as I can remember, cinnamon Monkey Bread with a buttery, brown sugar glaze has always been served on Christmas morning.
As a newlywed, years ago, my grandmother and former stepmom each filled out a bunch of recipe cards with favorite family recipes. Knowing that I always loved Monkey Bread, and it was something they both made, the Monkey Bread recipe was included!
It is pretty easy to make, but makes a great presentation! I make it for our kids several times a year; it always a big hit with the girls in the morning after sleep-over parties! 🙂
To make the Monkey Bread:
1.
Start with 28-30 oz of canned biscuits
(I use a generic 4 pack of buttermilk biscuits that work great!)
Tear or cut each biscuit into 4 pieces and toss the pieces into a cinnamon/sugar mix a few pieces at time, tossing with your hands; I use a bowl with about 2 cups of sugar and 4 Tablespoons of cinnamon.
2.
Heavily coat the inside of a Bundt pan with Crisco. Loosely pile the coated pieces into the pan.
3.
In a saucepan, melt 1.5 sticks of butter and 1.5 cups of brown sugar. When it is bubbly and “fluffy”, pour over the coated biscuits in the bundt pan.
4.
Bake at 350F for 40 minutes, then immediately flip onto a plate when removed from oven.

Do you make Monkey Bread? Is your recipe similar? I’ve heard of people adding sweetened cream cheese into the Bundt with the biscuits, but I’ve not yet tried making it that way. If I do, I’ll let you know, but for now, this classic version works for us every time! My goal is to get more of my favorite recipes photographed and organized onto my recipes page slowly, but surely!
Your Friend,
~Amber Hamilton Henson
PS.
This post will link with other blogs and be updated with links to blog parties at the bottom of this post:
arkansaswomenbloggers sunday-link-up
Hershey’s Special Dark Tiger Cookies

Hershey’s Special Dark Tiger Cookies
Ingredients:
1.5 cups granulated sugar
0.5 cup vegetable oil
0.5 cup Hershey’s brand Special Dark cocoa or Hershey’s cocoa
3 eggs
1.5 teaspoons vanilla extract
1.75 cups all purpose flour
1.5 teaspoons baking powder
0.5 teaspoon salt
Powdered sugar
48 Hershey’s Kisses
1. Stir together granulated sugar and oil in large bowl; add cocoa, beating until well blended. Beat in eggs and vanilla. Stir together flour, baking powder, and salt; gradually add to cocoa mixture, beating well.
2. Cover; refrigerated until dough is firm enough to handle, at least 6 hours.
3. Heat oven to 350F. Grease cookie sheet. Shape dough into 1″ balls (dough will be sticky); roll in powdered sugar to coat. Place balls about 2″ apart on prepared (greased) cookie sheet.
4. Bake 11 to 13 minutes or until almost no indentation remains when touched lightly and tops are cracked. Immediately press chocolate Hershey’s kiss into the center of each cookie, if desired. Allow to cool completely before removing from baking sheet.
Enjoy! (yields about 4 dozen)

The backstory: I was recently asked where I get my recipes. Well, I am an avid cookbook collector and Pinterest user, as well as the granddaughter of two women that are both fabulous cooks, and in addition to this blog with a recipes page, I maintain my own handwritten “cookbook” notebook of recipes that I’ve modified and like. I usually try to include the source(s) of my recipes on this blog, unless it is something from my own notebook or shared from a relative. For the most part, I include a link or cite a specific cookbook if I follow a recipe precisely; all photos included with recipes are 100% mine and taken in my own kitchen, though. For example, this is a recipe that is a household favorite around here. It is from a HERSHEY’S 3-in-1 cookbook, and my 11 year old daughter made this batch of cookies! I have a few cookbooks specifically about cookies and baking. Do you have one that you recommend that I try? I’m always looking for the next tried, tested, and truly great cookbook! Here is a photo of a few cookie and baking cookbooks in my collection that I recommend!

When you view this post, specifically by clicking on the title of the post, at the bottom of the post, please find the Pinterest, Twitter, Facebook and other options to share these photos and link! Please, feel free to share! Thanks for the blog love!
Your Friend,
~Amber Hamilton Henson


