Blog Archives

My Kitchen Update!
So, our old kitchen wasn’t terrible.
However, it was tired.
It was outdated.
It had been working hard for ten years, and it showed.
The family that owned the house before us raised teenage sons in it for five years. We have been raising three young daughters here for five years. Countless meals, lots of large gatherings, and endless craft projects have taken place in this kitchen for over a decade.
The construction of the ivory painted wood cabinets was sturdy, but the finish was worn.
The granite and hardware just weren’t my style/preference.
It had never really been a “finished” kitchen, to my eye, because there wasn’t a proper backsplash, just painted sheetrock between the countertop and upper cabinets.
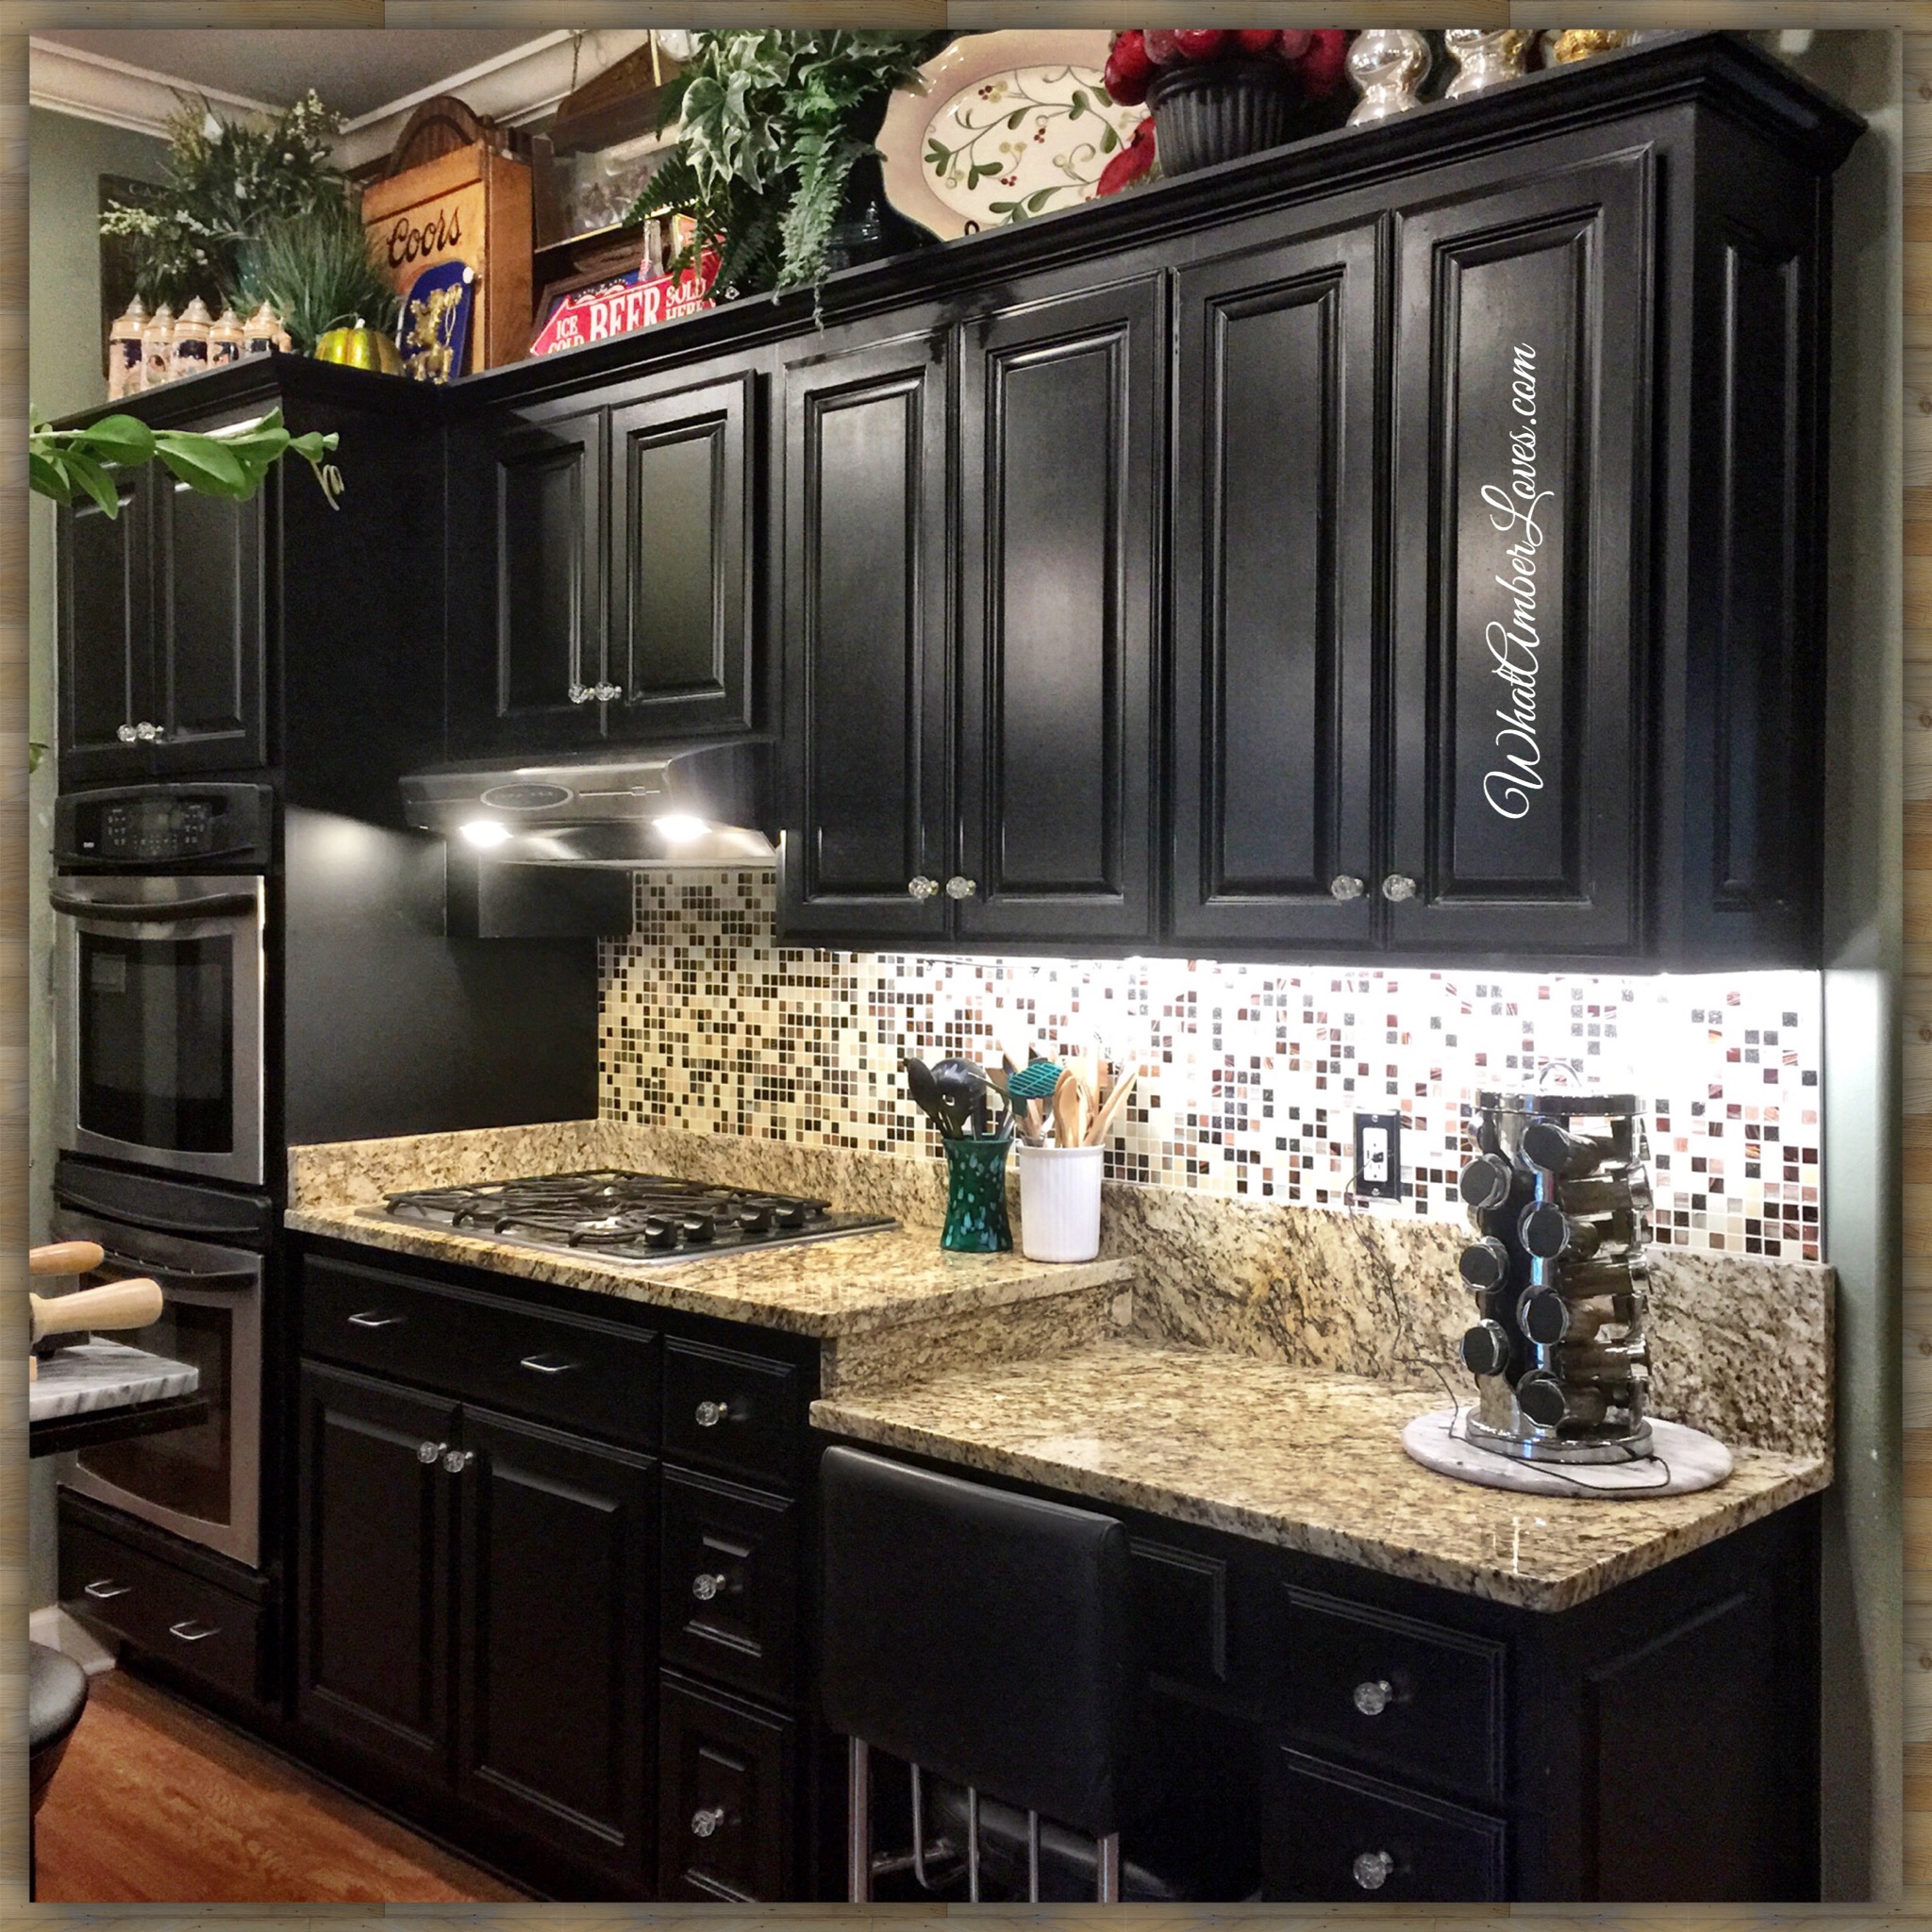
We updated it according to MY style, MY preferences!
Bonus: We did it without breaking the bank, and because this is an open-concept floor plan, the WHOLE house feels updated! Love it!!
Want to see LOTS of photos of my newly updated kitchen?
Do you like “before/after” photos as much as I do?
If so, here you go:
(Click on photo to have it enlarge into a new window.)


The detailed before/after photos:
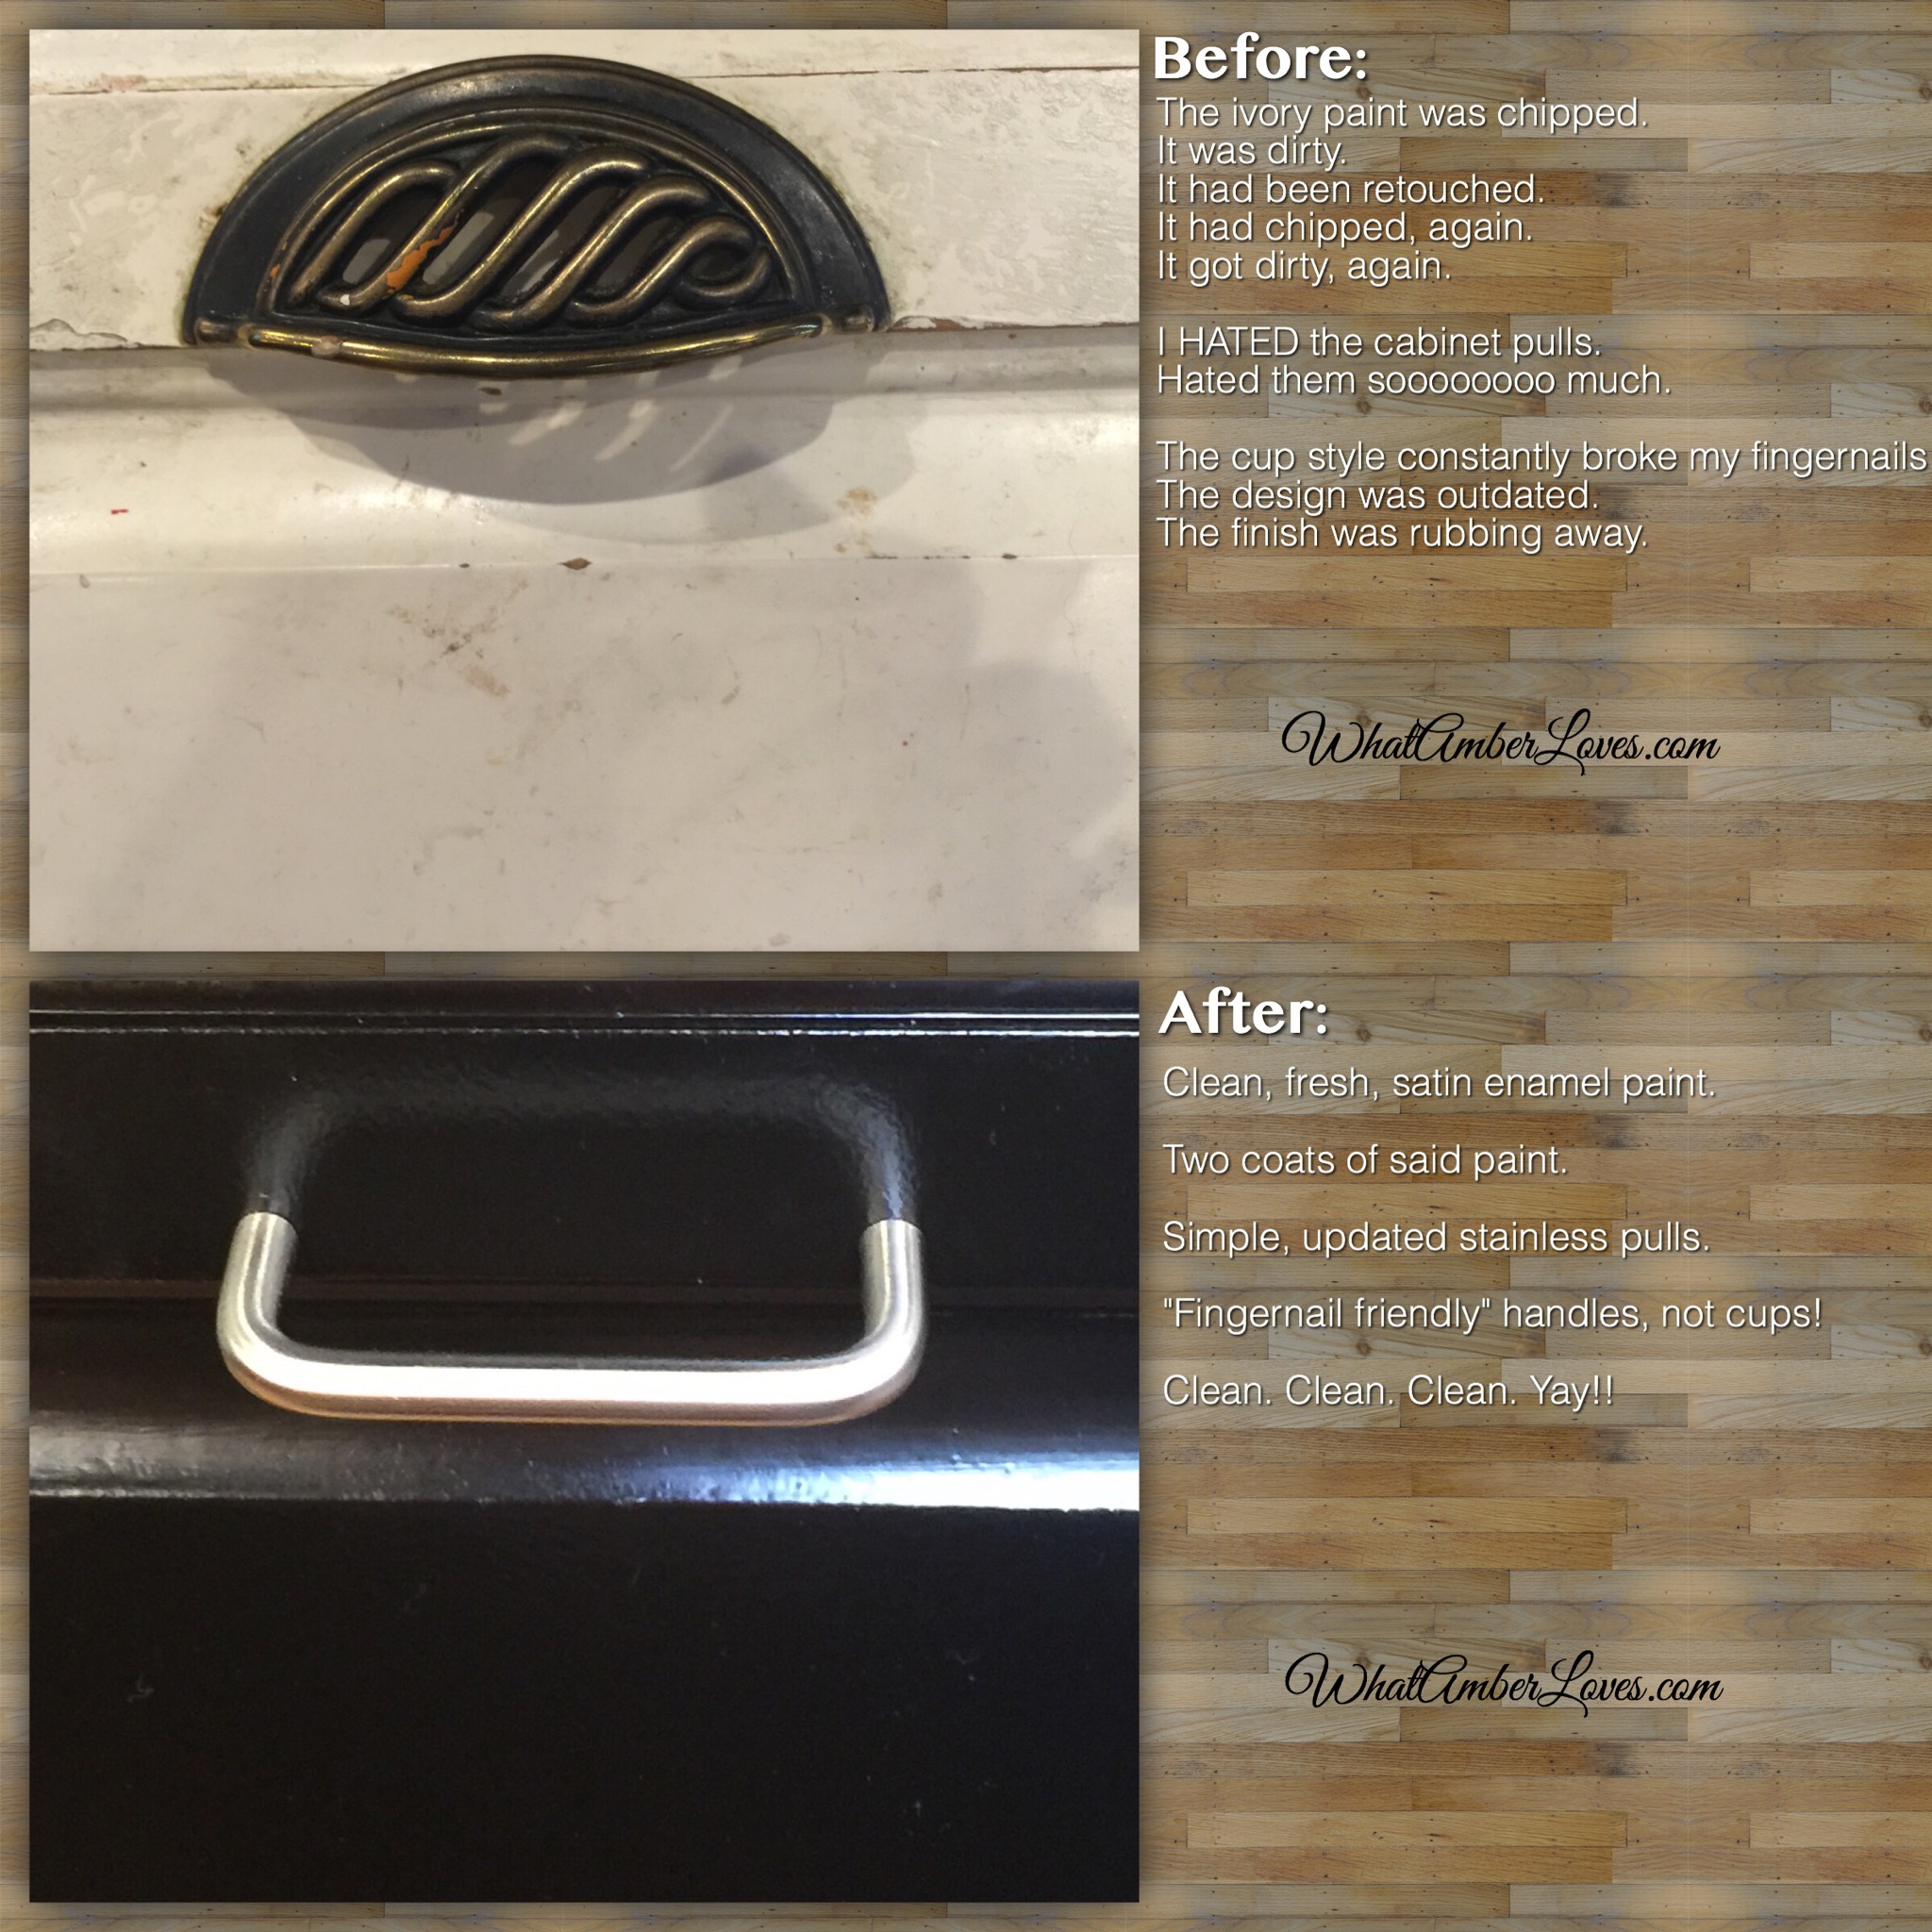
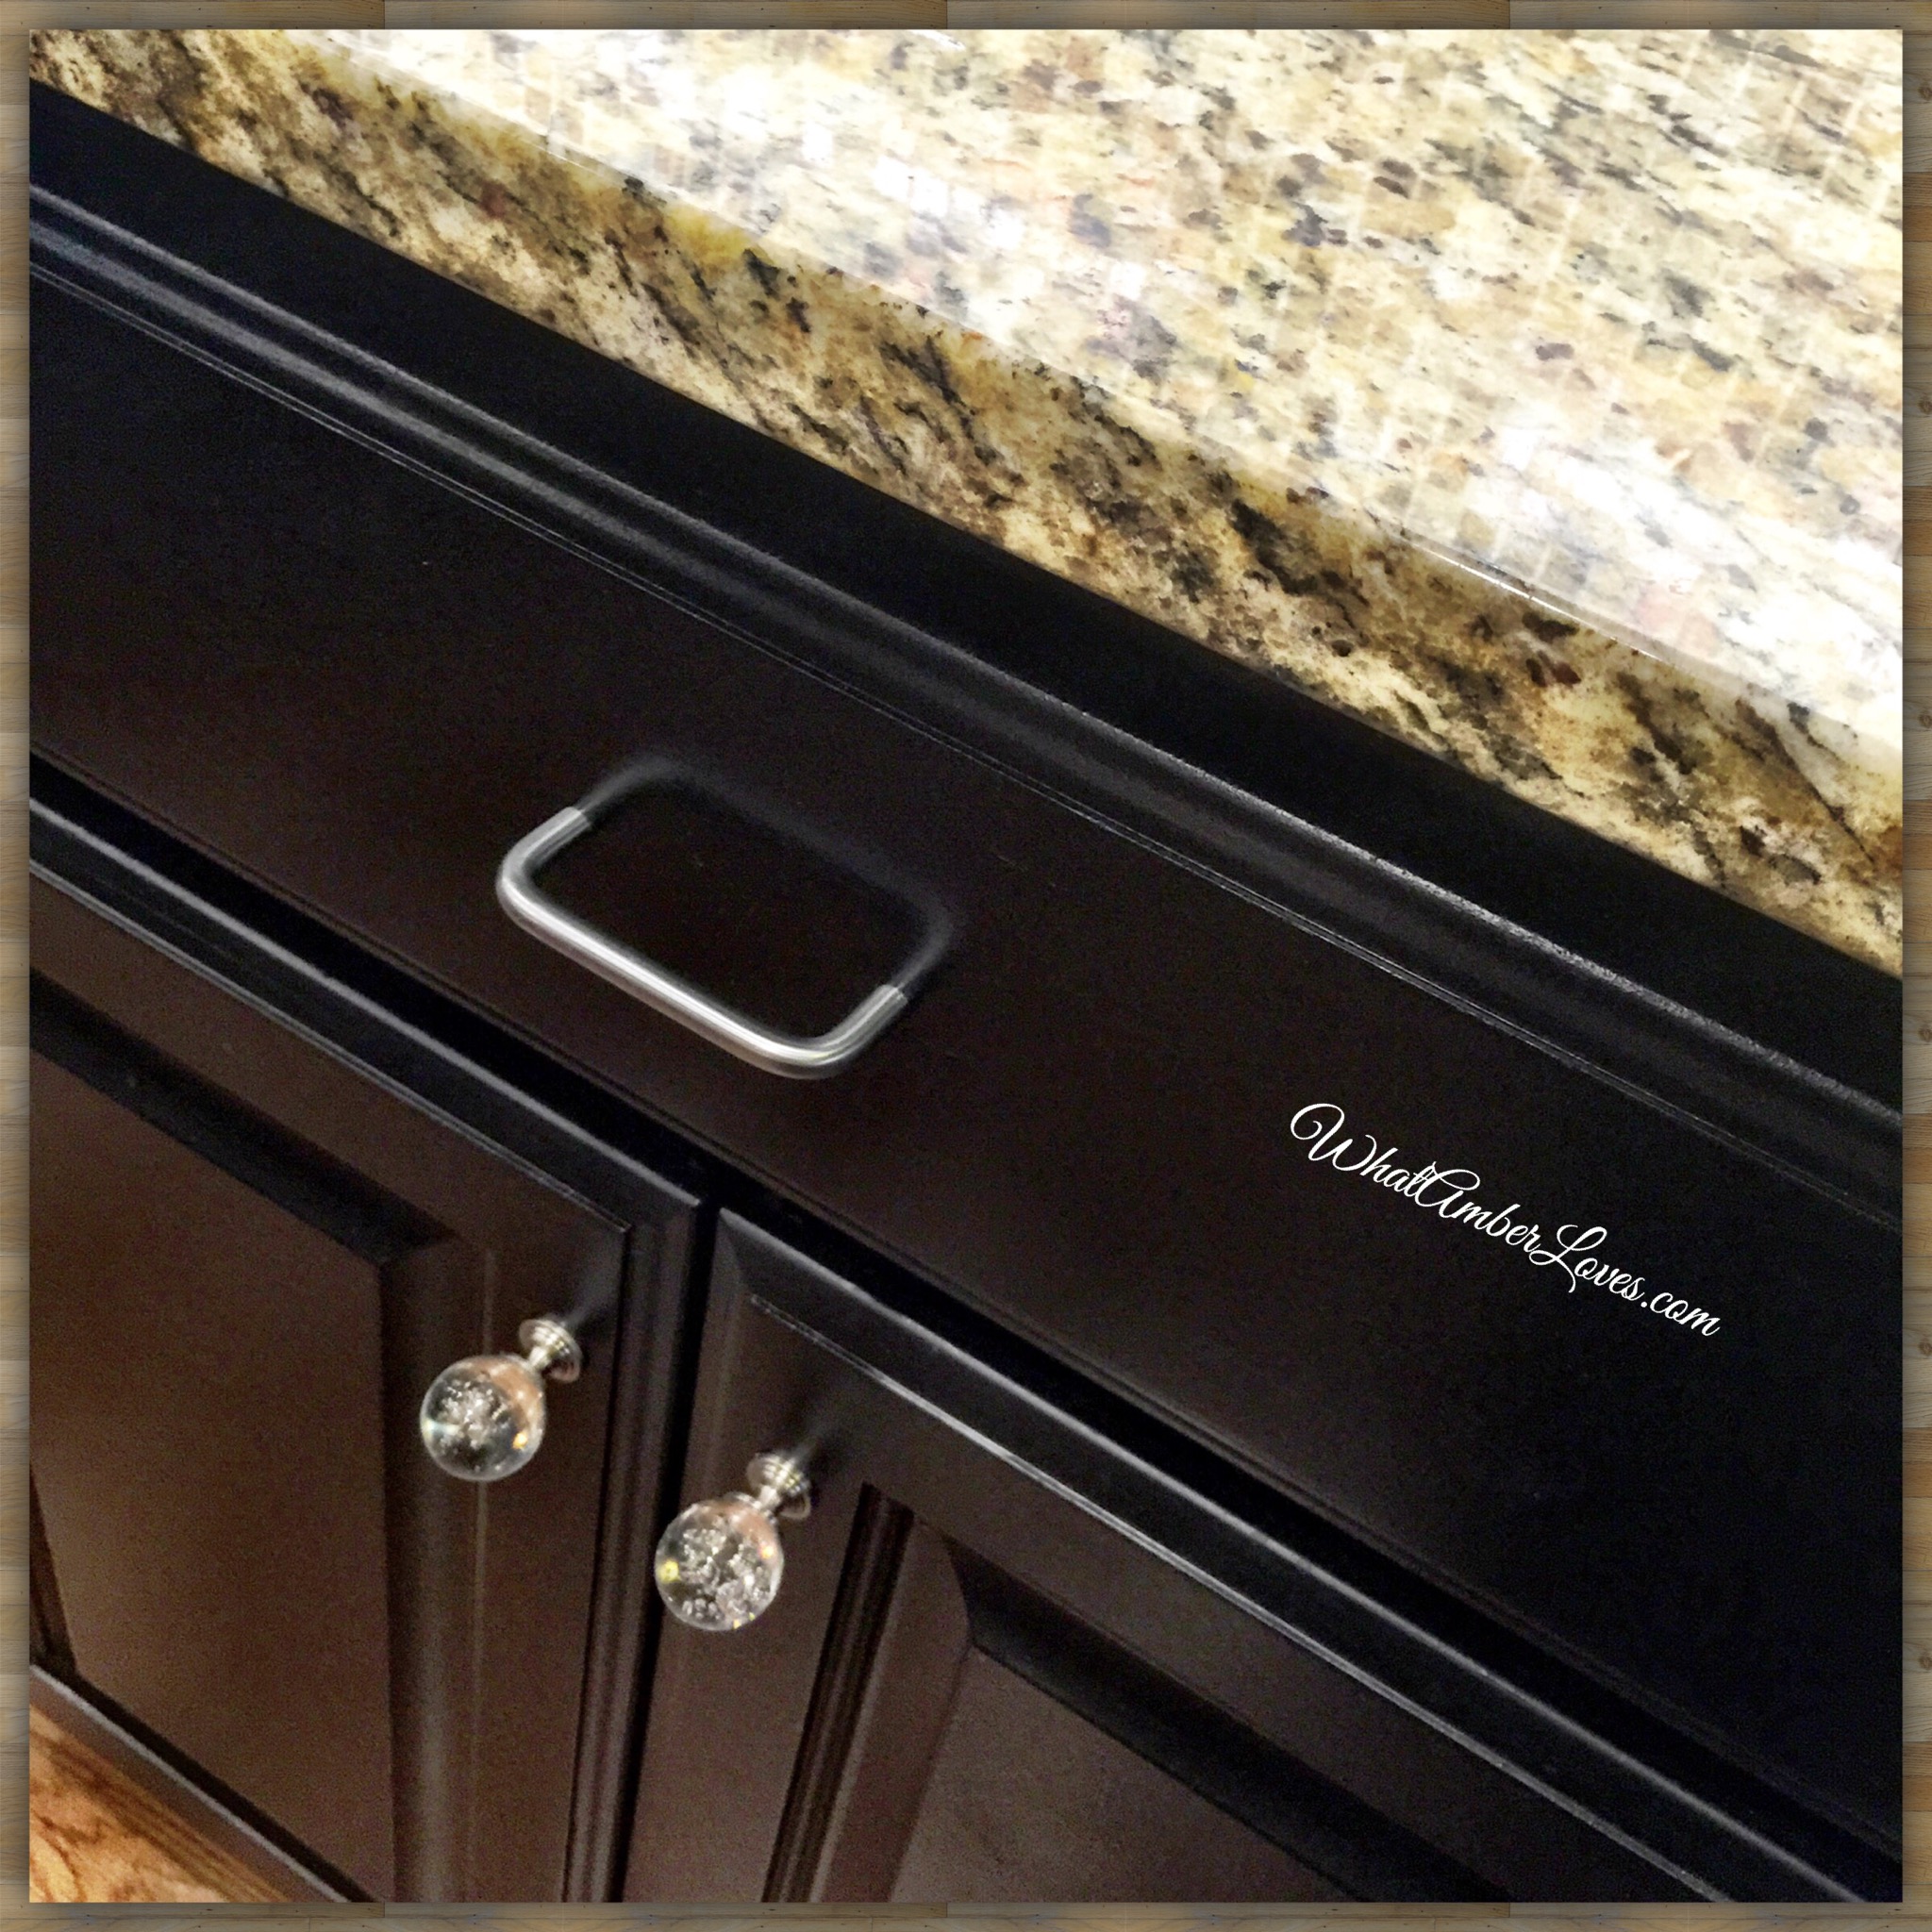
CABINET HARDWARE:
Before:
The ivory paint was chipped.
It was dirty.
It had been retouched.
It had chipped, again.
It got dirty, again.
I HATED the cabinet pulls.
Hated them soooooooo much.
The cup style constantly broke my fingernails.
The design was outdated.
The finish was rubbing away.
After:
Clean, fresh, satin enamel paint.
Two coats of said paint.
Simple, updated stainless pulls.
“Fingernail friendly” drawer handles, not cups!
Clean. Clean. Clean. Yay!!
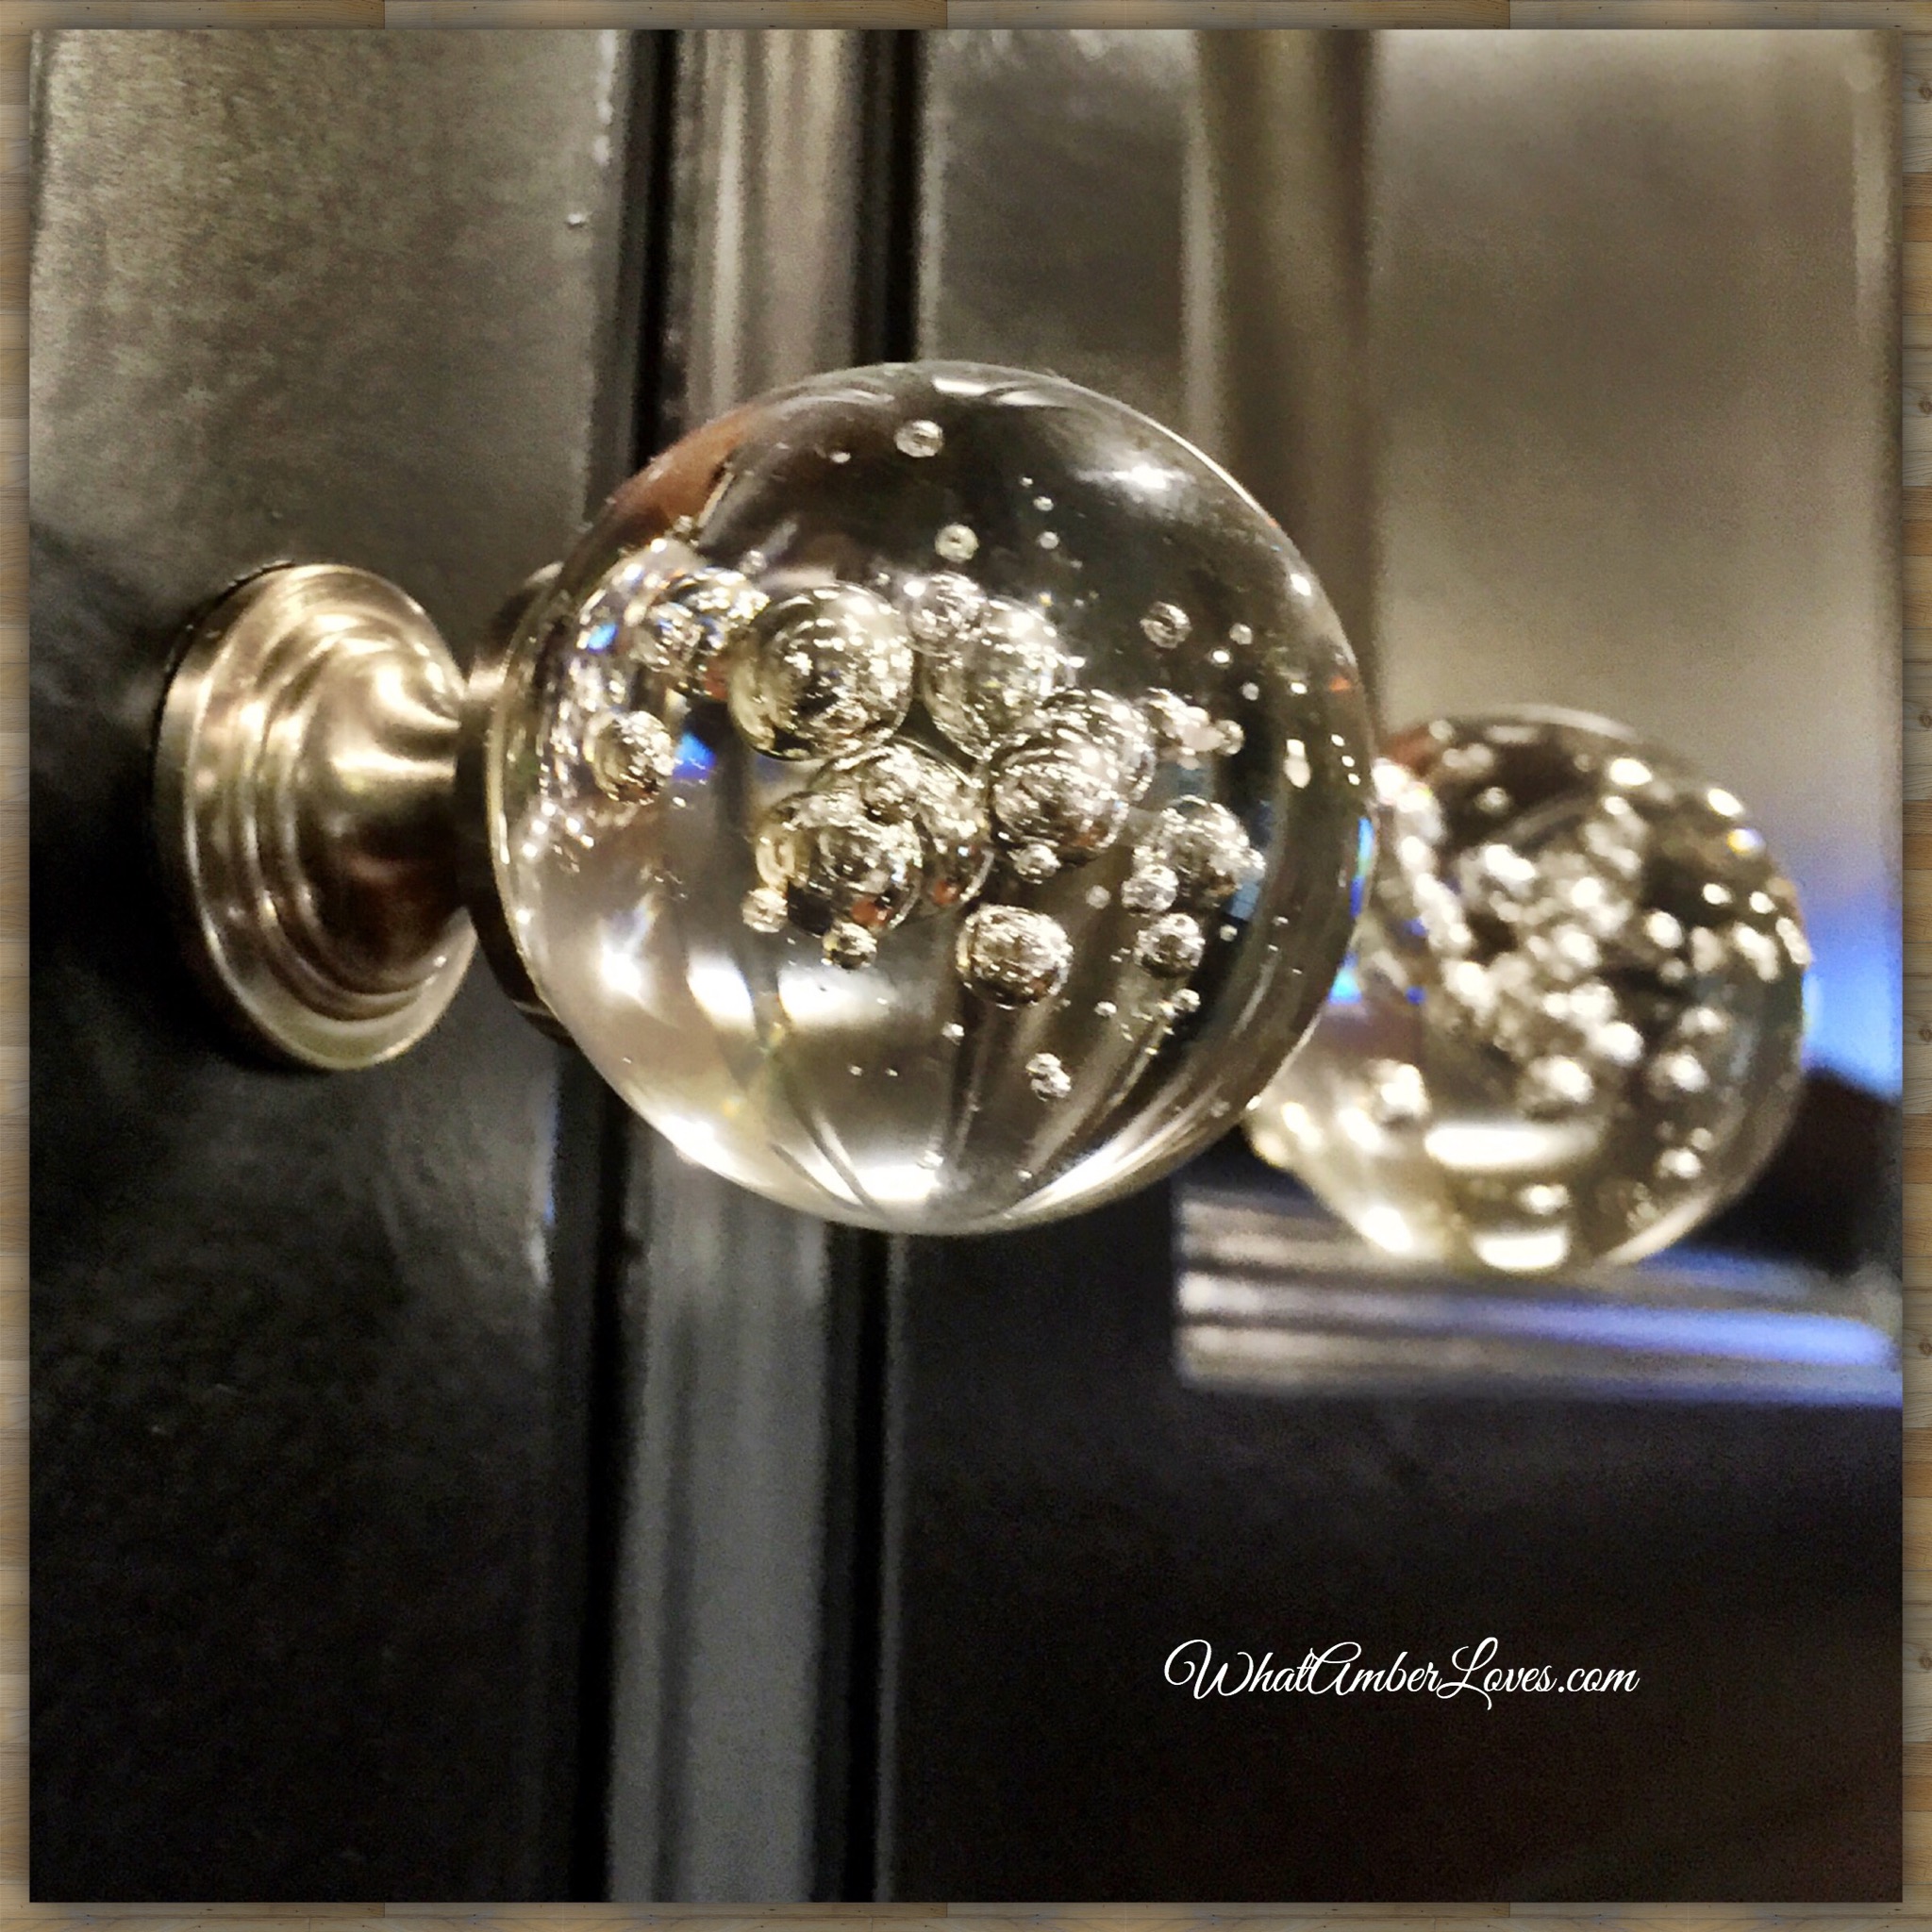
What do you think of my bubble glass knobs?
I adore them!
To me, they’re like the jewelry of a kitchen!
Next, the sink area:

KITCHEN SINK:
Before:
Tired.
My patience had run out.
I was tired of dealing with the inefficiency of
removing crumbs and spills from counters.
The big lip on the top mount sink was
terribly impractical.
Every. Single. Scratch. Showed.
This black sink was showing its 10 year age.
The thin black granite had several stress
breaks and cracks around the sink.
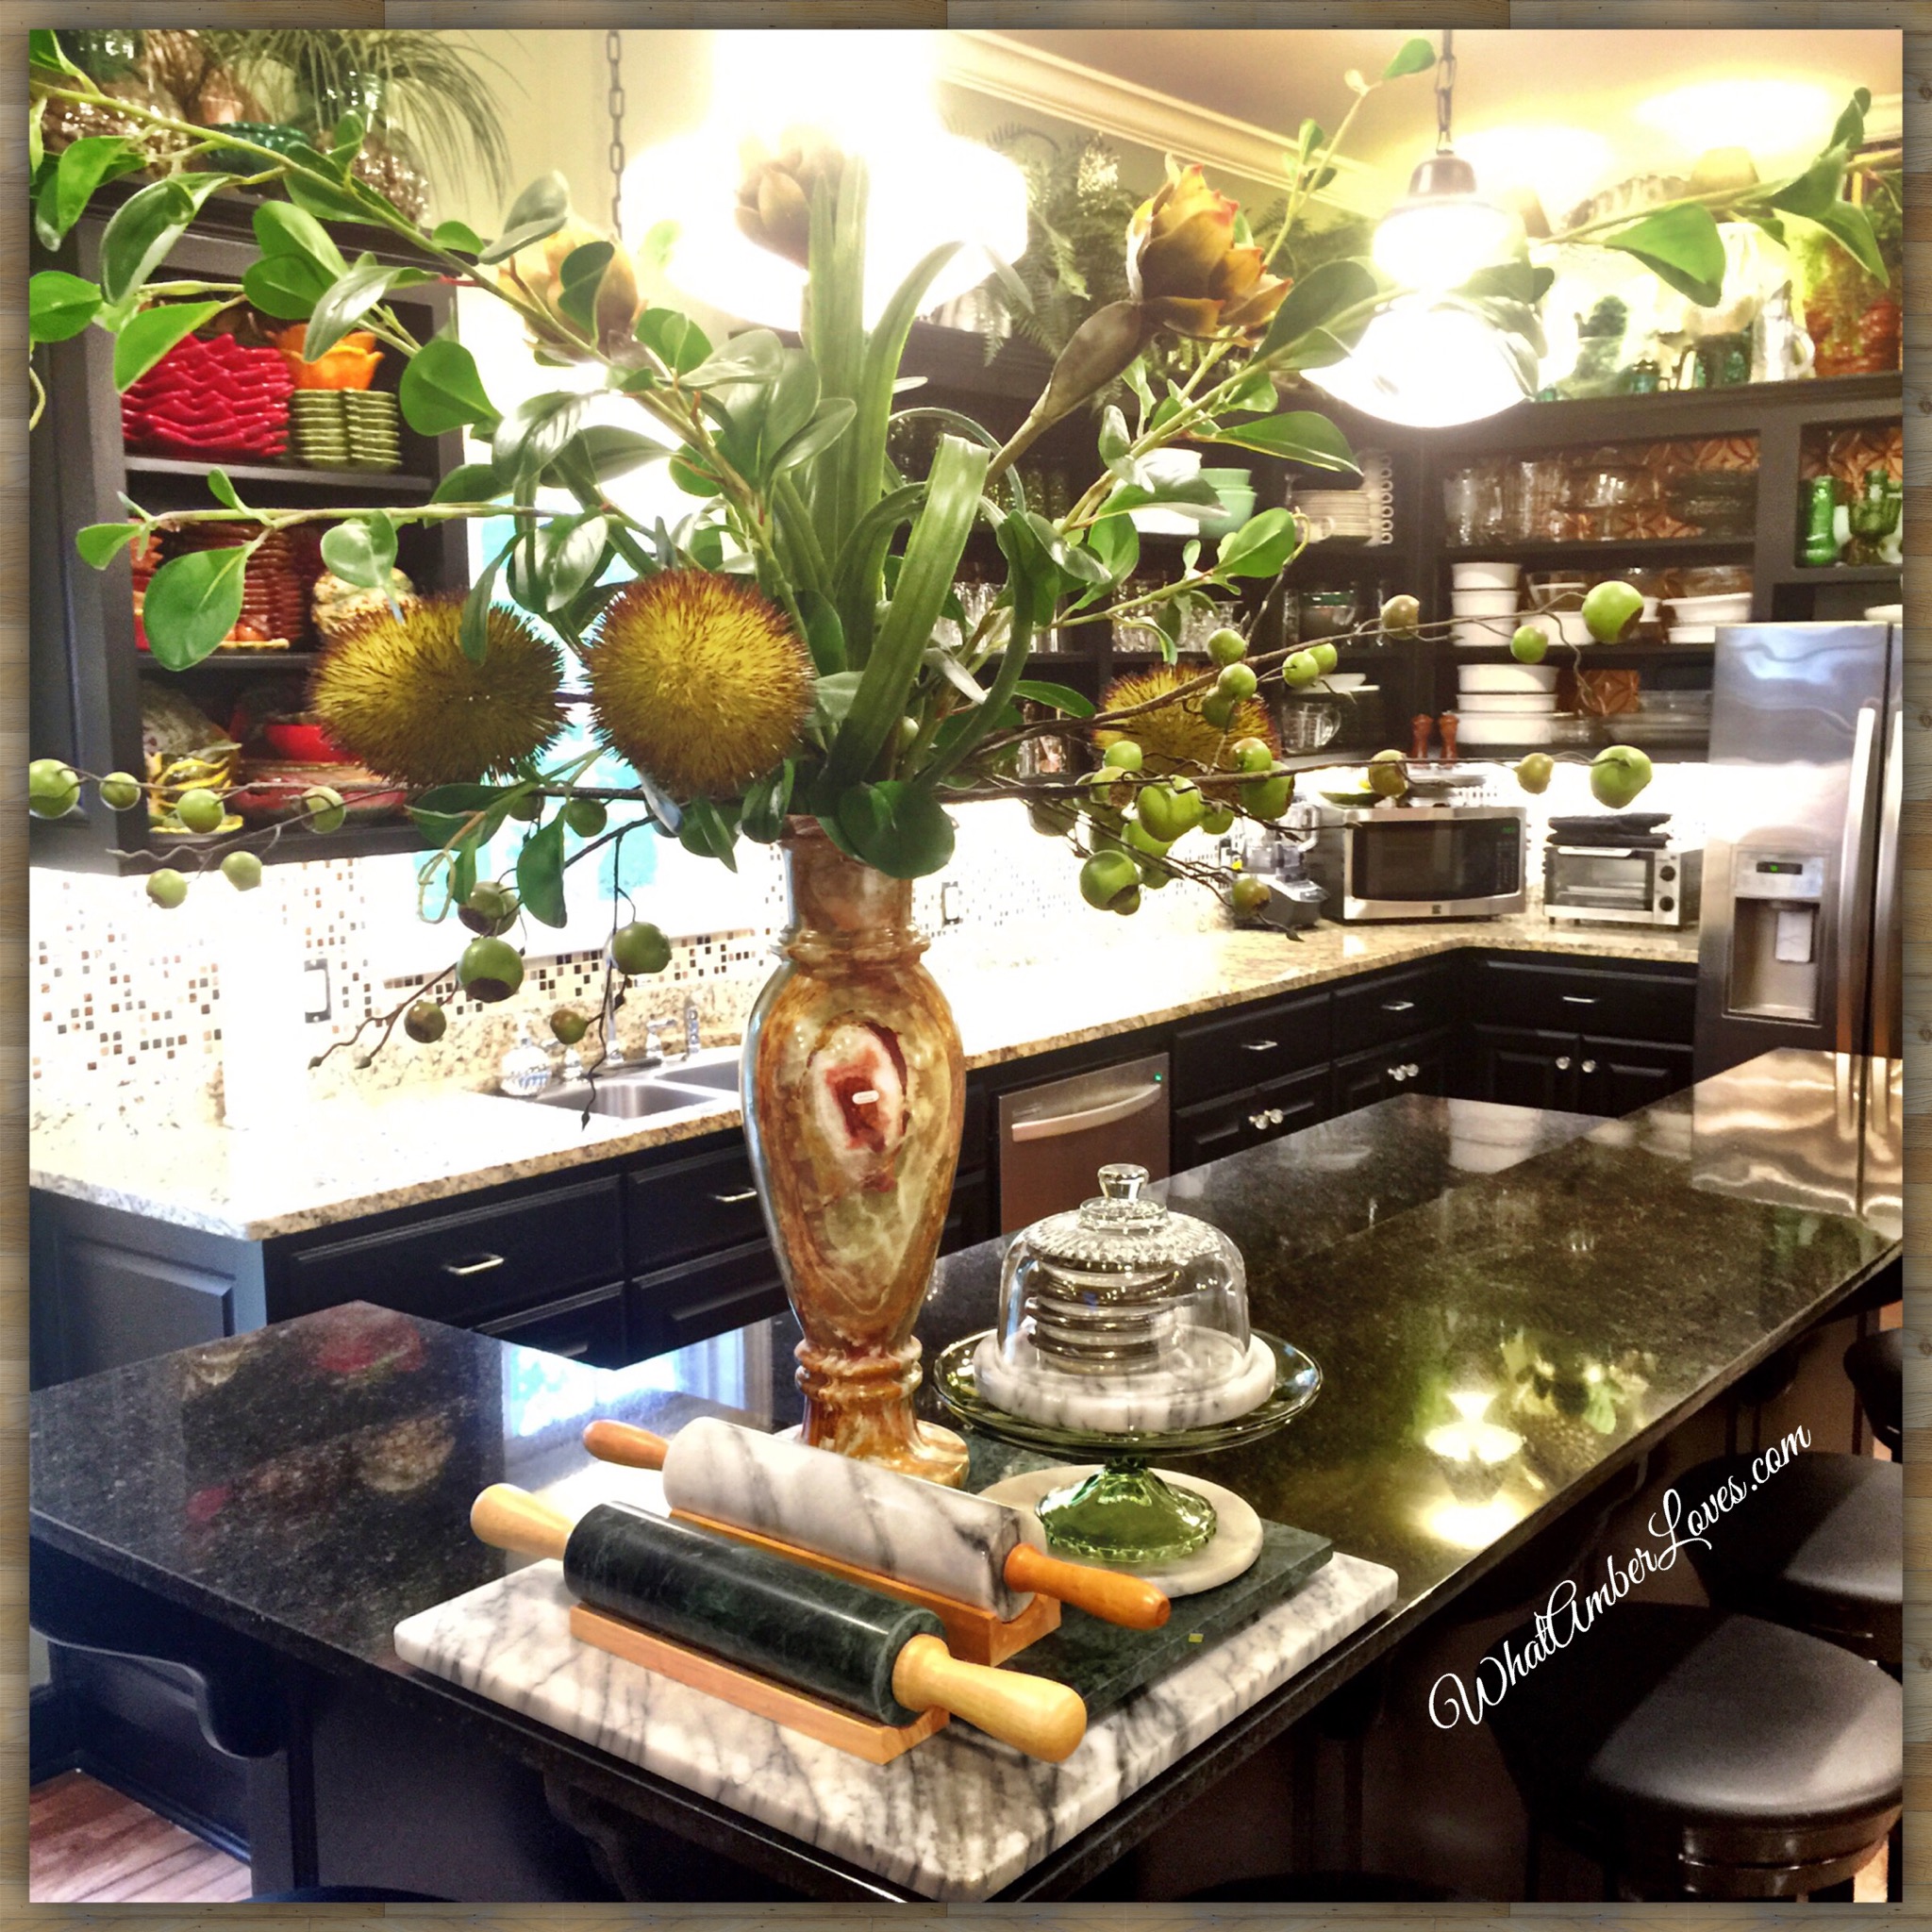
It was a really dark work surface.
I’ll keep this stone on the island, where I
serve dinner buffet-style, but it was way
to dark for my work areas.
After:
New! Efficient!
It is so much simpler, now, to be able to
easily wipe crumbs directly into the sink!
Yay!!
The mottled color is stunningly gorgeous!
The granite is literally almost twice as thick!
The fabricator/installer did a perfect job
smoothing and polishing the edges!
I am so pleased with the transformation
to the quality of the functionality of our
kitchen since making this change!

Next, let’s talk GRANITE:
Specifics about our NEW Granite Countertops:
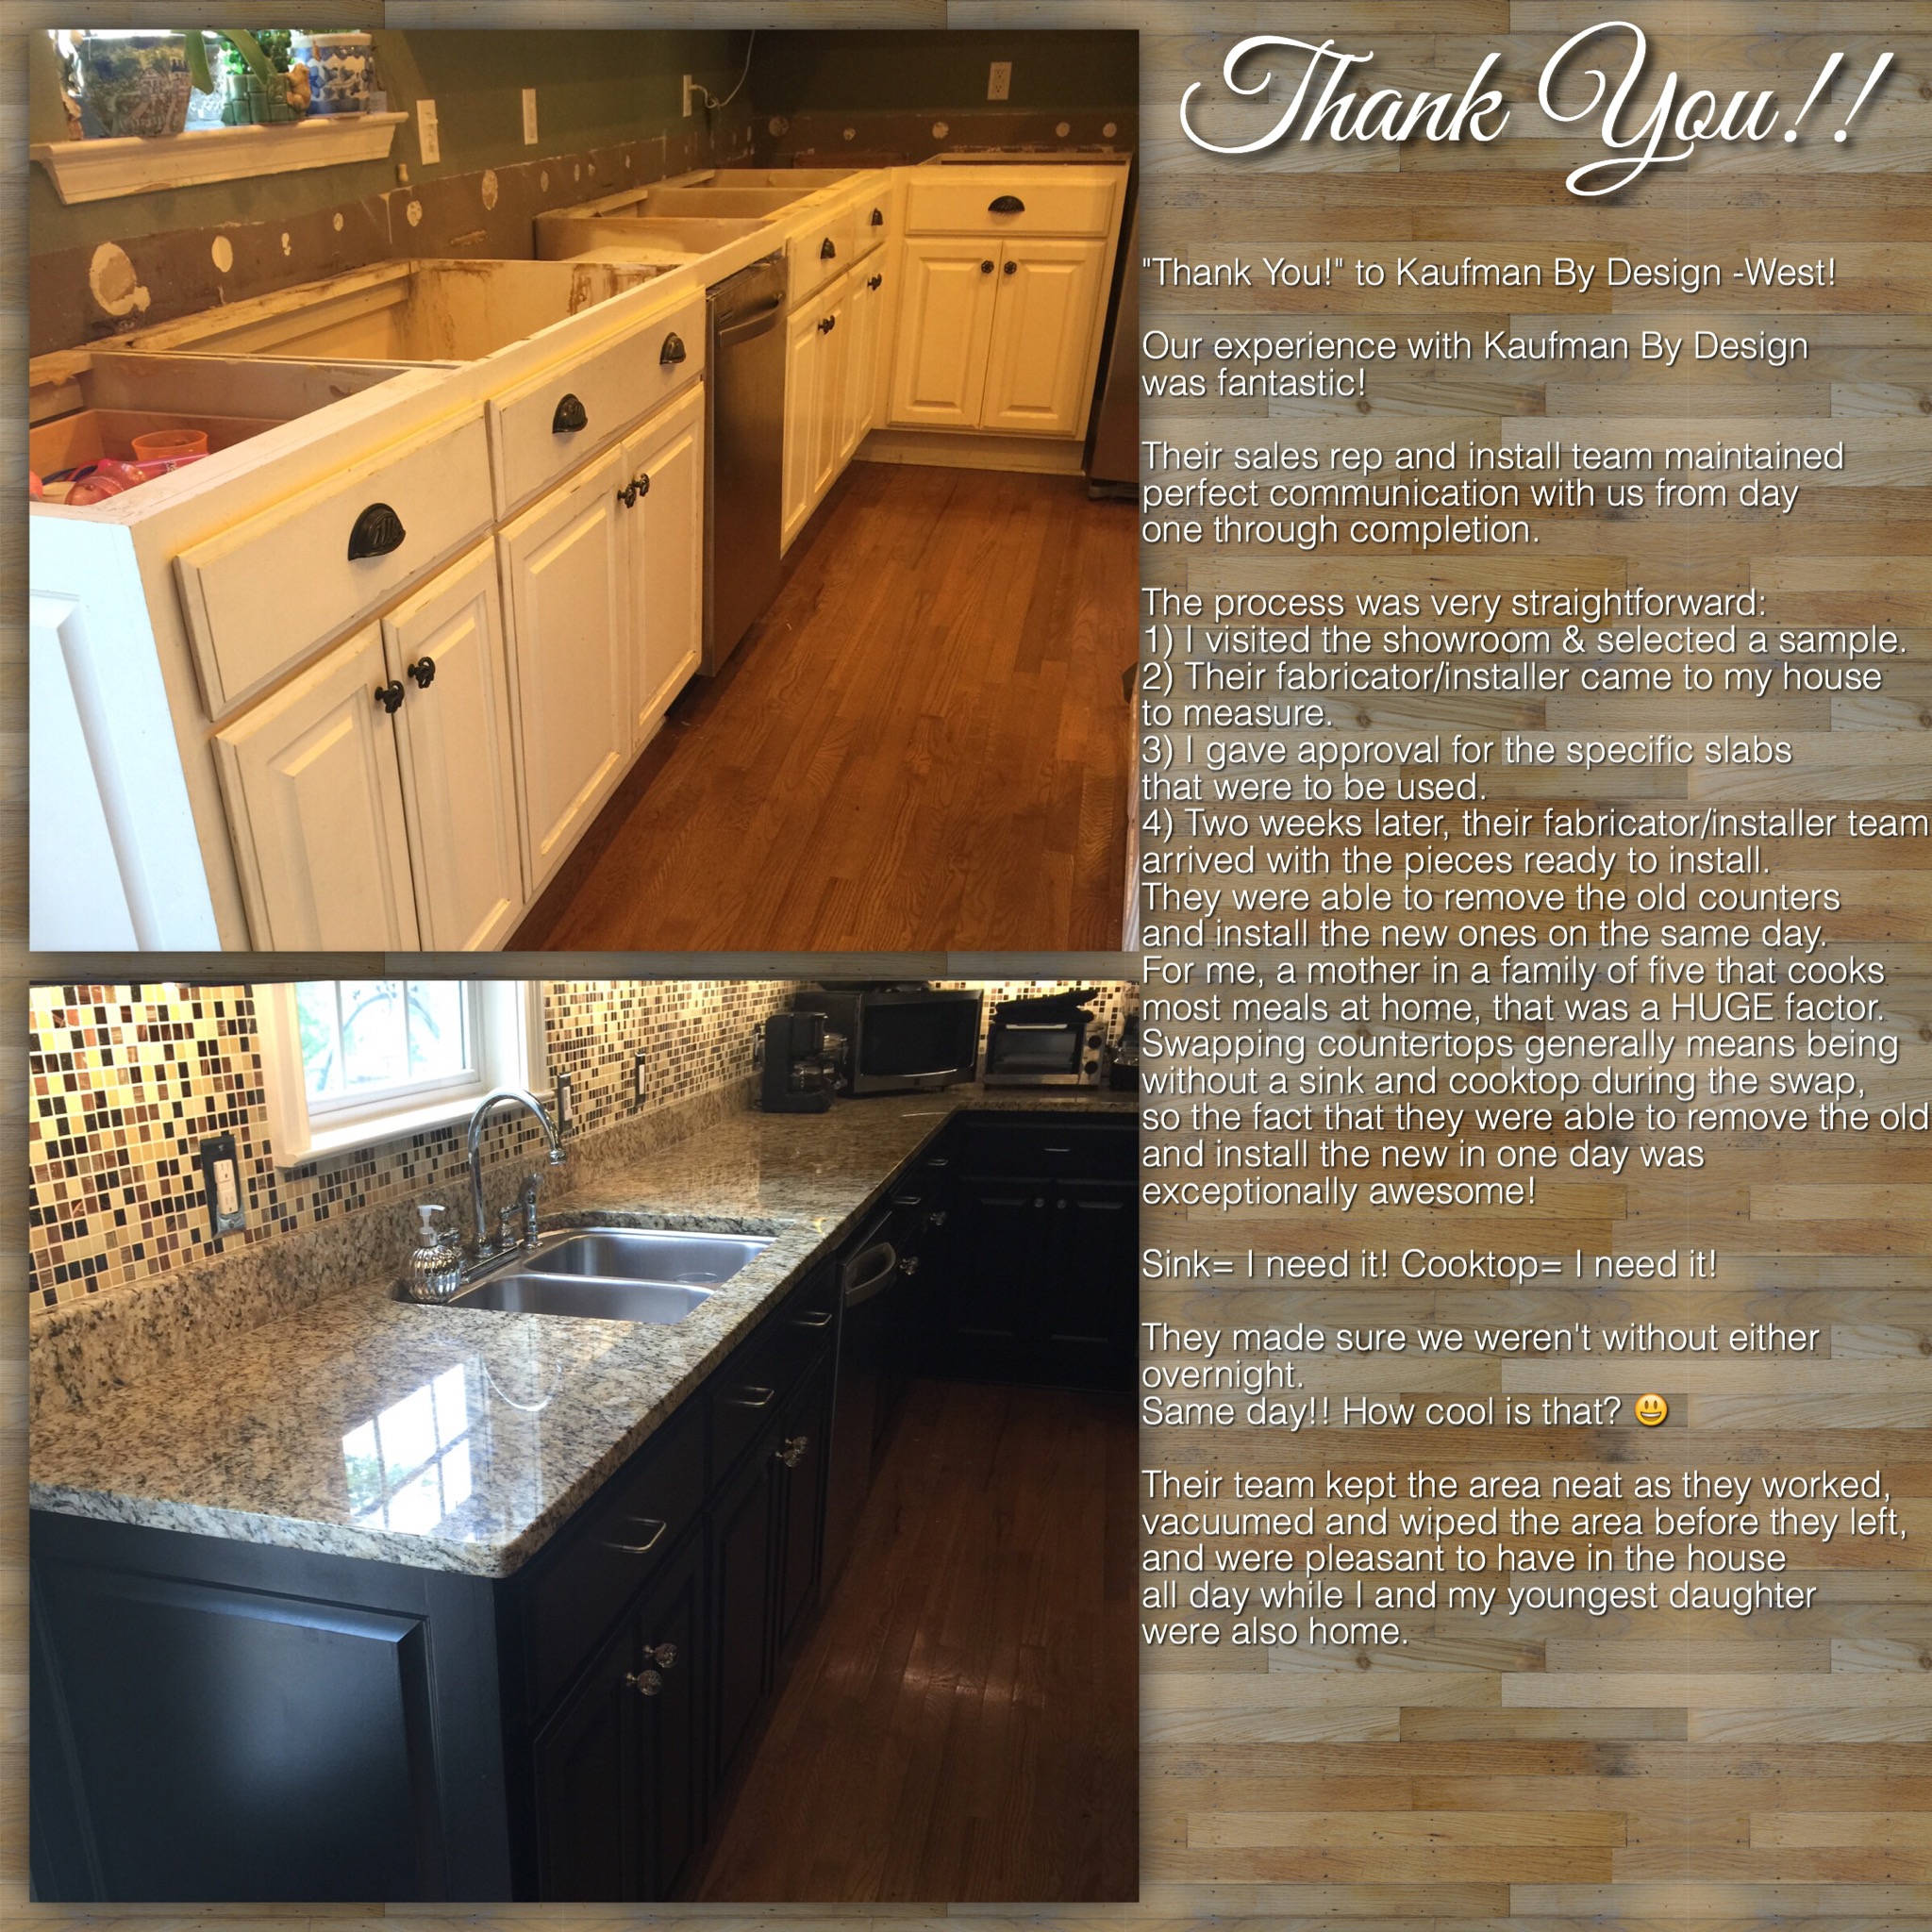
“Thank You!” to Kaufman By Design -West!
Our experience with Kaufman By Design was fantastic!
Their showroom is amazing! When designing for new construction, a remodel, or an update, like my project, it is amazing to be able to visit a well stocked showroom and be able to handle a spectrum of tile sample options ranging from earthy, tumbled natural stones to shiny, metallic dichroic glass and every option in between. Their sales rep and install team maintained perfect communication with us from day one through completion. The process was very straightforward:
1) I visited the showroom & selected a sample.
2) Their fabricator/installer came to my house to measure.
3) I gave approval for the specific slab to be used.
4) Two weeks later, their fabricator/installer team arrived with the pieces ready to install. They were able to remove the old counters and install the new ones on the same day. For me, a mother in a family of five that cooks most meals at home, that was a HUGE factor. Swapping countertops generally means being without a sink and cooktop during the swap, so the fact that they were able to remove the old and install the new in one day was exceptionally awesome! Sink= I need it! Cooktop= I need it! They made sure we weren’t without either overnight. Same day!! How cool is that? 😃 Their team kept the area neat as they worked, vacuumed and wiped the area before they left, and were pleasant to have in the house all day while I and my youngest daughter were also home.
If you see this post, and you’re in Central Arkansas, I highly recommend that you visit Kaufman By Design for any home maintenance project, repair, remodel, update, or new construction.
Find the Kaufman By Design website: click here
Find the Kaufman By Design Facebook page: click here

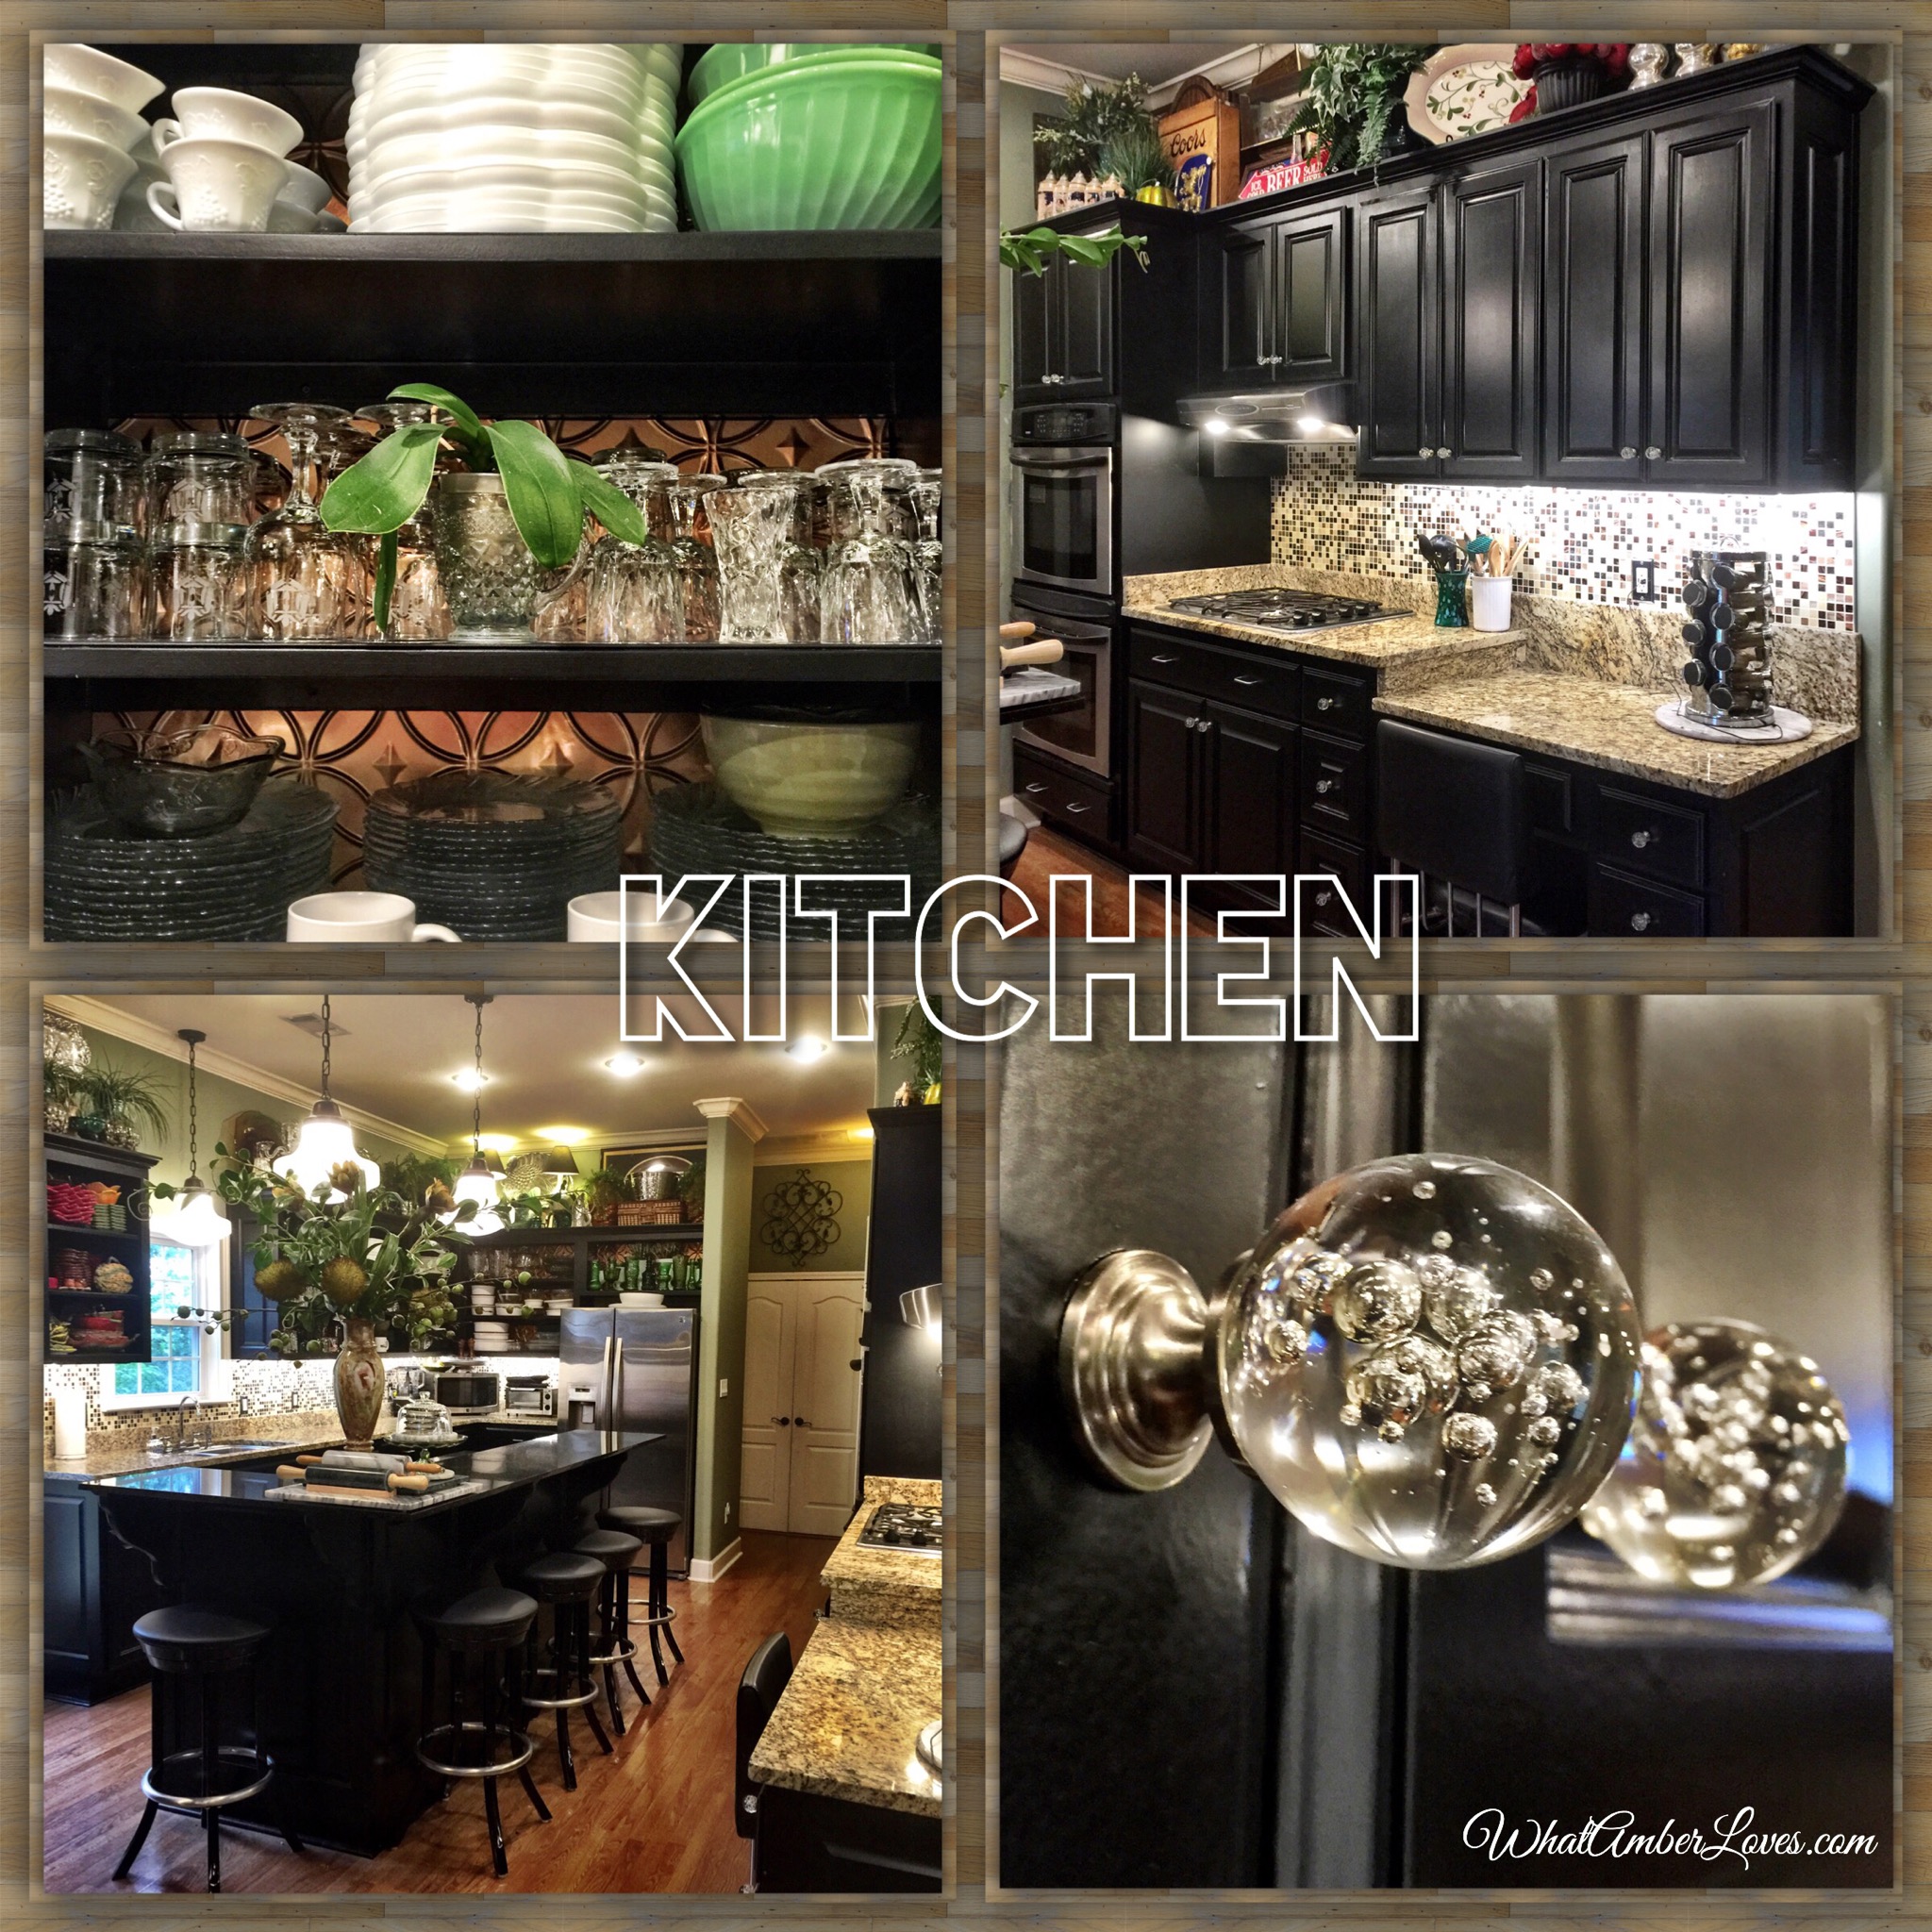
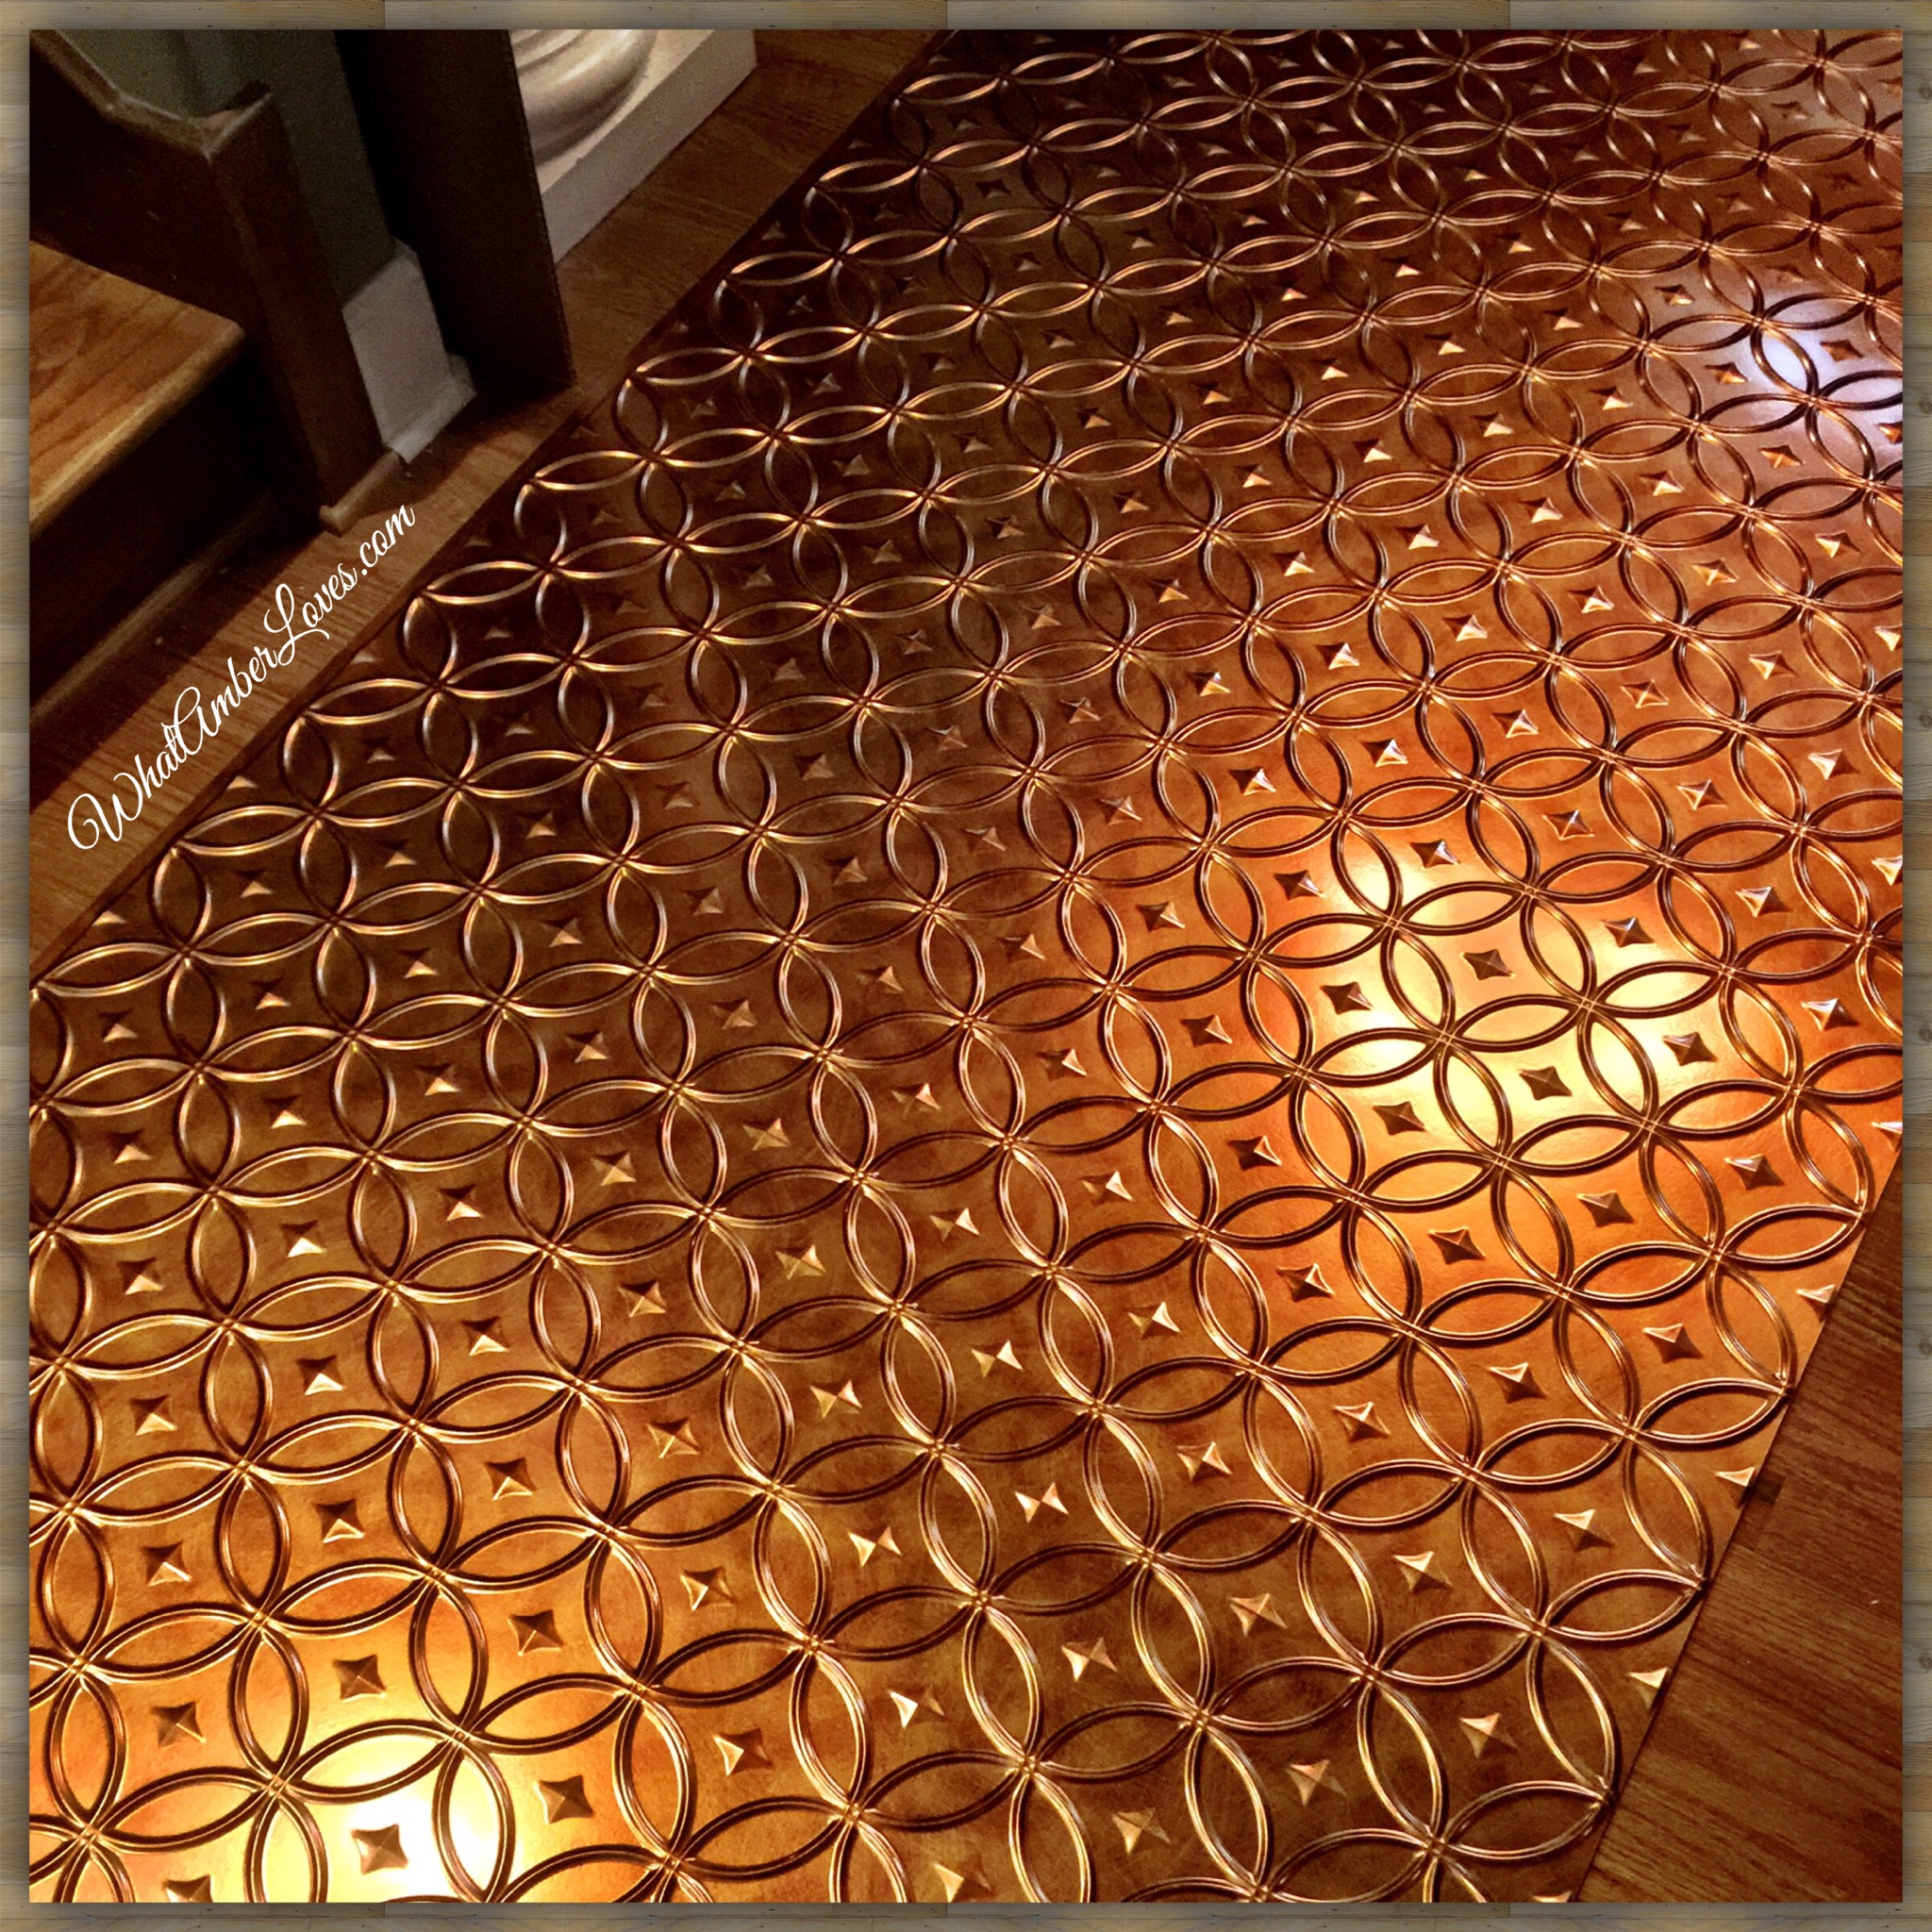
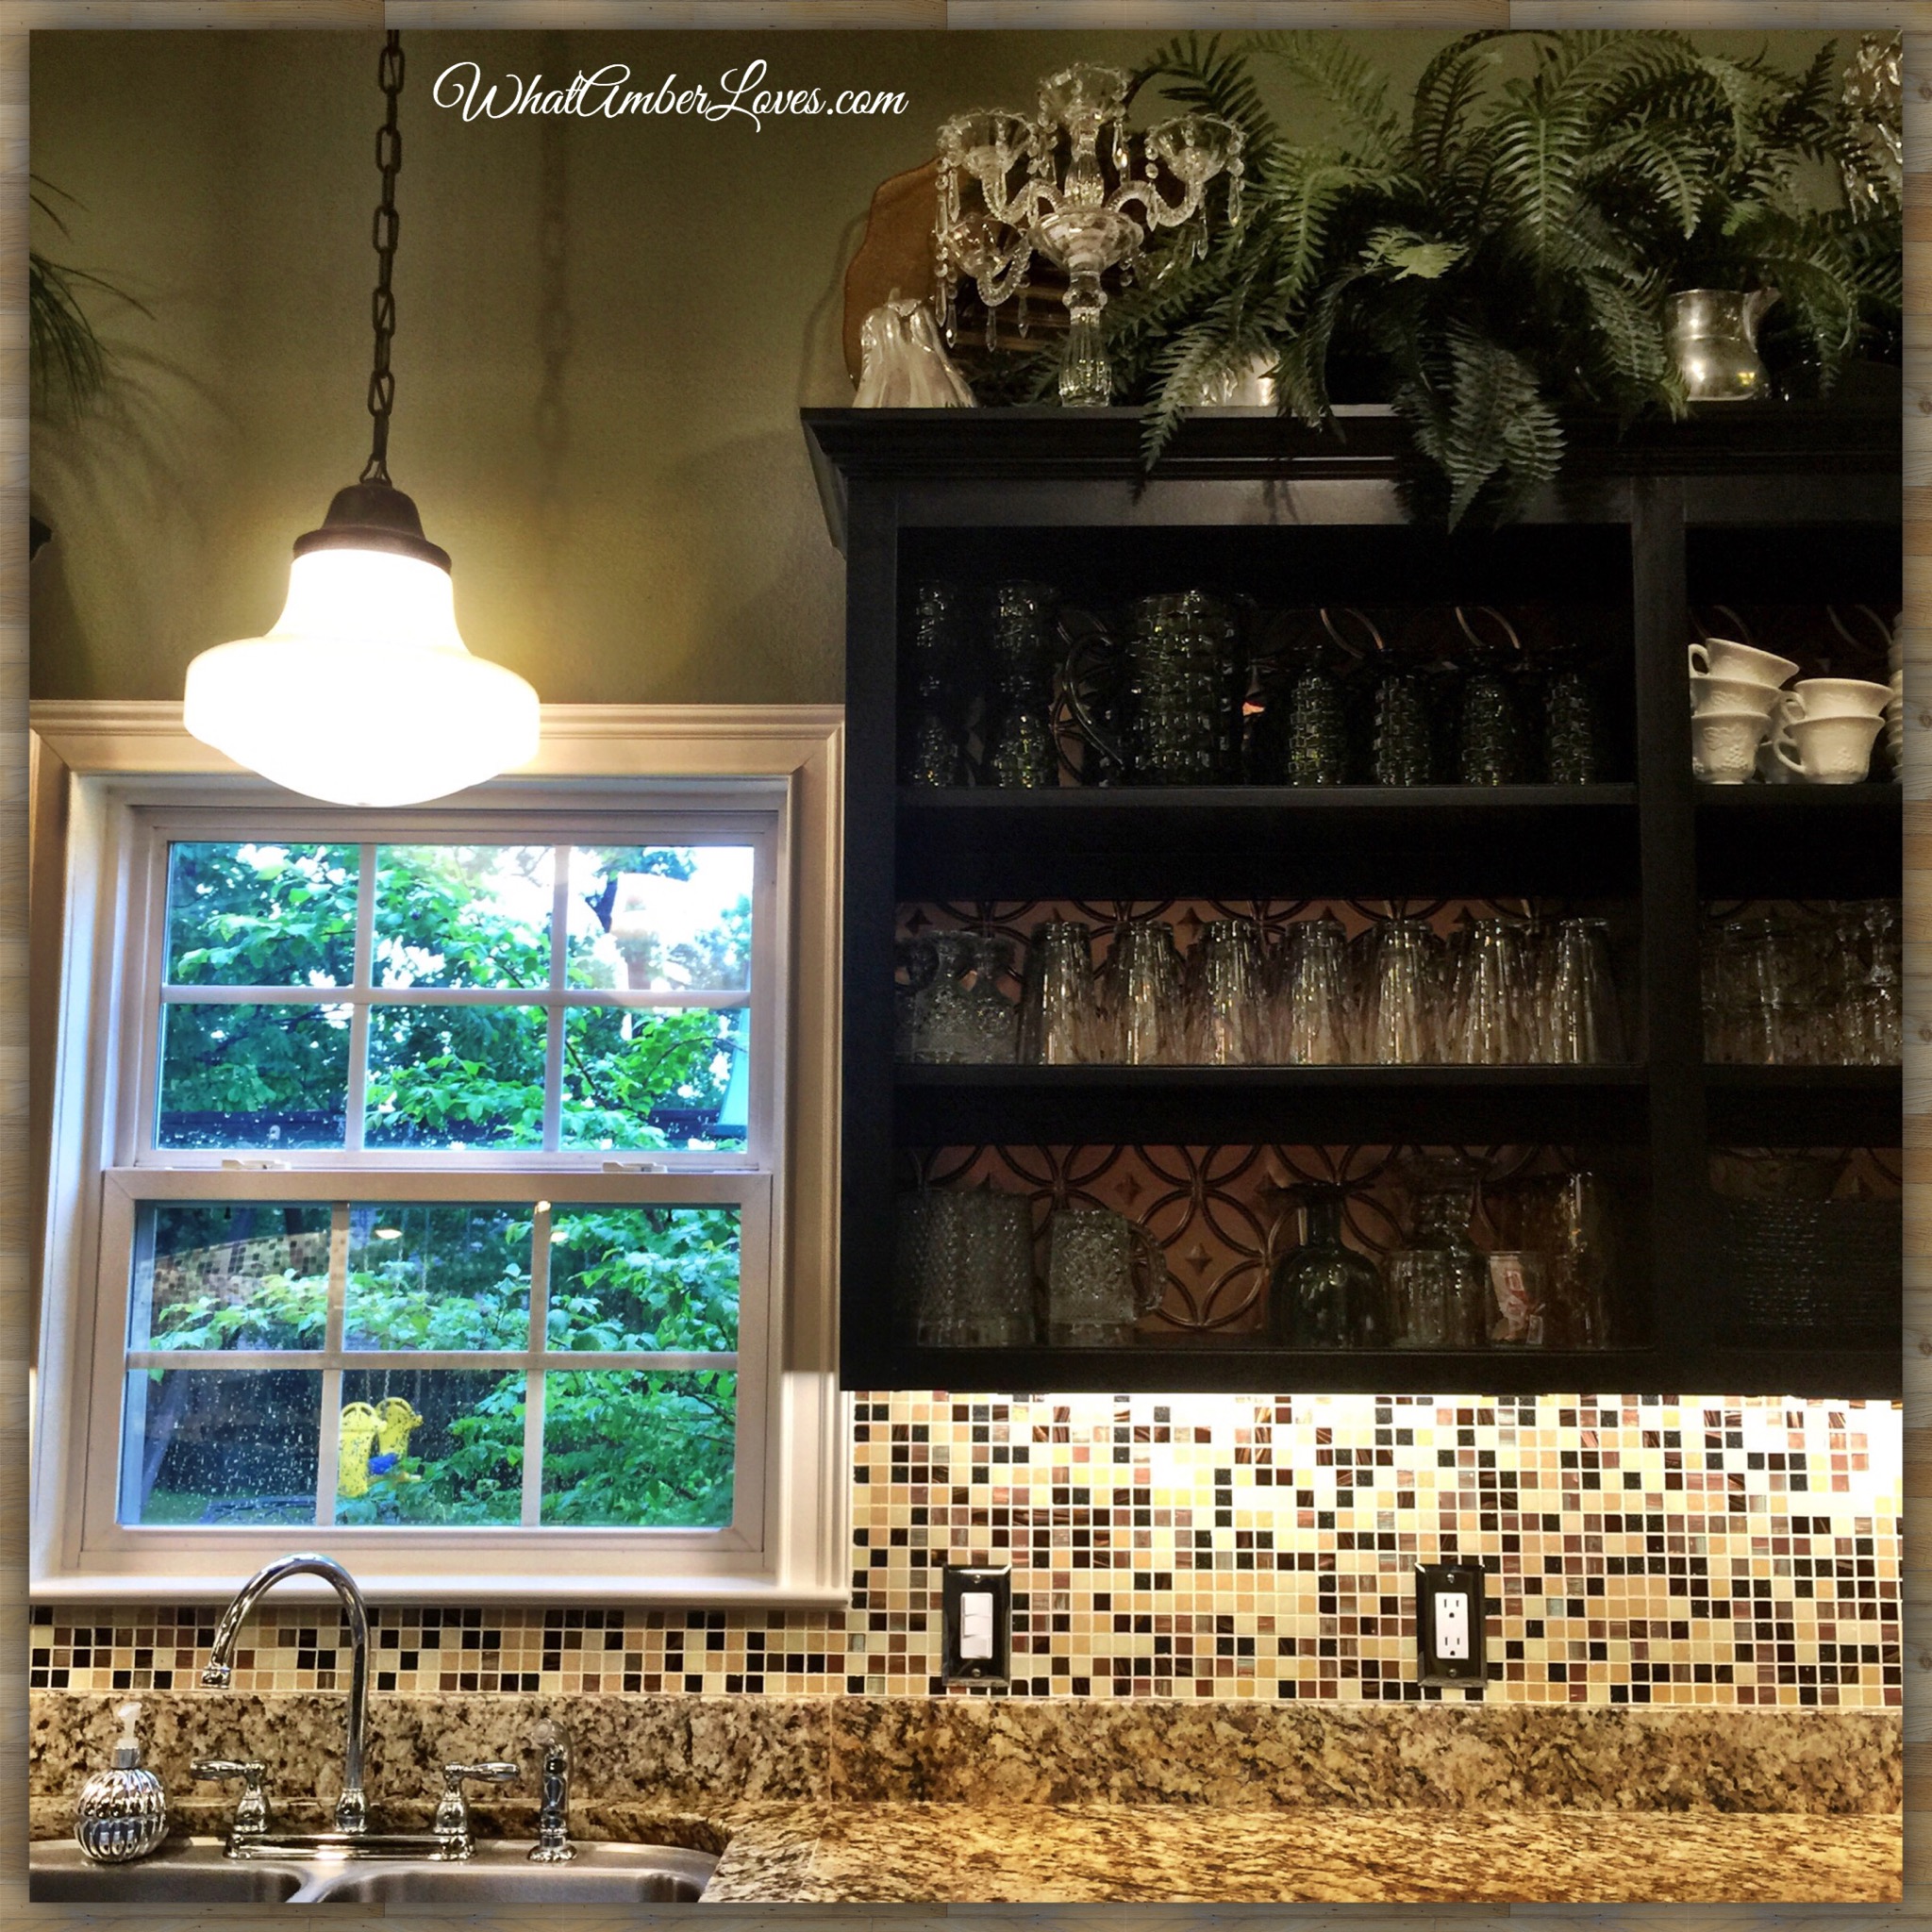
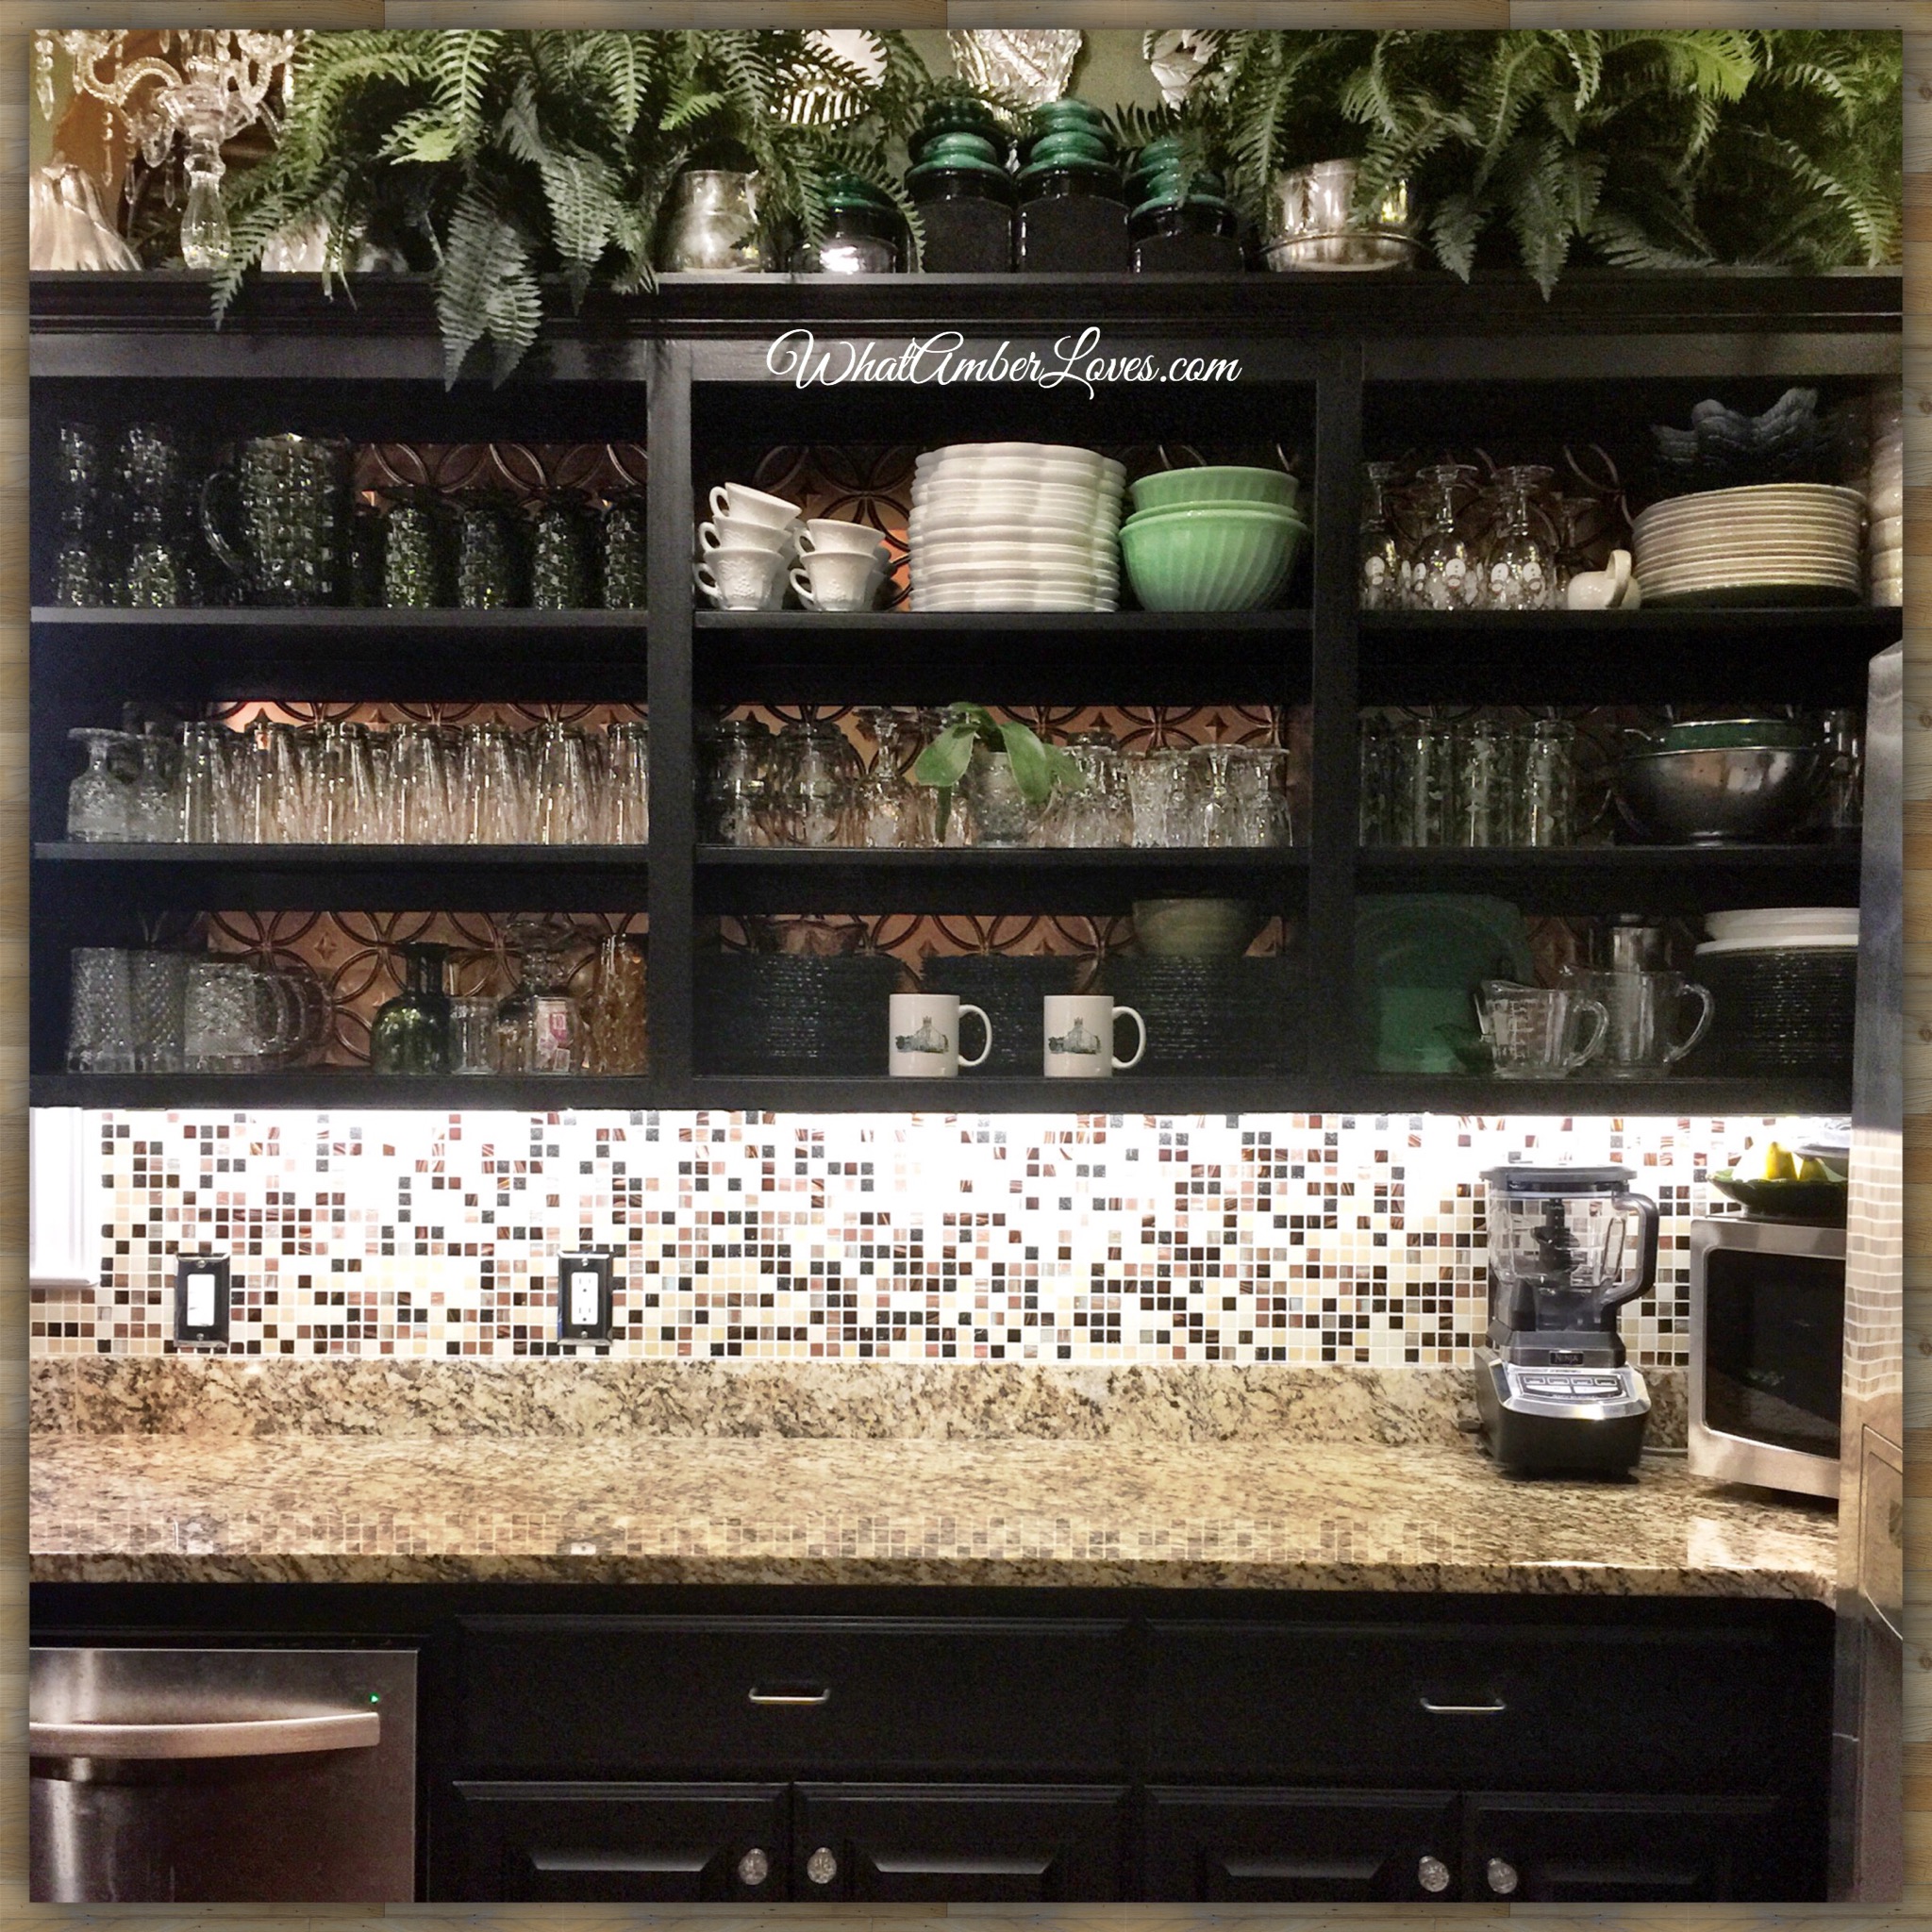
Also, in our Kitchen, we lined the open upper cabinets:
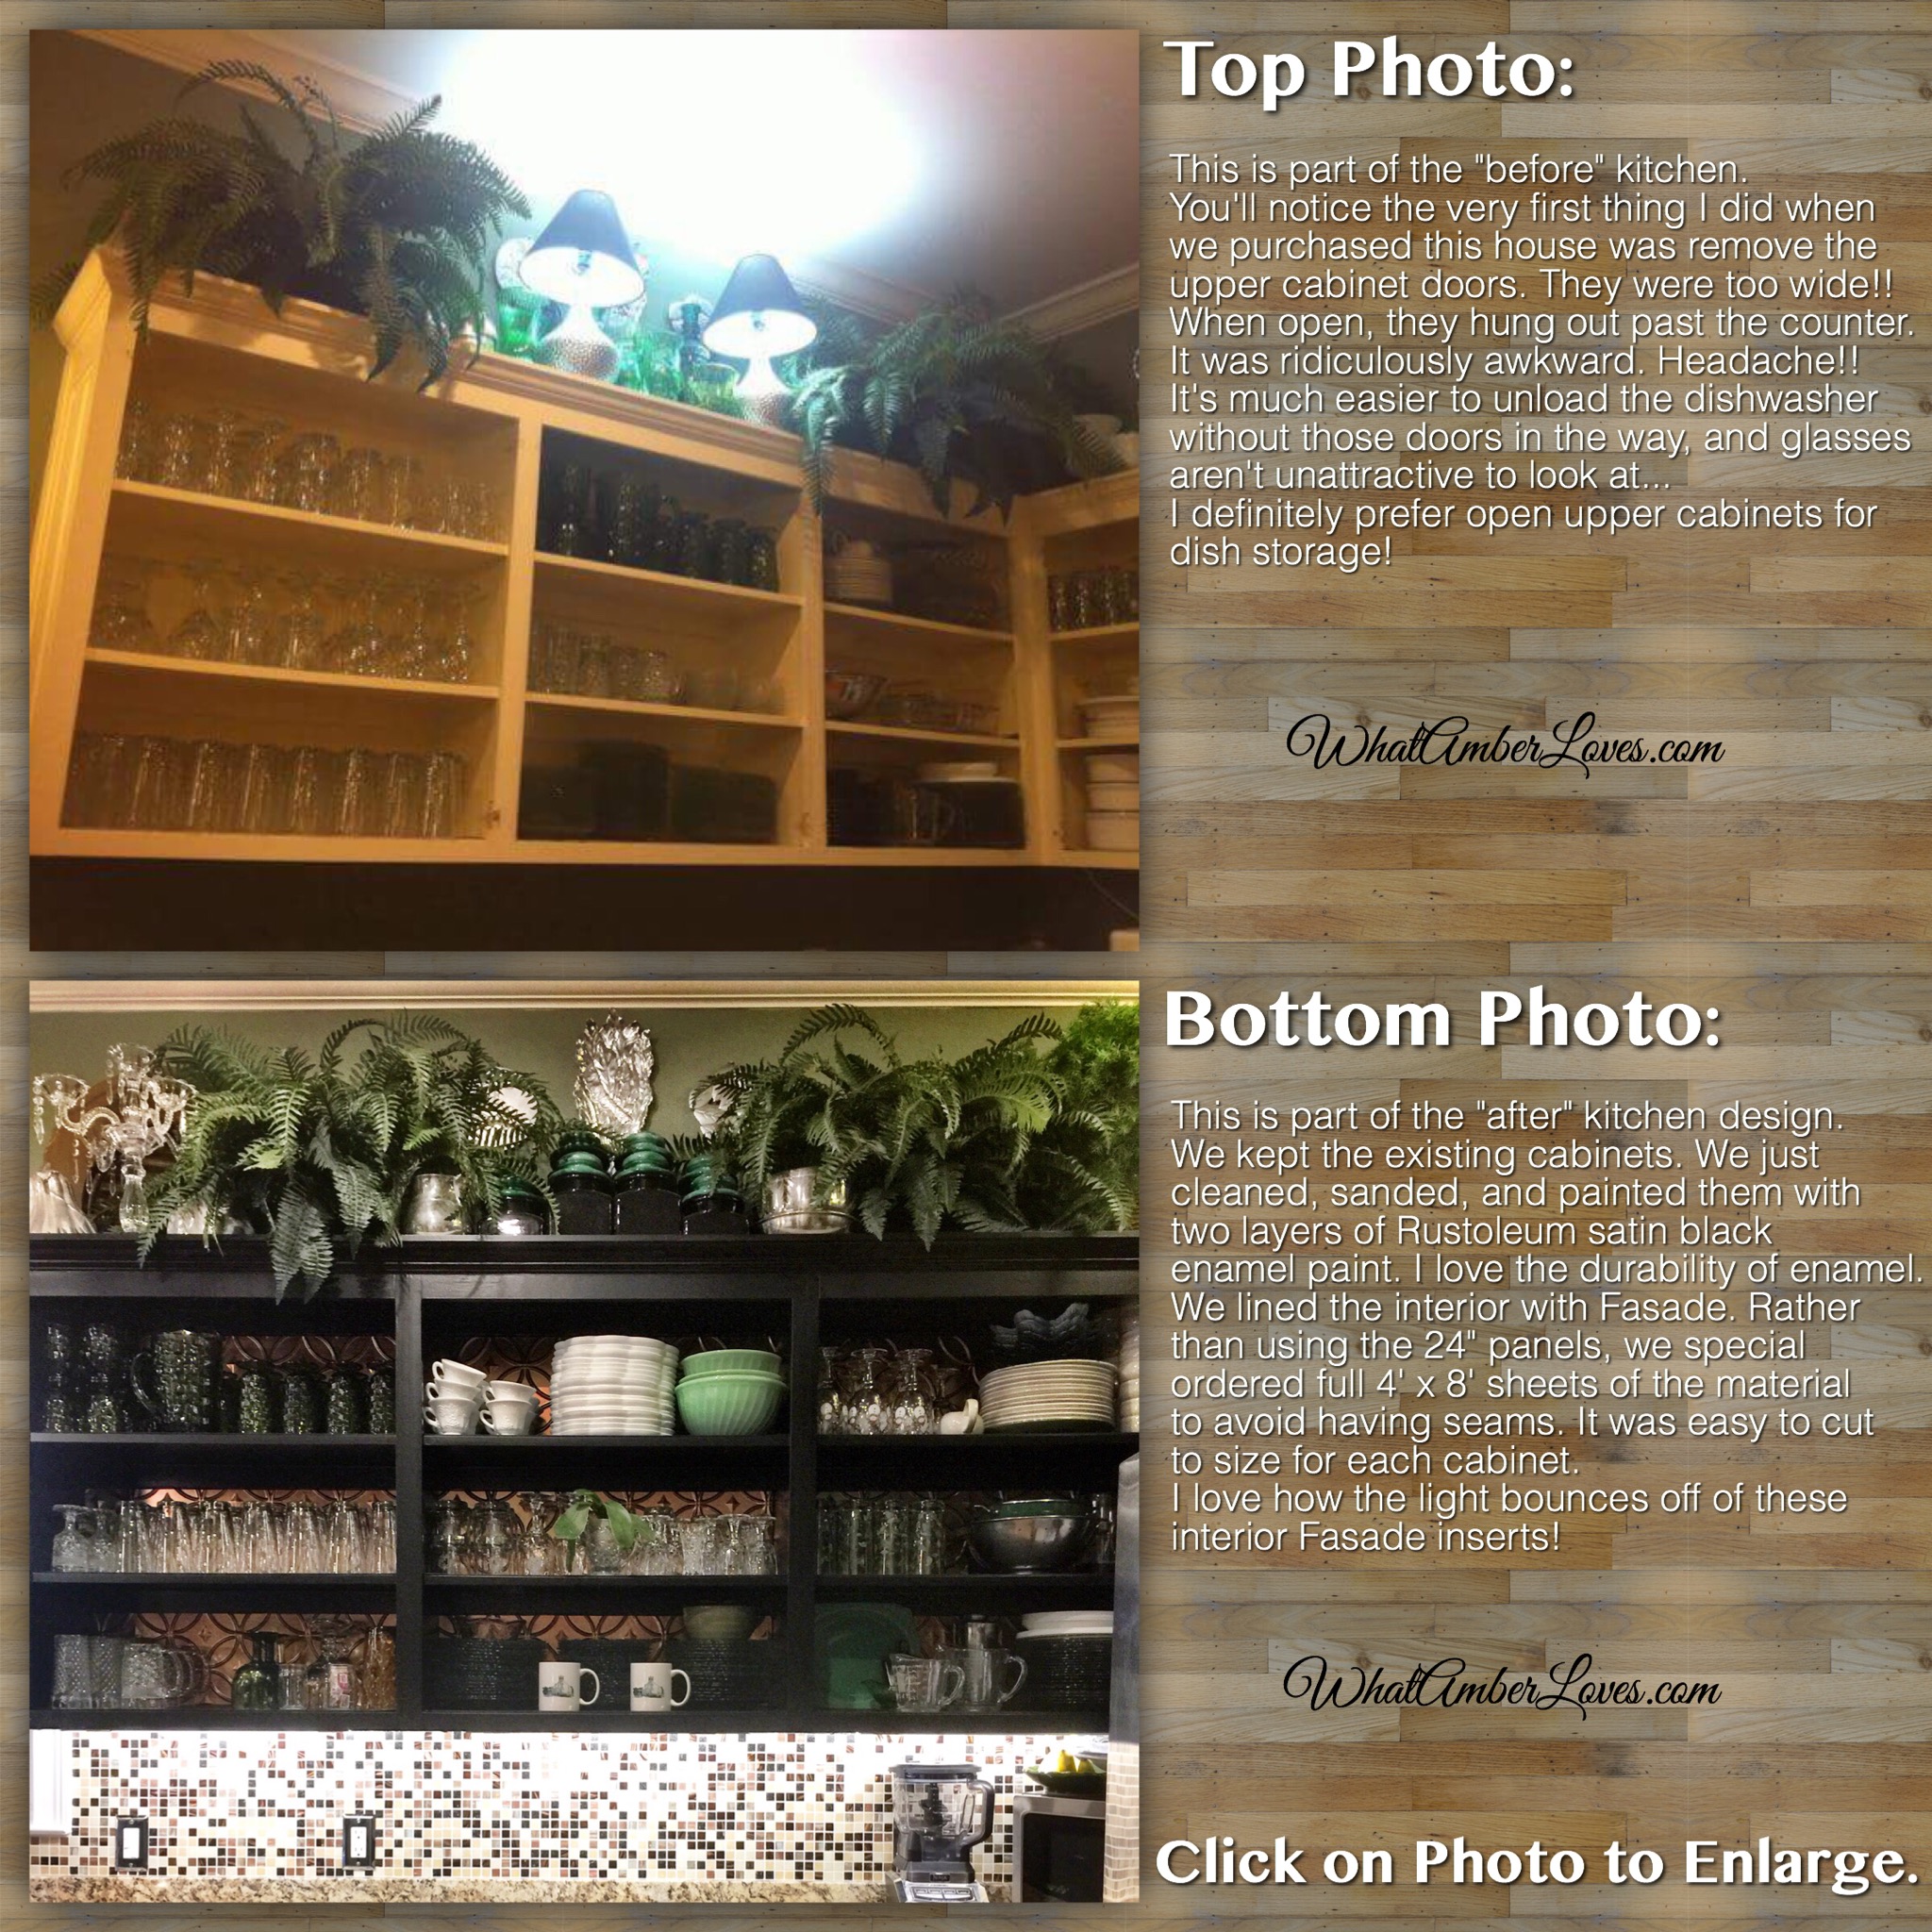
We purchased 4′ x 8′ sheets of a thermoplastic material in an antique bronze finish (looks Copper to me,) and then we cut the pieces to fit each cabinet! Easy!


Last, but not least, we installed under cabinet l.e.d. lighting and completed the DIY tile glass backsplash! I love how they glitter in the light!

There is another Fun detail I almost forgot to tell you about!! Lining the open shelves! I didn’t want to use the rolls of antiskid material sold at big box stores, because I really dislike the raw edges and how it slides around when casserole dishes are moved, but I did want a cushion to keep dishes from chipping and paint from getting scratched. Solution? We covered thin pieces of plastic with vinyl! Yes, it was a bit time intensive, but once it was done, it’s DONE. It’ll be durable forever!

Yay! Here are some overall view of our finished space!


Yay! That’s my kitchen update!
Whatcha think? 😃
~~AmberHH
PS Love Ya, but love you even more if you share this link! 💞😎


Flavorful Meatless Stuffed Jumbo Pasta Shells!

Easy recipe! Don’t overthink it; just adjust for your preferences as you go! I love this combination of flavor! You might leave out the crushed red pepper or kick it up by adding a lot! I’ve added lots of photos for reference!
Ingredients:
2 cups of ricotta
0.5 cup Parmesan cheese, plus more for garnish
fresh smashed garlic clove
frozen chopped spinach ( squeezed and drained)
Jumbo pasta shells, boiled
salt, pepper
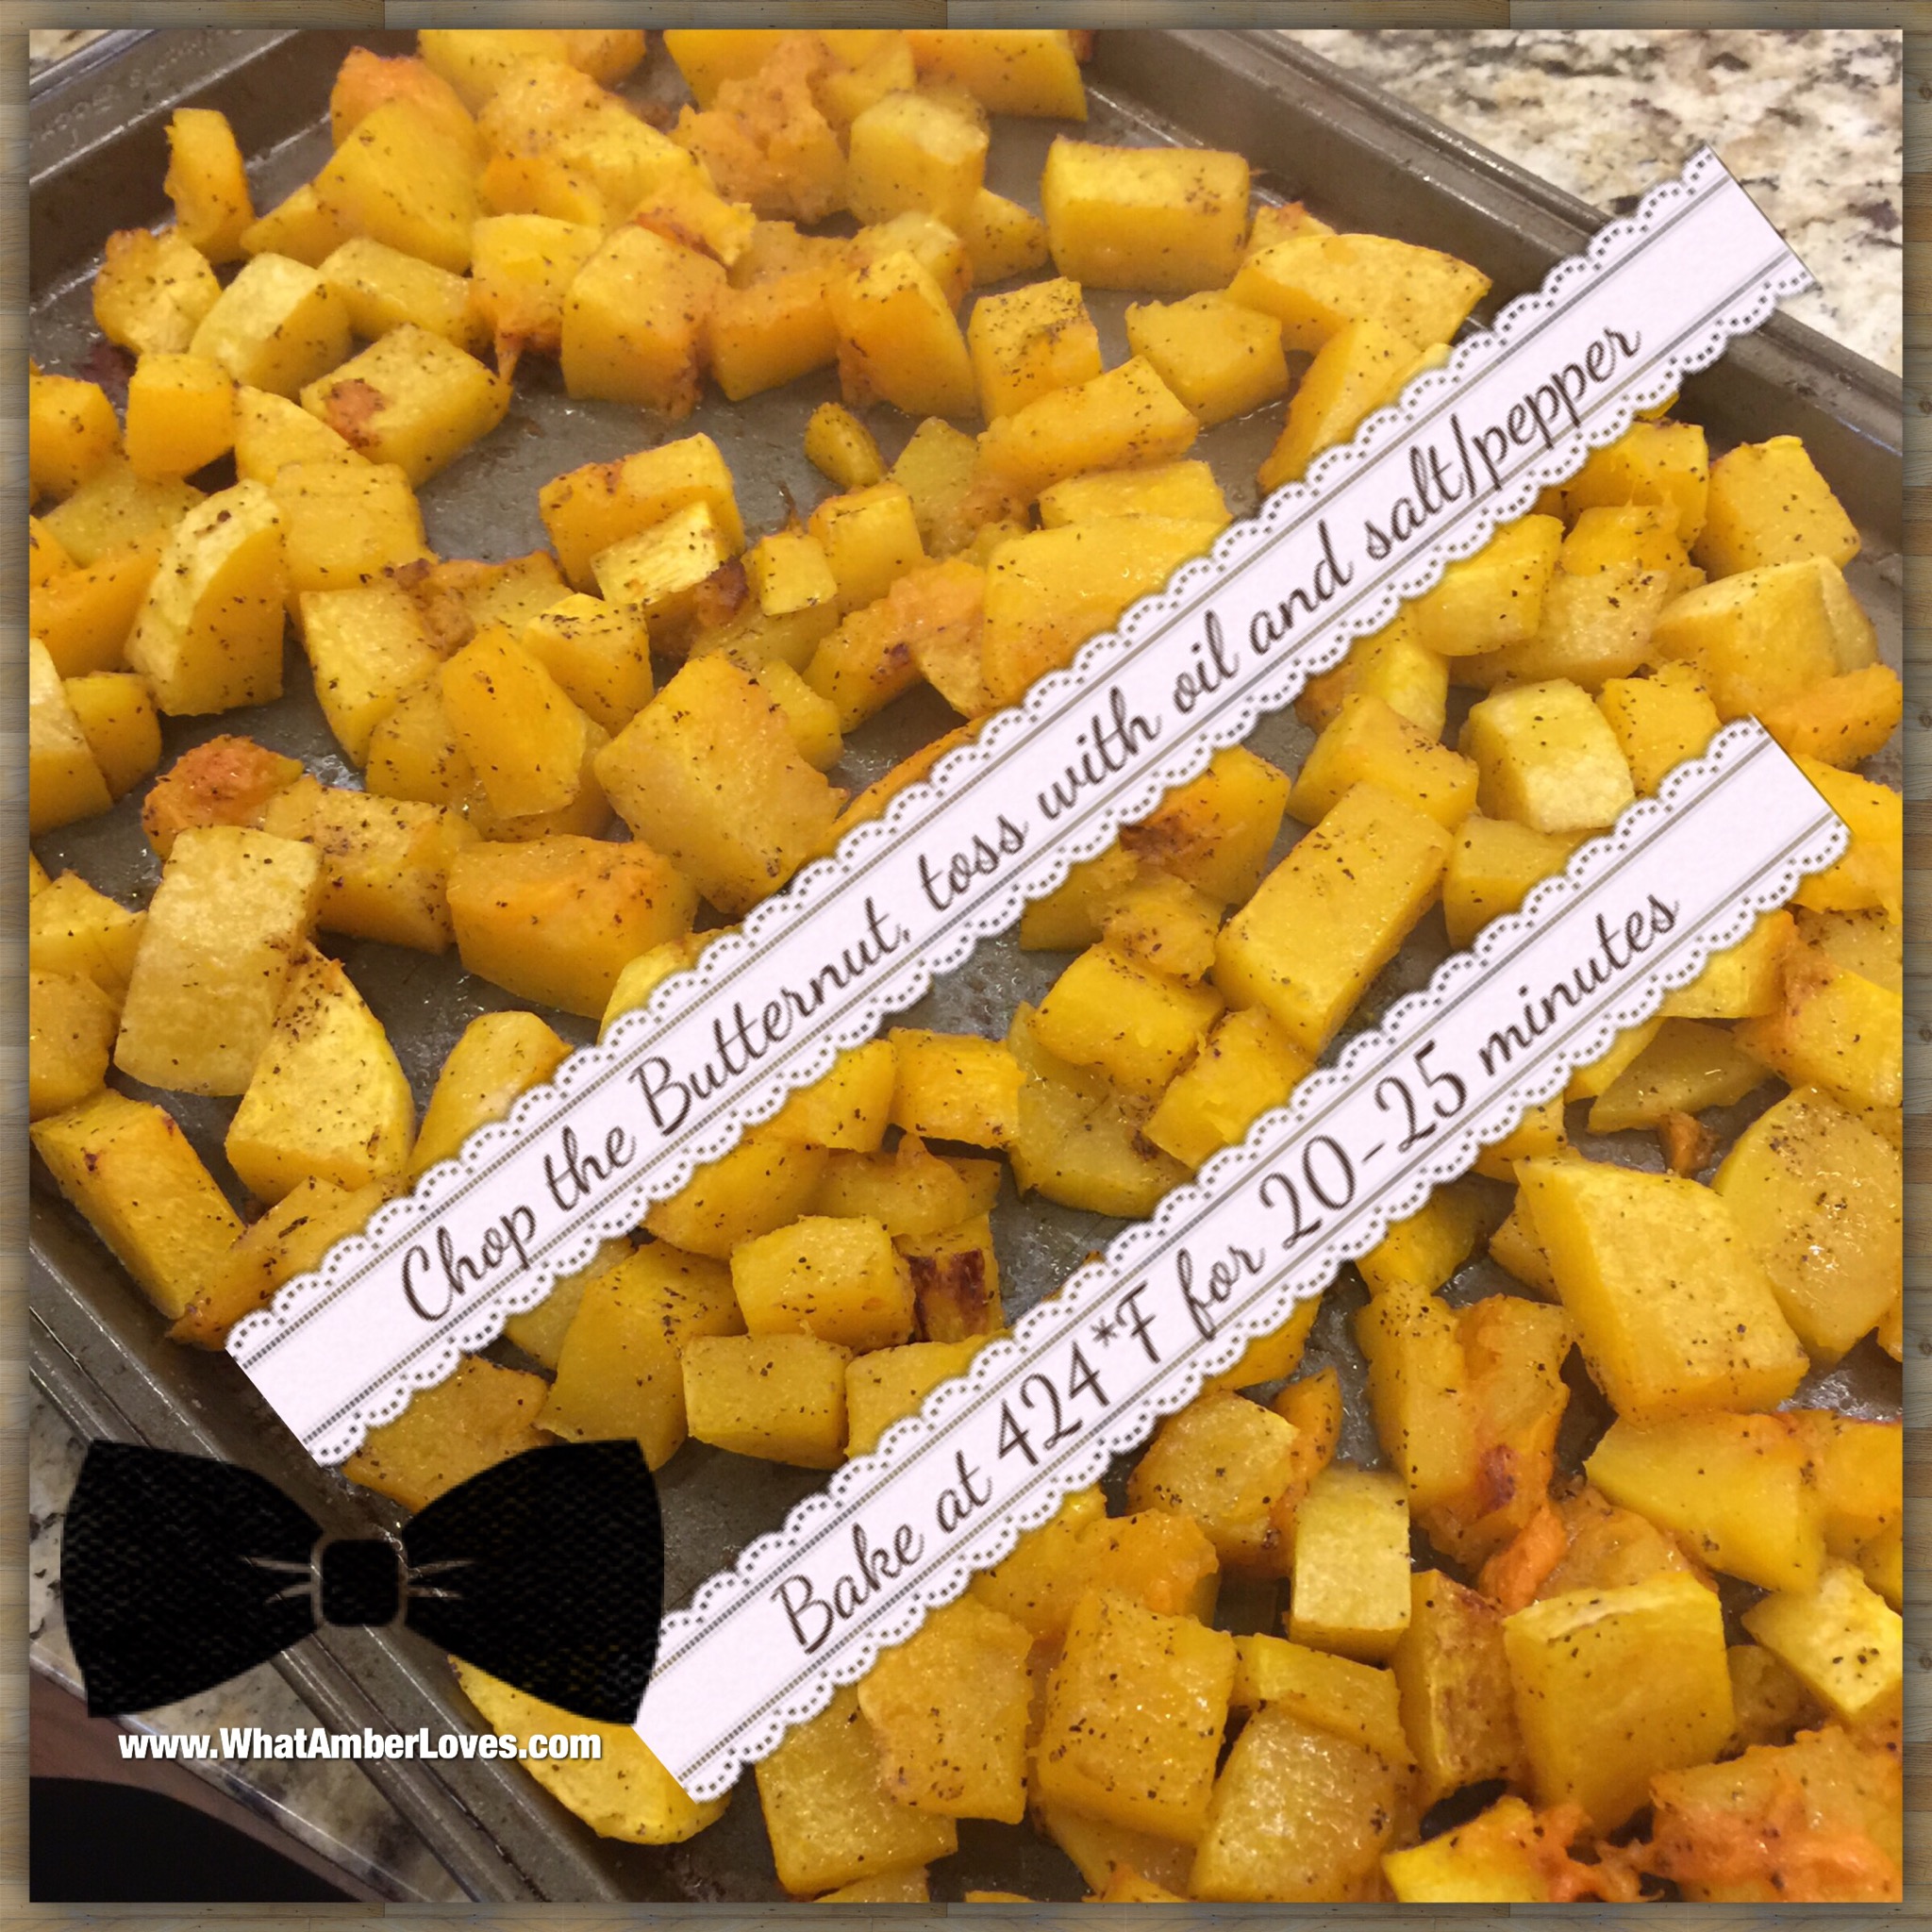
roasted butternut squash
grated lemon peel
stick of butter
Fresh sage leaves, garlic powder, red pepper flakes
fresh lemon
DIRECTIONS:
1) Peel, chop and toss in olive oil your butternut squash, then in a hot oven roast at 425 degrees fahrenheit for 20-25 minutes. Cook your jumbo pasta shells according to directions. Steam your spinach according to directions.
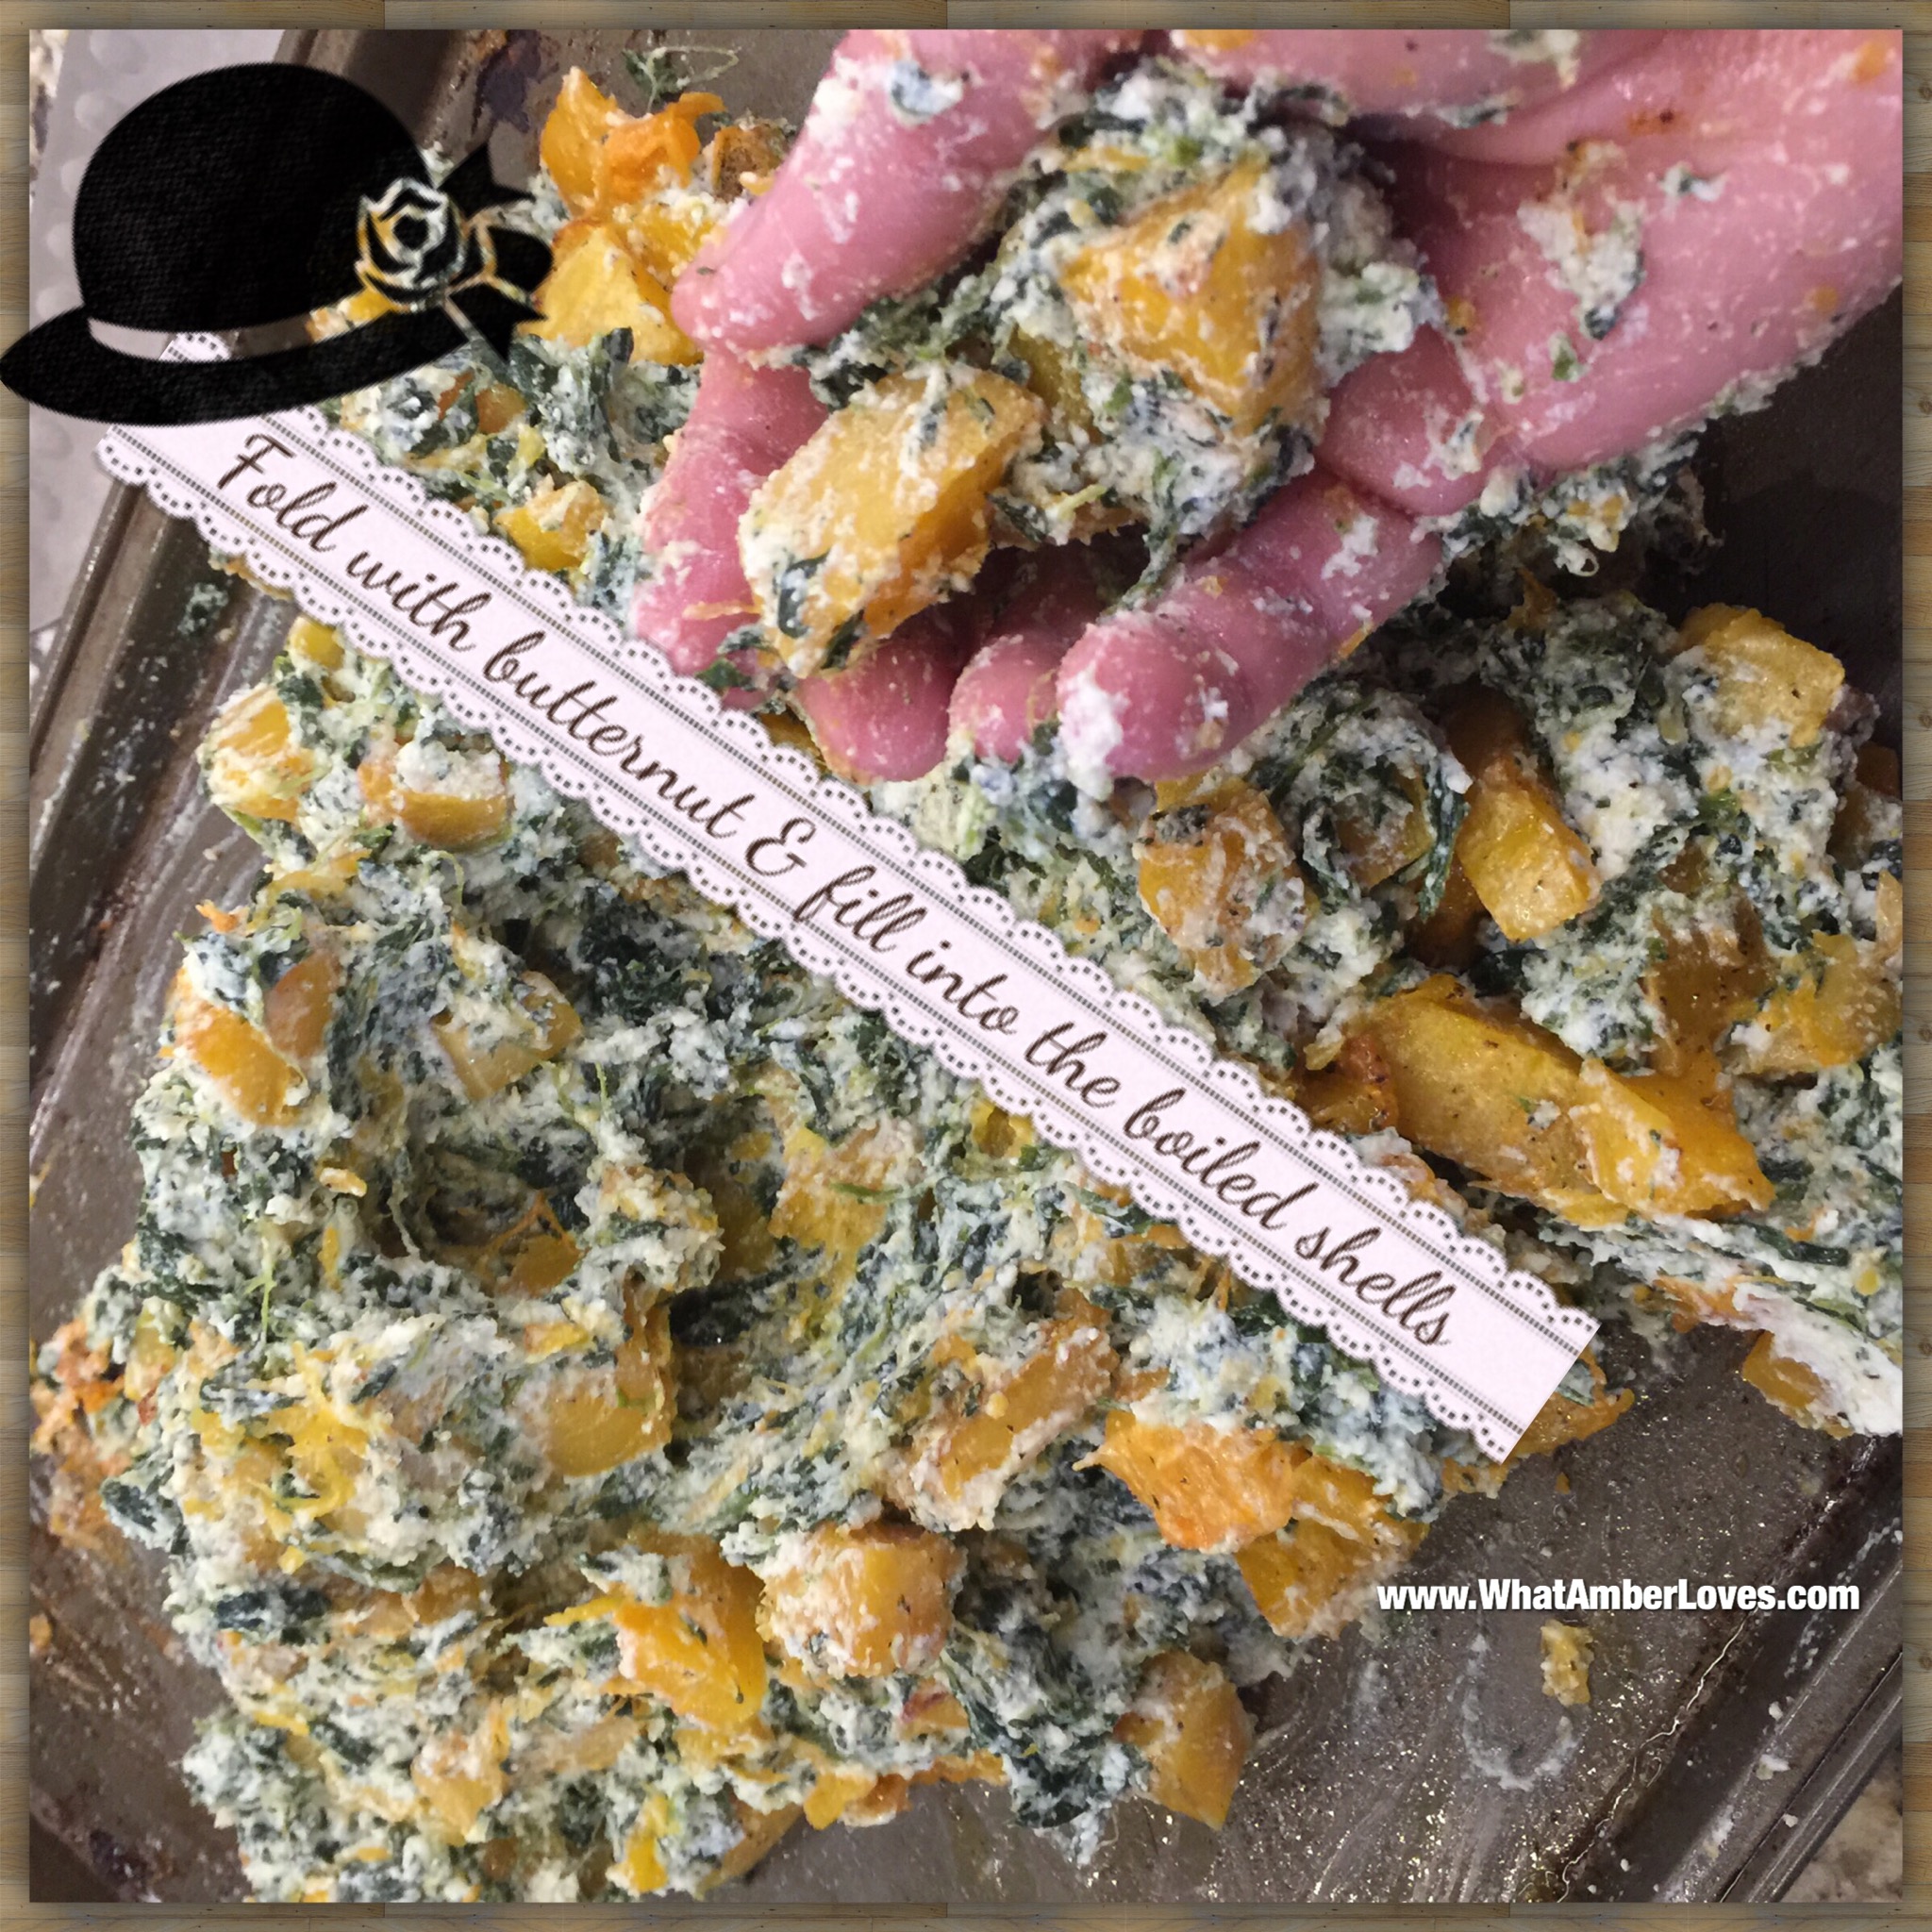
2) In a bowl add approximately 2 cups of ricotta, 1/2 cup parmesan cheese, 1 fresh smashed garlic clove, frozen chopped spinach ( squeezed and drained), salt, pepper, your cooled down roasted squash, and grated lemon peel. The lemon peel was key to this dish and added a nice bright flavor. Stuff the shells with the mixture and place in a buttered baking dish and top with shredded pepper jack cheese.
3) Place your shells in a 400 degrees fahrenheit oven until heated through around 20-25 minutes.
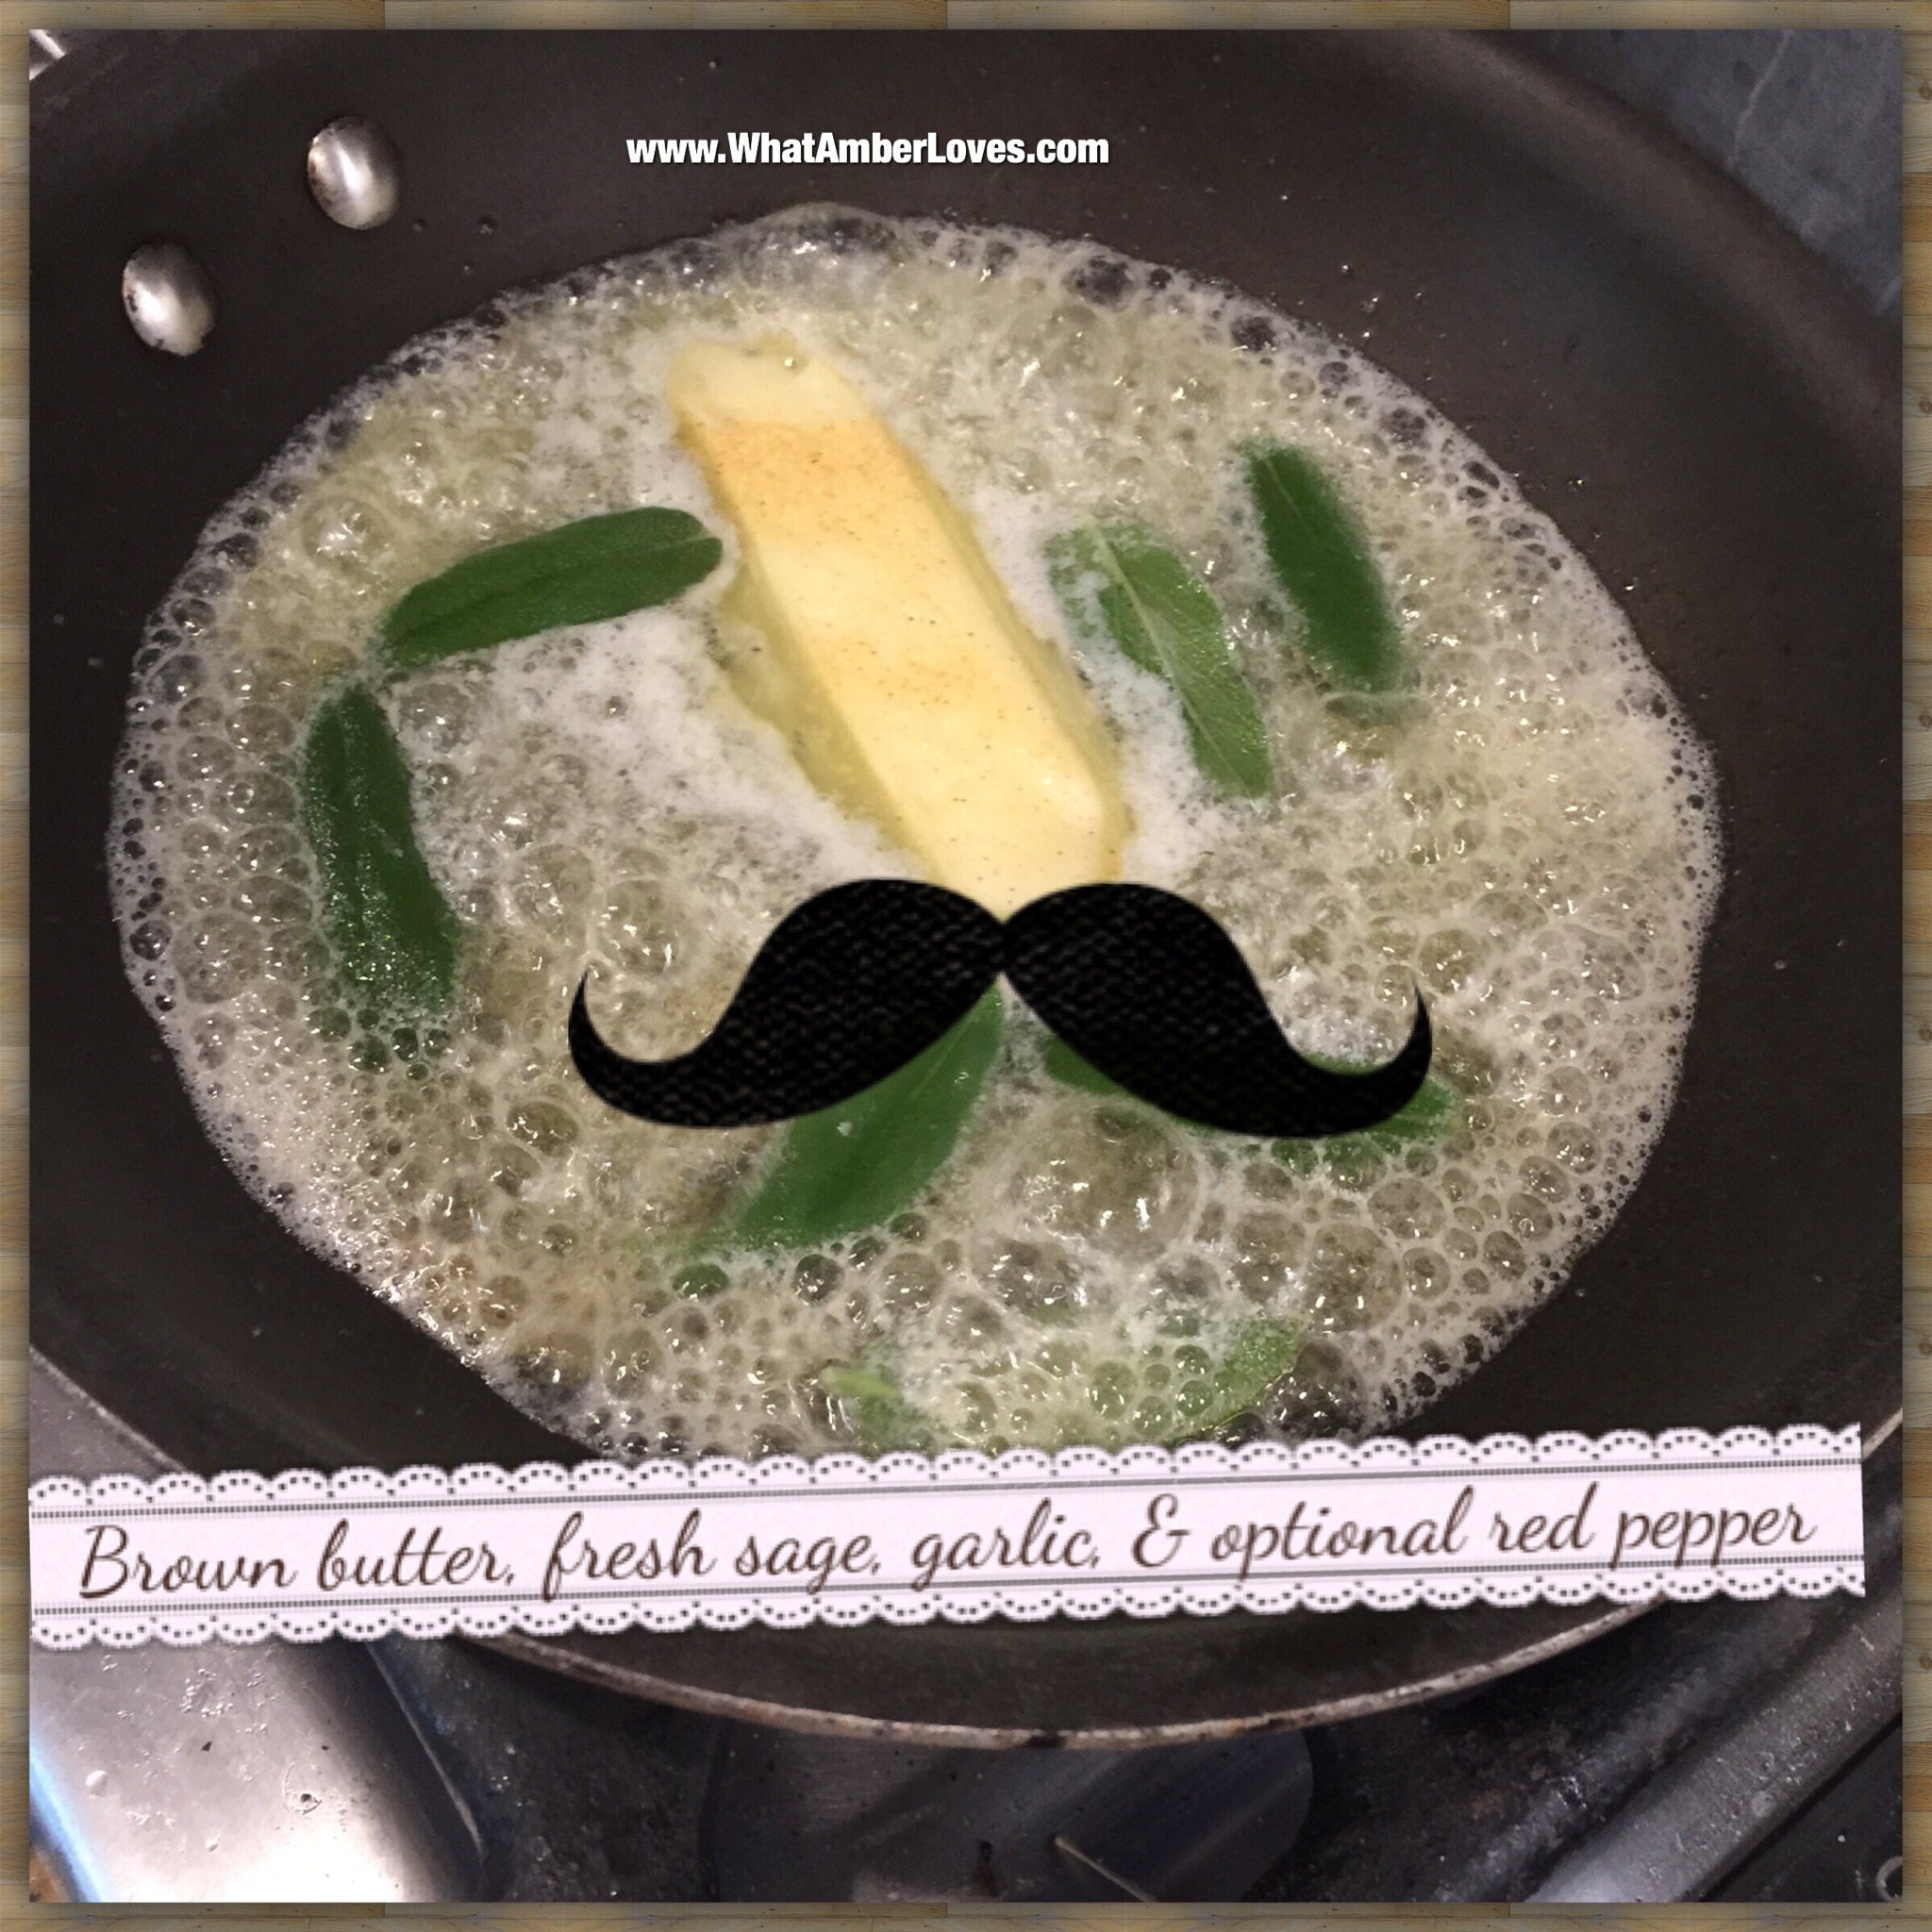
4) While it bakes, make a sage brown butter sauce by melting 1 stick of butter in a saute pan until golden brown and bubbly. Add at least 10 sage leaves until slightly crisp, garlic powder, & crushed red pepper flakes. Turn off heat and squeeze in fresh lemon juice. When it finishes baking and cheese is melty, spoon your warm sage sauce all over and sprinkle with grated Parmesan. Enjoy!


Try it?
Your Friend, AmberHH

Daily DIY: gemstones on estate silver!

You don’t have to read very many of my design/decor project posts to know that thrifting (vintique stores, garage sales, estate sales, etc) and transforming my finds is a favorite hobby of mine.
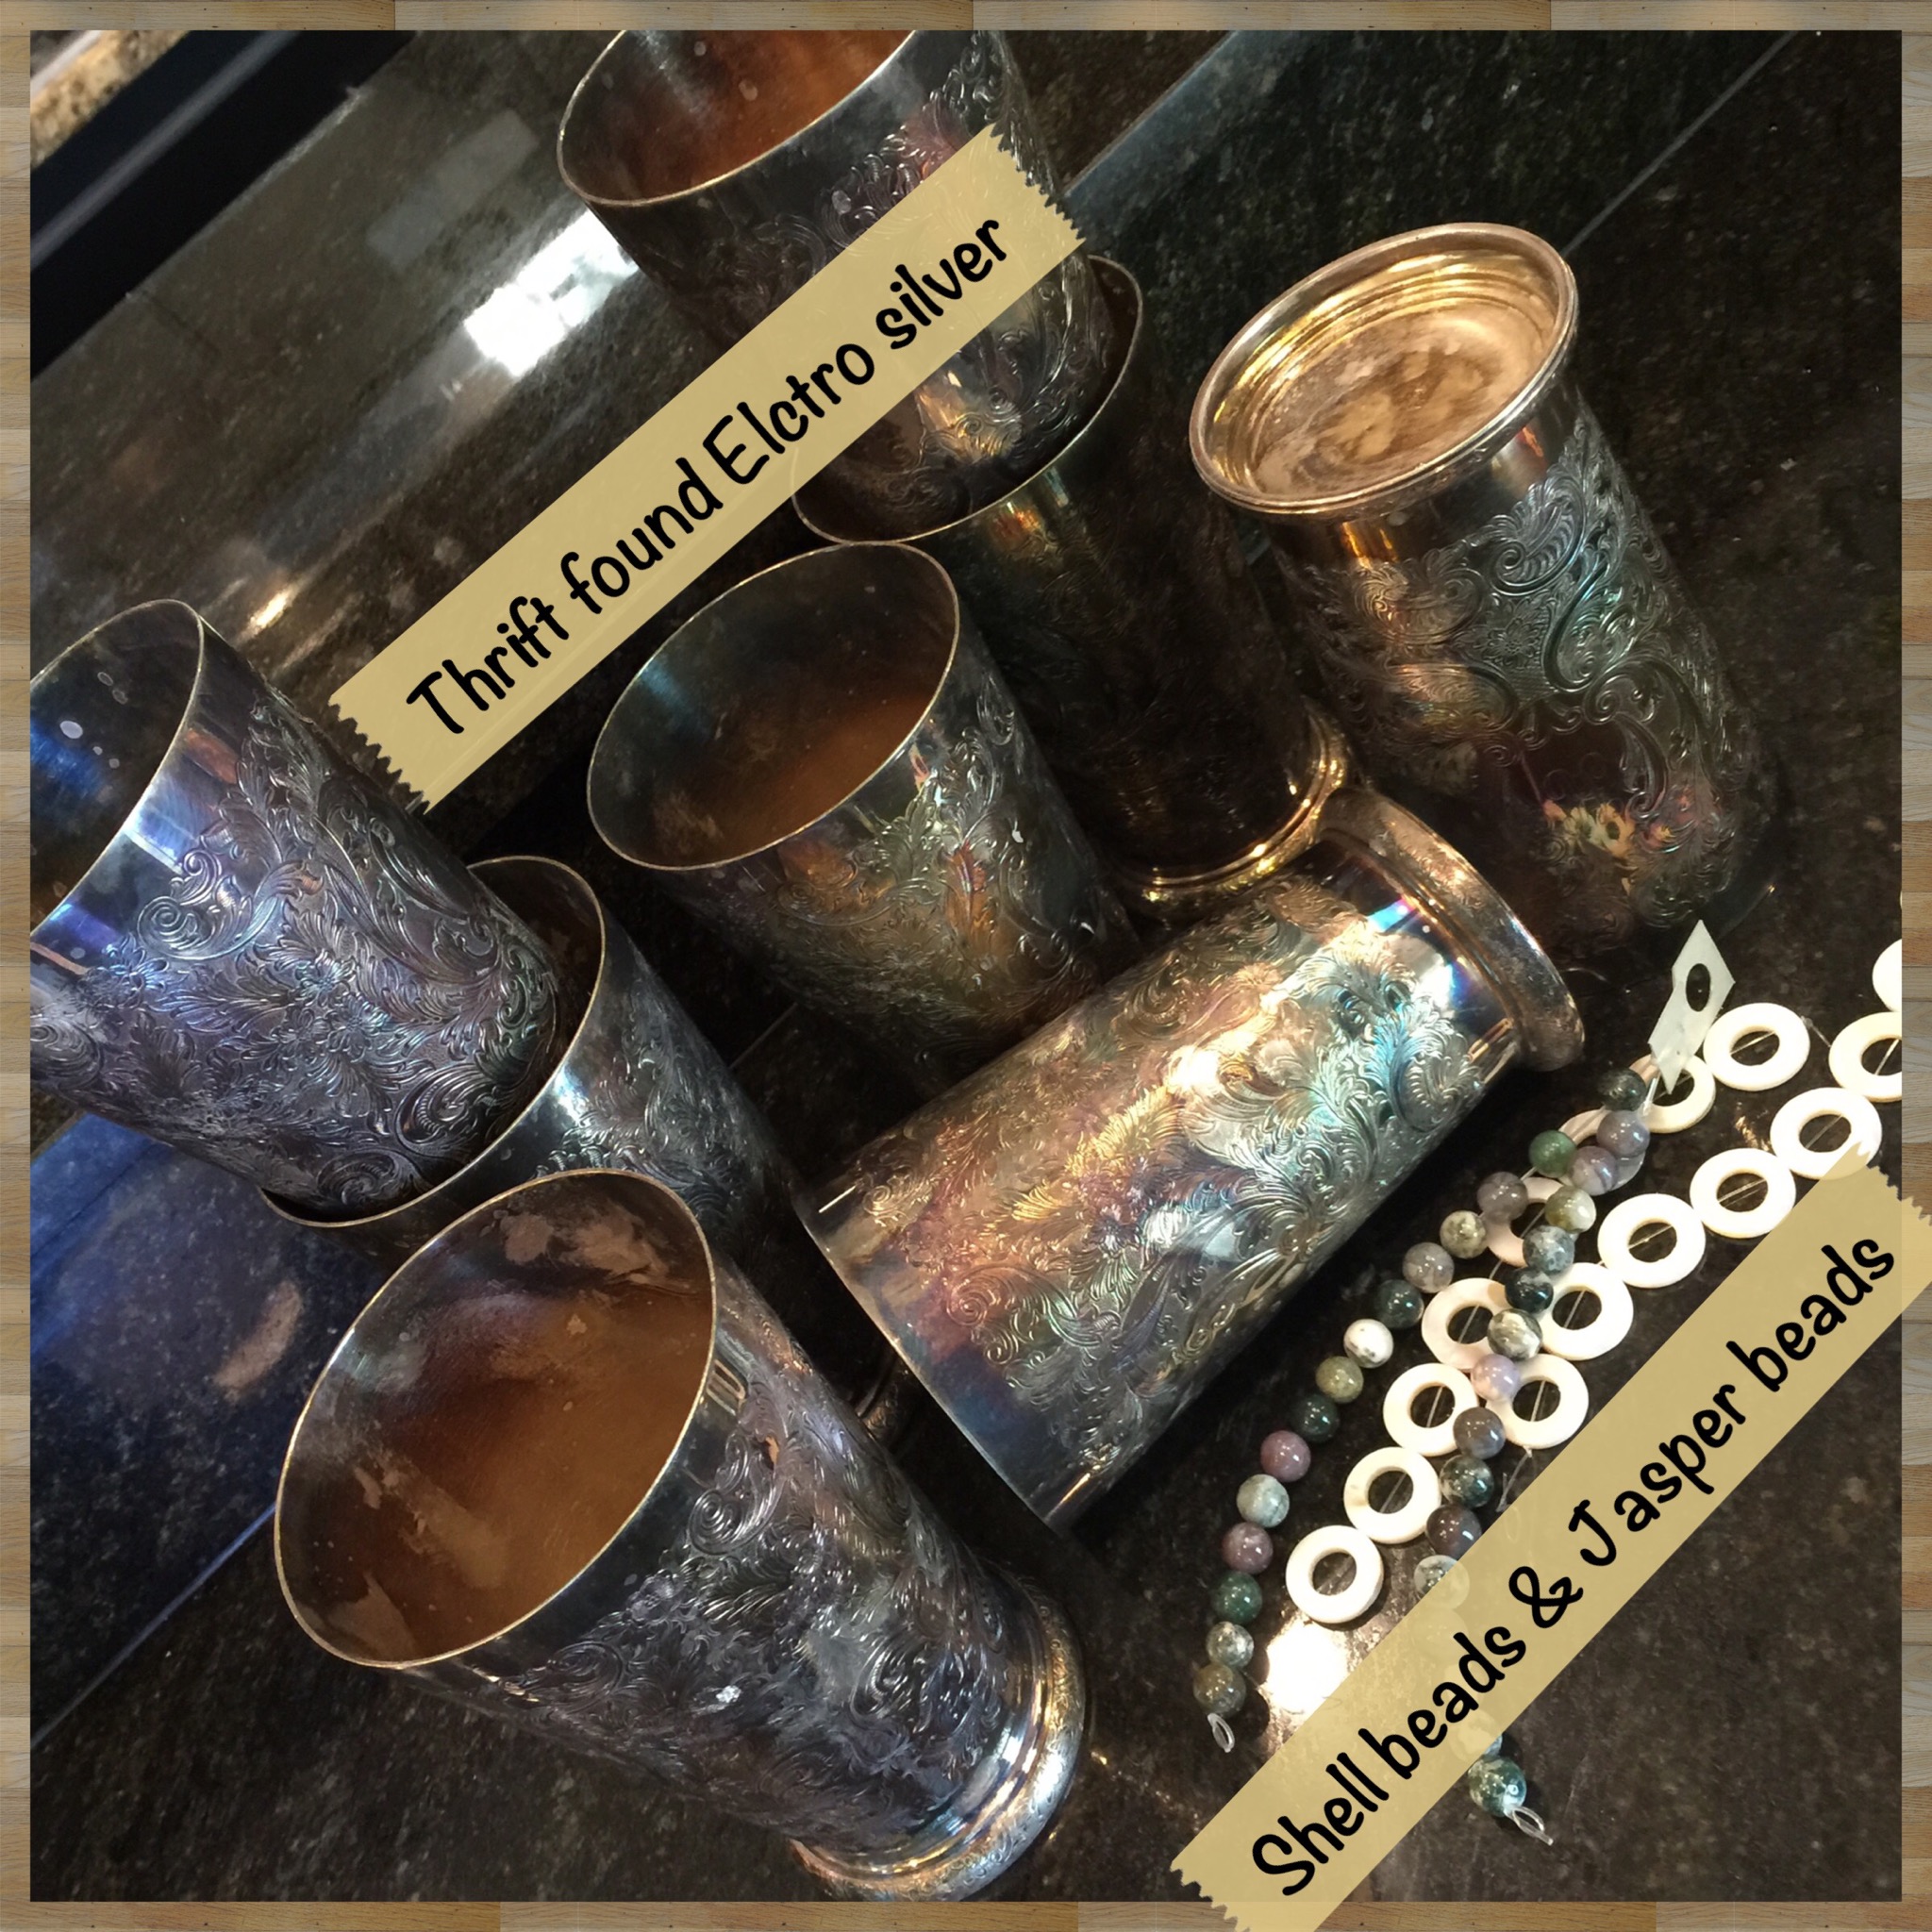
Recently, I arrived early, stood in line awaiting opening, and found another great deal at an Estate Sale, here in Little Rock, Arkansas! The deal: I found a set of eight (8) silver electroplated vessels, intended to be used for drinks. They were only $1 each, and I knew I needed to buy them, even though they were engraved with a “K” on two sides of every piece.
For awhile, they’ve been tucked away in a cabinet, awaiting my effort to find a local engraver to alter the K into an H.
I changed my mind about going to that trouble, and I decided that it would be much more interesting to embellish the silver vessels with some sort of gemstone cabochons or charm or whatever caught my eye in order to cover the K!
Gem cabochons (16) turned out to also be a bit pricey for what I wanted to do, but I found BEADS! Glorious beads!! Yea!! I just used a quick setting, two part, clear epoxy to adhere them!
The “frame” beads are made of SEASHELL, and the sphere beads are JASPER! Yay!!
So, here they are!! All 8, currently being used as vases in my kitchen! (Wisteria, Rosemary, and Lacebark Elm branches from my yard.)
Some, I lightly cleaned and others I left the patina.
I absolutely adore them! I think they have a very peaceful, ethereal vibe as I sit here staring at them while I type this project post!


Whatcha think? 😊🙌
💞–AmberHH


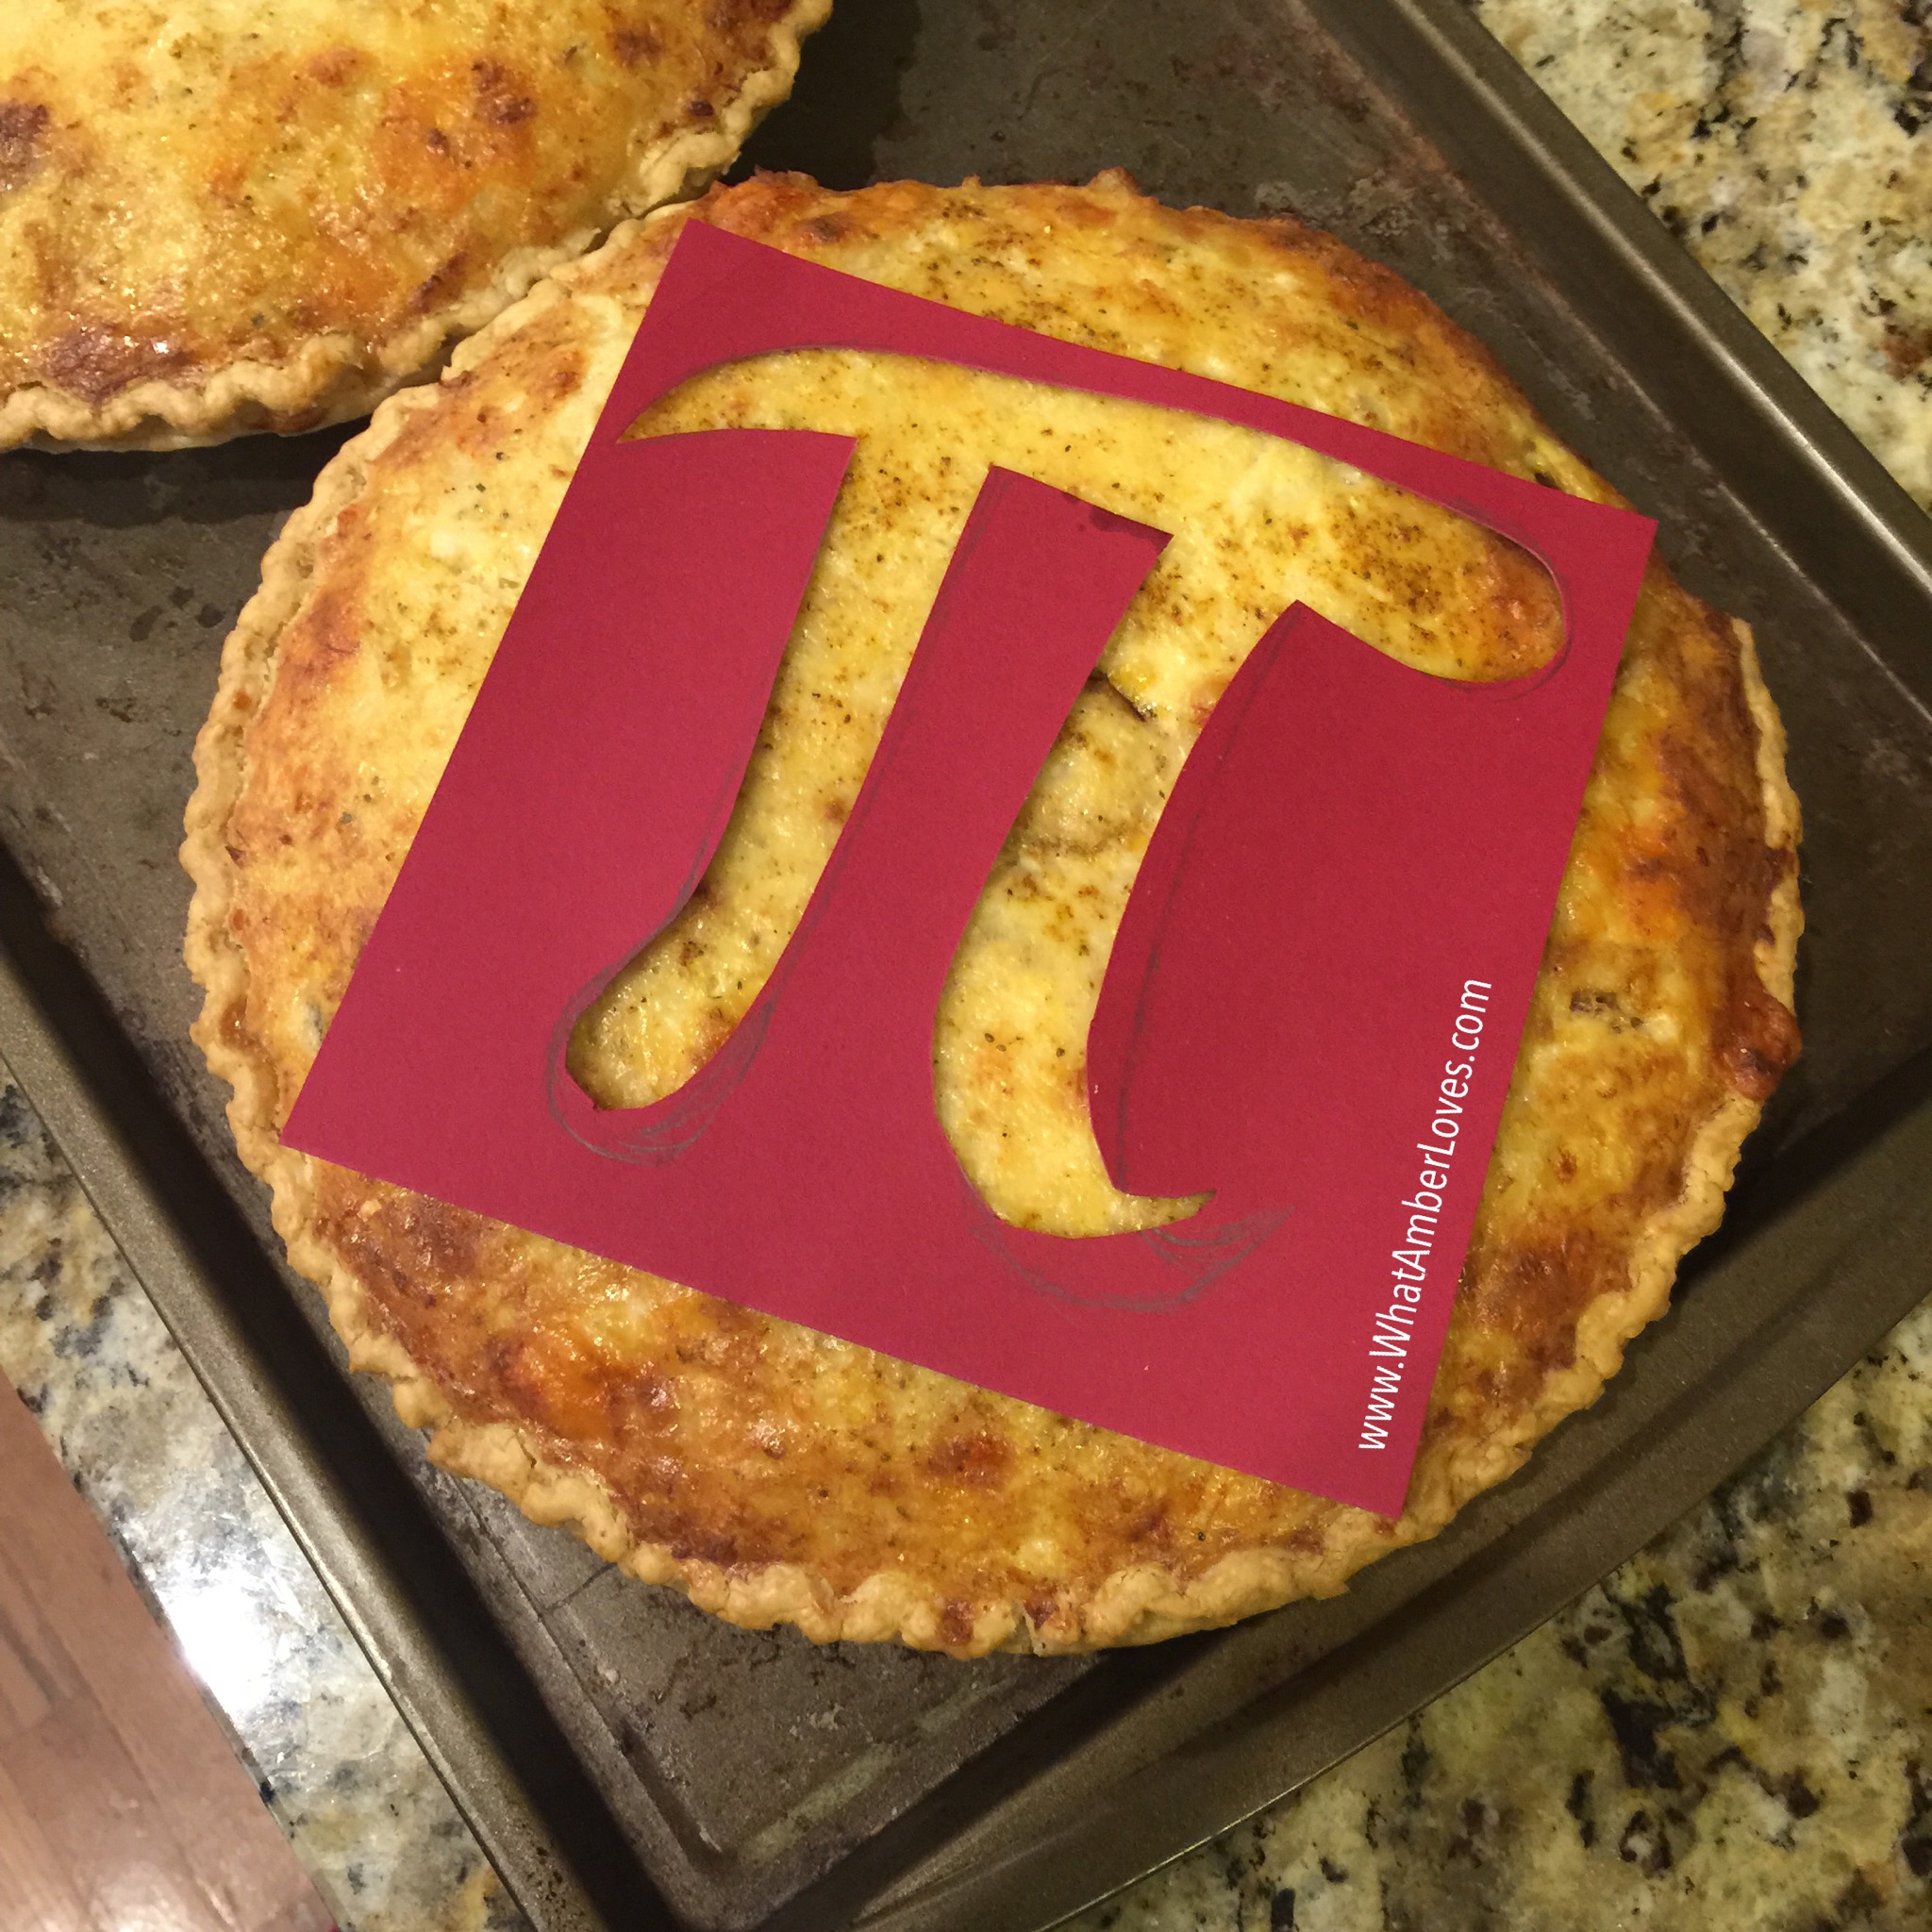
pi Day = 3.14 “Cheesy Crab Pie”

I like theme days! They’re like simplified, fun holidays! You? In honor of 3.14, March 14th, we made Pie for pi day! Specifically, this is an easy, cheesy Crab Pie!
(More photos after these not too wordy instructions)
Ingredients:
2- 9″ deep pie crusts (baked 3 minutes and cooled)
1 lb. lump crab meat *
4 eggs
2 Tbsp. flour
1 cup mayonnaise
1 cup whole milk
12 oz. shredded Swiss cheese
8 oz. shredded Cheddar cheese
3 tsp. Old Bay seasoning
1- Tbsp. finely chopped onion
1- Tbsp. finely chopped green pepper
Directions:
1) preheat oven to 350*F
2) whisk together eggs, milk, flour, seasoning
3) fold in mayo
4) add crab, cheeses, onion, & pepper
5) divide evenly into two pie shells
6) bake for 50 minutes
*) optional, create a “pi” template, then sprinkle seasoning spices (Old Bay) into the negative space of the template to create the pi 💞👍👍


I served it with a sauté of squash, zucchini, carrots, & onions.


Happy “pi Day,” Friends!
😊 — Amber Hamilton Henson


Quick Crab Bisque!

Serves: Serves 6
Ingredients
1 pound lump crab meat
2 stalks celery, reserve the celery leaves, finely diced (about ¾ cup)
1 cup of shredded/grated “matchstick” carrots
1 clove garlic, minced
celery leaves, chopped
1 tablespoon chopped parsley
1-2 cups fresh spinach leaves
3 tablespoons reduced fat butter
3 cups chicken broth
2 cups half-‘n’-half
½ cup sherry (can use cooking sherry)
3 tablespoon all-purpose flour
black pepper, to taste
Instructions
Melt the butter over medium heat in a large pot. Add the carrots and celery, cook until just softened, 5-7 minutes. Sprinkle in the flour, and cook, stirring, for 1 minute. Pour in the sherry until all absorbed, stir, browning slightly for 1-2 minutes. Add chicken broth, add the garlic, chopped celery leaves, chopped parsley, spinach, and pepper. Bring to a boil and cook for 3-5 minutes. Reduce heat, stir in light cream, stir and cook over low heat until heated through, then add crab meat, stir, and serve!


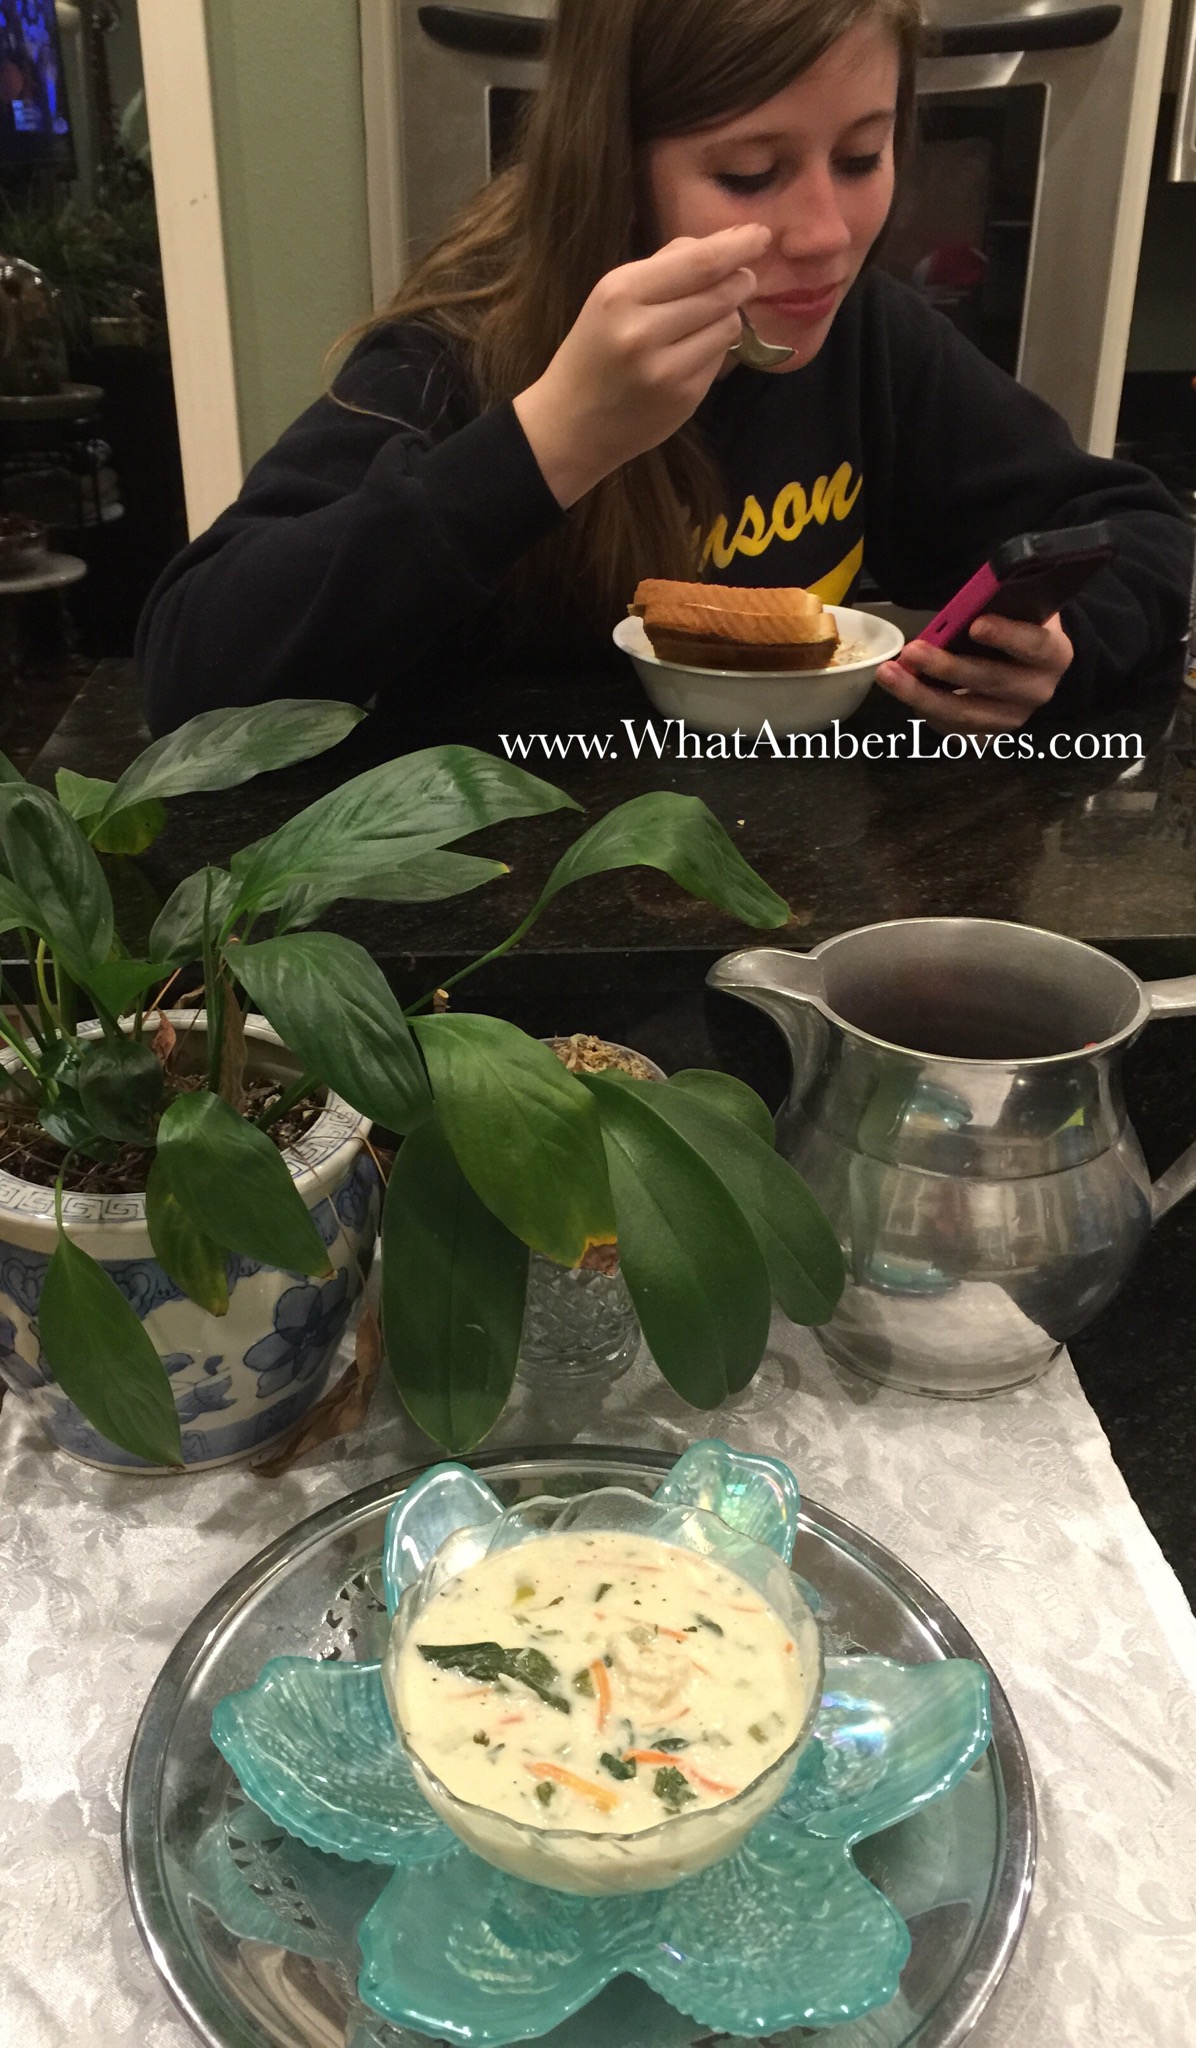
Enjoy! Daughter paired it with garlic cheese toast!
💞😃

Your Friend, AmberHH


TexMex Spaghetti Squash for “National Spaghetti Day!”

Another low calorie yummy meatless meal rich in vitamins and fiber!
Spaghetti squash, black beans, corn, sautéed onions, peppers, & garlic. + cilantro, cumin, oregano, & chili powder!
This is my new replacement for taco night!
(Mitch had cheese on his! I didn’t.)


Easy instructions:
1) split your spaghetti squash and cook it face down in 1″ of water in a casserole dish. Shred with a fork after its done.
2) chop veg and sauté, stir in beans, and taco seasoning or other TexMex spices.
3) stir the sauté ‘d veg into to spaghetti squash shell and serve! *Optional, coat with shredded cheese and bake until cheese melts!

Enjoy!
Your Friend,
Amber Hamilton Henson

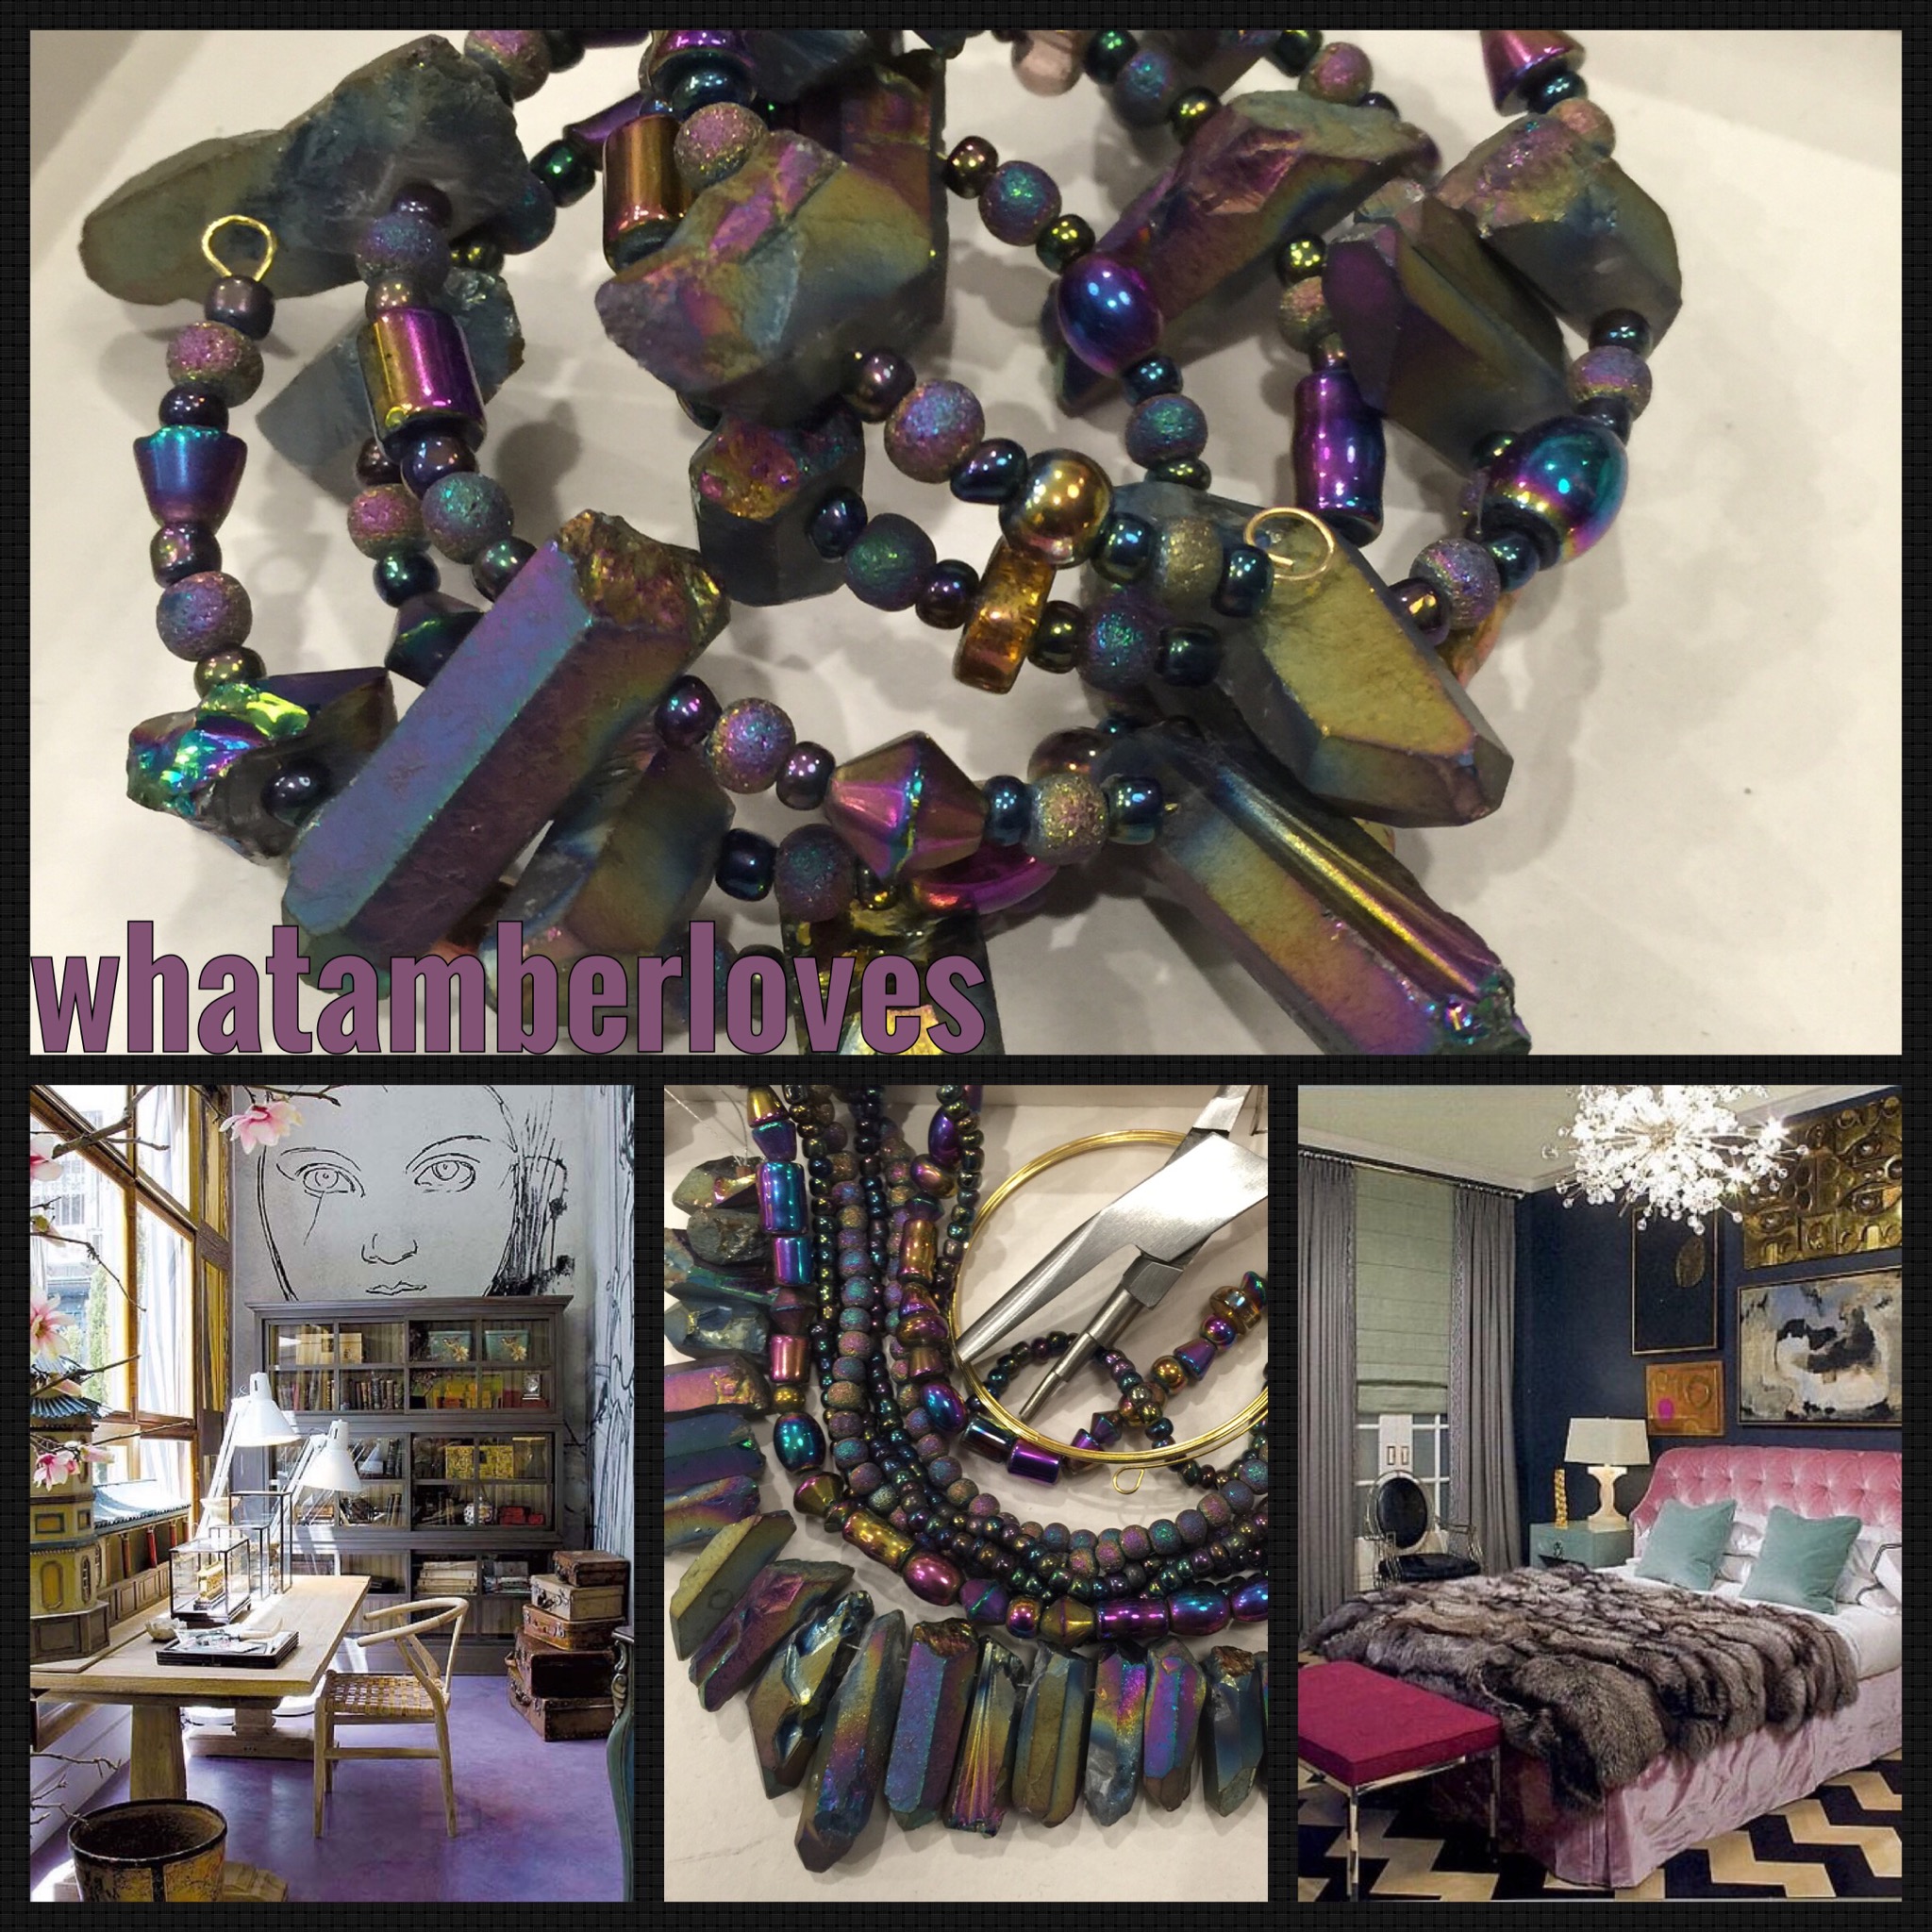
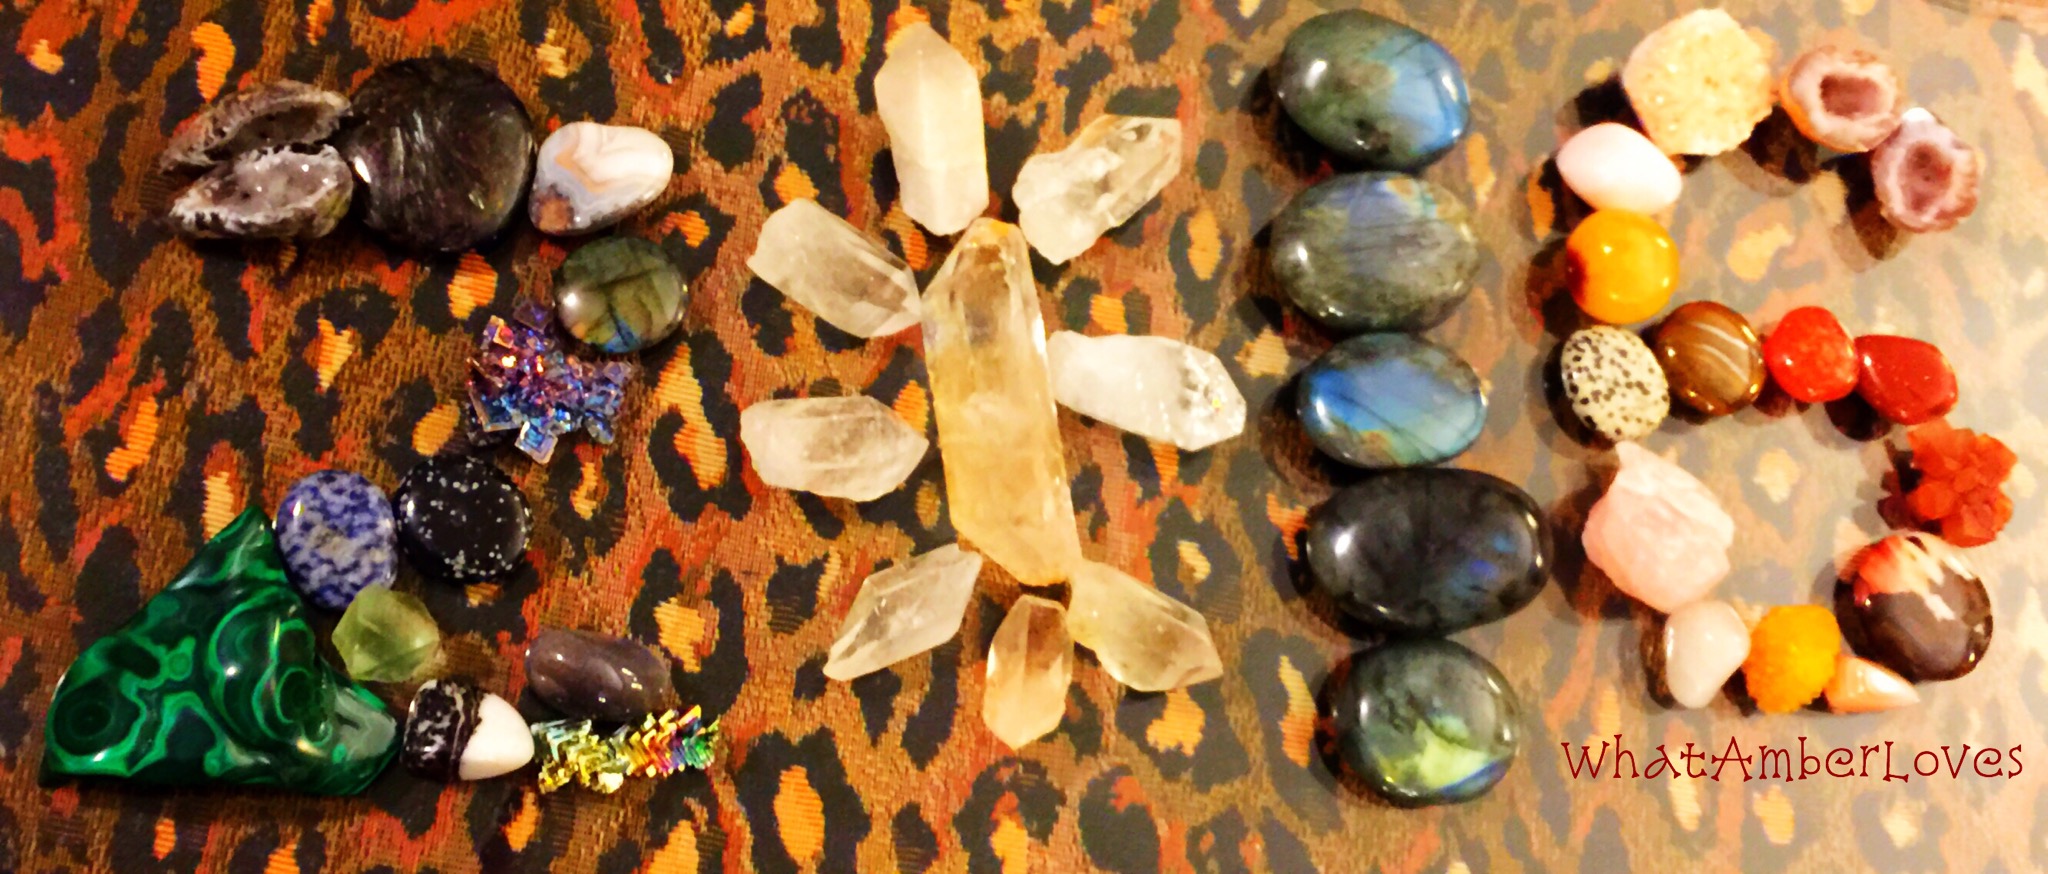
Titanium QUARTZ Memory Wire Bracelet!
An easy DIY project:
*beads
*memory wire
*looping tool, for ends of wire


Sacred Adornment!
😊💎💚💙💜💎😊
You may remember another memory wire bracelet (sacred adornment) that I completed recently. I discussed how it mentally/emotionally transports me to another space/vibe. See the other bracelet, here: https://whatamberloves.com/2015/08/14/sacred-adornment-quartz-memory-wire-bracelet/
While this bracelet is similar in many ways, it takes me in a completely different direction than the previous bracelet.

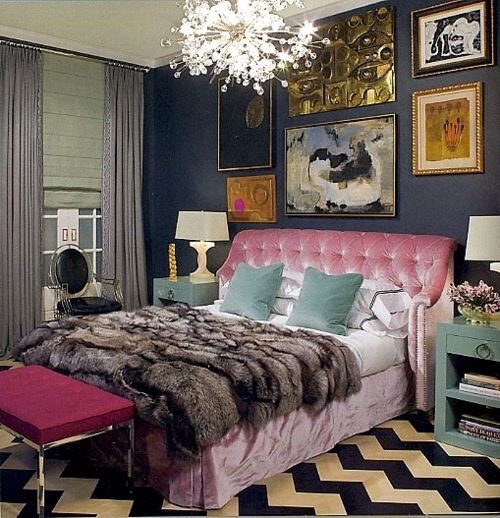
Mind you, while I was crafting this bracelet, physically I was in my own living room trying to tune out whatever noisy show the husband was watching on TV. Holding these stones, focusing on their spectrum of colors, and mentally flipping through the racks of clothes in my closet assembling an outfit to wear with the bracelet, I was completely enveloped in other spaces … other rooms in my mind, if you will. The full resolution photos of the rooms and/or links to their original publication sources can be found on my Pinterest board, “Rooms that Inspire Me” the link: https://www.pinterest.com/amberhh/rooms-that-inspire-me/
Well, thoughts?
Leave me a comment!
Pin the project/story using the gray “Pinterest” button at the bottom of this post?
Thanks, in advance!!
Your Friend,
–Amber Hamilton Henson


Seasons’ Greetings! Winter Edition
This has been a fun filled season so far!


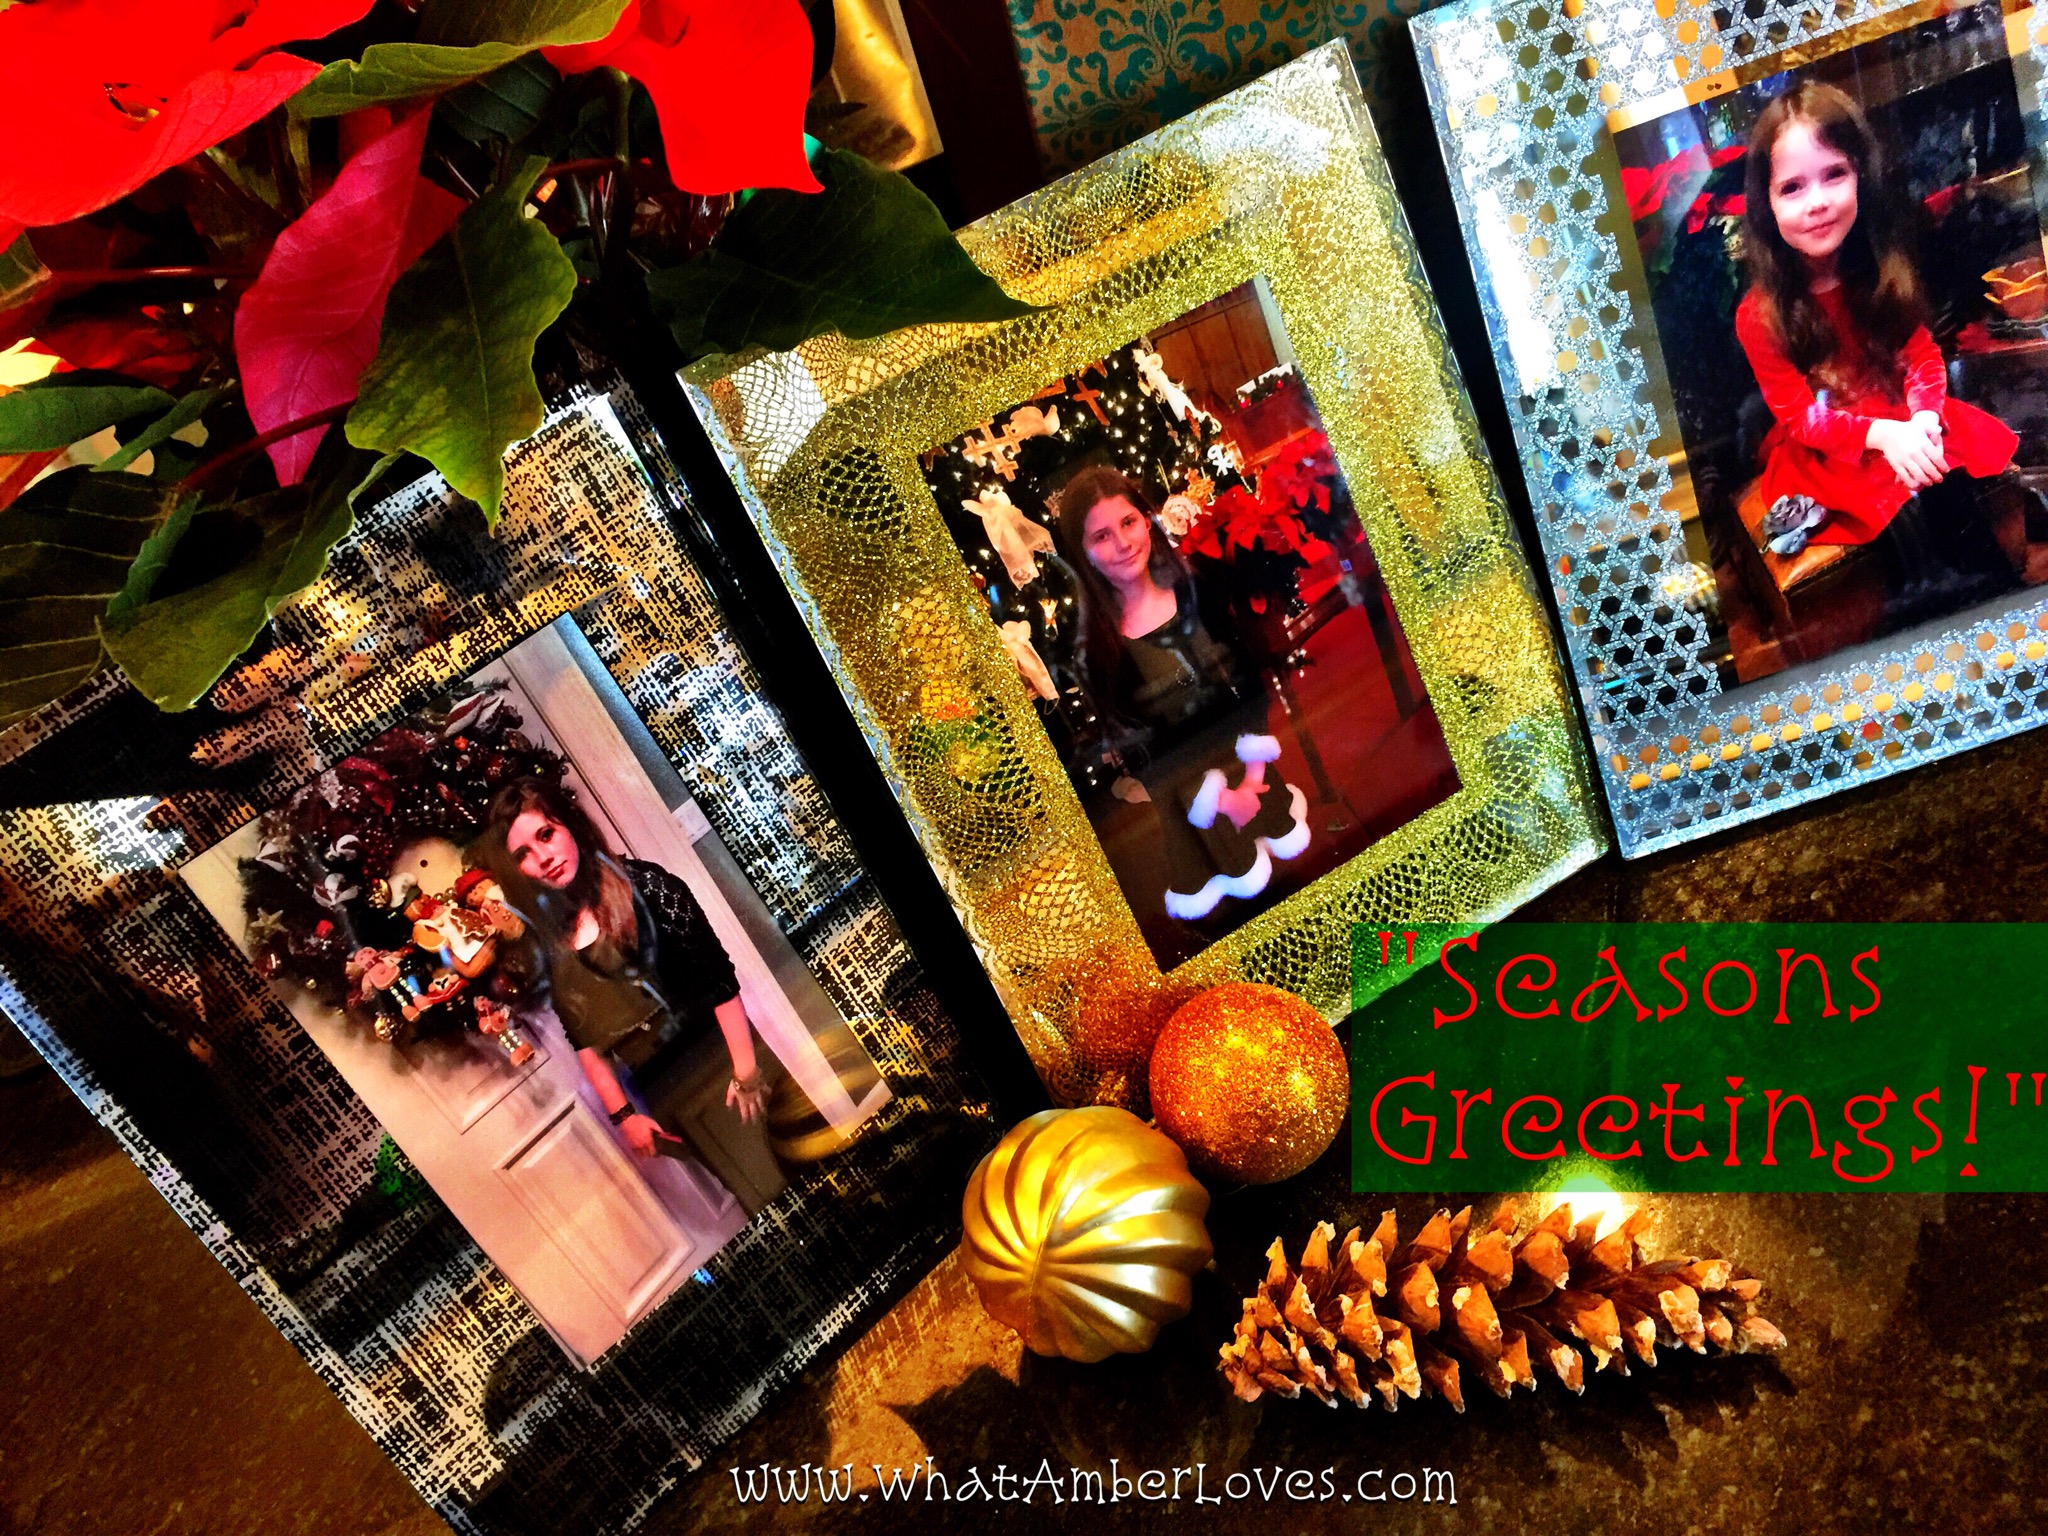

We’re sure looking forward to 2016, too!
💞
Amber Hamilton Henson


