Blog Archives
Hungarian Mushroom Soup
Hungarian Mushroom Soup
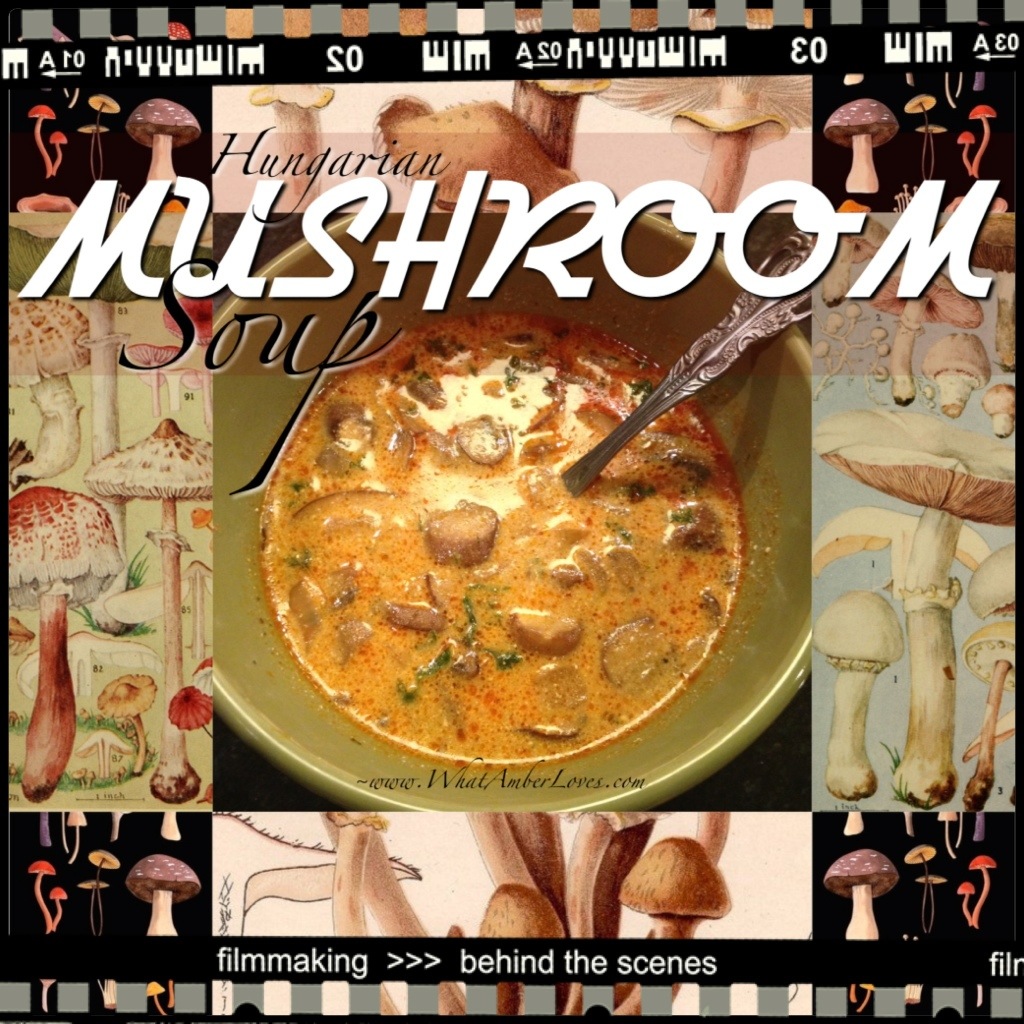
I LOVE It!! Really, really loved it!! It is by far, my favorite new soup discovery!!
Adapted from AllRecipes
4 tablespoons unsalted butter
2 cups chopped onions
1 pound fresh mushrooms, sliced
2 teaspoons dried dill weed
1 tablespoon paprika
1 tablespoon soy sauce
2 cups chicken broth
1 cup milk
3 tablespoons all-purpose flour
1 teaspoon salt
ground black pepper to taste
2 teaspoons lemon juice
1/4 cup chopped fresh parsley
1/2 cup sour cream
DIRECTIONS: (makes 6 servings)
1) Melt the butter in a large pot over medium heat. Saute the onions in the butter for 5 minutes. Add the mushrooms and saute for 5 more minutes. Stir in the dill, paprika, soy sauce and broth. Reduce heat to low, cover, and simmer for 15 minutes.
2) In a separate small bowl, whisk the milk and flour together. Pour this into the soup and stir well to blend. Cover and simmer for 15 more minutes, stirring occasionally.
3) Finally, stir in the salt, ground black pepper, lemon juice, parsley and sour cream. Mix together and allow to heat through over low heat, about 3 to 5 minutes. Do not boil. Serve immediately.
Last night, I’d originally planned to make Sriracha Fig Jam Chicken Wings, but then I remembered that my daughter was cheering at her middle school home basketball game, so I wouldn’t be home to cook. (Stay tuned for the Wings, they’re happening soon, though.) Hubby to the rescue! He offered to cook!! I thought a soup might be a good idea, since its hard to predict exactly when daughter and I would be home… He made mushroom soup for me, and it was AMAZING! Not only was the soup amazingly yummy, it was pretty cool that he found the recipe and made it just for me and daughter, because we LOVE mushrooms. He doesn’t eat them! As a matter of fact, he avoids them at all costs, the same way I avoid all seafood and fish!! Yet, he made mushroom soup for me!! Is there anything hotter than a hot guy in the kitchen? No, there’s not! 🙂 Lucky girls we are!! We loved the “Hungarian Mushroom Soup!!” Thanks, Mitch! We give you 5 of 5 stars!!
~Amber

PS
Want to see what else is cooked in this house? Check my recipes page or find me on Pinterest.
This recipe will link to other blogs and will be updated with those links at the bottom of the post:
SMOTHERED CABBAGE

Smothered Cabbage:
Some things you just grow up eating, never referring to a recipe, just cooking it the way it has always been cooked. This is one of those things for me, but here is my best attempt to give you my recipe and directions for preparation of “Smothered Cabbage.”

1 medium to large head of green cabbage
6 slices bacon, each cut into 8 pieces
1 yellow onion, chopped
1-2 Serrano pepper, finely diced
1 tsp salt
2 Tbsp black pepper
1 Tbsp sugar
Discard the first few outer cabbage leaves. Cut your cabbage into bite sized pieces.
Fry bacon in a large pot until it is *almost* crisp. Add onions and Serrano pepper into the pan with the bacon; sauté for 5-7 minutes, until onions are translucent. Add the cabbage and sprinkle with s&p and sugar. Toss and stir, coating all pieces of cabbage in the bacon drippings and onions. Cover, and simmer for 40-45 minutes, or until cabbage is tender, lifting lid to toss and re-coat the cabbage every few minutes. Keeping the cover on as much as possible is important to keep it from drying out.
* This is my best estimate for seasonings—I always taste and season while cooking. You can adjust heat by using more or less Serrano peppers and including seeds or not to preference. 🙂 In most cases, I’m not a fan of adding sugar to vegetables, but I do LOVE it here. It makes all the difference in this cabbage!!
Your Friend,
~Amber Hamilton Henson

Please feel free to share!! 🙂
PS
This post will link! Please, visit the links at your leisure:
arkansaswomenbloggers’ sunday-link-up
Trifle
Some of y’all sure make pretty trifles! This isn’t so pretty, but it was certainly a yummy enough dessert for my daughters’ New Year Eve sleepover party last night, apparently, since it is all gone now! Every bit! Love.

Large glass bowl.
Layer of Crumbled brownies.
Layer of Jello Chocolate Pudding.
Layer of Cool Whip.
Layer of Heath brand toffee bits.
Repeat layers. Refrigerate. 🙂

Happy New Year, today!
I’ve got black eyed peas for good luck in the new year cooking on the stove, right now! See my recipe for annual Black Eyed Peas, here and on my recipes page!
🙂
~Amber Hamilton Henson
Sriracha Brussel Sprouts!

So, I found this amazing recipe. Rather, it’s creator found this blog via WordPress. I, then, found the Nerdsteak.com site and this recipe for Sriracha Brussel Sprouts. Readers, I don’t know if you know or not, but WordPress is its own neat community these days! When I first started blogging a year and a half ago, I always felt like I was talking to myself, but finding other blogs to read and realizing that others find this blog is pretty cool, now!
As soon as I saw his recipe, I knew I had to make it! I couldn’t find the exact spice blend that he uses at my local grocery store (I’ll look into buying it online; it looks like a cool brand of spice products), so I used what we, in this house, refer to as “Rooster Sauce.” It is the Huy Fong Foods SRIRACHA. The results were incredible!! AND, it was super easy to make!!
Directions:
Cut Brussel sprouts into halves or quarters
Coat in olive oil, tossing in a bowl
Drizzle and coat in Sriracha in the same bowl (1/2 cup or so)
Spread onto baking sheet and add s&p, to taste
Bake at 350F for about 20 minutes
Stir in more Sriracha and coconut (1/2 cup or so) and almond slivers (1/2 cup)
Return to oven for an additional 5-8 minutes!
Sooooo good!
Pics: (click on photos to enlarge)


I served lamb meatballs with these Sriracha Brussel Sprouts tonight and LOVED it!
Thanks, Nerdsteak.com!
Your Friend,
~Amber Hamilton Henson

PS
This post will link! Please, visit the links at your leisure:
arkansaswomenbloggers’ sunday-link-up
Buffalo Chicken Crescent Roll “Lasagna”

Somedays, it just nice to put together something quickly and easily that you know the kids will eat. When you can let just a few easily accessible ingredients do the heavy lifting, it is even better! Days that I make a meal using only one frying pan and an 8″x8″ dish without messing up a cutting board, a bajillion mixing bowls and measuring cups, then I have time to actually spend with my girls! Love!
Tonight, I layered crescent rolls, chicken in Buffalo sauce, shredded cheese, repeat, repeat, repeat. “Lasagna” style! So easy!
Here are the ingredients:
2 pounds of Tyson ground chicken (cook in pan, until done)
1 cup of Frank’s buffalo sauce (add into pan after chicken is done)
2 tubes of Pillsbury crescent roll dough
3 cups shredded cheese blend (I used WalMart’s Great Value “Fiesta Cheese”)
Preheat oven to 350F
Grease an 8″x8″ glass baking dish
Layer dough, cooked chicken/sauce, cheese,
Repeat. Repeat. Ending with dough on top, covered in cheese.
Cover with foil, Bake 40-45 minutes at 350F
Turn on broiler to brown cheese on top for 2-3 minutes, if desired.
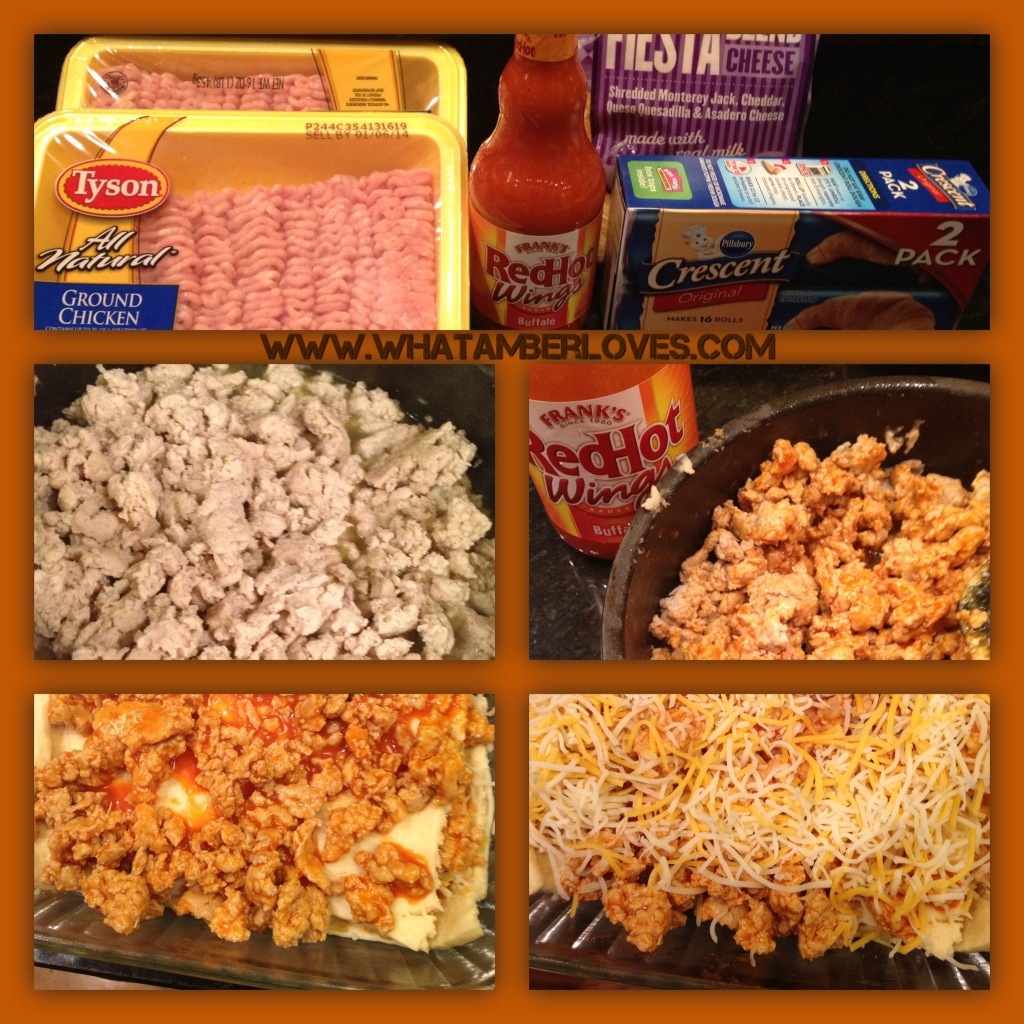
See!
Easy!
No muss, no fuss!
The kids say, “YUM!”
They even ate their brocolli, in order to be granted rights to get a second serving of the Buffalo Chicken Crescent Roll “Lasagna”!
🙂
~Amber Hamilton Henson
Cinnamon Monkey Bread

Cinnamon Monkey Bread
Yum! For as long as I can remember, cinnamon Monkey Bread with a buttery, brown sugar glaze has always been served on Christmas morning.
As a newlywed, years ago, my grandmother and former stepmom each filled out a bunch of recipe cards with favorite family recipes. Knowing that I always loved Monkey Bread, and it was something they both made, the Monkey Bread recipe was included!
It is pretty easy to make, but makes a great presentation! I make it for our kids several times a year; it always a big hit with the girls in the morning after sleep-over parties! 🙂
To make the Monkey Bread:
1.
Start with 28-30 oz of canned biscuits
(I use a generic 4 pack of buttermilk biscuits that work great!)
Tear or cut each biscuit into 4 pieces and toss the pieces into a cinnamon/sugar mix a few pieces at time, tossing with your hands; I use a bowl with about 2 cups of sugar and 4 Tablespoons of cinnamon.
2.
Heavily coat the inside of a Bundt pan with Crisco. Loosely pile the coated pieces into the pan.
3.
In a saucepan, melt 1.5 sticks of butter and 1.5 cups of brown sugar. When it is bubbly and “fluffy”, pour over the coated biscuits in the bundt pan.
4.
Bake at 350F for 40 minutes, then immediately flip onto a plate when removed from oven.

Do you make Monkey Bread? Is your recipe similar? I’ve heard of people adding sweetened cream cheese into the Bundt with the biscuits, but I’ve not yet tried making it that way. If I do, I’ll let you know, but for now, this classic version works for us every time! My goal is to get more of my favorite recipes photographed and organized onto my recipes page slowly, but surely!
Your Friend,
~Amber Hamilton Henson
PS.
This post will link with other blogs and be updated with links to blog parties at the bottom of this post:
arkansaswomenbloggers sunday-link-up
Hershey’s Special Dark Tiger Cookies

Hershey’s Special Dark Tiger Cookies
Ingredients:
1.5 cups granulated sugar
0.5 cup vegetable oil
0.5 cup Hershey’s brand Special Dark cocoa or Hershey’s cocoa
3 eggs
1.5 teaspoons vanilla extract
1.75 cups all purpose flour
1.5 teaspoons baking powder
0.5 teaspoon salt
Powdered sugar
48 Hershey’s Kisses
1. Stir together granulated sugar and oil in large bowl; add cocoa, beating until well blended. Beat in eggs and vanilla. Stir together flour, baking powder, and salt; gradually add to cocoa mixture, beating well.
2. Cover; refrigerated until dough is firm enough to handle, at least 6 hours.
3. Heat oven to 350F. Grease cookie sheet. Shape dough into 1″ balls (dough will be sticky); roll in powdered sugar to coat. Place balls about 2″ apart on prepared (greased) cookie sheet.
4. Bake 11 to 13 minutes or until almost no indentation remains when touched lightly and tops are cracked. Immediately press chocolate Hershey’s kiss into the center of each cookie, if desired. Allow to cool completely before removing from baking sheet.
Enjoy! (yields about 4 dozen)

The backstory: I was recently asked where I get my recipes. Well, I am an avid cookbook collector and Pinterest user, as well as the granddaughter of two women that are both fabulous cooks, and in addition to this blog with a recipes page, I maintain my own handwritten “cookbook” notebook of recipes that I’ve modified and like. I usually try to include the source(s) of my recipes on this blog, unless it is something from my own notebook or shared from a relative. For the most part, I include a link or cite a specific cookbook if I follow a recipe precisely; all photos included with recipes are 100% mine and taken in my own kitchen, though. For example, this is a recipe that is a household favorite around here. It is from a HERSHEY’S 3-in-1 cookbook, and my 11 year old daughter made this batch of cookies! I have a few cookbooks specifically about cookies and baking. Do you have one that you recommend that I try? I’m always looking for the next tried, tested, and truly great cookbook! Here is a photo of a few cookie and baking cookbooks in my collection that I recommend!

When you view this post, specifically by clicking on the title of the post, at the bottom of the post, please find the Pinterest, Twitter, Facebook and other options to share these photos and link! Please, feel free to share! Thanks for the blog love!
Your Friend,
~Amber Hamilton Henson
PINEAPPLE CAKE

PINEAPPLE CAKE
. . . with cream cheese icing!
Ingredients
CAKE:
2 c all purpose flour
2 c sugar
2 eggs
1 tsp baking soda
1 tsp vanilla
pinch salt
1 – 20 oz can of crushed pineapple in heavy syrup ( undrained )
CREAM CHEESE ICING:
1 stick butter
1 – 8 oz cream cheese, softened
1 tsp vanilla
1 1/2 c confectioners’ sugar
1 .
Preheat oven to 350 degree F.
Mix cake ingredients in a bowl with a fork. Pour into a greased 9X13 inch glass pan and bake at 350 for 35 minutes (until top is golden brown).
2.
Icing: Beat butter, cream cheese and vanilla together until creamy. Gradually mix in powdered sugar.
3.
Frost cake with cream cheese icing while still warm. Sprinkle with chopped nuts if desired. (Shown with pecan pieces! Yum!)
4.
Enjoy!

Your Friend,
~Amber Hamilton Henson
PS
This post will link with other blogs:

RUSSIAN TEA CAKES

RUSSIAN TEA CAKES
(jelly filled shortbread cookies)
INGREDIENTS:
cookies: 1 cup salted butter
1/2 cup confectioners’ (powdered) sugar
2 tsp. pure vanilla extract
2 cups all-purpose flour
1/4 tsp. salt
toppings:
1/2 cup fruit preserves/jam/jelly*
1/4 cup confectioners’ sugar
Yield: 2 dozen
DIRECTIONS:
1.
preheat oven to 325 degrees F
2.
in large bowl cream butter and sugar using an electric mixer. add vanilla, scraping down bowl as needed. blend in flour and salt, mixing until thoroughly combined.
3.
roll tablespoonfuls of dough into small balls about 1 in. in diameter. place dough balls on lightly greased cookie sheets about 1 in. apart. press down the center of each ball with a spoon, forming a depression. fill each with a tsp. of preserves or nuts.
4.
bake 15-20 min. or until golden brown. transfer cookies immediately to a cool, flat surface. when cookies are completely cool, dust them lightly with confectioners’ sugar.
*in the photo, you’ll see I used strawberry preserves, fig preseves, and black raspberry-jalapeno jam for variety!
~Amber D. Hamilton Henson

PS: Linking
ArkansasWomenBloggers’ sunday-link-up
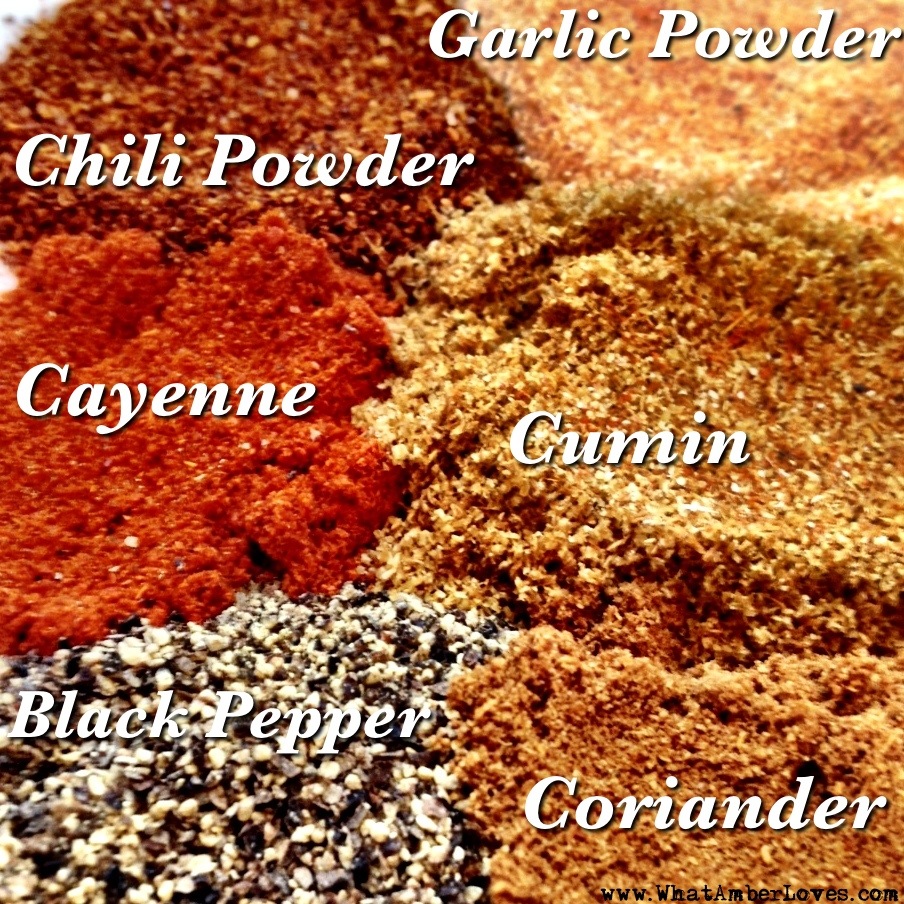
GAMEDAY EDAMAME

GAMEDAY EDAMAME
a.k.a. Spiced, Roasted Soybeans
In honor of Arkansas’s Soybean Month, how about a soybean recipe? We use soy products in a variety of ways throughout the year, but this time of year perhaps it makes sense to share one of our favorite SEC football gameday snacks: “Spiced, Roasted Soybeans! GAMEDAY EDAMAME!!”
Yep, like all of y’all, I serve wings, little sandwiches, chips & dips, and more as snack foods for the hubby while he watches football throughout the season, and I also serve spiced edamame. There are a variety of ways to season soybeans (a.k.a. Edamame) when roasting. Garlic and parmesan is pretty popular and so is this 6 season blend. My husband, Mitch, and our daughters LOVE the spiced, roasted Edamame! Here’s how I served it, today, during the Arkansas/Ole Miss game:
INGREDIENTS:
14 oz bag frozen, shelled soybeans
(a.k.a. EDAMAME)
3 Tablespoons VEGETABLE OIL (soybean oil)
1/2 teaspoon BLACK PEPPER
1/4 teaspoon CAYENNE PEPPER
1/2 teaspoon CHILI POWDER
1/2 teaspoon GROUND CORIANDER
1/2 teaspoon GROUND CUMIN
1/2 teaspoon GARLIC POWDER
1) Preheat oven to 375 degrees F (190 degrees C).
2)Place the thawed edamame into a mixing bowl, drizzle with the oil and salt to taste, then sprinkle with spices. Toss until the edamame are evenly coated with the oil and spices. Spread into a 9×13 inch glass baking dish or on a baking sheet with silicon mat (as I do) in a single layer.
3)Bake uncovered in the preheated oven until the beans begin to brown, 12 to 15 minutes. Stir once halfway through cooking. Enjoy!
(Click on photos to enlarge.)


It’s always fun to serve with a bit of pizzazz! These little pepper shaped dishes sure are fun and indicative of the heat from these spiced soybeans! Cute, right? 🙂
Laters!
Your Friend,
~Amber Hamilton Henson
PS
For more information about Arkansas Soybeans, recipes, and more visit TheMiracleBean.com and Arkansas Soybean Promotion Board on Facebook!
This blog post will link with other blogs party link-ups; links will be updated as this post links:
Arkansas Women Bloggers’ Sunday Link-up
iShouldBeMoppingTheFloor’s “Inspiration Monday Link Party”
This post is also published in the internationally distributed HAT TRICK MAGAZINE. To read the online version of the magazine, please click on the magazine cover below this text.(pg. 100)


