Mad Tea Party!
We’ve been invited to a blogland “Mad Tea Party!” It’s actually the 7th annual event! Where have I been during the last 6 years?!
If you love whimsy even half as much as I do, you should click on the invitation FLYER to be re-directed to the informational (and rules) invitation by A Fanciful Twist. Her whole blog is such a treat! You’ll be glad you visited!

She is definitely the hostess with the mostest! Beyond showcasing her work, and offering tours of her spaces, she has invited us all to participate in this “Mad Tea Party!” She has links to our blogs on her sidebar, and on July 12th, we ALL post a Mad Tea Party of our own and then hop from blog to blog to visit all of the tea parties!
What will we offer at our tea party on July 12th? (Our = me + 3 daughters?) Well, we’ll pull out our finest, of course! Come see our treasures escape the china cabinet and get put into use! What fun! What FUN!! We’ll serve many treats we make ourselves, like our Coconut Macaroons … with Milk in Martini Glasses, and we’ll have a curious adventure of big and small spaces that we show and tell along the way!

(Click on Photo to enlarge It.)

We’re tweeting the news! The birds have heard and may join us, too!
(Click on Photo to enlarge It.)

Sound interesting? Well, take a look at a few posts from I’ve found from previous years’s Mad Tea Parties:
Hostess Vanessa’s Mad Tea Parties for the last 6 years:
http://afancifultwist.typepad.com/a_fanciful_twist/2008/06/the-time-has-co.html
http://afancifultwist.typepad.com/a_fanciful_twist/2009/06/-the-mad-tea-party-2009.html
http://afancifultwist.typepad.com/a_fanciful_twist/2010/06/mad-tea-party-2010.html
http://afancifultwist.typepad.com/a_fanciful_twist/2011/06/mad-tea-party-2011.html
http://afancifultwist.typepad.com/a_fanciful_twist/2012/07/mad-tea-party-2012.html
http://afancifultwist.typepad.com/a_fanciful_twist/2013/07/mad-tea-party-2013.html
Participant Mad Tea Parties:
http://triciafountaine.blogspot.com/2011/06/mad-catter-tea-party.html
http://apinkdreamer.blogspot.gr/2013/07/a-magic-invitation-magic-summer-art.html
http://cobblestone-prims.blogspot.de/2013/07/happy-un-birthday.html
and soooo many more!!
Save the Date, and we’ll see you for a blogland Mad Tea Party in July! Songbirds and sweet treats will be here for our adventure!
Your Friends,
Amber, Caroline, Abigail, & Veronica!
PS
I’m Linking with some great blog parties to extend the invitation! You’re invited to visit the parties:
HowSweetTheSound ~ Pink Saturday

Marrying Together Unusual Items!
How about putting an Antique Shoe Display Table together with a 70’s Slab Wood Clock, so that it is a new piece of furniture? Well, we did just that. Now, we have a side table that includes a plant stand!
I picked up the gilded, cast aluminum(?) table-ish piece at an estate sale. The resident of the house told me it was salvaged from on old shoe store that closed and was eventually torn down in town decades ago. The same weekend, I bought a piece of slab wood that has a high gloss finish. It had a hole drilled in the center and an area routed in the back indicating it had once been used as a large clock. 1970’s style?
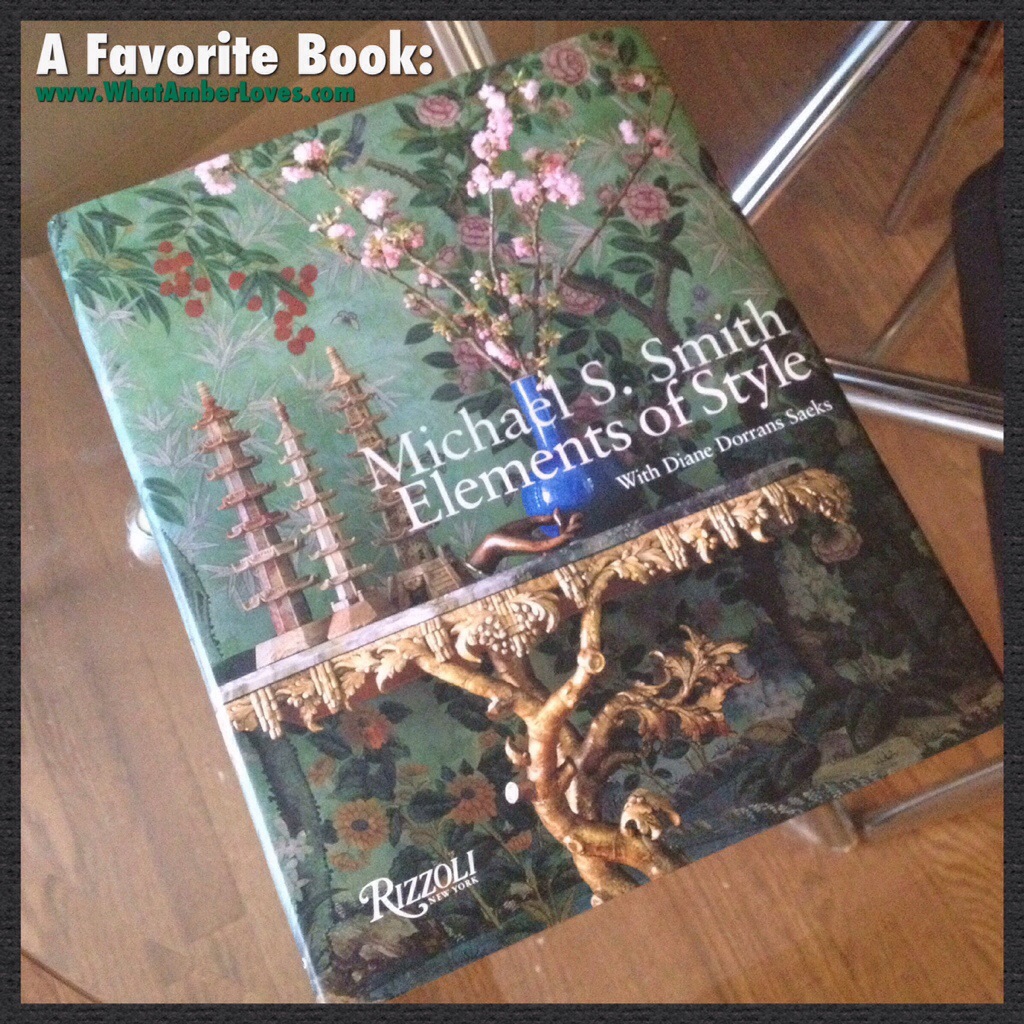
The pieces had both been sitting in the garage for a few weeks, awaiting inspiration, when while looking at one of my favorite interior design books, it suddenly came to me that I should put the two pieces together, forming a side table with plant stand! It took a little work to get the pieces together…husband had to wrestle some old bolts and chisel a bit more wood out of the way in order to get them to fit together, but “TaDa!” Here it is:
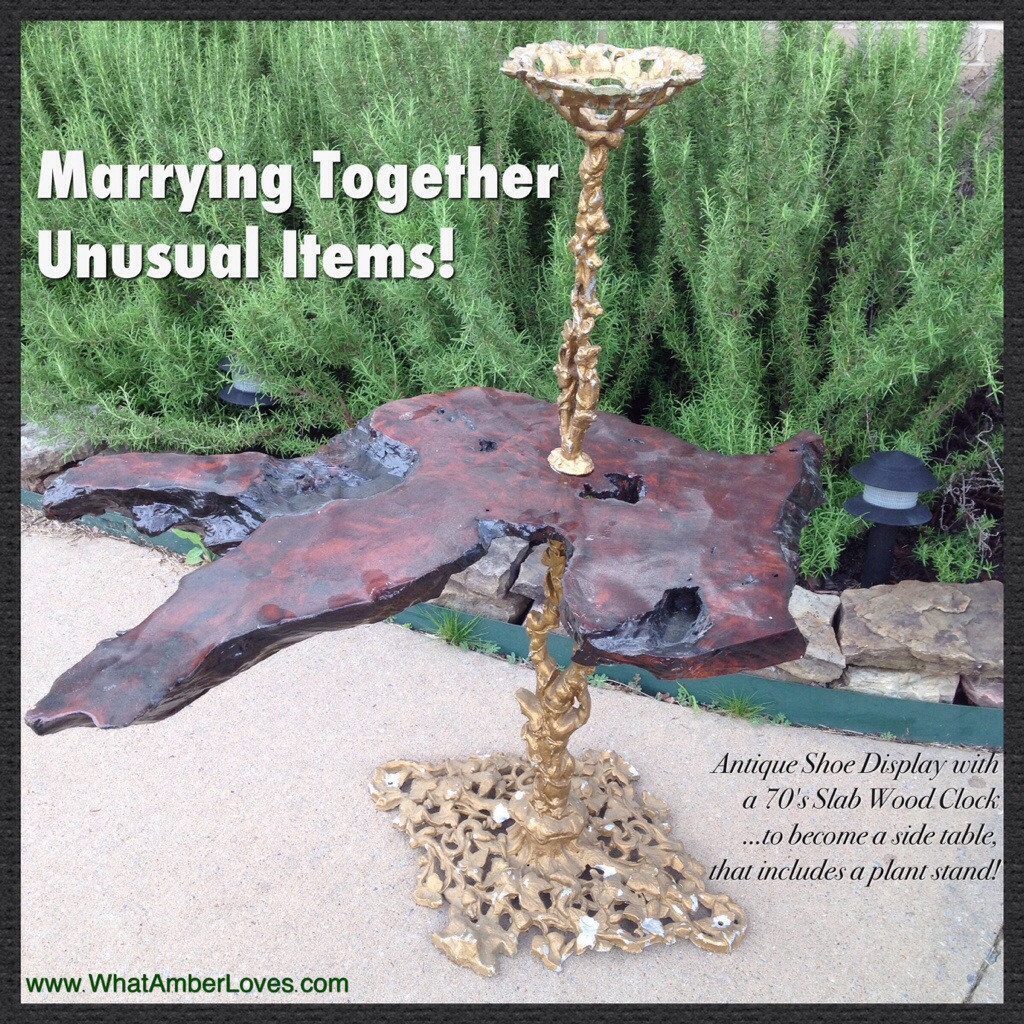
Click on photo to enlarge it.

Click on photo to enlarge it..
Click on photo to enlarge it.
Click on photo to enlarge it.

Click on photo to enlarge it.

Click on photo to enlarge it.
 </a
</a
Click on photo to enlarge it.

Click on photo to enlarge it.
So, what do you think of our funky little creation?
If you like this project, you may also like my belt chair, collage of frames, room tours, and more, if you click around my blog/website!
I LOVE comments; please do, while you’re here!
Thanks for visiting!
~Amber Hamilton Henson
PS
I’m linking with some great blog parties! Check them out! (I’m updating this post as I link each day this week!)
FromMyFrontPorchToYours ~ Treasure Hunt Thursday #158
TwiggStudios ~ Our Sunday Best Showcase
Nifty Thrifty Things ~ Sunday #158
My1929Charmer ~ Sunday’s Best Par-Tay
ArkansasWomenBloggers ~ Sunday Link
IShouldBeMoppingTheFloor ~ Inspiration Monday
ModVintageLife ~ Mod Mix Monday #155
ElizabethAndCo ~ Be Inspired #121
SavvySouthernStyle ~ Wow Us Wednesday #172
HandyManCraftyWoman ~ Wicked Awesome Wednesday #163
ReDouxInteriors ~ Best DIY Linky
My Repurposed Life ~ Catch as Catch Can
MissMustardSeed ~ Furniture Feature Friday
ShabbyNest ~ Frugal Friday
The36thAvenue ~ Best DIY projects and recipes
ChicOnAShoestringDecorating ~ Flaunt it Friday
TrulyLovelyBlog ~ Fancy This #179
HomeStoriesAtoZ~ Tutorials Tips #161
HouseByHoff ~ Enchanting Inspiration
FunkyJunkInteriors ~ #242
Funky Junk Interiors ~ Upcycled Side Tables

ReUpholstering Chairs!
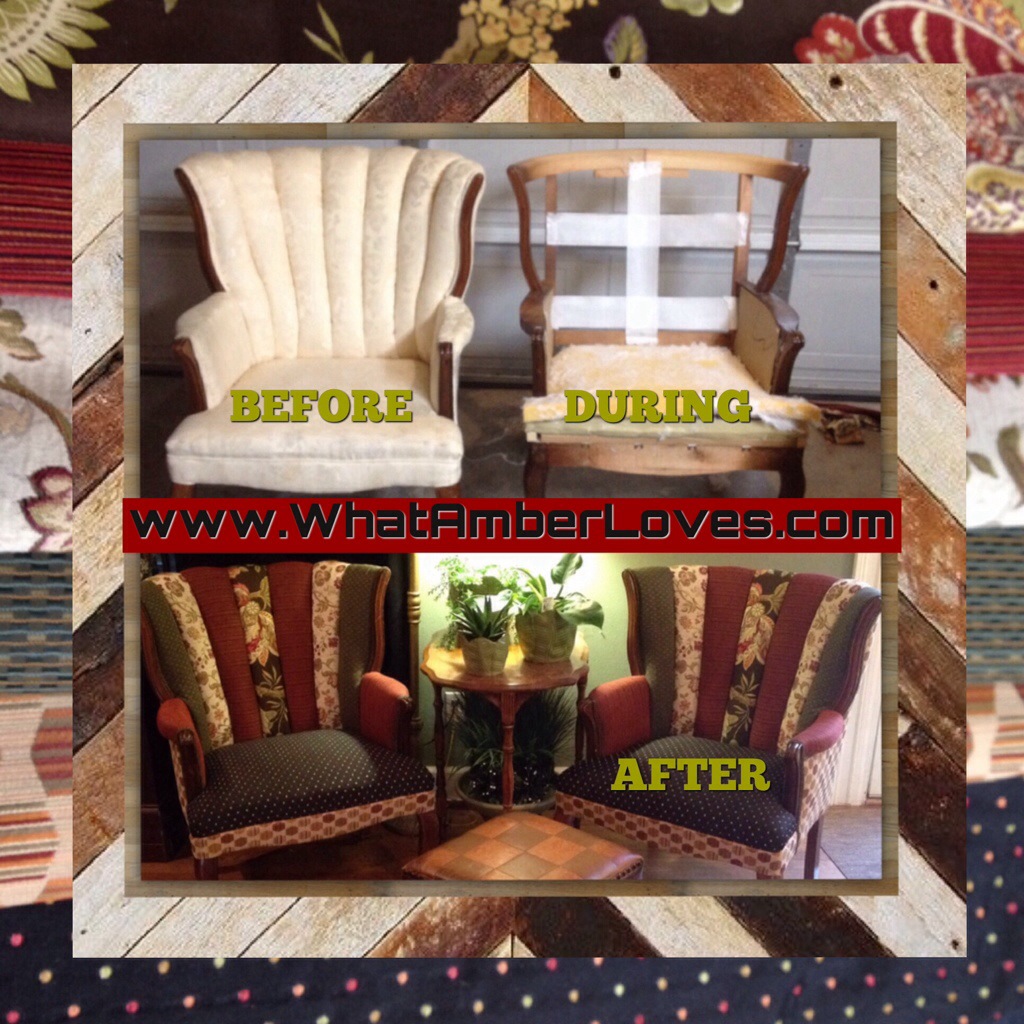
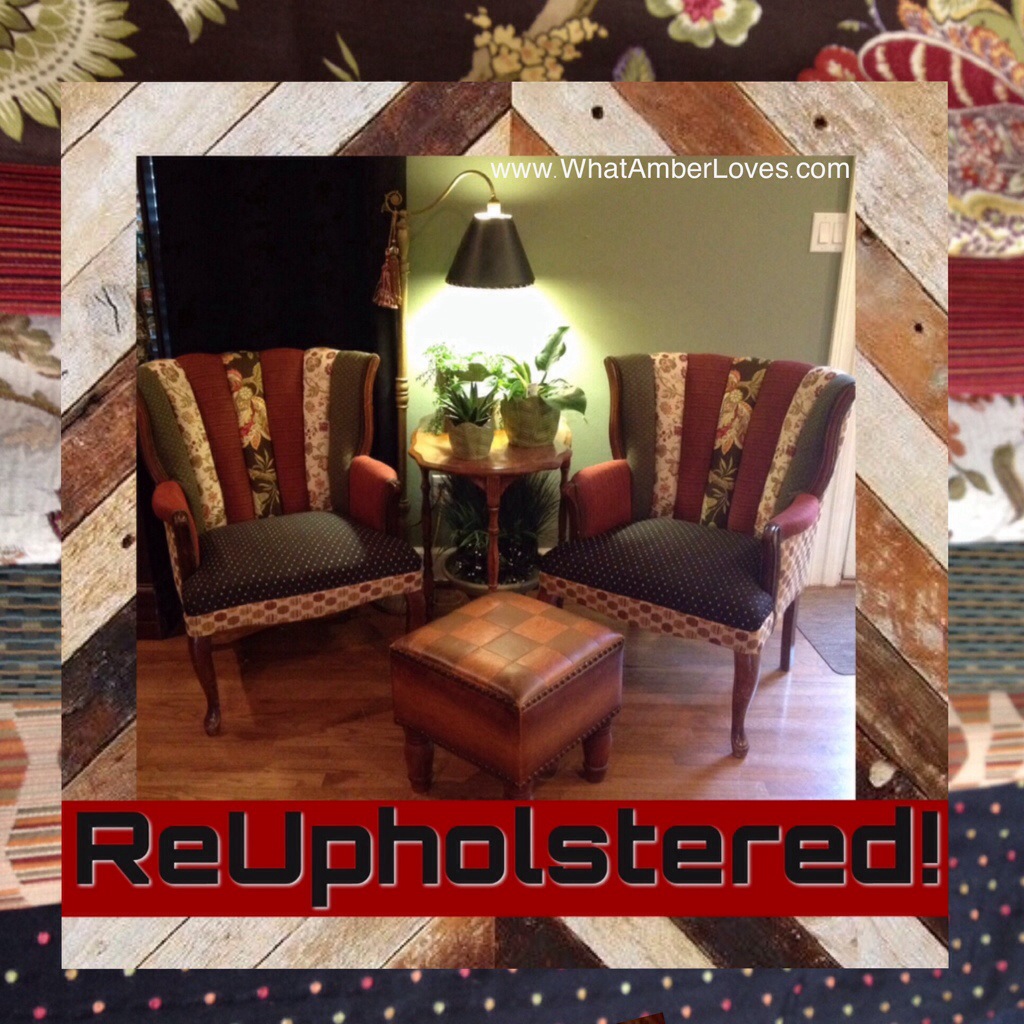
So here’s the deal. I’m re-upholstering a pair of chairs in this post. See, I bought the pair of chairs at an estate sale for $40 bucks, measured and bought clearance fabric, then took a bunch of photos while my husband re-upholstered them for me! Voila! I re-upholstered chairs, right? All kidding aside, my husband is an aircraft upholsterer by day and at night he’ll upholster things for me from time to time. So, I’m giving you in-depth, up-close look at how he re-upholstered a pair of chairs for me in the garage. You may pick up a few tips, so you can try it yourself!
I’m a very VISUAL person, so first I’m showing you several collaged photos, then text will follow with more detail. Refer back to photos as you read the text at the end. Click on any photo to enlarge it into a new window to read captions! Ready? Let’s upholster:
Click on photo to enlarge it
Click on photo to enlarge it

Click on photo to enlarge it
Click on photo to enlarge it
Click on photo to enlarge it
Click on photo to enlarge it’ll

Click on photo to enlarge it

Click on photo to enlarge it

Click on photo to enlarge it
Click on photo to enlarge it
****************************
Click on any photo to enlarge it!
****************************
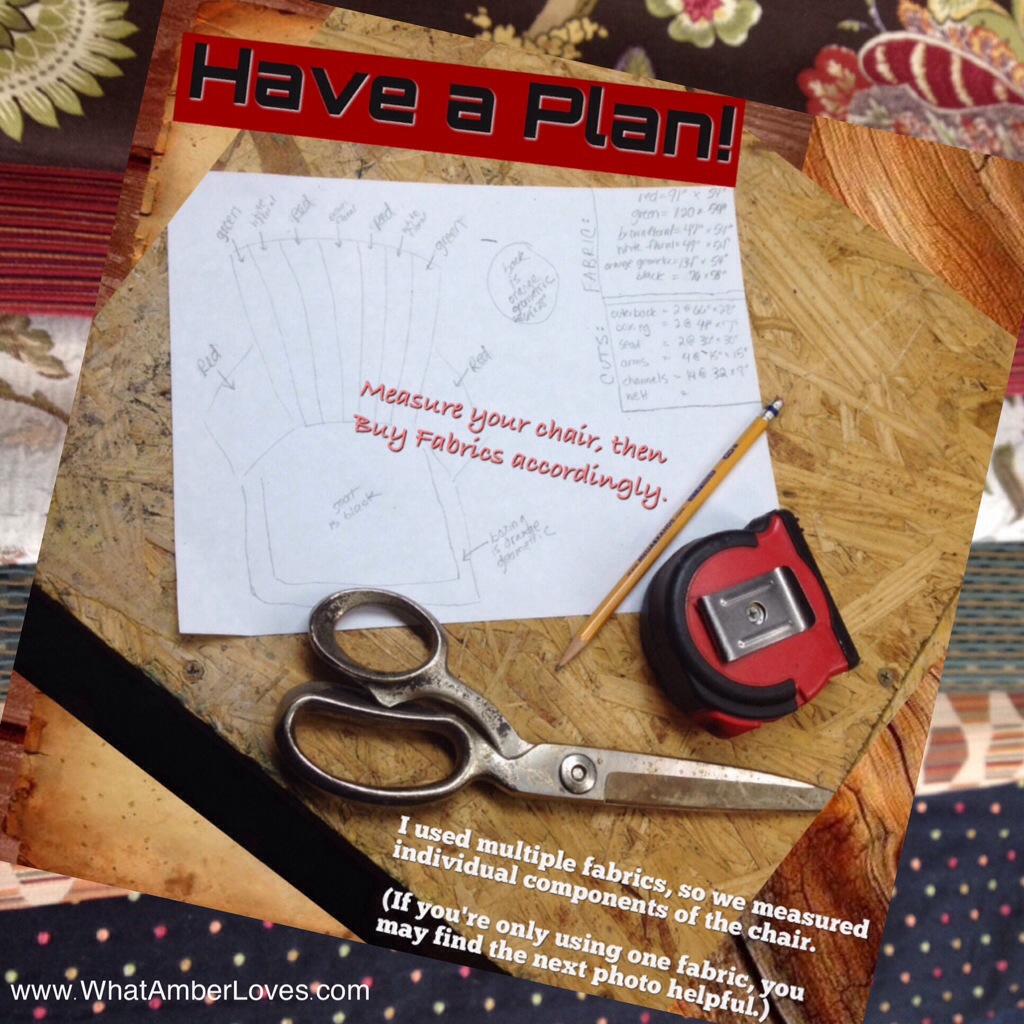
Have a Plan: I used multiple fabrics, so we measured individual components of the chair.
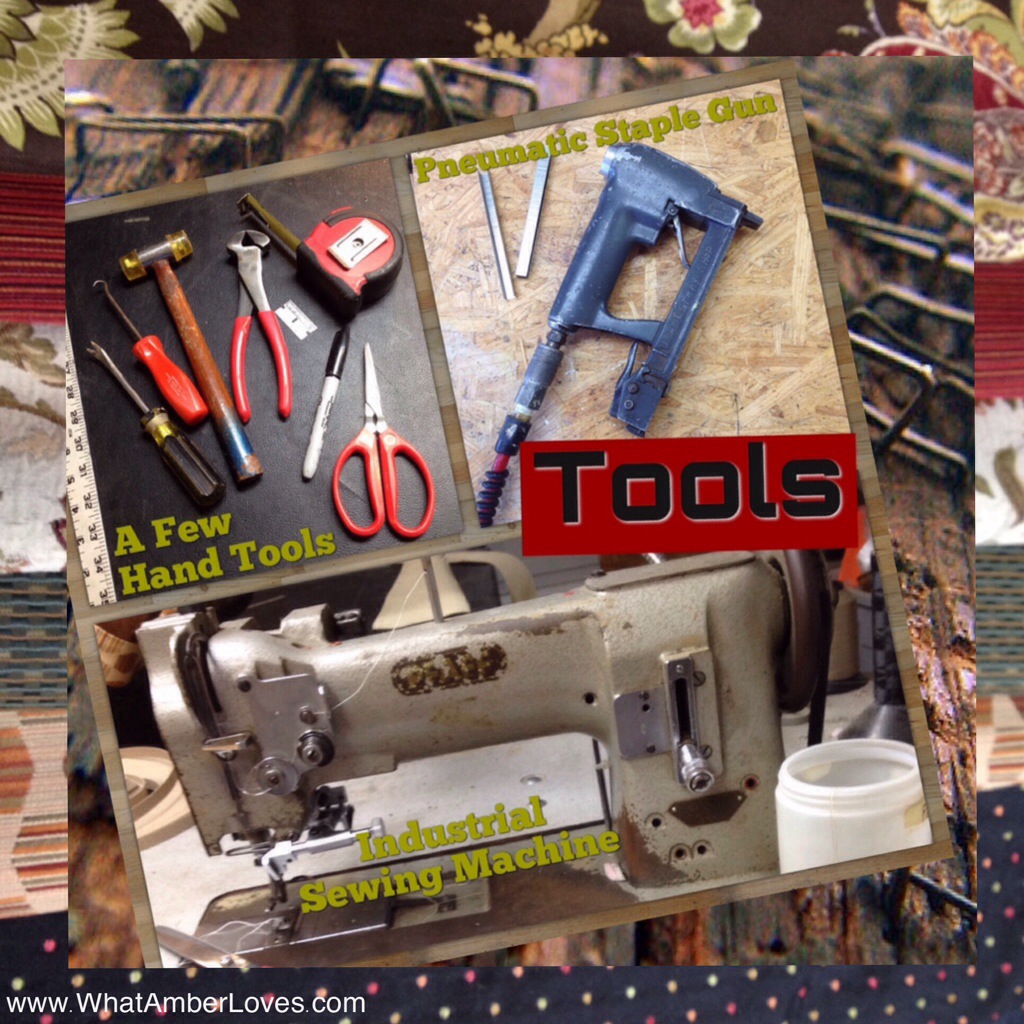
Tools: Gather your tools! A few hand tools, a pneumatic staple gun, and an industrial sewing machine with an optional double welt cord foot.
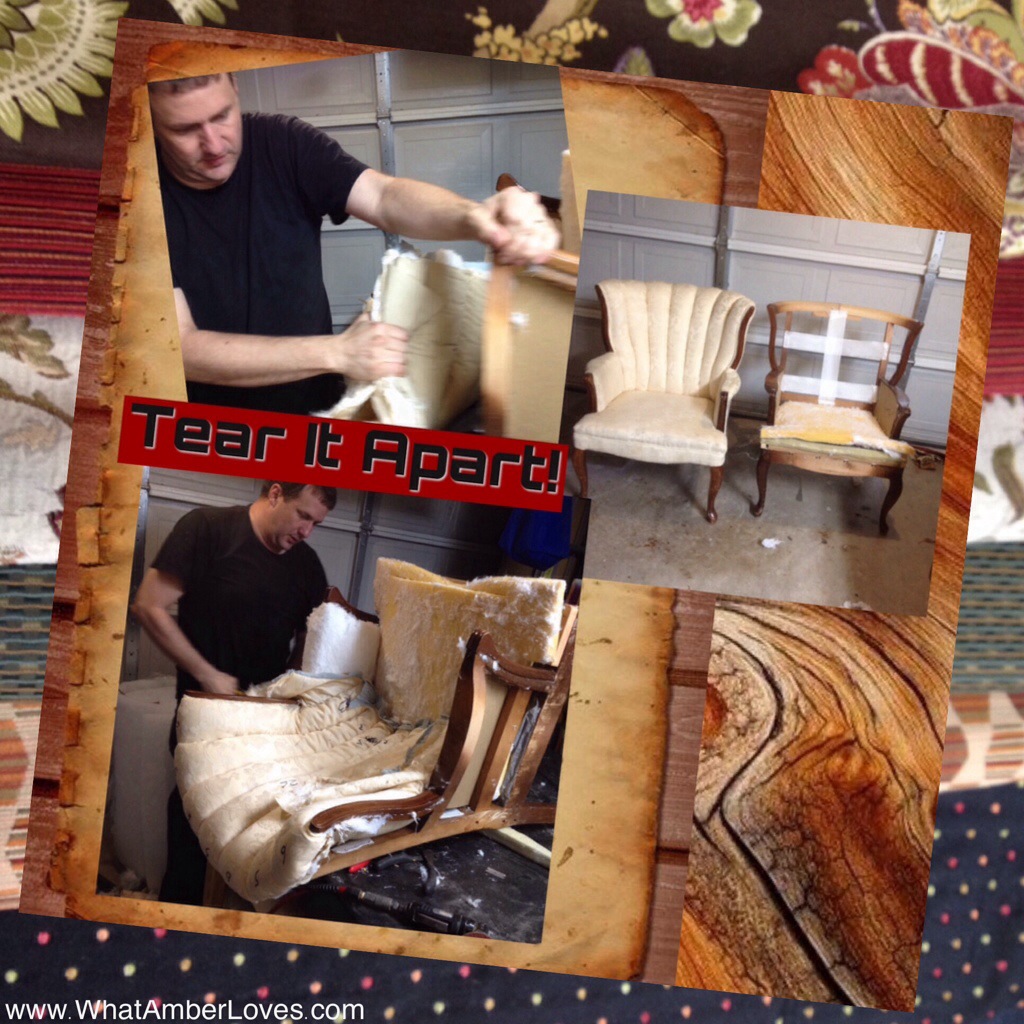
Tear it apart: Only after you’ve taken all of your measurements, made any necessary patterns*, and taken plenty of “before” photos, should you begin tearing apart the upholstery. Now, have fun tearing it apart! Be sure to remove all old staples, too!
(If you’re only using one fabric, you may find the fabric estimating photo helpful.)
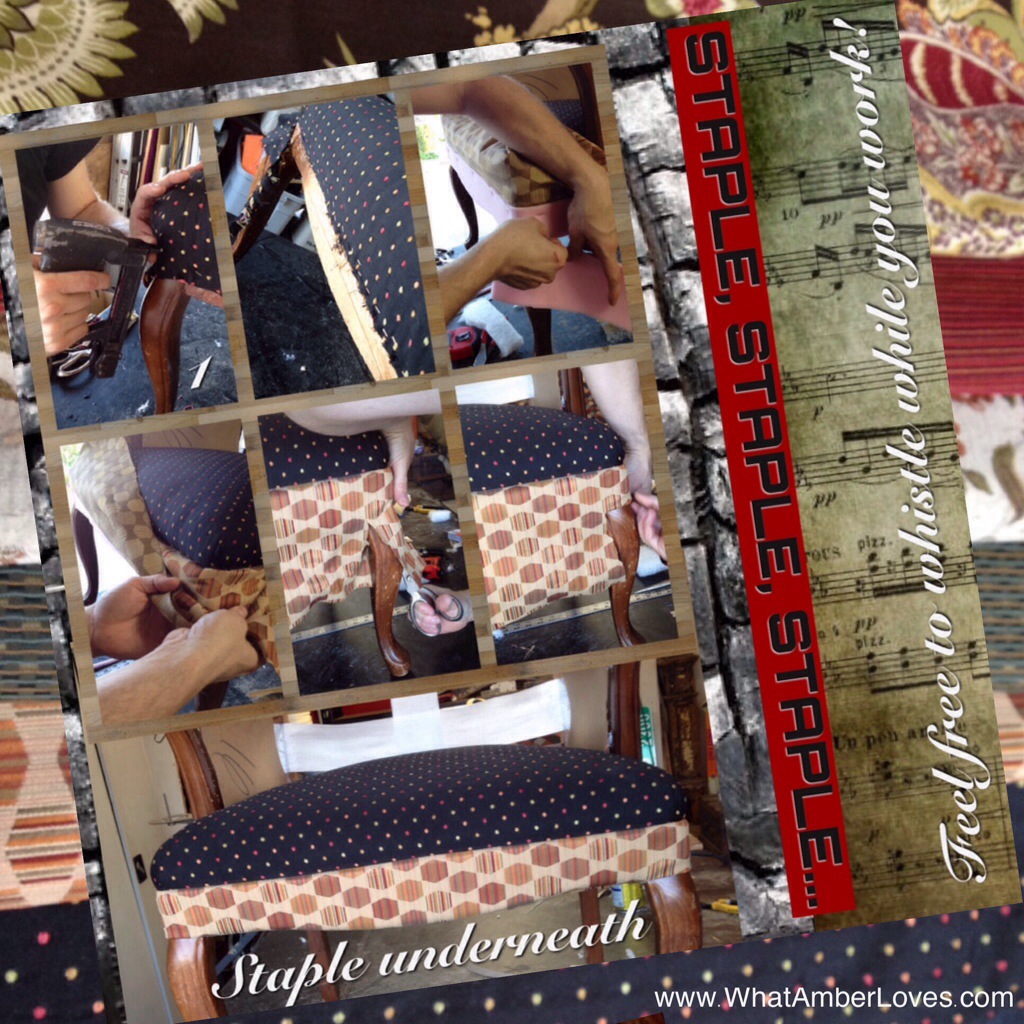
Staple, Staple, Staple: assuming you paid attention to the order you removed the previous upholstery, staple your new upholstery in reverse order, adding polyester as needed. For these chairs, the seat was first, then the bottom boxing, then the arms, then…
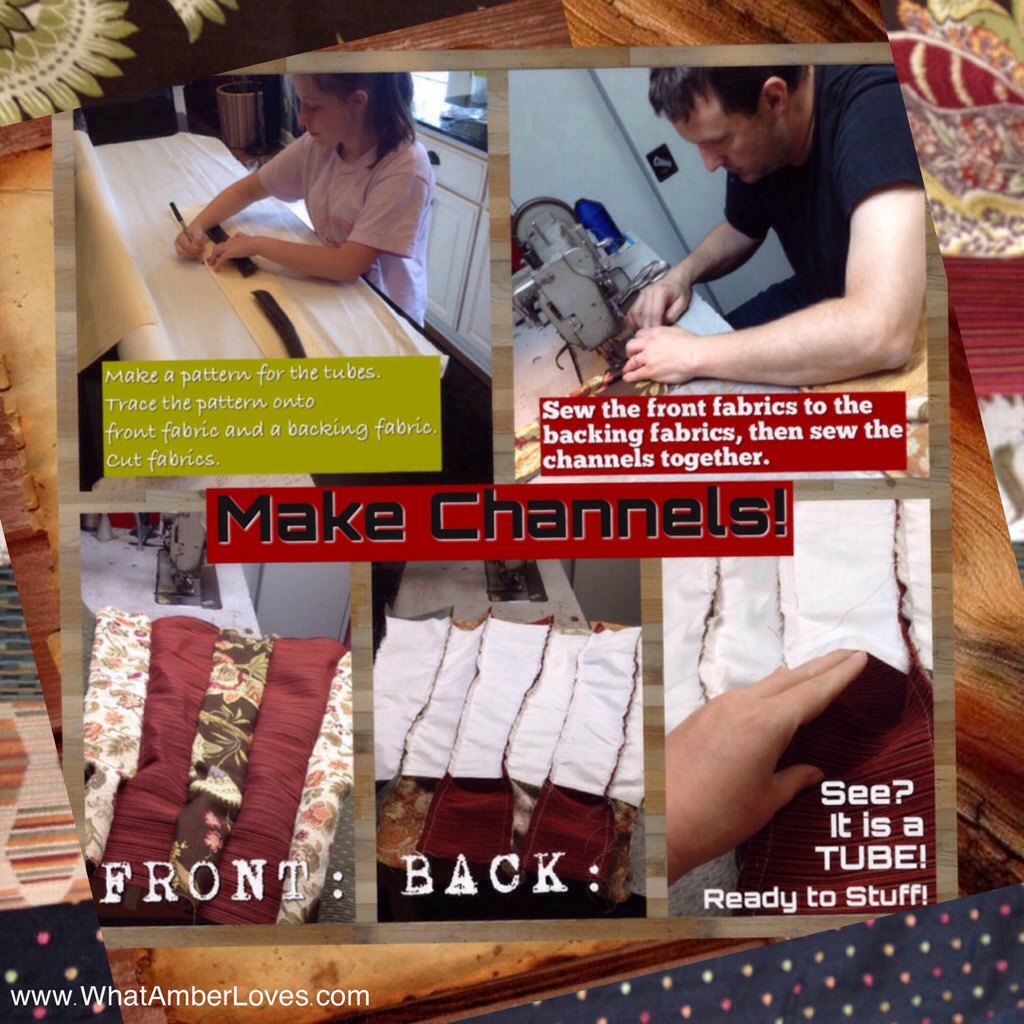
Channels: Make a pattern for the channels (tubes.) Trace the pattern onto front fabric and a backing fabric. Cut fabrics for the channels (tubes.) Sew front fabrics to backing fabrics, creating channels (tubes.) Sew the channels together. Staple to chair.
Wrap the Back: more stapling, using cardboard tack strip for folds and edges as needed. Don’t trim to short, because you need to be able to fold the fabric under to go around the legs neatly.
Repeat: second chair. Everyone likes a matched pair of chairs, right? When working with patterned fabric(s), be sure to pay particular attention to alignment!
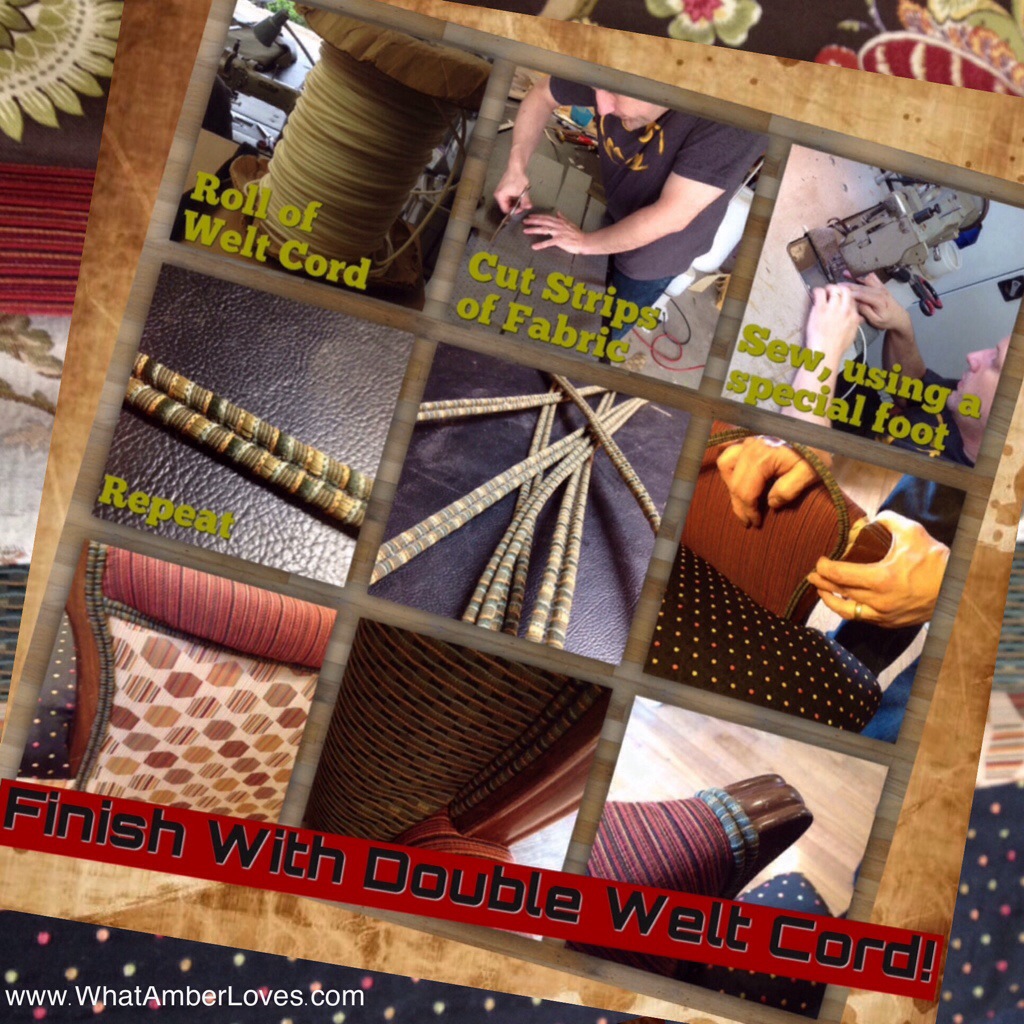
Finish with Welt Chord: cut strips of fabric, sew double welt cord, trim excess fabric, and attach to chairs via glue or staples (between cords) to finish all edges!
Photograph your finished chairs! 🙂
***********************
Please, leave a comment so that I know you’ve visited, (I LOVE comments), feel free to share it on social media, or if you have specific Questions for your project, just email me! My email address is on my ABOUT page. Feel free to click around all of the blog while you’re here visiting WhatAmberLoves! You might like my Decor and Crafts page with the room tours and other tutorials, too! 🙂
Your Friend,
~Amber Hamilton Henson

Guess what? This post is featured and linked another blog! I linked to a blog party and was chosen as a feature! Click on the square button below this text to be re-directed to her blog!

I’m linking with some great blog parties! Check them out! (I’m updating this post as I link each day this week!)
MyRepurposedLife ~ Catch As Catch Can
ACreativePrincess ~ Party #160
BeyondThePicketFence ~ Under $100 link party
RedouxInteriors ~ Best DIY linky party #156
TheHappyScraps ~ Creative Exchange
TheBrambleBerryCottage ~ Time Travel Thursday
FrenchCountryCottage ~ Feathered Nest Friday
MissMustardSeed ~ Furniture Feature Friday
RootedInThyme ~ Simple & Sweet
TaterTotsAndJello ~ Link Party Palooza
TwiggStudios ~ Our Sunday Best Showcase
Nifty Thrifty Things ~ Sunday #158
My1929Charmer ~ Sunday’s Best Par-Tay
ArkansasWomenBloggers ~ Sunday Link
IShouldBeMoppingTheFloor ~ Inspiration Monday
ModVintageLife ~ Mod Mix Monday #155
ElizabethAndCo ~ Be Inspired #121
SavvySouthernStyle ~ Wow Us Wednesday #172
MarigoldsLoft ~ Tutorial Thursdays
FunkyJunkInteriors ~ #242

Turnip “Fries”
Take 4 turnips, peel and slice into French fry size strips. Toss with 2 tsp. olive oil and add seasonings you like (I use sea salt, garlic powder, and Mrs. Dash extra spicy). Lay out on a baking sheet and bake at 400 until lightly browned. They will not become crispy as they dehydrate, but they will have a consistency like McDonald’s fries. 🙂 Enjoy!

🙂
~Amber
>
")
DOLMA! (Lamb in GrapeLeaves!)
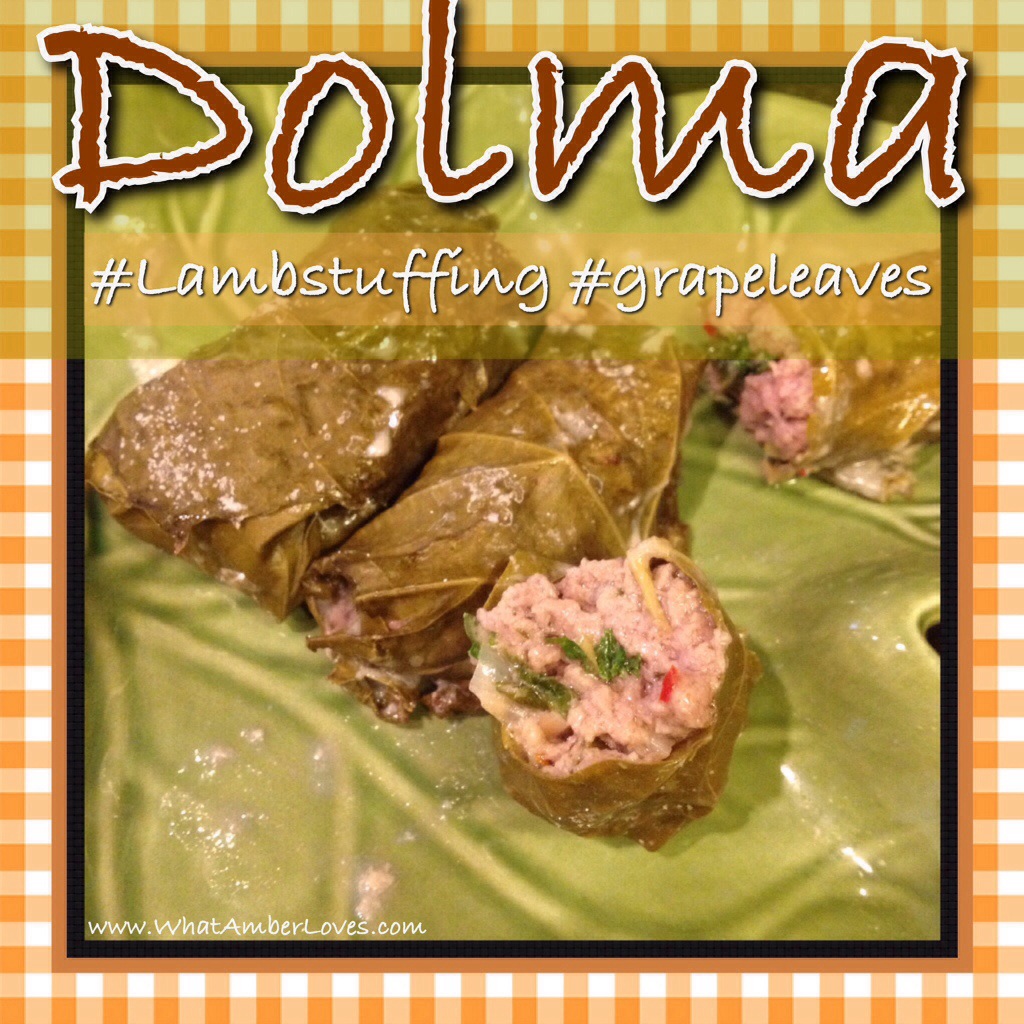
LAMB DOLMAS
1 1⁄2 Lb lean ground lamb
1⁄2 medium sized leek (finely chopped)
5 cloves garlic (minced)
2 lemons (zested and juiced)
1⁄2 tsp ground cumin
1 tsp red pepper flakes
2 tbsp olive oil
2 eggs
small handful of mint leaves (chopped)
small handful parsley (chopped)
small handful fresh dill (chopped)
2 tsp mustard
1 1/2 tsp sea salt
black pepper to your liking
1 jar grape leaves (drained of brine and soaked in fresh cold water)
*Place a medium to large size sauté pan over medium heat. Add about a tablespoon of grape seed or olive oil and lightly cook leeks and garlic till softened but not browned (about 5 minutes), to cool. set aside
*After allowing leeks to cool, add all ingredients except grape leaves in a sufficient mixing bowl. Begin to mix filling until just thoroughly combined making sure not to over mix . *Refrigerate for at least 1 hour or up to 4 hours.
*Lay out a clean towel or some paper towel. One at a time, take a grape leave, place shiny side down on towel stem facing yourself. Add a couple small spoonfuls of lamb mixture to center of grape leaf. Firmly tuck in left and right side of leaf, then with both of your thumbs tightly roll forward. (You can do this one by one or lay ten leaves out at a time)
*Place each dolma on a lightly sprayed (with olive oil) sheet pan seam side down. Place sheet pan on middle rack in a preheated 400 oven and bake for about 8 minutes or until internal tem- perature is 140 degrees.
Makes 25-30 dolmas. ENJOY!


🙂
~Amber Hamilton Henson
>

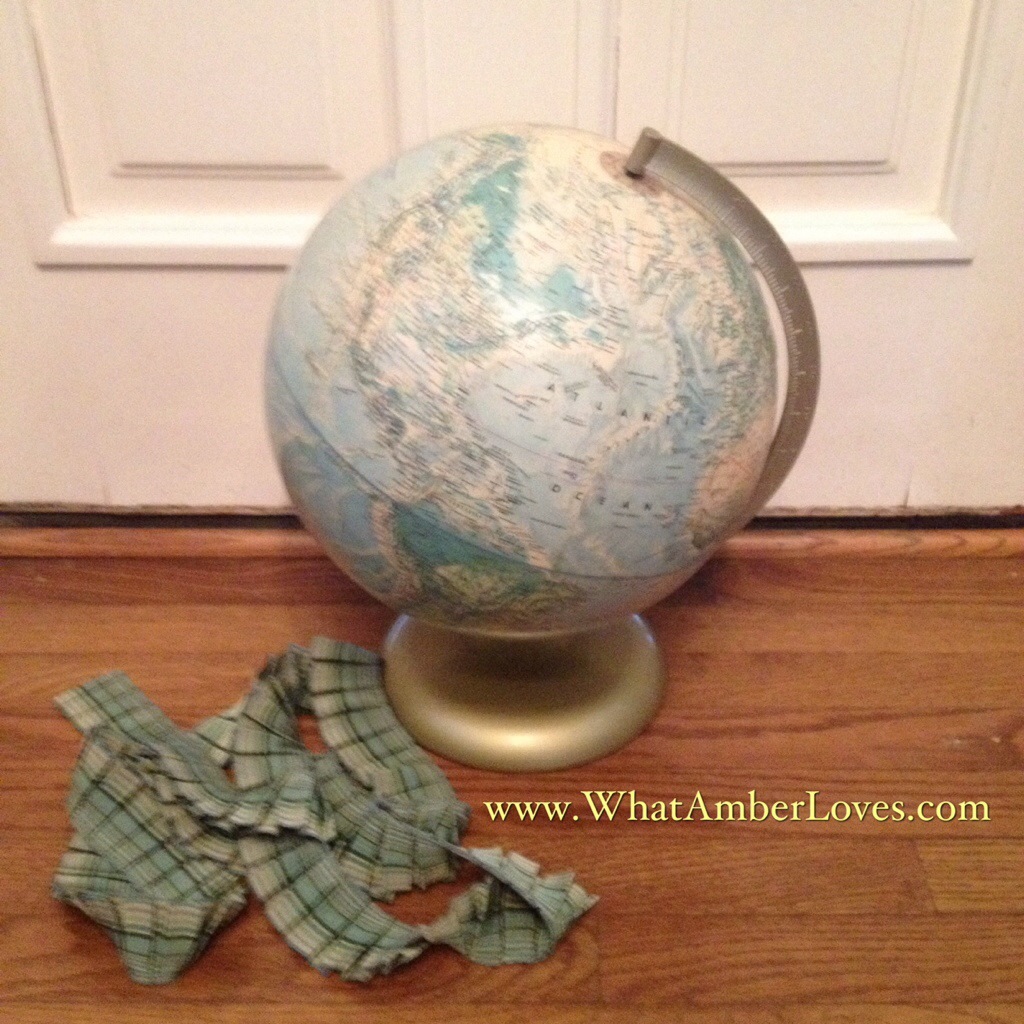
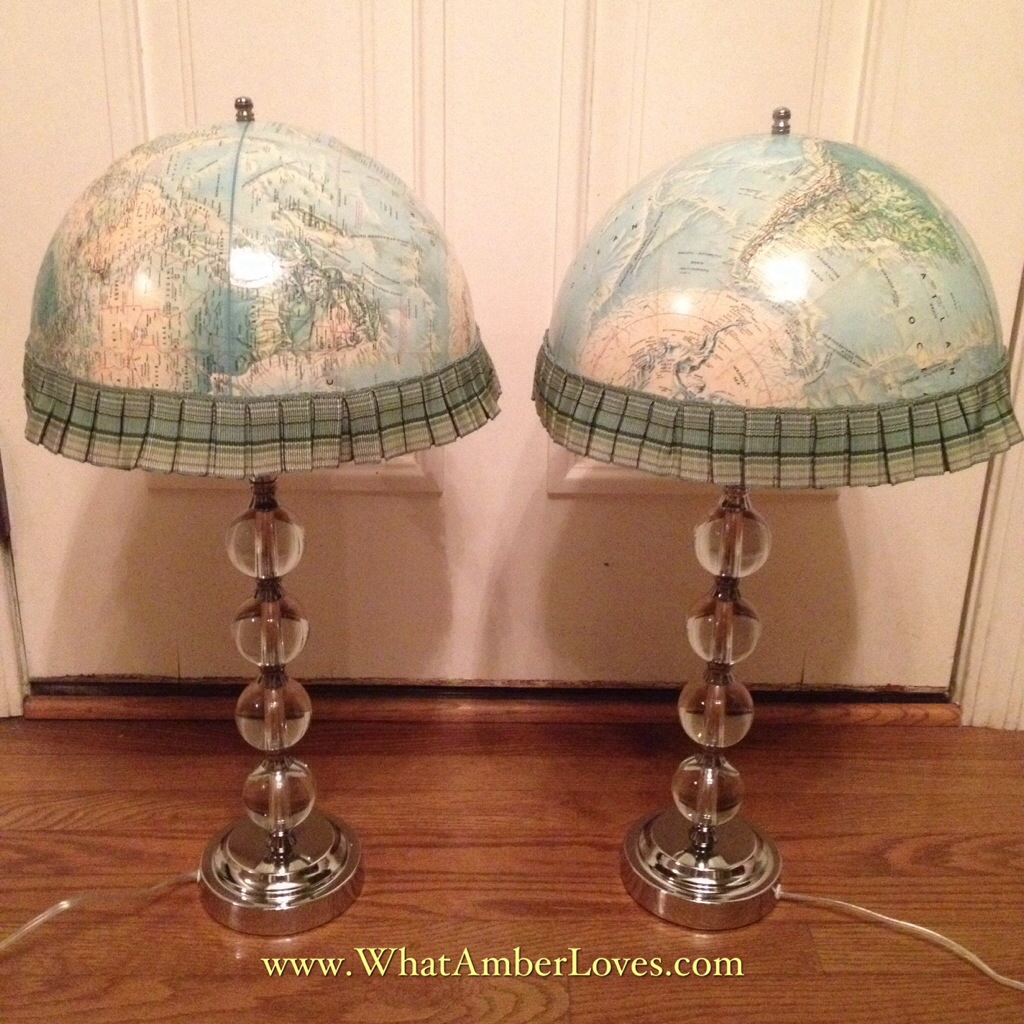
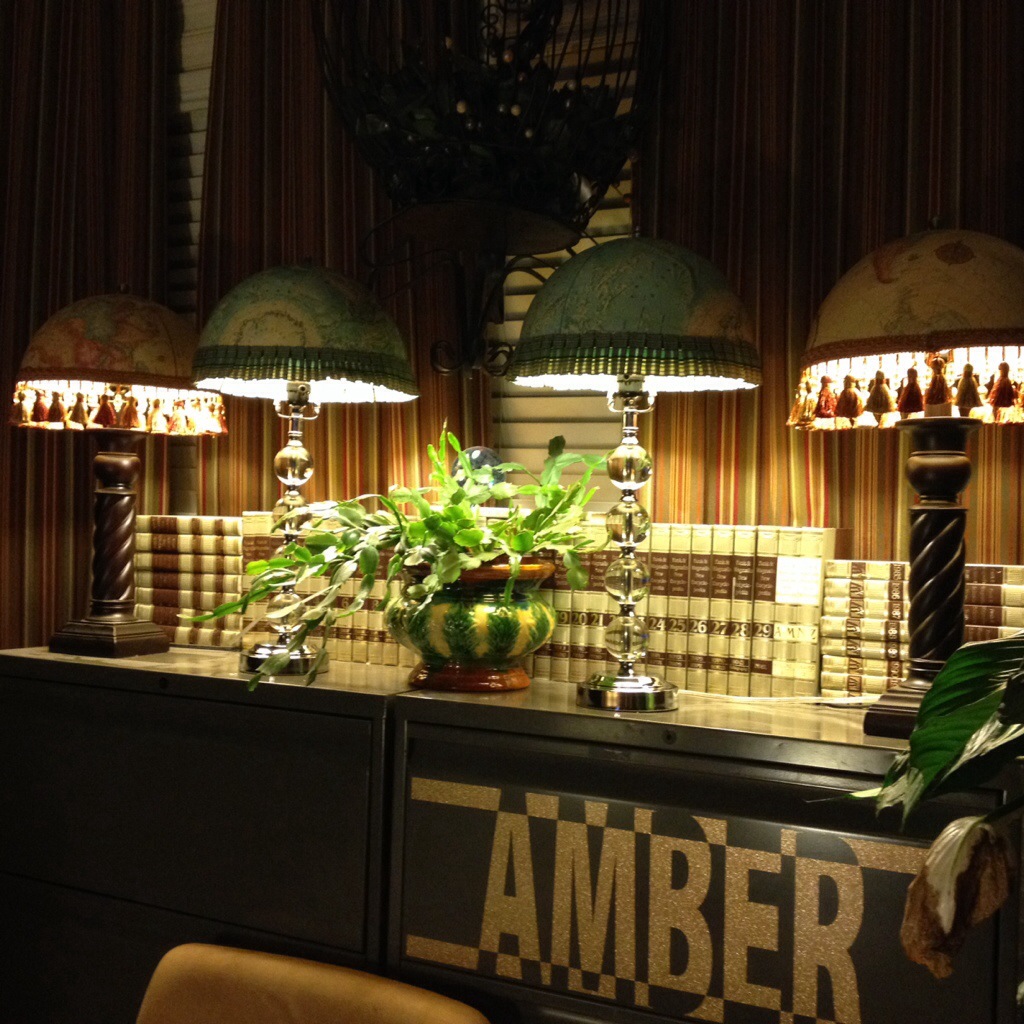
Vintage Globe into New Lampshades!

Easily turn a vintage globe into a new pair of lampshades!
Just saw the globe in half. Use a hot glue gun to adhere trim/fringe. Drill a hole in the top, so that it secures between your lamp harp and finial.
Viola!
You’ve made vintage fun and funky!
#upcycle #reuse


r />
Have you upcycled anything recently? For more Upcycling and craft ideas, please visit my decor & crafts page!
Laters!
~Your Friend, Amber Hamilton Henson
St. Patrick’s Day Fun!
We used a cookie cutter as template/border for pouring our sprinkles onto our St. Patrick’s Day pie! It’s a Jello brand no bake cheesecake that we tinted green with food coloring! Yummy!
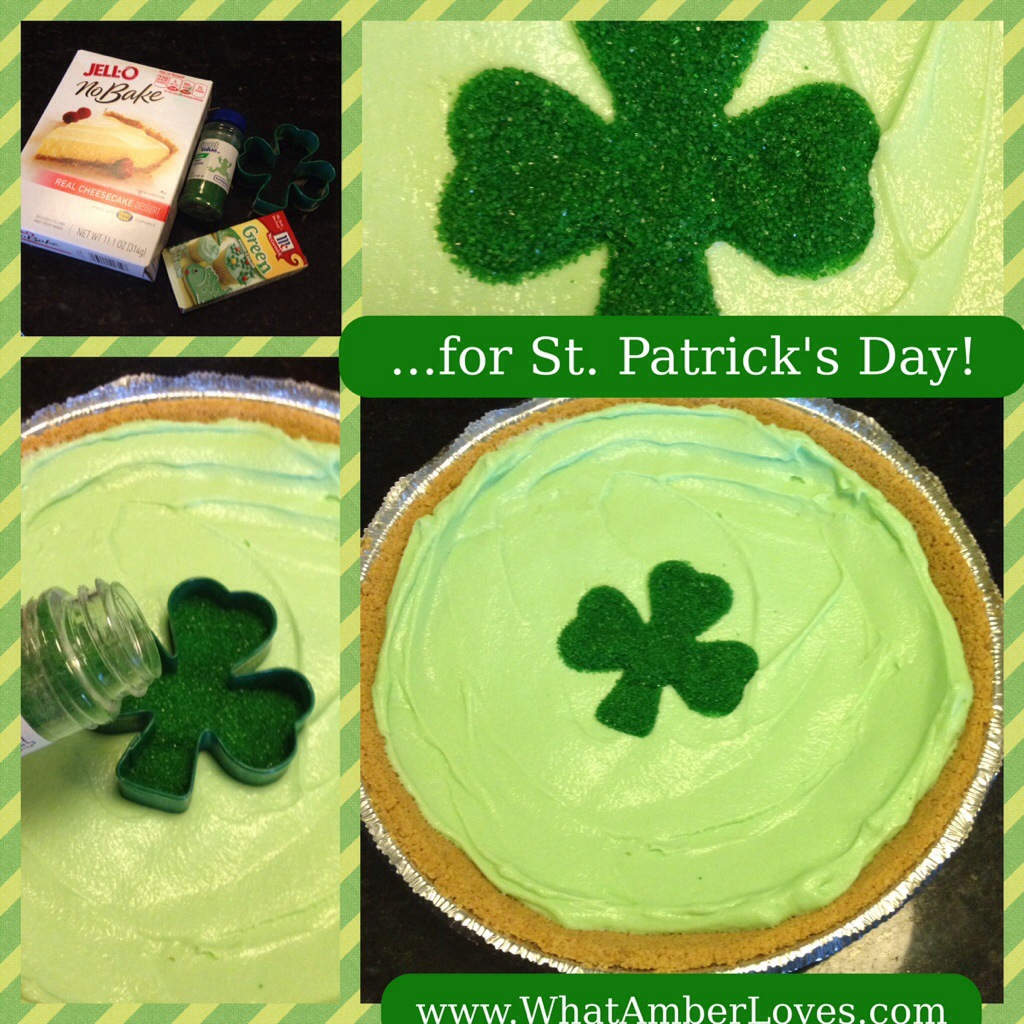
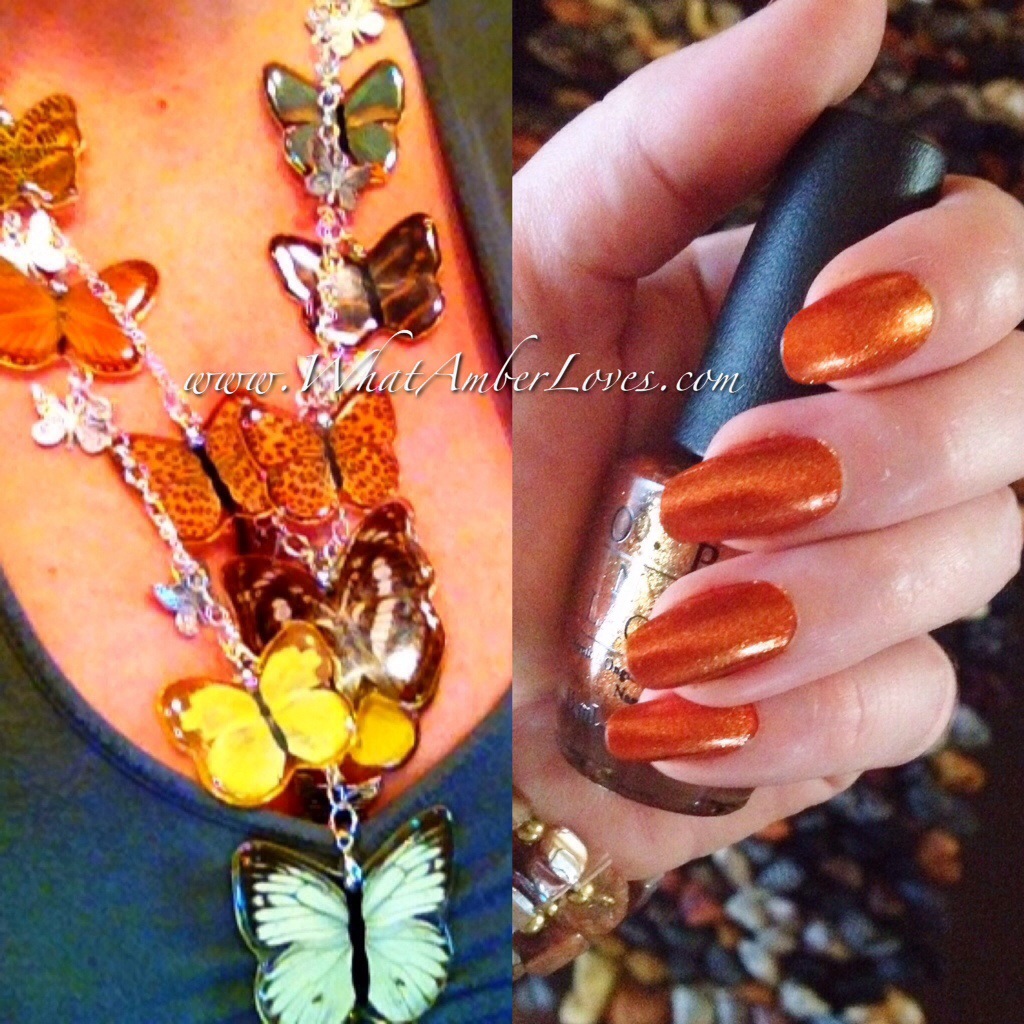
My nails are also painted sparkly green for the occasion! Haha! Can’t pinch me!!

I may update this post with a few more pics, tomorrow!
We hope you enjoy your St. Patrick’s Day, too!!
Your Friend,
~Amber Hamilton Henson

King Cake!

Mini-Me(s) & I made tomorrow’s breakfast! We looked for them at two stores, but who needs purple sprinkles when candy coated chocolate purple beads are available?! 😃
Yep, that’s about a pound of cream cheese icing melted across our cinnamon bundt cake. Love it!
~Amber

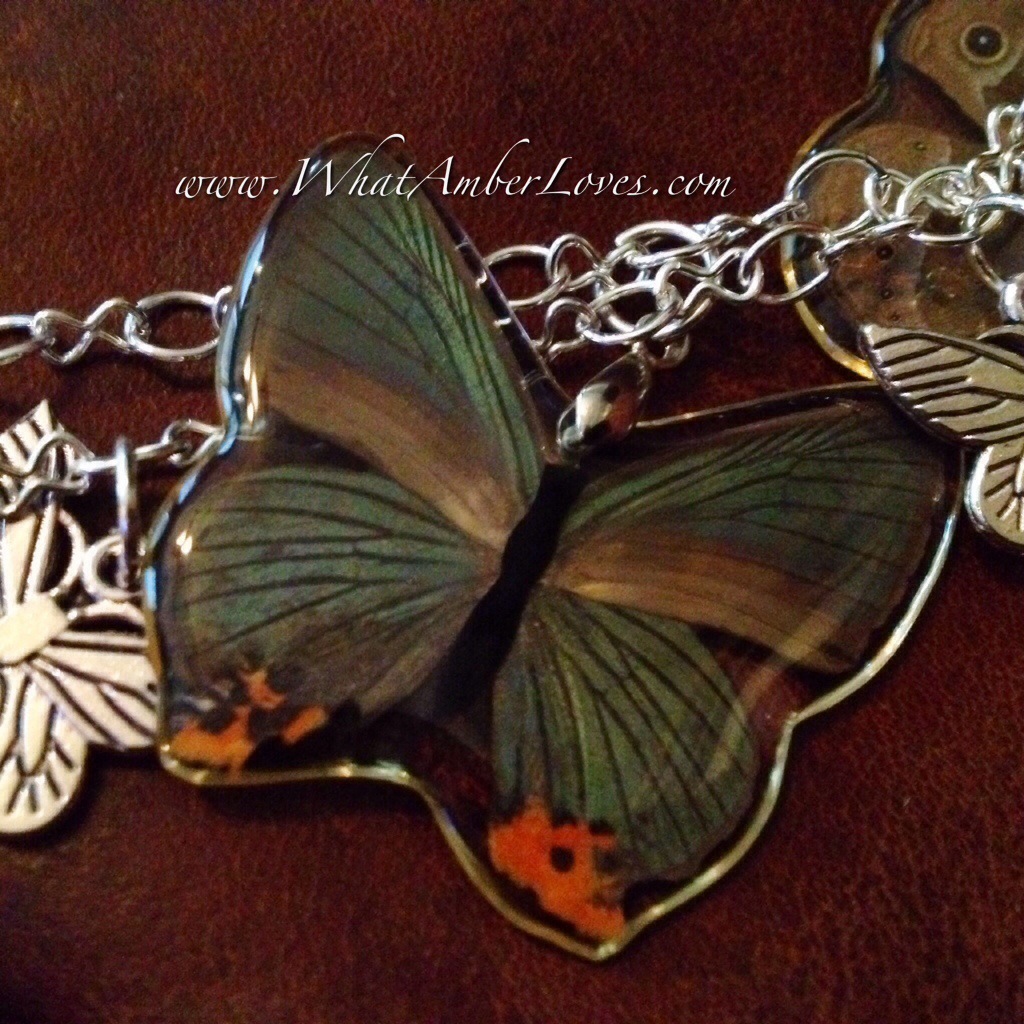
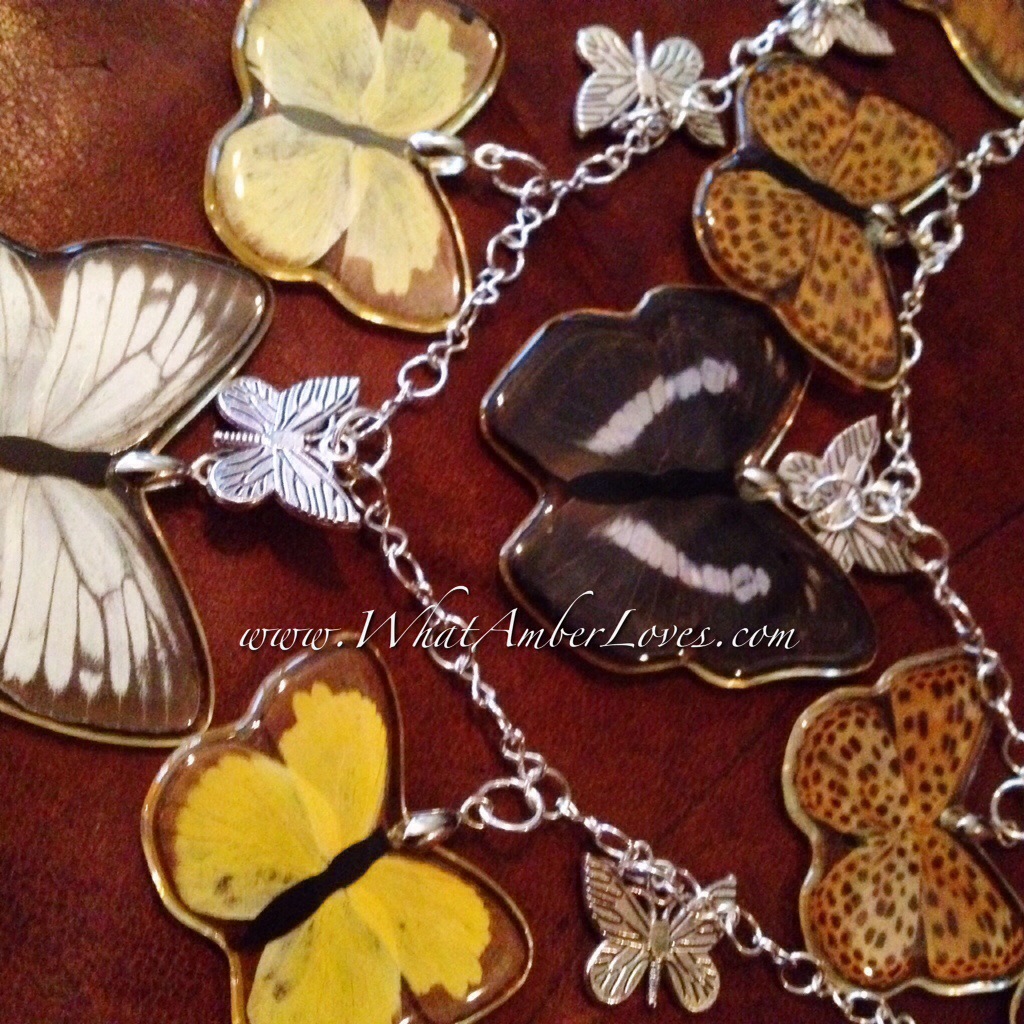
Real Butterfly Necklace!

Real Butterfly Necklace!
Here is my new butterfly necklace that I assembled this week … just in time for Spring!
I am so pleased with how it came together!
It is assembled using silver chain, real butterfly wings encased in resin, little stainless steel butterfly charms, lots of jump rings and a lobster clasp.
I’ve taken photos in various light to try to showcase the depth and variation of color of these beautiful butterfly and moth wings. It’s amazing to me how different the wings appear depending upon whether they’re in natural sunlight, indirect light, or under a lamp!
The details: (click on photos to enlarge into a new window)


If you’re interested in seeing more of the jewelry I create, you might like these links of mine:
I Make Bracelets
I Make Necklaces, too
You can also find thumbnail links to many of my other unique craft projects, here:
Amber’s Decor & Craft Tutorials
What do you think of my real butterfly necklace creation?
Please, feel free to be social and share this post via Pinterest, Facebook, Twitter or other!
🙂
Your Friend,
~Amber Hamilton Henson
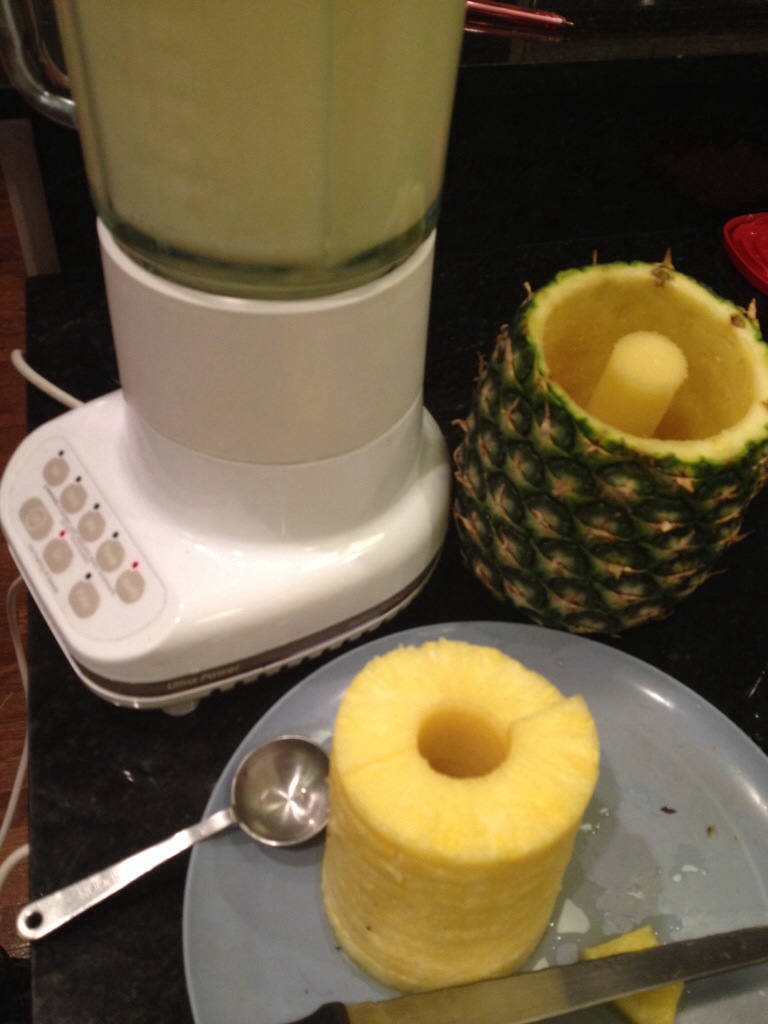
Happy National Margarita Day!

Happy National Margarita Day! Feb 22, 2014!
Margarita Night!
5 rings fresh pineapple
3 Tbsp Orange Liqueur
3 Tbsp simple syrup
2 Tbsp Agave nectar
4 Tbsp lime juice
8 Tbsp tequila
3 cups ice
Blend in blender, thoroughly!
Drink. Repeat as needed!
(Please, drink responsibly!)