Category Archives: Uncategorized
Happy National Carrot Day!
Yes, February 3rd is National Carrot Day. Really! Trust me. It is!!
While we didn’t dine exclusively on carrots all day, we certainly did participate! Did you?
Tonight, I roasted carrots in the oven! So simple and delicious:


My carrots:
Using a food processor, slice a 6-10 carrots.
Add a teaspoon of each of your favorite spices. (I used cinn, chili powder, garlic powder, fresh rosemary.)
Add 2 tablespoons of your preferred oil. (I used grape seed oil)
and, a pinch or two of sea salt.
Mix all, coating carrots, and spread on baking sheet.
Bake at 400F for 20 minutes!
Tonight, our carrots were served beside Pasta&Mushrooms! Love!
Happy National Carrot Day!
(and I think something known as the “Super Bowl” is happening today, too!)
😉
“Later,” Gators and “Afterwhile” Crocodiles!
Your Friend,
~Amber Hamilton Henson
(This is a personal blog. All of the opinions here are exclusively my own and were unsolicited. They do not necessarily reflect the opinions of those products, businesses, or events that may be featured within posts, although my goal IS to be PR friendly toward such products, businesses, and events that I choose to promote, while simultaneously offering valuable, relevant data, facts, links, or other to my family, friends, and community that may encounter this post. I have not received compensation, product, or payment of any type for publishing this post. In the event that I am compensated after-the-fact, the post will be edited in this section to reflect such compensation. Any reader attempting to duplicate any recipe, activity, craft, or other created by me [Amber] or shown on this blog should be done at the reader’s own risk. Cool? Cool.)
Pickled Okra & Ham Roll-Ups
Sometimes, you just need an easy finger food to set out. These fit that need! If you haven’t tried pickled okra, cream cheese, ham roll ups, you should.

Ham coated in cream cheese spread is wrapped around a pickled okra!
Slice about one inch thick, sprinkle with seasoning, and serve.
Easy, easy!
We LOVE pickled okra, but we especially love THIS pickled okra, Old South Pickled Okra. Bonus, they’re an Arkansas company. Please, click around their website and take a look at their wonderful local products! Hopefully, if you’re in Arkansas, you can already find their products in your grocery store, if not, speak up and support local agriculture! (We bought ours at our neighborhood WalMart.)
Enjoy!
Your Friend,
~Amber Hamilton Henson
Pie Crust Basics
We improved our pie crust making skills today at Eggshells Kitchen Co.!
Earlier this week, I would have told you that I was spending Saturday morning at an organic gardening seminar, but it has been re-scheduled until March. Not wanting to waste an opportunity to spend a Saturday morning learning to do something fun with my two oldest daughters, we jumped at the chance to attend a Pie Crust Basics class at Eggshells Kitchen Co., here in Little Rock. We’re so glad we did! It was a great class, our first time in the store, and we’ll definitely be back!
Want to know what we learned? I’ll do my best to tell you! See photos as well!
Recently, I had been using pre-made frozen pie crusts and refrigerated pie crust dough because I just wasn’t really happy with my crusts. Now, I see where I was going wrong!!

For starters, in the past I was mixing my dough too dry and it was crumbling as I rolled it. Today, we started with a much moister dough, and because we were constantly adding flour to roll it, flip and add more flour to roll it, flip and add more flour to roll it, repeat 8-12 times, the finished dough was perfect!
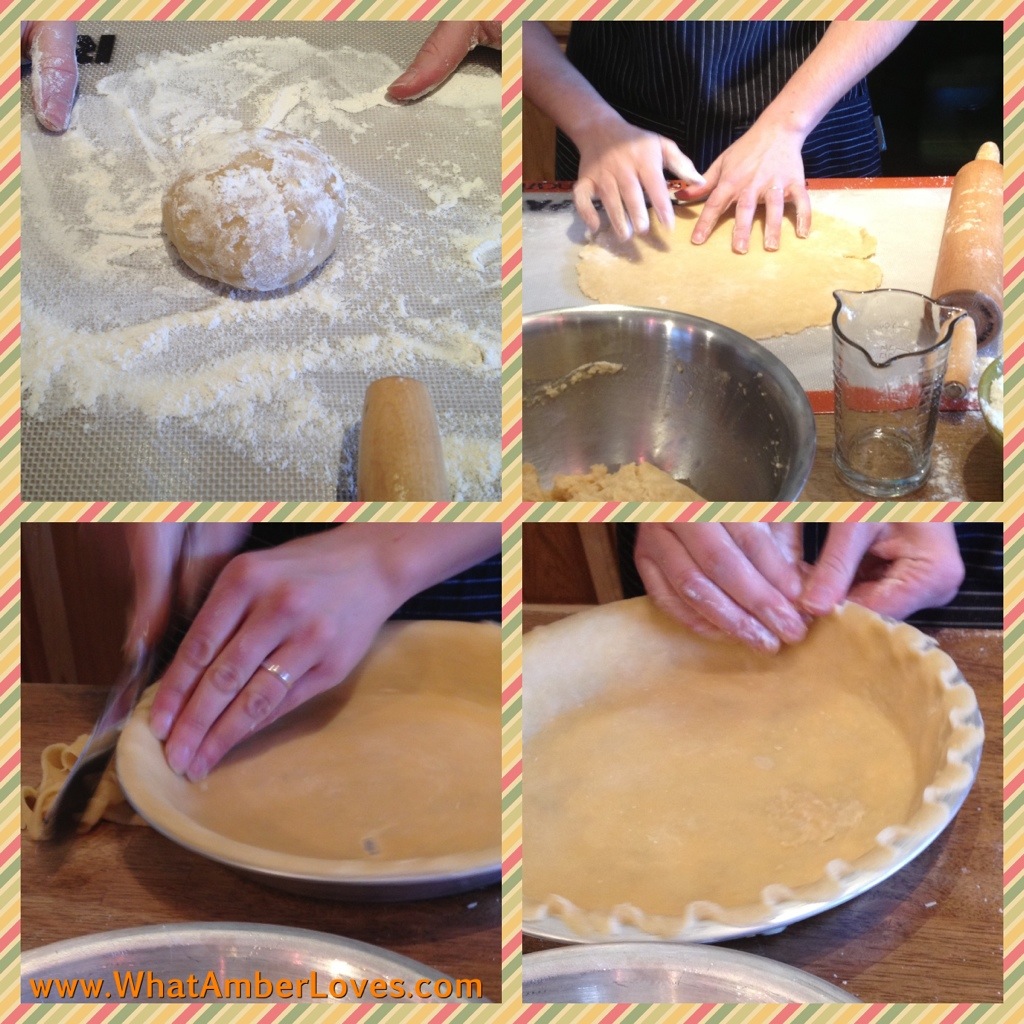
Mix ingredients.
Form hockey puck shape.
Roll on floured surface.
Flip, coat lightly with flour, roll. (Repeat 8-10x)
until it is translucent and large enough to cover pie pan.
Transfer into ungreased pie pan and press into the bottom crease.
Trim excess from top edge.
Using thumb of one hand and index finger of the other hand, create a decorative edge!
Poke holes with a fork to prevent air pocket bubbles when baking.

After a demonstration, we were given an opportunity to try it! While other women attending the class jumped in to try, so did my oldest daughter! She’s only in 5th grade, but did a GREAT job. I’m confident we can repeat the process at home, now that we’ve had training by a culinary genius!
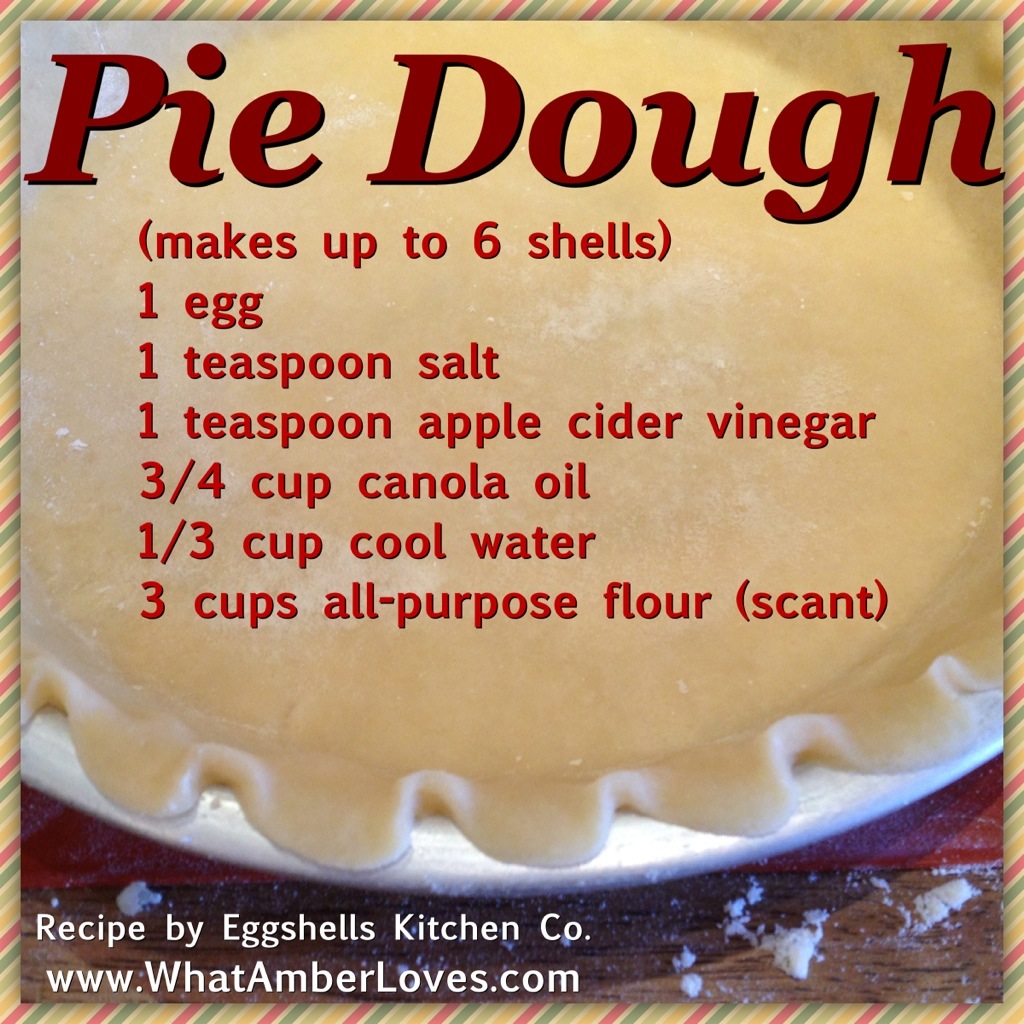
Here is the recipe for the crust we made in class today:
DOUGH (makes up to 6 shells)
1 egg
1 teaspoon salt
1 teaspoon apple cider vinegar
3/4 cup canola oil
1/3 cup cool water
3 cups all-purpose flour (scant)
*If you’re not baking 6 pies at once, the unbaked pie shells will freeze and keep well; just line with wax paper between each! 🙂
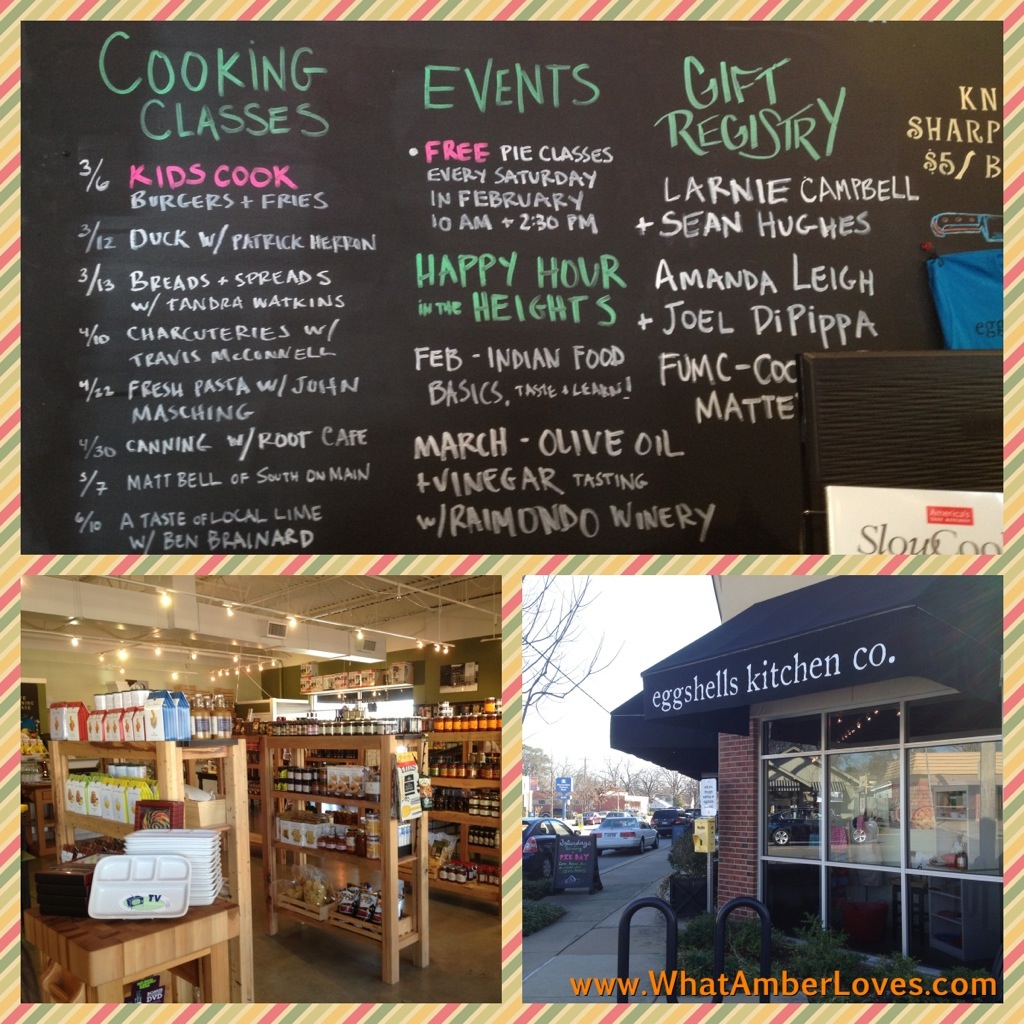
Eggshells Kitchen Co. is hosting pie classes every Saturday during the month of February, 2013.
(10am and 2:30pm)
They also have lots of other classes scheduled on their board, a beautiful store stocked full of every gadget and utensil you could dream of for your kitchen, and a great selection of sauces, pickles, spice blends, and more!
Stop by there! Remember to shop local, the sense of well-being is free. But, if you’re not local, you’ll enjoy their online store as well! You’ll be glad you did! We loved the experience!
Your Friend,
~Amber Hamilton Henson
Grow Food Not Lawns

Spring will be here soon. Pre-ordering of fruit trees and perusing seed catalogs has begun. Are you lucky enough to have neighbors that share plants? Are there seed swaps in your area? If you look, I think there are! You know why I think that? Because more and more, people are realizing that sustainability matters. Growing food matters. Growing lawns . . . Umm, not so much.
As a US citizen, we can be environmentally friendly and grow our food or we can grow lawns and have watermelons from the southern hemisphere of mother Earth in every grocery store during the middle of winter. We can support our celebrity television chefs that recommend eating what is seasonal, locally or we can listen to some of the other irresponsible chatter. What chatter you ask? Well, it has sort of stuck with me that a few months ago, I was watching a celebrity chef’s show, and the chef made a comment about using fresh berries and how great it is that they are available year ’round. The chef then started adding all of these strawberries, blackberries, and raspberries to the dish she was creating for the television audience. I cringed. Here in Arkansas, I know when fresh blackberries should be available. Mid January is NOT that time. In this context, I’m using the term “chef” a bit loosely; as we’re all aware, some of those shows are as much (or more) entertainment than they are about actually creating a meaningful dialogue about food or gardening. Despite our seasonal differences, the recipe looked pleasing and I look forward to trying it, when the season is right for me, here in Arkansas!
The truth is, buying fresh berries in Arkansas this time of year means the berries have travelled a great distance. This is not environmentally friendly. Second, during January, instead of buying these “travelled” berries, the frozen berries are usually going to taste better than the travelled because the frozen berries were picked at peak of ripeness then frozen instead of being picked early in order to accommodate travel time. Regardless, the “chef” was correct; you can, in fact, buy fresh berries in the middle of January that have been trucked in from distant states or shipped from foreign countries.
Times have changed. I’m not that old; I’m only 34, but I’m certain that when I was a kid, we weren’t buying fresh blackberries and watermelons in January. What has caused this dramatic change in our markets? Is because we CAN, we do, despite the inferior quality compared to having local when it is in season? Are they made available to us because a few celebrity chefs tell us these things should be available whenever we want them? Despite living in a farming state, it’s astounding to me how much of the produce isn’t local or regional in our area grocery stores.
I’m aware that if you live in a Northern state and enjoy pineapple or avocados, shipping produce huge distances is the only option to get these items. So, for that, I’m grateful we live in a global economy. Enjoy your pineapples and avocados. I mean that. I enjoy mine. My complaint genuinely is with fact that local seasonality doesn’t seem to receive as much acclaim as it deserves. So, I’m asking of you and me, “When possible, can we all try to eat a bit more of what is actually ‘in season’ for our region?” Let’s be aware of what we’re eating and where it was grown. Our choices are affecting ALL of us that share this planet.
Ok, I’m off my “seed box” for now. Well, sort of. Nevermind, there’s actually quite a bit more of being on my “seed box” to come. . .
If you’re lucky enough to have a yard, are you using any of it for garden space? Is there an edible plant in your yard? If there is even one that was planted by you, I celebrate you and your effort!
I’m not a professional gardener. However, I’m trying to be more responsible than being a “lawn-er.” I’m planting. I’m learning bit by bit, one plant at a time. YOU can do it, too!
Our old house that we sold two years ago had a few impressive garden features, especially given its small lot size. There was a huge pecan tree in the backyard, and in addition to that existing tree, during the 13 years we owned the home, we planted an apple tree, two plum trees, multiple figs, 3 grape vines, blackberries, rosemary, and a decent size vegetable patch in addition to all of the ornamental and fragrant plantings.
This new home we purchased sits atop a hill. Gardening this space has its challenges, but I’m determined. It may take me the next 13 years to transform it, like our last house, or we may move on before it is “full,” but regardless, I know one day if/when we leave it, it i will leave knowing it has become a piece of property much improved by the addition of fruit trees and herbs and garden patches.
I truly, at a very fundamental level, think it is important to grow something you eat. Even if it is just one thing, perhaps start with planting rosemary. You’ll love having it available year ’round. Or chives; they just keep coming back. Grow something.
I’ve found this really motivating Facebook page about sustainability gardening, called Grow Food Not Lawns. I say that I’ve “found” the page, but in actuality, there are over 100,000 other people that have found it before me.
Unfortunately, Pinterest isn’t able to “pin” directly from Facebook, but I would like to share these cute images and spread a message thoroughly support, so I am adding a few of those images to this post!


As for me and my lawn? Well, there is still more than enough lawn to spare *sigh*, but we’re working on it! 🙂 YaY! To date, in addition to the existing walnut tree, because we believe sustainability matters, I’m proud to say we’ve planted a few edibles: an apple tree, three types of peach trees, two grape vines, rosemary en masse, sage, chives, and roses.
click here to read all about my peach trees:
https://whatamberloves.com/2012/07/12/peaches-peaches-peaches/
click here to see some of my rosemary and one of my uses for it:
https://whatamberloves.com/2012/08/22/herb-infused-olive-oil-roasted-garlic-and-hummus/
I’ll let you know what else I plant this year. I’m thinking figs along the back fence, for sure. Do you have anything that you recommend for me, here in zone 7?
This coming Saturday, I’m attending “Organic Farming & Gardening Seminar” featuring the Nuffers of Armstead Mountain Farm and Sam Hedges, Director of Arkansas Sustainability’s Local Food Club.
Muddy hands cleanse the spirit!
Get out there, dig a hole, and get dirty!
Your Friend,
~Amber Hamilton Henson

This article is featured in HAT TRICK magazine, beginning on page 72. Click on magazine cover to be redirected: Hat Trick magazine

NOTE: This article has been revised by me, and may be revised again at a later date without notice. If you commit to grow something edible, you’ll appreciate farmers more. I’m convinced. I’ve found that I’m quite a bit more appreciative of the food on my plate, now that I participate actually growing part of what goes onto the plate. I’ve also been lucky enough to see actual farms, recently, here in Arkansas, that are now growing strawberries year ’round, thanks to protective hoop coverings during winter months! I’ve been following both SEED SAVER trends and GMO/GE crop technology and find both absolutely FASCINATING!
Black Eyed Peas for New Years Day

Do you eat Black Eyed Peas on New Year’s Day? Is it for good luck, tradition, both? I eat them on New Year’s Day, every year. My mom always made them. My mother in law made them. My grandmothers both still make them. I’m sure they’re fine from a can, but I wouldn’t know. I’m from the school of “For-New-Years,-Dried-Beans-Get-Soaked-Overnight!” Whether you call it “comfort food” or “soul food,” it is definitely a Southern tradition. Most people I know are eating them, today, and most of the local restaurants are serving them, even if they aren’t usually on the menu. It’s New Year’s Day. The Day of the Black Eyed Pea.
I like flavorful beans.( Despite their name, Black Eyed Peas are a bean.) I like to infuse as much flavor as possible into beans. This dish is a meal in itself. Featuring Chunks of Petit Jean Peppered Ham, Onions, Celery, Rotel, and creole seasoning, it pairs well with sweet yellow cornbread.

Here is How I make my New Year’s Black Eyed Peas:
*I start with a pound of dryed blackeyedpeas, pick out all of the “stones” and broken beans, then soak them overnight in the refrigerator in 8 cups of water.
*Next morning, I drain and rinse them a few times, being careful not to remove their paper-like shell.
*I put them in a large pot with a chopped yellow onion, chopped purple onion, can of “hot” Rotel, a few stalks of chopped celery, and a pound of chopped black pepper ham. I add just enough water to barely cover them.
*I bring it to a rolling boil, then reduce heat to a simmer for 2-3 hours! I season with Tony Chachere’s Creole Seasoning as I serve!
Mmmmm… Spicy!! Perfect with sweet cornbread!

Happy New Year!
May this New Year bring lots of luck to you and yours!
Your Friend,
~Amber Hamilton Henson
This recipe post is featured in Hat Trick Magazine, beginning on page 74!
Click on the magazine’s cover photo (below) to be redirected to the online magazine:

End of 2012!
End of the year! It is New Year’s Eve! Today, we cleaned house a bit and put away the Christmas tree in order to facilitate a FRESH new year for 2013! Not wanting to leave any project undone, now is as good of a time as any to update this blog, too! Right? Right! The last time I wrote on here, we were making Halloween projects! Wow! We’ve done a lot since then, here a few photo highlights:


We’re looking forward to 2013 and hope that you are too!
Your Friends,
Mitch and Amber Henson
email: WhatAmberLoves@att.net
Zombie Rats for Dessert!
It is definitely a Halloween tradition of ours to let the kids make a few crazy treats each Halloween. Last year, we made witch cupcakes, that was before I started blogging. Maybe I’ll upload a round-up of old Halloween pics? That would be fun! Regardless, here is what we made tonight, ZOMBIE RATS!!!
The “zombie rats” are actually red velvet cake balls coated in a hard chocolate shell! They have almond slivers for ears, red hot candy eyes, and candy tails!

I saw the “creepy cake ball lab mice” tutorial on Polish The Star’s Blog, and decided to try it, with a twist! 🙂 Instead of white lab mice, we went for big brown rats with red velvet filling! Mice + Rats + Halloween at its best! Yum!
My husband, Mitch, and our daughters really get all of the credit for actually assembling our yummy little rats; I was in the room, though, so that counts, right?!
Here’s how they did it:
Bake a cake, let it cool, crumble it up, mix it with icing, form balls (mice bodies).
Put in freezer for ten minutes with a skewer to use for dipping.
Melt coating. Dip bodies. Return to freezer for 10 minutes to firm the coating.
Remove skewer, insert twizzler tails, and affix red hot candy eyes with addition chocolate.
🙂


Happy Halloween!
~Amber Hamilton Henson
Spider Eggs!

(click on photos to enlarge)

Devilled Eggs embellished with black olive spiders are an addition to our brunch on this Sunday before Halloween!
Easy to Make:
Hard boiled eggs, split in half.
Yolks removed and blended with mayo, sweet pickle relish, garlic powder, salt, and pepper.
Refilled and Dressed with black olives!
“Spider Eggs!”
Happy Halloween!
~Amber Hamilton Henson
Halloween Wreath!
For the first time EVER, I’ve made a Halloween wreath that isn’t of the cutesy, sparkly variety! It has bones. It has spiders. It has moss, webs, and twigs. There isn’t anything orange or purple or pink or any other bright color on it. At all. It’s a first for me. I kinda like it! It matches well with the brick and stone exterior of our house, an unplanned bonus! It’s a mossy skeleton wreath!
Here it is: (click on photo to enlarge!)

The supplies were simple enough: (around $20 and around 20 minutes) a $5 grapevine wreath, bag of bones from WalMart for $9.97, Spanish moss for $4 from Hobby Lobby, burlap ribbon for $1.99 from Hobby Lobby, artificial spiders, craft letters leftover from another project, hot glue. (see next photo)

The details: (click on photo to enlarge)

So, there it is in all its glory, my first non-cute “scary style” Halloween wreath!
It’s already hanging on our haunted house!
(click on photo to enlarge)

^that is a photo of our house that was edited on the iPad using the “wordfoto” app!
Thanks for stopping by to see my newly assembled mossy skeleton wreath! What do you think?
~Amber
PS
As always, feel free to re-post an image, pin it, tweet it, fb it, or whatever, so long as it clearly links back to here! If you do feature this project on your blog, site, or ‘zine, please, let me know and I’ll add your link into this post!
You’ll see this wreath at these HALLOWEEN themed parties:
Door Decor and Halloween Link Party @ Momnivore’s Dilemma
Halloween Party @ ChickenScratchNY
Handmade Halloween @ HappyHourProjects
Halloween Party @ PolishTheStars
Eat, Drink, & Be Scary @ SomeWhatSimple (this is a HUGE party!!)
We’ll also be spreading the scare at these awesome parties:
Be Inspired #41 @ ElizabethAndCo
Wow Us Wednesday #88 @ SavvySouthernStyle
All Star Block Party #20 @ FullCircleCreations
Tutorials, Tips, & Tidbits #18 @ StoneGableBlog
Treasure Hunt Thursday #78 @ FromMyFrontPorchToYours
Happy Hour Friday @ HappyHourProjects
DIY Globe Lampshades!

I needed a pair of lamps to sit on top of my file cabinets in our home office/library. I decided I wanted globe lamps. You know, when you cut apart a globe in order to make lampshades out of the globe?
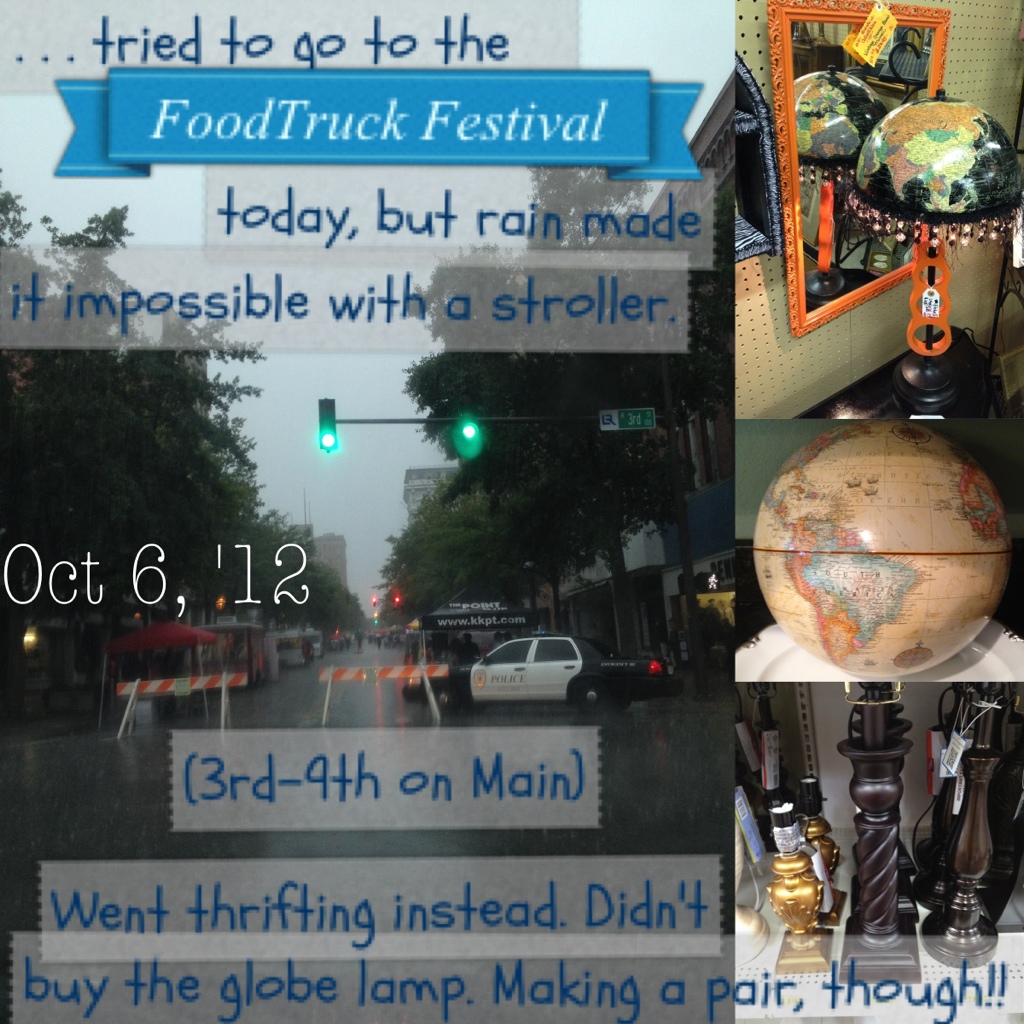
Not wanting to cut up my husband’s childhood globe and since it was raining on Saturday, making it impossible for us to attend a local FOODTRUCK Festival in the rain with our youngest in a stroller, we went looking around at a few local thrift/antique stores in order to find a globe and just muse around.
I saw a lamp that I really liked while we were out shopping: (click on photo to enlarge it)

Despite the fact that I totally fell in love with the lamp and globe lampshade, I didn’t get it, because I wanted a pair of lamps; however, I firmly believe YOU should totally go buy this handcrafted one-of-a-kind globe lamp. It’s only $15.99 at Hidden Treasures on Hwy 107 in NorthLittleRock/Sherwood, Arkansas.
I did find a globe that day at MidTowne Antiques to use for MY project. 10 bucks. Deal. That makes two lamp shades at only $5 each!! 🙂
(click on photo to enlarge it)

HOW TO:
The easier way to split the globe would have been to just remove the tape along the equator, but then one globe would be rightside up and the other would be upside down. That wouldn’t do! I wanted a pair!! So, using a jigsaw, my husband Mitch cut it along one of the lines of longitude for me! 🙂 Now, I have a pair that are BOTH sideways. Both. That makes me happy. Next, we just drilled a hole in the top, so that it slides on easily and is held in place between the lamp’s harp and finial. Glue on trim. Insert low wattage bulb. Important: very low wattage bulb, because this is a cardboard shade. Done! (click on photos to enlarge them)


Thanks for tuning in! Since making this project, I’ve kind of been fascinated by globe projects and prices. I’ve compiled a round-up and shopping board on Pinterest, click “Globe Trotting,” to see the globe projects I’ve found!
Second, Want to know more about the age or value of the globe you’re using in a craft project? If you look, I think there are probably several resources available. For instance, it took me about three seconds when I looked, and I discovered the globe I used was manufactured in 1981, based on the names of countries/political boundaries. The link for discovering the age of my globe is here. Neat, huh? 🙂
AND, I can’t finish this post without a big HAPPY BIRTHDAY shout out to my dad, pretty much the most awesome guy that has ever existed! Love you Dad!!
Your Friend,
~Amber Hamilton Henson
PS
When this globe lampshade parties or is featured, you’ll see the links and buttons at the bottom of this post updated daily! As always, feel free to re-post an image, pin it, tweet it, fb it, or whatever, so long as it clearly links back to here! If you do feature this project on your blog, site, or ‘zine, please, let me know and I’ll add your link into this post!

These globe lampshades were featured!! Twice!!
(click on featured button links to see!)


Linking to the best Parties:
Lampshades Category @ FunkyJunkInteriors
Be Inspired #40 @ ElizabethAndCo.
Wow Us Wednesdays #87 @ SavvySouthernStyle
Primp Your Stuff #66 @ PrimpJunktion
Penny Pinching #158 @ TheThriftyHome
Treasure Hunt Thursday #77 @ FromMyFrontPorchToYours
Tutorials, Tips, & Tidbits @ StoneGableBlog
Home and Garden Thursday #10 @ BlissfulRhythm Delightsome Life
Transformation Thursday #173 @ TheShabbyCreekCottage
Hookin’ up With HOH #120 @ HouseOfHepworths
Happy Hour Friday @ HappyHourProjects
Catch as Catch Can #93 @ My Repurposed Life
ReDoux Friday #76 @ ReDoux Interiors
Funky Junk Saturday Nite Special #156 @ FunkyJunkInteriors
Be Inspired #41 @ ElizabethAndCo


