Category Archives: Uncategorized
Crescent Roll Wreaths
Today, I’m going to post onto this blog/website twice:
First, I’m going to share one of my favorite things to create for dinner: CRESCENT ROLL WREATH!
Second, I’m going to show you another fun little photo editing app for iPhone/iPad users that I use occasionally, named WATERMYPHOTO.
Ok, the crescent roll wreaths… Love them!! Here we go…

The crescent roll wreaths/rings are great, because they can be stuffed with any of your favorite meats, veggies, and sauces, whatever is seasonal, and any sort of leftovers sitting in your refrigerator. Seriously, the options are endless! You can create breakfast wreaths, dinner wreaths, dessert wreaths, and wreaths for special occasions like bridal showers, baby showers, pot-luck events, and more. I make crescent roll wreathes A LOT. The reason? They’re pretty simple and they look great. Presentation matters.
I almost always use the same brand of pre-made crescent roll dough in a tube. Their recipe for breakfast wreaths using bacon and eggs looks pretty good, too! Pillsbury brand crescent rolls yield consistent results for me. Here is another crescent wreath that I made a couple of weeks ago:
EASY CRESCENT WREATHS RECIPES:
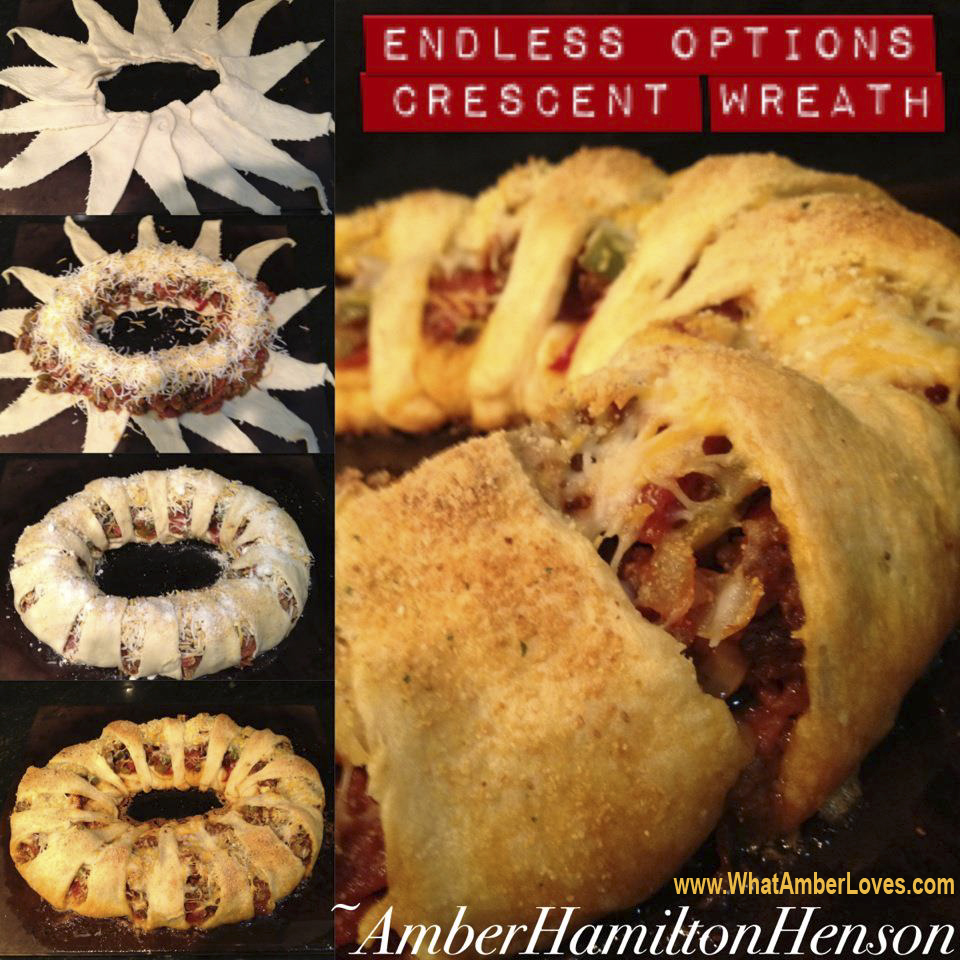
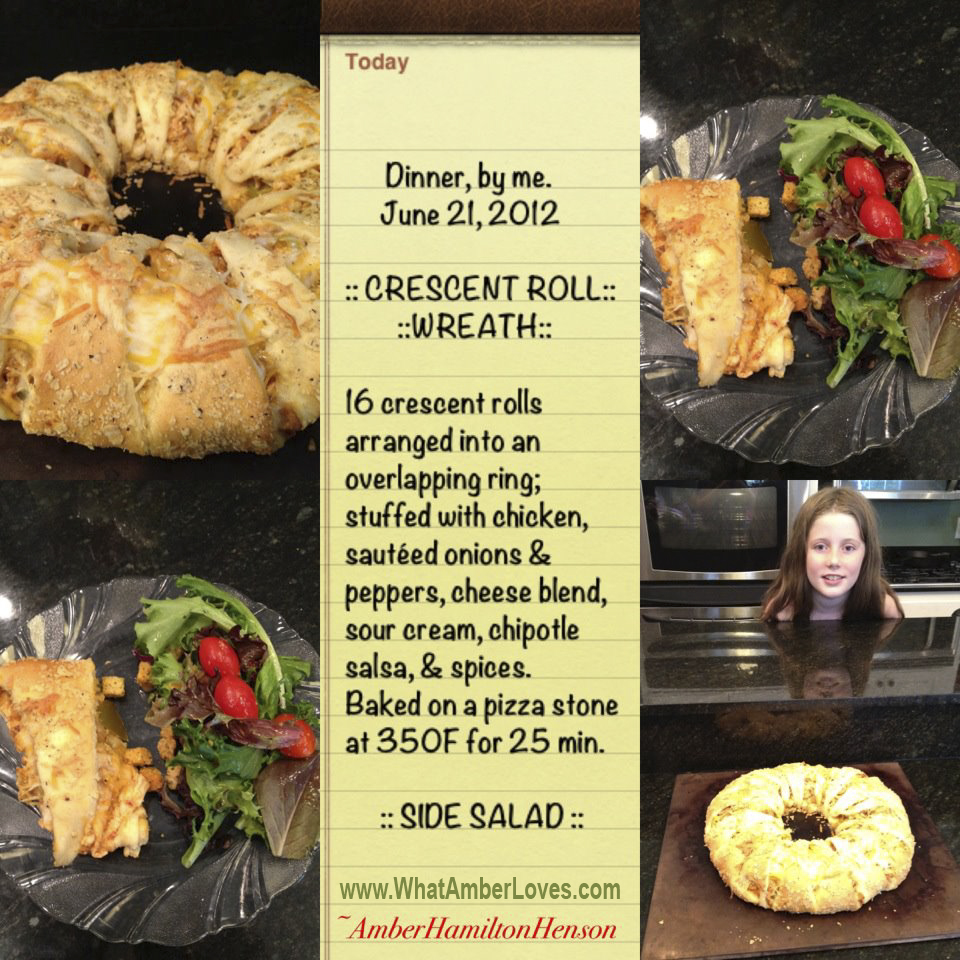
These wreaths are really easy. You decide how big or small you want to make the wreath and use a quantity of crescent roll dough accordingly. I’m feeding a family of 5, so I use two tubes of 8 crescent triangles (16 total.) The “stuffing” includes meats and veggies that have already been cooked and any sort of sauce or cheese to help hold it all together. Use ANYTHING as a stuffing for the wreath. When I lay out the wreath, I put the short sides of the triangles together, making sure that they overlap. I add the ring of stuffing, and then I tuck the tips of the triangles under. I promise, its easy. You can’t go wrong.
It goes in the oven at 350F for 25 minutes, primarily to cook the crescent dough. I always bake mine on a pizza stone, but I would guess that it would work fine on a greased cookie sheet, too!
*The top photo shows the one that my husband and daughters refer to as the “PIZZA WREATH”. It is stuffed with cooked ground beef, crispy bacon, pepperoni, sautéed onion/peppers/mushrooms, and then is held together with 3/4 jar of Arrabbiatta sauce and a layer of cheese. As a finishing touch, I brushed the crescent dough with butter, sprinkled garlic powder, and a generous dusting of Parmesan cheese.
*The wreath in the second photo was stuffed with chicken, onions, peppers, garlic, chipotle salsa, sour cream, and cheese with crumbled corn chips pressed into the crescent dough, for texture. I think adding the crumbled chips onto the dough was important for this wreath. Beyond just adding texture, it really added a salty, corn flavor to the dough, which is otherwise a little sweet!
Have Fun Creating Your Own Version! If you have questions or if you want to share a link to one that you make, please feel free use my comment button! As always, feel free to be social by pinning, re-blogging, and more, as long as it is clear that it links back to this page, too!
Your Friend, ~Amber Hamilton Henson
P.S.
Like this post? Be sure to check my “my Kitchen” for links to more of my recipes!
Wonder to which parties I’m linking? I have a page dedicated to “shares”, too!
Linked:
Mom’s Test Kitchen
If this post gets featured, the Party Hostesses’ Links/Buttons will be pasted here:
Guess what?! I’VE BEEN FEATURED!!!


This post is also linked:
Funky Junk Interiors (wreaths category)
RePurpose and ReUpholster Chairs by using BELTS!
Those of you who have visited our house can attest to just how much i love the use of contrast in design and decor. Few things please my eye more than a great study in contrast. Placing a pair of chrome, mid-century mod chairs on each side of an ornate, antique cabinet excites me. Having an unusual, re-purposed piece adjacent to something contemporary and common is what makes a space interesting, I believe.
The room that we use as our “television den” was lacking pieces with character, but due to the oversized sofa and chairs, there was little room to add much more furniture. However, there is plenty of room for a straight-backed, armless chair (or two) on either side of a chest. Straight-backed, armless chairs occupy only a very small space, are great as spare seating during a party or holiday gathering, and can be pulled up to the big dining room table to squeeze in one extra guest in a pinch! So, the question became, where do I find such chairs that are actually interesting to look at, not just another plain chair?!
Well, the answer was easy. See, several years ago, when our oldest daughter was a toddler, my mother gave us a small, child-size chair that had been hers when she was a child. It had a seat that was woven in rush (similar to caning) that was starting to fray and had discolored. I wanted to keep the chair. I decided to tackle the re-seating project myself using alternative materials. I considered fabric, neckties, and more, but ultimately, I was afraid that they wouldn’t be durable enough, then I thought of belts! They were perfect! Made of thick, heavy duty leather, if woven together, they would provide plenty of support, durability, and would be easy to clean if there was a spill. So, that’s what I used. Belts.


Finding another broken chair was easy. I go to estate sales (where the entire contents of house are sold due to death, divorce, cross-country moves, etc) on Saturday mornings a couple times of year. There are several in central Arkansas every weekend, but who has time to go that often?! I wish I did, but our daughters’ schedules keep us so busy that a few times a year is all I get. Yesterday, I went to two estate sales. It turns out that these old, rush woven chairs with broken seats are common. Many are quite old, “antique,” I dare say. Through the years, when people have purchased new dining sets, upholstered pieces, and so forth, the old rush-woven and caned chairs get moved to porches, decks, patios, and garages. They deteriorate pretty quickly when they are left exposed to the elements. The chairs then get discarded, set by the street for the garbage trucks, or a lucky few get a price tag of a few dollars at an estate sale or vintage re-sale shop until someone comes along with a craft idea for how to re-use them. So, I just bought another one at an estate sale this weekend.

The process of putting it together was really simple. First, using a knife, I cut away the old, woven rush. Then, I cleaned the chair with an abrasive, soapy sponge. Next, I misted the chair with a light dusting of satin black spray paint, letting the original mahogany wood stain still show through in places. Last, I just wove the belts on the chair, doing all of the side-to-side belts first and buckling them on the underside of the seat. For the front-to-back direction, I alternated going over or under the side-to-side belts. If having the “tails” of the belts hanging down after they’re buckled bothers you, just do what I did and use a zip-tie to hold them in place! 😀

Now, it is important to note that not all belts will fit perfectly. The easiest belts to work with were the ones that had holes, grommets, or weave that ran the full length of the belt. These belts are my favorite. In the future, if I ever do decide to re-weave the chair with traditional materials, these belts will be able to return to their original use as belts, unaltered! But, for the ones that didn’t fit, it was really easy to just use a hole-punching tool to add a hole where you need it. If you don’t have a punch tool like the one I’ve pictured, I’m pretty sure that you could just hammer a nail through the belt atop a piece of wood in order to make your hole.
😉
Enjoy my project or links? Please, pin it, tweet it, like it, whatever… just be social and feel free to share as long it links back to here, my watermark remains visible on my photos, and you contact me to let me know! (WhatAmberLoves@att.net) I’d love to see what everyone else in the blogoshpere is making!
I hope y’all are enjoying your Sunday, today! Your friend, Amber
P.S.
Hi, again! Please, see my new “Press” page for info leading to other blogs/sites!
Guess what?! I was featured!!!
 |
 |
I’m linked/linking:
Funky Junk Interiors
MissMustardSeed “Furniture Feature Friday”
Catch as Catch Can @ My Repurposed Life
BlissRanch’s Junkers United

Dill Pickle Fries and the Labelbox app


I really, really, really enjoy using a variety of iPhone/iPad apps for quick edits of my photos that I use in social media. I am trained in the use of Adobe Photoshop and LOVE it, but the little apps are really pretty amazing, too. There are lots of actions being performed by iPhone photo editting apps in a matter of seconds that would otherwise take us graphic artists a significant amount of time to re-create in Photoshop.
My iPhone/iPad photo-editting highlight of the day: LABELBOX


;
It is a great free app that can be used to add simple captions to to your photos. I use it A LOT. I use it to label recipe/cooking photos, I use it to caption photos of my kids, and I use it to caption all sorts of activity oriented photos. It is absolutely one of my favorite free photo editing apps. It is uber simple to install and use.
Click here to get “Labelbox” app, now.
;;
I hope you enjoy! Your friend, Amber

P.S.
Hi, again! Please, see my new “SHARES” page for info leading to other blogs/sites!
Peaches, Peaches, Peaches!
Oh, my goodness, y’all! We absolutely LOVE fresh peaches! Local orchards are open for business, there are always pick-up trucks selling peaches and watermelons parked in the shade somewhere along every major street, and all of the WalMart, HomeDepot, and garden centers are selling fruit trees that are ready to transplant. Most of the fruit trees available for sale around here are big enough that you will have fruit ready the very next year. Afterall, THIS is summertime in Arkansas.
In this post: 1) Picking peaches at a local orchard, 2) “Peach & Pecan Crumble” for dessert, 3) “Peach Bellinis” for adult beverage hour, 4) planting new peach trees in my yard, and 5) tips for pruning the trees each year! ::
:: Peaches grow really, really well here in Arkansas. (The Zone 7 climate is perfect!) ::
1) Since we had no other plans on a recent Saturday, my husband and I decided to take our three daughters to a peach orchard and let them pick a few pounds of fresh peaches! We went to Cadron Crest Orchards in Guy, Arkansas. It is near Conway, here in central Arkansas. I don’t know whether they have a website or not, but you can call them at (501) 679-3243 to find out whether or not the orchard is open or closed for the day and which varieties are being picked each week. They have about 20 different varieties of peach trees; a full, long row of each variety of tree makes for a large orchard! Different varieties ripen during different times of the summer. “Summer Prince” peaches open the season and are picked around June 20th, but “Big Red” peaches don’t ripen until around September 15th. ::

:: Anyway, each of our two older daughters carried a bag and filled it with peaches! In just a matter of minutes, the bags were full. We went to have them weighed in order to pay for our haul, and we discovered they had picked over 20 pounds of peaches! Oy! Well, we are a family of five, so we ate them all pretty quickly! ::
2) Photo of “My Peach & Pecan Crumble” for dessert (The Peach Crumble recipe that I followed)


3) Photo of My Peach Bellinis (The recipe that I followed has great photos!)
 "Pin It")
4) GARDENING: Well, we live in the suburbs. Our lot is only 13,500 square feet, not acreage. Womp, womp, womp… I want acreage, lots and lots of acreage. At our next house… I digress. Back to my current garden space… We have 13,000+ square feet, which is plenty of room for a small collection of fruit trees. When we bought this house in 2010, the backyard was already fully fenced, had one mature walnut tree, and the rest was lawn, a blend of Zoysia and Bermuda grass, to be specific. Thus, even with all of our girls playground equipment, there is plenty of room to add fruit trees! So, guess what we bought?! We bought 3 new little peach trees!! We bought three different varieties that will ripen during different parts of the summer!! YaY!!!

Having never grown peach trees before now, I did a little research about how to care for them. It turns out that they have a pretty short lifespan and for best fruit production they need a pretty specific style of pruning every year. Peaches only grow on new little pieces of wood (branches) that are less than two years old. That’s quite the opposite of apples, which only grow on wood older than 3 years. Thus, the way that you prune a peach tree is very different than the way you prune an apple tree.
5) RESEARCH: Here are a few links to what I learned in order to help me care for my new peach trees:
A diagram showing how to prune:

…a short video explaining the differences between pruning apples and peaches…
Why are most fruiting trees in the south painted white at the bottom! Nope, it is not to prevent bugs; it is to prevent SUNBURN! Who knew?! I haven’t painted my trees yet, but I will. I will use household interior latex paint, only. Exterior paints and enamels contain chemicals that could damage/poison the trees. ALL of the trees at the orchard that we visited had their trunks painted white from the ground to about 24″.
🙂 Okay, that is all for now. My youngest daughter is calling for me. I’ll probably write again tomorrow. My goal will be to use and write on this blog/website at least once or twice a week. We’ll see. Whether you like my post, see technical errors, or have a comment, please, try my “comment” button and/or enter your email address to subscribe to updates! Thanks!
“Later, ‘gators” and “Afterwhile, crocodiles!” ~Your friend, Amber
P.S.
Hi, again! Please, see my new “SHARES” page for info leading to other blogs/sites!
First Post!
First Post :: Okay, this is kind of a secret blog at this point, since I haven’t told anyone that I’m creating this blog! I’m hoping to figure out some of the basics and get a few posts completed before I begin to share this blog by linking to other social media and telling my family and friends about it. ::
Let’s start by attaching a current photo of me. ::

Amber Hamilton Henson

:: Lets see if I can get a Pinterest button to work on my new blog; it’ll make it easier to share recipes, crafts, and more on future posts. :: Did it work?


