ReUpholstering Chairs!
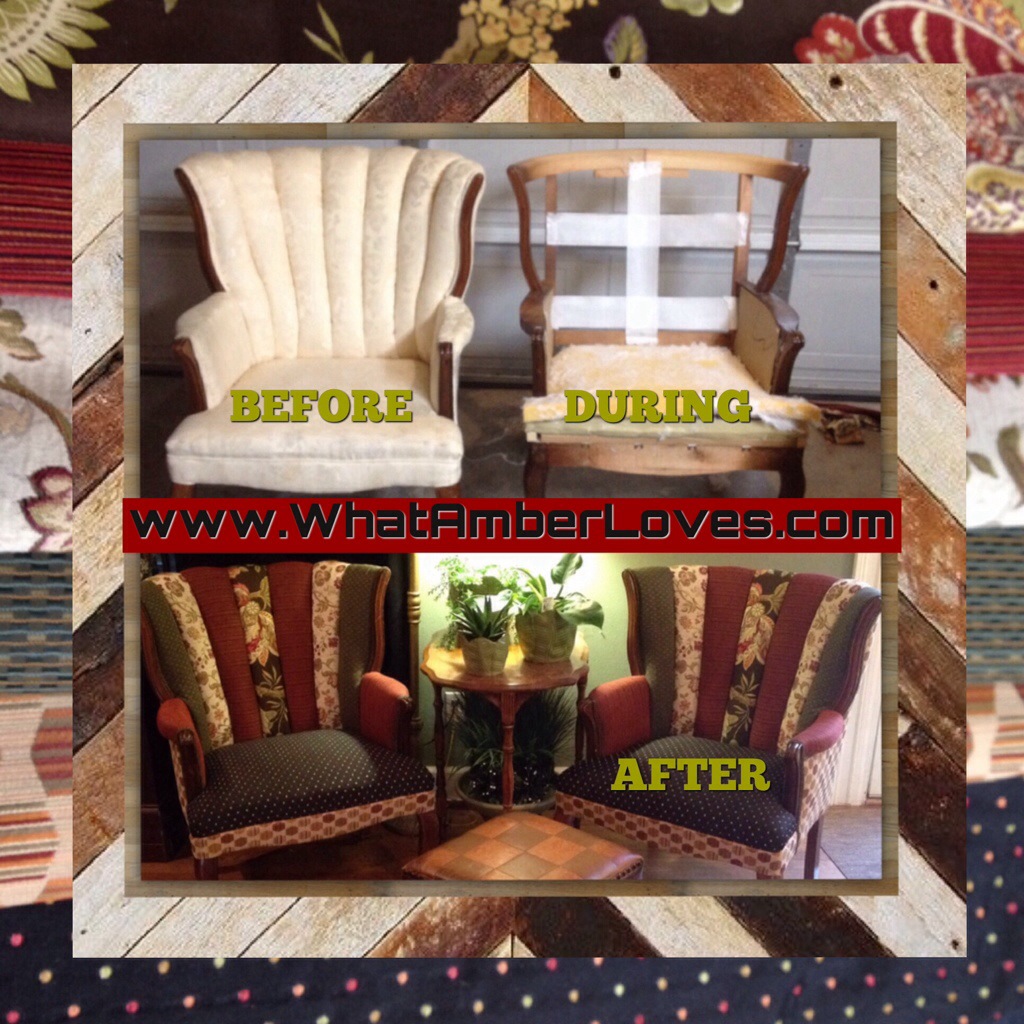
So here’s the deal. I’m re-upholstering a pair of chairs in this post. See, I bought the pair of chairs at an estate sale for $40 bucks, measured and bought clearance fabric, then took a bunch of photos while my husband re-upholstered them for me! Voila! I re-upholstered chairs, right? All kidding aside, my husband is an aircraft upholsterer by day and at night he’ll upholster things for me from time to time. So, I’m giving you in-depth, up-close look at how he re-upholstered a pair of chairs for me in the garage. You may pick up a few tips, so you can try it yourself!
I’m a very VISUAL person, so first I’m showing you several collaged photos, then text will follow with more detail. Refer back to photos as you read the text at the end. Click on any photo to enlarge it into a new window to read captions! Ready? Let’s upholster:
Click on photo to enlarge it
Click on photo to enlarge it

Click on photo to enlarge it
Click on photo to enlarge it
Click on photo to enlarge it
Click on photo to enlarge it’ll

Click on photo to enlarge it

Click on photo to enlarge it

Click on photo to enlarge it
Click on photo to enlarge it

****************************
Click on any photo to enlarge it!
****************************
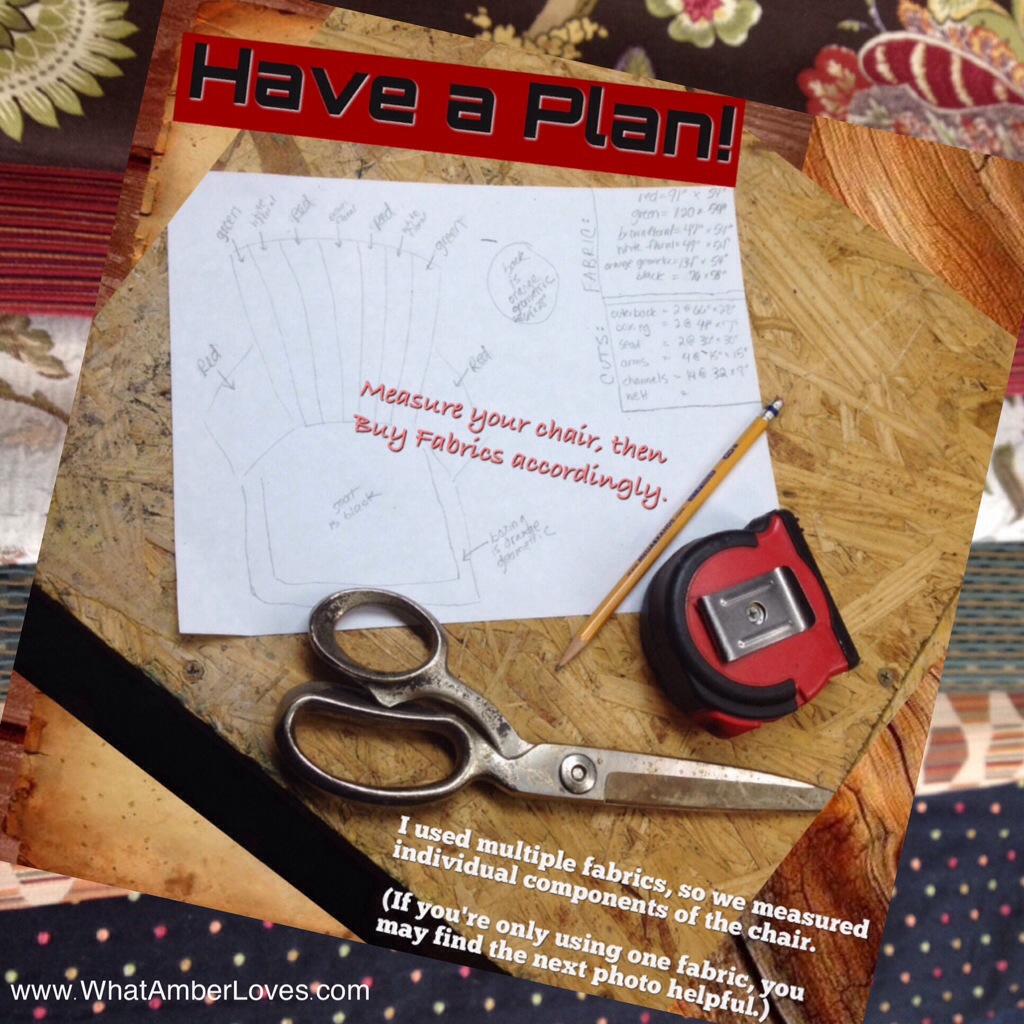
Have a Plan: I used multiple fabrics, so we measured individual components of the chair.
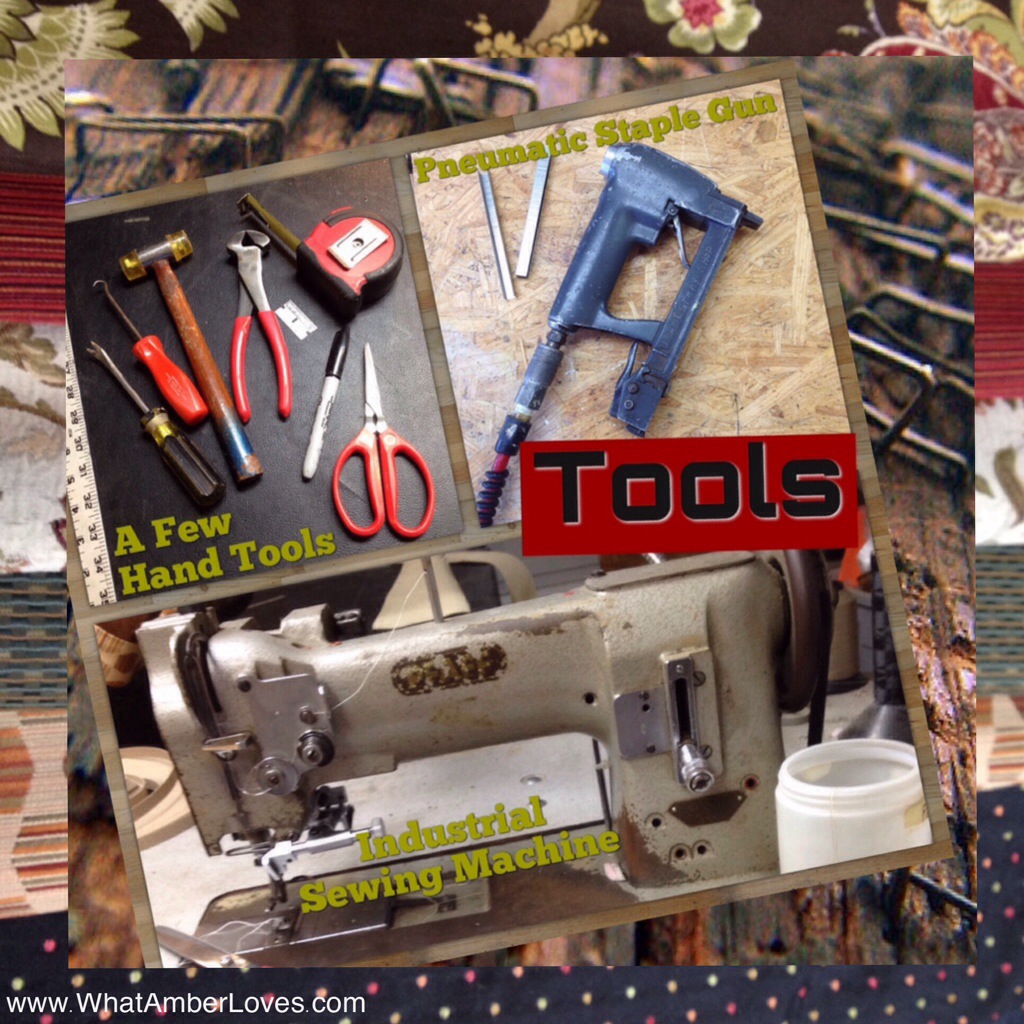
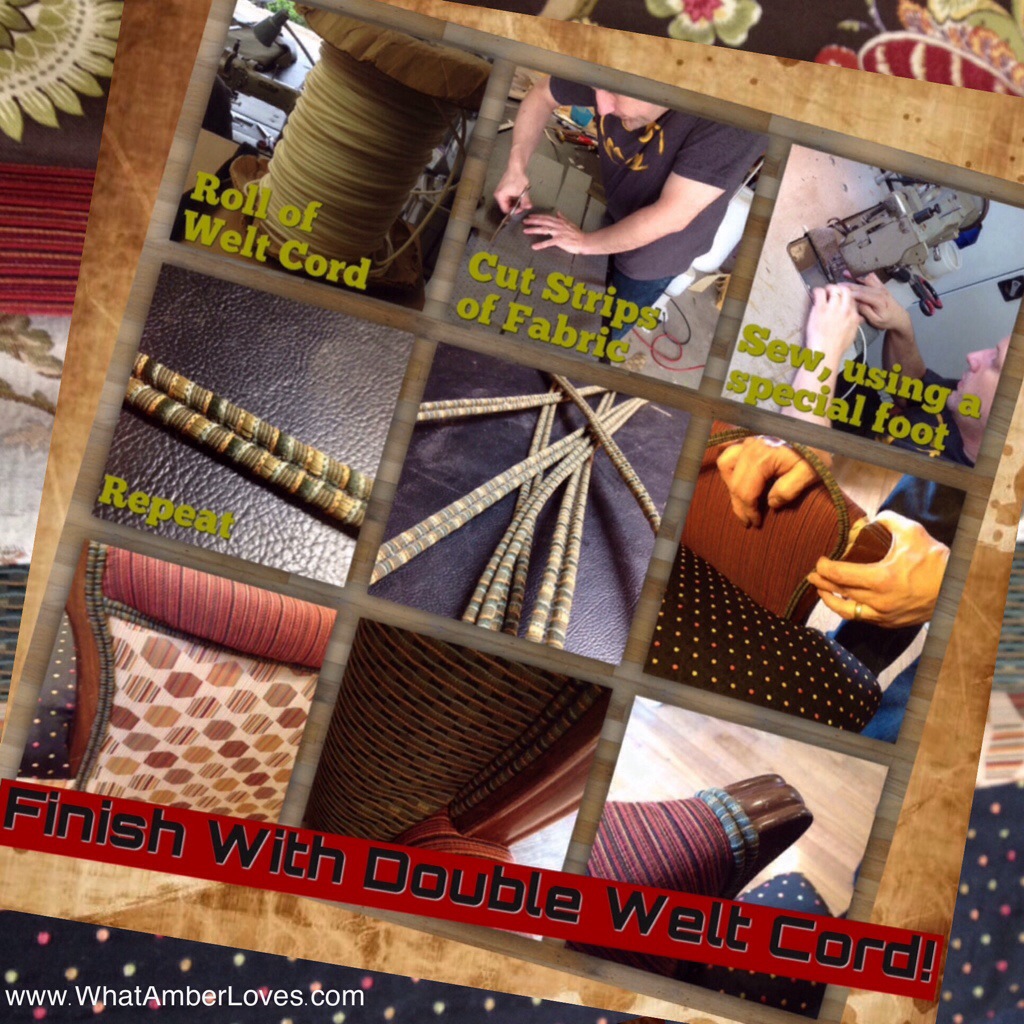
Tools: Gather your tools! A few hand tools, a pneumatic staple gun, and an industrial sewing machine with an optional double welt cord foot.
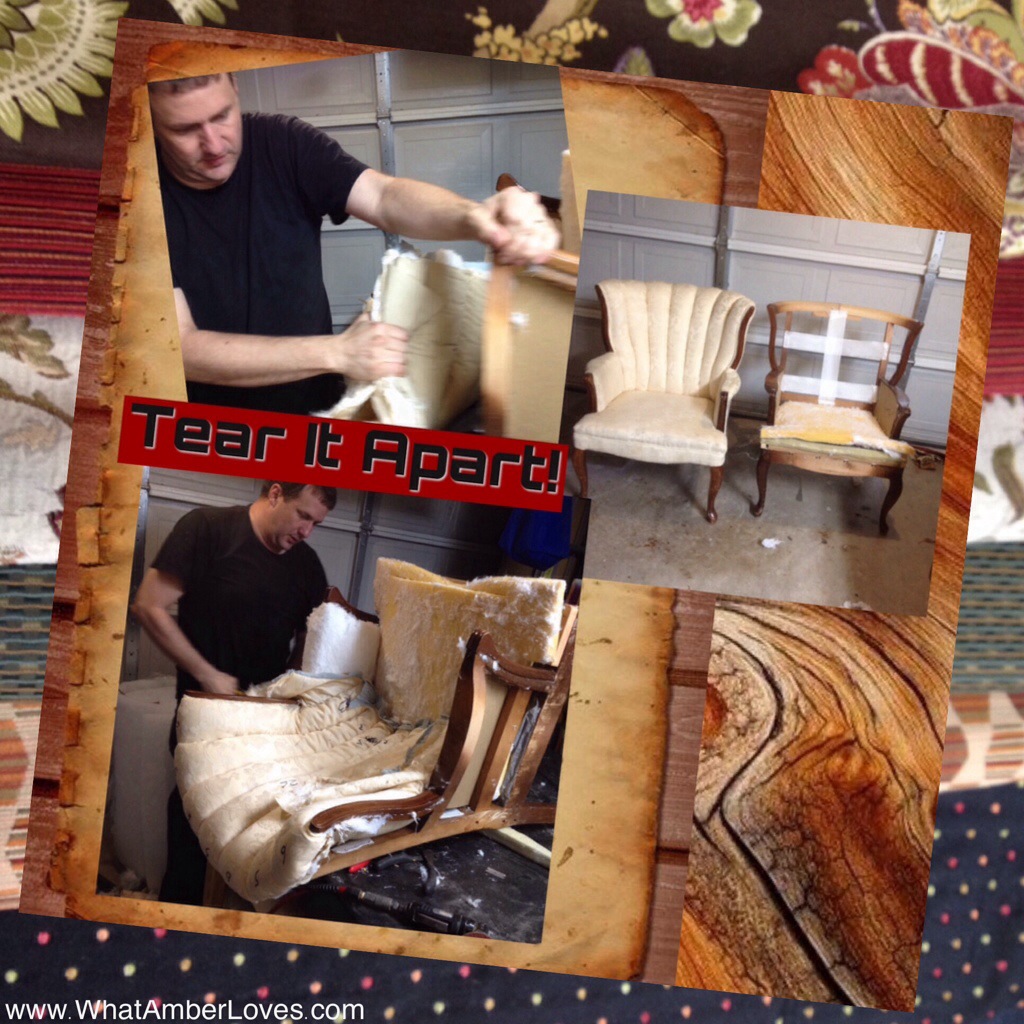
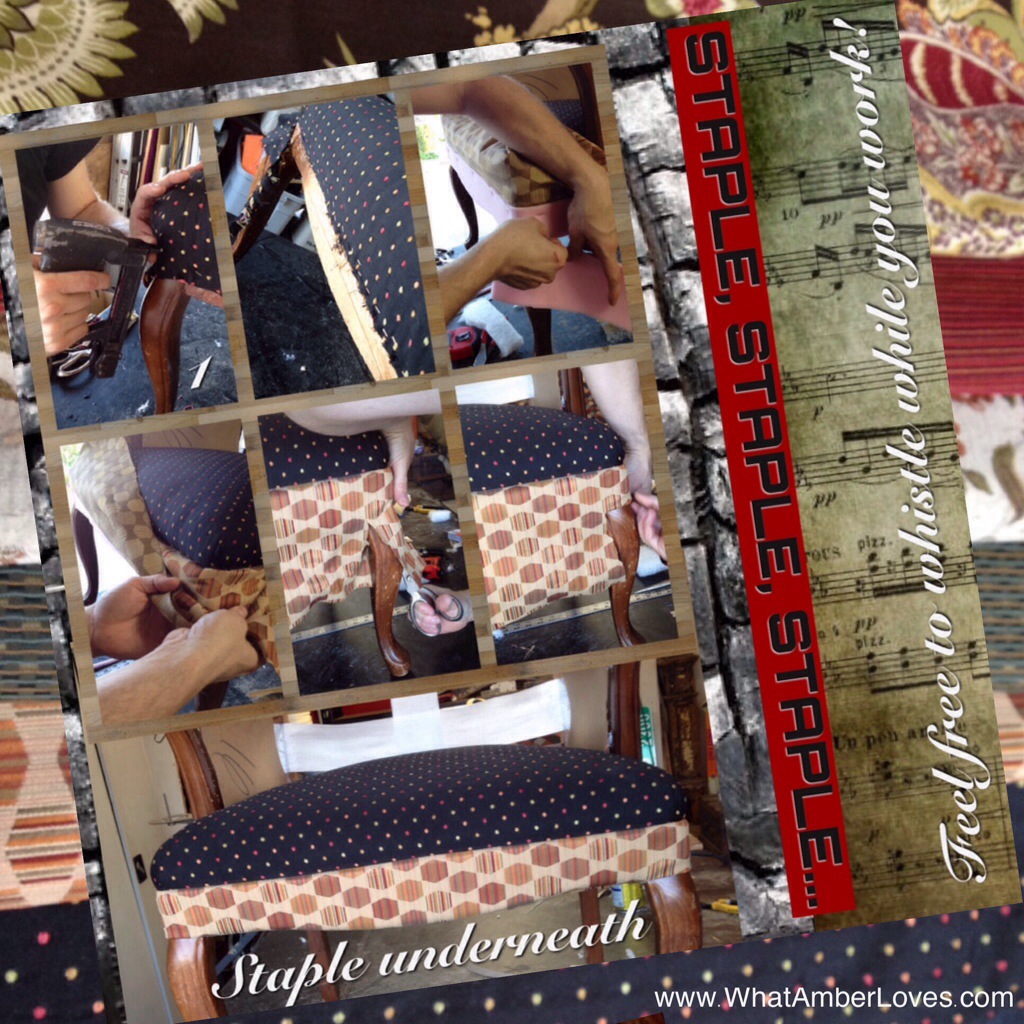
Tear it apart: Only after you’ve taken all of your measurements, made any necessary patterns*, and taken plenty of “before” photos, should you begin tearing apart the upholstery. Now, have fun tearing it apart! Be sure to remove all old staples, too!
(If you’re only using one fabric, you may find the fabric estimating photo helpful.)
Staple, Staple, Staple: assuming you paid attention to the order you removed the previous upholstery, staple your new upholstery in reverse order, adding polyester as needed. For these chairs, the seat was first, then the bottom boxing, then the arms, then…
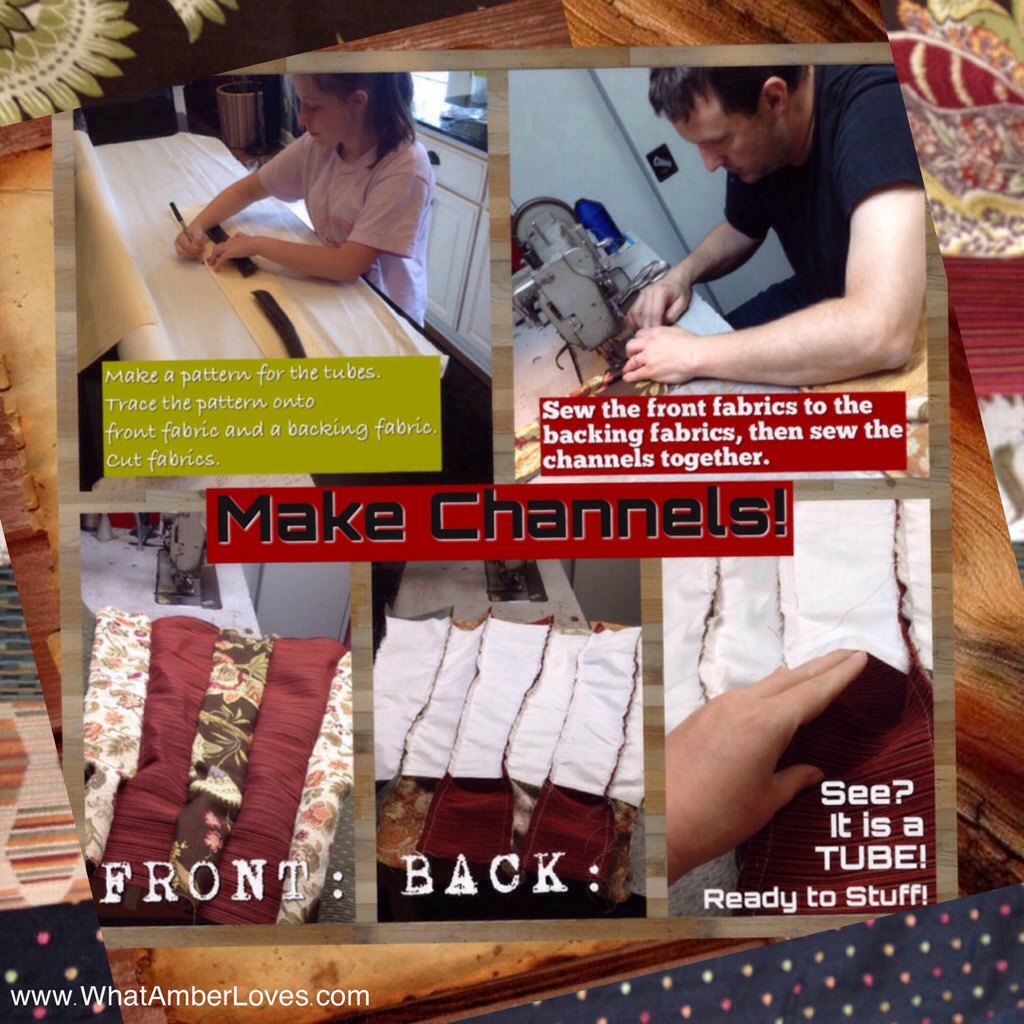
Channels: Make a pattern for the channels (tubes.) Trace the pattern onto front fabric and a backing fabric. Cut fabrics for the channels (tubes.) Sew front fabrics to backing fabrics, creating channels (tubes.) Sew the channels together. Staple to chair.
Wrap the Back: more stapling, using cardboard tack strip for folds and edges as needed. Don’t trim to short, because you need to be able to fold the fabric under to go around the legs neatly.
Repeat: second chair. Everyone likes a matched pair of chairs, right? When working with patterned fabric(s), be sure to pay particular attention to alignment!
Finish with Welt Chord: cut strips of fabric, sew double welt cord, trim excess fabric, and attach to chairs via glue or staples (between cords) to finish all edges!
Photograph your finished chairs! 🙂
***********************
Please, leave a comment so that I know you’ve visited, (I LOVE comments), feel free to share it on social media, or if you have specific Questions for your project, just email me! My email address is on my ABOUT page. Feel free to click around all of the blog while you’re here visiting WhatAmberLoves! You might like my Decor and Crafts page with the room tours and other tutorials, too! 🙂
Your Friend,
~Amber Hamilton Henson

Guess what? This post is featured and linked another blog! I linked to a blog party and was chosen as a feature! Click on the square button below this text to be re-directed to her blog!

I’m linking with some great blog parties! Check them out! (I’m updating this post as I link each day this week!)
MyRepurposedLife ~ Catch As Catch Can
ACreativePrincess ~ Party #160
BeyondThePicketFence ~ Under $100 link party
RedouxInteriors ~ Best DIY linky party #156
TheHappyScraps ~ Creative Exchange
TheBrambleBerryCottage ~ Time Travel Thursday
FrenchCountryCottage ~ Feathered Nest Friday
MissMustardSeed ~ Furniture Feature Friday
RootedInThyme ~ Simple & Sweet
TaterTotsAndJello ~ Link Party Palooza
TwiggStudios ~ Our Sunday Best Showcase
Nifty Thrifty Things ~ Sunday #158
My1929Charmer ~ Sunday’s Best Par-Tay
ArkansasWomenBloggers ~ Sunday Link
IShouldBeMoppingTheFloor ~ Inspiration Monday
ModVintageLife ~ Mod Mix Monday #155
ElizabethAndCo ~ Be Inspired #121
SavvySouthernStyle ~ Wow Us Wednesday #172
MarigoldsLoft ~ Tutorial Thursdays
FunkyJunkInteriors ~ #242
Share this:

Posted on May 27, 2014, in Uncategorized and tagged Arkansas, chairs, decor, design, re-upholster, re-upholstery, reupholster, reupholstering, reupholstering chairs. Bookmark the permalink. 14 Comments.


Beautiful work! Wow I’d love to reupholster a couple of chairs I got for 20 apiece,.. They are wingbacks, and also recliners. Any special hints about those two? thanks!
Thanks, Katharine! I’d say measure well rather than using the chart because you’ll need more fabric than standard chairs, and I suggest only disassembling one at a time, so that you still have one chair for reference as you reassemble! 🙂 ~Amber
I would never have thought of those tidbits! Thanks! 🙂
At least they are small chairs, almost dainty for a recliner…
Love them! If you were finishing with single welt cord I assume you couldn’t staple, so what kind of glue would be needed? Thanks!
Thanks, Lisa! Glue: a professional grade, high temp hot glue will get the job done for you!
Omg! Excellent work! You all are talented especially your husband!
😃Thanks, Carol!😃
Cute, but too complicated for me!
This particular pair of chairs is definitely not a beginner project. I’m working on an armless side chair project that is much simpler, right now! It’s a fun project for my daughter’s room: teal paint and peacock fabric! Thanks for stopping by! 🙂 Amber
So pretty – I have a chair in my stash that I haven’t gathered the nerve yet to tackle. Thanks for all of the insight!
Wow! The chairs look amazing. Thank you for linking up your tutorial to The Creative Exchange.
😃Thanks!
I love them, looks wonderful. I was looking at the Peacock chair and noticed this project. We have a chair like this I have wanted to reupholster. Appreciate all the pictures you include. Will keep this in mind until my husband and I acquire more experience.
These chairs are a bit time consuming compared to the Peacock chair, but not terribly difficult if you tackle it in manageable pieces, we think. We strip the chair one day, tackle the seat one day, tackle the back one day, etc. 😃